
Let’s Build User Profile UI With Android for our E-Commerce App
We are going to create an android UI for our UserProfile backend API we are creating for our demo E-commerce tutorial

Introduction
We are building an e-commerce platform from scratch. In the last tutorial, we build the backend for the UserProfile
In this article, we will build the android UI for the UserProfile backend, which can be a base for many other applications.
Not long before was the time when the user profile consisted of a hard copy form. From the advent of digital technology and sophisticated software, profiles have been becoming more intuitive.
Backend API description
Here we describe the most important component of our user profile application: the REST API. A REST API is an application that uses the existing protocol stack for data communication between different applications on the web. Here, we are using a web API to communicate between our android application and a remote database for user data storage. Our API handles the GET and POST request which basically allows the android application to create and fetch data from the database.
The API used here is created using Java and Spring Boot framework. Spring is a popular application development framework, developed for the enterprise edition of the Java programming language. You can find detailed project files for the REST API over here.

Android Studio is the official Integrated Development Environment (IDE) for Android app development, based on IntelliJ IDEA. On top of IntelliJ’s powerful code editor and developer tools, Android Studio offers even more features that enhance your productivity when building Android apps, such as:
- A flexible Gradle-based build system.
- A fast and feature-rich emulator.
- A unified environment where you can develop for all Android devices.
- Apply Changes to push code and resource changes to your running app without restarting your app.
- Code templates and GitHub integration to help you build common app features and import sample code.
- Extensive testing tools and frameworks.
- Lint tools to catch performance, usability, version compatibility, and other problems.
- C++ and NDK support.
- Built-in support for Google Cloud Platform, making it easy to integrate Google Cloud Messaging and App Engine.
The benefit of using Android Studio over any other IDE is we get a rich set of features built-in which enable us to focus more on the development aspect while the back-end of this IDE handles the requirements and dependencies. For this project, an existing API endpoint has been used for database connectivity.
Prerequisite:
Before we start developing, we need to check off a few requirements:
- You will need to have a Java JDK installed on your system. You can find the instructions for installing the JDK here.
- You will need to install Android Studio on your system.
- Lastly, we can use our Android smartphone with USB debugging enabled for testing the android app or we can use the built-in Android emulator from Android Studio (I have used my smartphone for testing and debugging).
Project Setup and Structure:
Once you install Android Studio on your system, you can start with creating a new project.
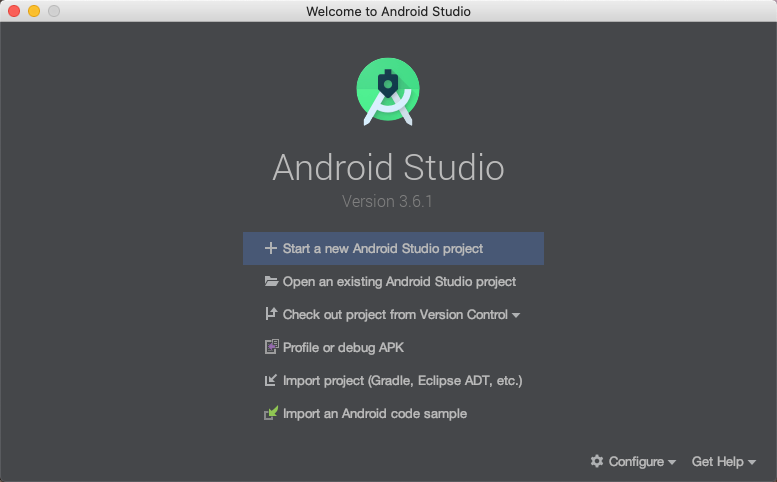
To create your new Android project, follow these steps:
- In the Welcome to Android Studio window, click Start a new Android Studio project.
- In the Select a Project Template window, select Empty Activity and click Next.
- In the Configure your project window, complete the following:
- Enter “User Authentication” in the Name field.
- Enter “com.example.userprofile” in the Package name field.
- If you’d like to place the project in a different folder, change its Save location.
- Select Java from the Language drop-down menu.
- Select the lowest version of Android your app will support in the Minimum SDK field. I have selected API level 22 (Android Lollipop).
- Leave the other options as they are.
4. Click Finish.
After some processing time, the Android Studio main window appears.
Now take a moment to review the most important files. First, be sure the Project window is open (select View > Tool Windows > Project) and the Android view is selected from the drop-down list at the top of that window. You can then see the following files:
- app > java > com.example.userprofile > MainActivity
This is the main activity. It’s the entry point for your app. When you build and run your app, the system launches an instance of this Activity and loads its layout.
- app > res > layout > activity_main.xml
This XML file defines the layout for the activity’s user interface (UI). It contains a TextView element with the text “Hello, World!”
- app > manifests > AndroidManifest.xml
The manifest file describes the fundamental characteristics of the app and defines each of its components.
- Gradle Scripts > build.gradle
There are two files with this name: one for the project, “Project: User Authentication” and one for the app module, “Module: app.” Each module has its own build.gradle file, but this project currently has just one module. Use each module’s build.gradle file to control how the Gradle plugin builds your app. For more information about this file, see Configure your build.
Before you run your first app, get your smartphone, and enable USB debugging by following the instructions over here. After, enabling USB debugging, connect your smartphone to your PC and you are ready to go.
In Android Studio, select Run > Run ‘app’ or click the Run icon in the toolbar.
Congratulations on creating your very first app. But you are far from what we have to achieve. Next, we need to create the rest of the application.
Setting up the files:
Let’s start with app > res > drawables. This is the directory where we will be storing all the graphical elements for our application. We are going to store three different categories of graphic elements.
- Image. (filename: background.jpg)
- Icon elements. (filenames: account.xml, email.xml, pencil.xml)
- Custom graphic file. (round_button.xml)
The image used here is for the background of the UI. You can use any image you like but be sure to use the same file name for the next part where we will be coding the back-end and creating activity layouts.
Icon elements are XML files for vector graphic icons used in our application. You can find and download these files from here.
The custom graphic file here is used for creating a rich look for our buttons in the application. It’s an XML file containing various tags and attributes specifying the properties that the button will have for its appearance.
Moving on, we have two layout files for our two pages: create user and fetch user data page. These files are contained in app > res > layout having names activity_main.xml, user.xml. To create these files, right-click on the layout directory and select new > layout resource file. A New Resource File pop-up with several fields should appear. In the File name field, we’ll insert the required file names.
In the Root element field of this same pop-up, make sure to type in RelativeLayout. The remaining two fields can remain the same. Click OK. This will create a new layout for us.
However, Android Studio will likely default to the visual editor we saw our Constraint Layout in earlier. To edit our layout’s XML directly, we’ll need to navigate out of the visual editor and into the XML editor. Near the top-right of the editor screen, you should see three tabs: code, split, design. Select the code tab to toggle into the XML editor.
If you can notice then all these files contain some common tags having some attributes. These tags are View elements that are going to be displayed in the application. Let’s review them one by one for a general idea.
- RelativeLayout: RelativeLayout is a view group that displays child views in relative positions. The position of each view can be specified as relative to sibling elements (such as to the left-of or below another view) or in positions relative to the parent RelativeLayout area (such as aligned to the bottom, left, or center).
- TextView: A TextView displays text to the user and optionally allows them to edit it. A TextView is a complete text editor, however, the basic class is configured to not allow editing.
- EditText: EditText is a standard entry widget in android apps. It is an overlay over TextView that configures itself to be editable. EditText is a subclass of TextView with text editing operations. We often use EditText in our applications to provide an input or text field, especially in forms.
- Button: In Android, Button represents a push button. Push buttons can be clicked, or pressed by the user to perform an action. On a button, we can perform different actions or events like click event, pressed event, touch event, etc.
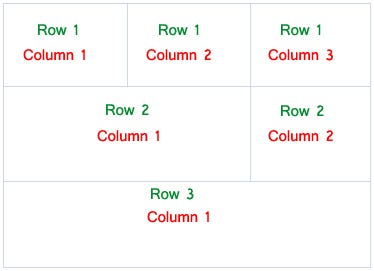
- TableLayout: A layout that arranges its children into rows and columns. A TableLayout consists of several TableRow objects, each defining a row. TableLayout containers do not display border lines for their rows, columns, or cells. Each row has zero or more cells; each cell can hold one View object. The table has as many columns as the row with the most cells. A table can leave cells empty. Cells can span columns, as they can in HTML.
- TableRow: For building a row in a table we use the TableRow element. Table row objects are the child's views of a table layout. Each row of the table has zero or more cells and each cell can hold only one view object like ImageView, TextView, or any other view.
There are many more tags and have many different attributes for creating various intuitive design elements and UI for an android application.
Next up, we will create the files necessary for the back-end of our applications: Java files.
We will be creating two more java class files which are Config.java and User.java.
To create them, right-click on app > java > com.example.userprofile directory and click New > Java Class. Enter the file name and press enter.
Before moving ahead, we must configure our AndroidManifest.xml file for the file additions and requirements that we want.
Adding in the code
To save the hassle, each class for a given activity contains a default piece of code that is essential for the behavior of the application.
As a user navigates through, out of, and back to your app, the Activity instances in your app transition through different stages in their life-cycle. The Activity class provides several callbacks that allow the activity to know that a state has changed: that the system is creating, stopping, or resuming an activity, or destroying the process in which the activity resides.
Within the lifecycle callback methods, you can declare how your activity behaves when the user leaves and re-enters the activity. For example, if you’re building a streaming video player, you might pause the video and terminate the network connection when the user switches to another app.
When the user returns, you can reconnect to the network and allow the user to resume the video from the same spot. In other words, each callback allows you to perform specific work that’s appropriate to a given change of state. Doing the right work at the right time and handling transitions properly make your app more robust and performant. For example, good implementation of the lifecycle callbacks can help ensure that your app avoids:
- Crashing if the user receives a phone call or switches to another app while using your app.
- Consuming valuable system resources when the user is not actively using it.
- Losing the user’s progress if they leave your app and return to it at a later time.
- Crashing or losing the user’s progress when the screen rotates between landscape and portrait orientation.
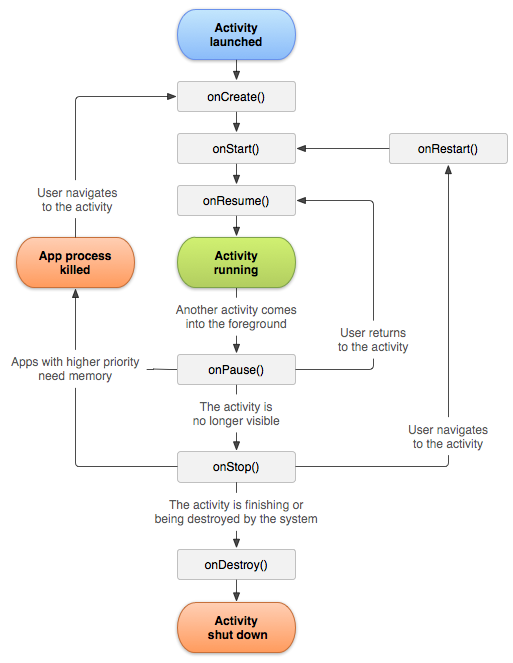
We have extensively use the onCreate() activity method which defines the behavior of the application on start-up.
For the first file, MainActivity.java:
Let’s go through the methods defined in this code snippet-
- create(): This method is at the heart of profile creation where the magic happens. Right from getting the input to processing it; is managed by this method. The most important job of this method is to create an HTTP client tunnel connection to the server hosting the database and send the HTTP POST request. Here, we have provided the existing API endpoint. Also, this method will be handling failed requests and other errors while successfully creating a user profile.
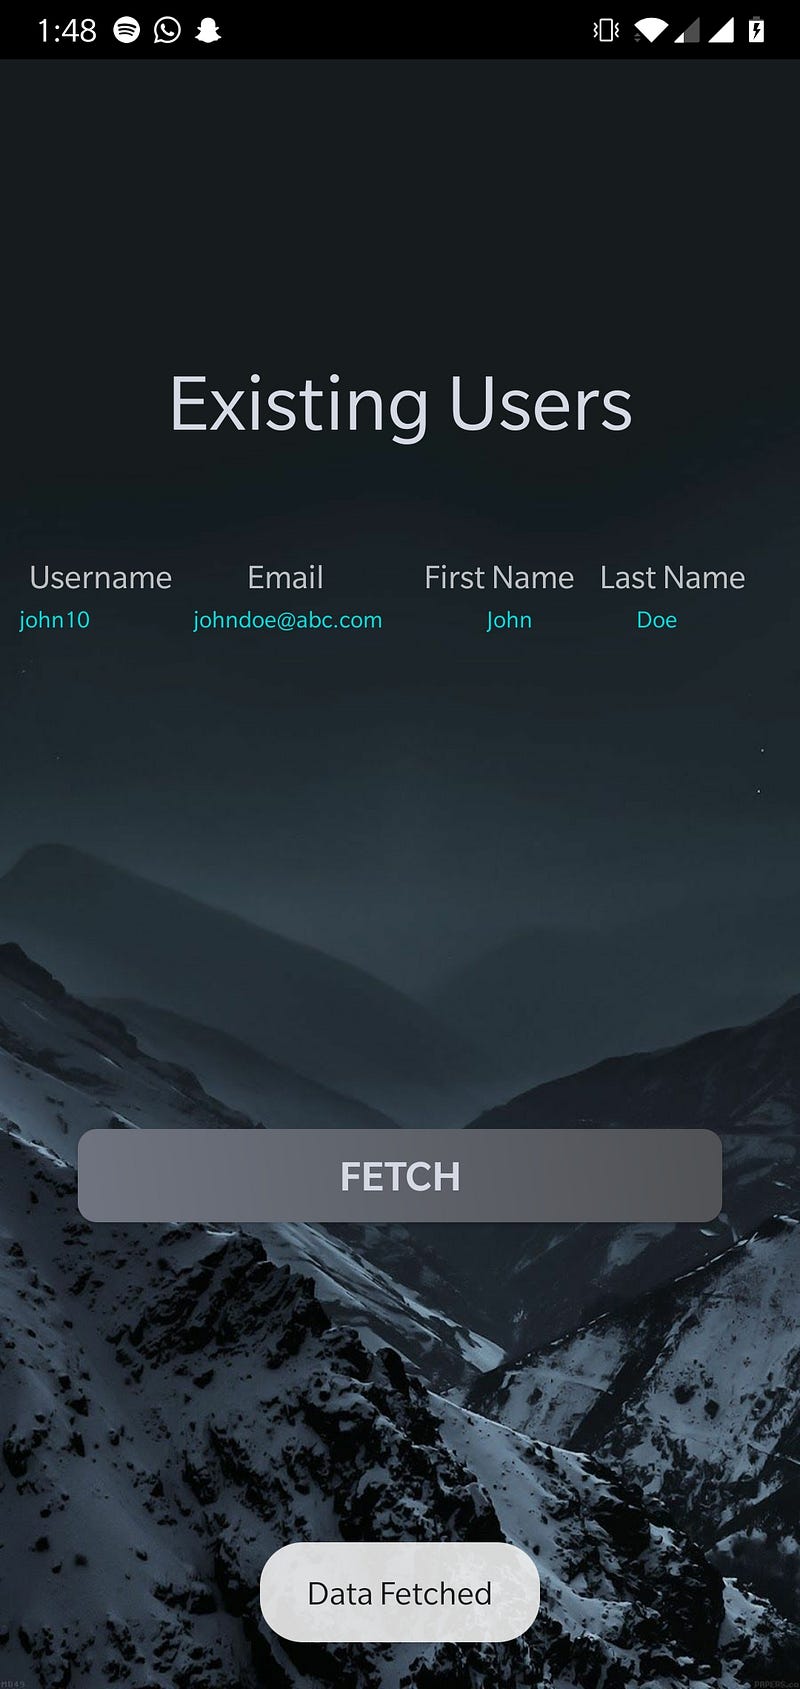
- user(): This method starts a new activity called user. There we can view the existing user profiles in the database.
Next, we have the User.java file:
Let’s go through the methods defined in this code snippet-
- fetch(): This method performs the operation of fetching user data from a remote database. It performs this operation by sending an HTTP GET request. After fetching the data, the method dynamically creates the required number of rows for the number of users that will be displayed on the UI. The received data is in the form of a JSON string, which is parsed into a JSON object. From here, we extract the necessary data for display purposes.
- createTextView(): This method creates a TextView object while setting the required parameters to this object and finally attaching it as a child to the TableRow object.
Finally, we have the Config.java file:
This file is a java interface file that stores the API endpoint.
Now we will run our program as previously stated by connecting our android device via USB.


