

OPENING THE VAULT
An Obsidian Template for Collections & Specimens
An index card inspired template for keeping track of collection information
When I was in college working toward a degree in Geology, I spent a summer cataloging the department’s mineralogy specimens and samples for use in our campus museum and in classes. As someone who has always been a collector of things, frequently coming home from walks and hikes with some new find in my pocket, I loved this work.
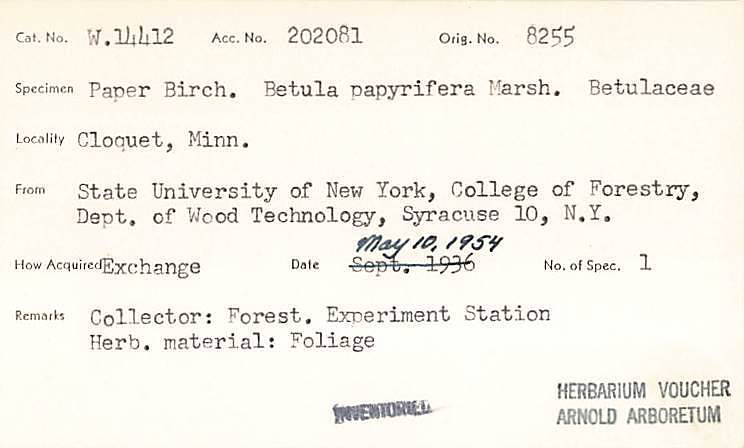
One of the main responsibilities I was tasked with was entering the data stored on old and withered collection index cards into a spreadsheet. They looked something like this:
Now, as someone who has amassed a small personal museum of rocks and fossils, tree bark and cones, I have taken inspiration from these very index cards to create a Specimen Collection Template that displays data about a specimen in a simple and succinct table.
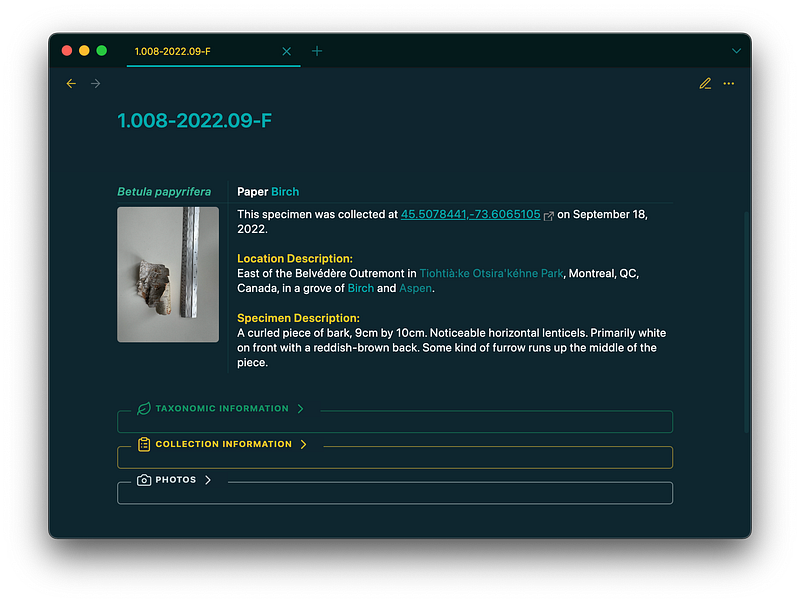
Here’s an example:
In this article, I’ll walk through the different sections of the template and explain the rationale behind them. I’ll note from the start that while I personally use this template for “natural” specimens, like plant material, animal traces, and fossils, a few simple adjustments can be made to easily use this template for any kind of collectible item. It essentially all comes down to the data included in the callouts.
If you want to skip straight to the template, a link to the markdown file can be found at the end of this article!
Note: I’ve written before about a Nature Collection template. I have completely replaced this template in my vault with the following specimen template, though this new template is directly based on the old version, containing all the same information, just formatted a bit differently.
The Template
To start, here’s a look at the source code for the entire template:
---
created: <% tp.file.creation_date() %>
tags:
  - specimen
parent: "[[Specimen Collection]]"
---
# [[<% tp.file.title %>]]
| `=this.genus` `=this.species`                                                                        | `=this.common-name`                                                                                                                                                                                                                                                                                                             |
| :--------------------------------------------------------------------------------------------------- | ------------------------------------------------------------------------------------------------------------------------------------------------------------------------------------------------------------------------------------------------------------------------------------------------------------------------------- |
| `=choice(this.photo, replace(string(this.photo), "]]", " \| 200]]"), "This specimen has no photo.")` | This specimen was collected at `=join(list("[", this.latitude, ",", this.longitude, "](https://gps-coordinates.org/my-location.php?lat=", this.latitude, "&lng=", this.longitude, ")"), "")` on `=dateformat(this.collection-date, "MMMM dd, yyyy")`.<br><br>**Location Description:**<br><br><br>**Specimen Description:**<br> |

> [!taxon]- Taxonomic Information
> Kingdom::
> Genus::
> Species::
> Specimen::
> Common Name::

> [!collection]- Collection Information
> Collection Date::
> ID:: [[<% tp.file.title %>]]
> Latitude::
> Longitude::
> Captive::

> [!photo]- Photos
> Photo::
That table at the beginning can look a little menacing, but the template itself just renders to this:
Up Top
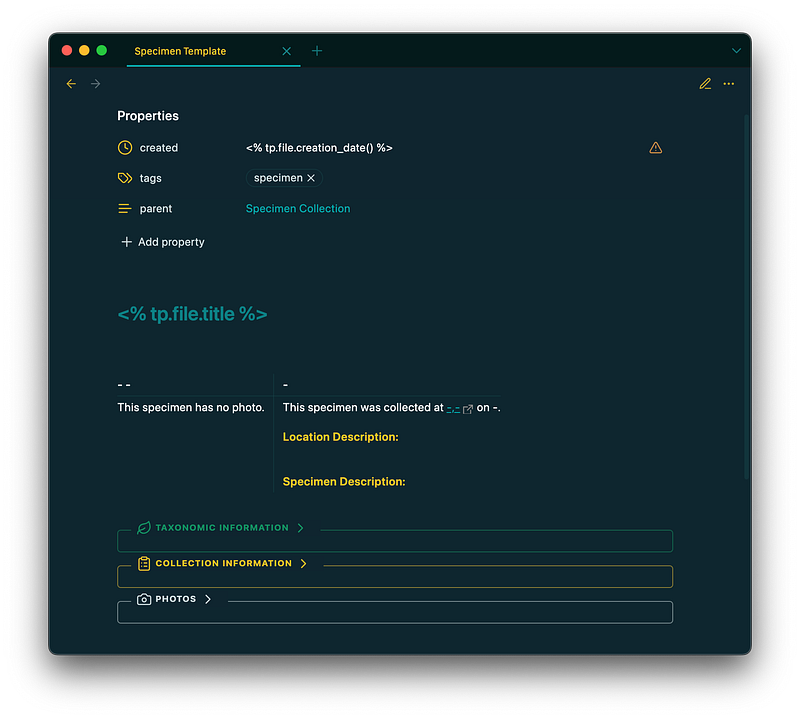
To start off, I include some basic frontmatter:
- A Templater snippet (
<% tp.file.creation_date() %>) to input the file creation date - A
#specimentag - A link to my “Specimen Collection” index (more on that below) in the
parentproperty
Then, another Templater snippet (<% tp.file.title %>) is used to include the file title (which, for me, is always the specimen ID number) as a link in the H1 header. In most of my notes, I almost always add the file title as a link so that the header automatically updates itself if I happen to change the filename later on.
The Callouts — More Metadata
Let’s skip over the table for now and head to the callouts at the bottom of the note. These callouts are used to collect the relevant data for each specimen. This data is then used to automatically fill in much of the above table.
Note that these are custom callouts I’ve created using the Callout Manager community plugin. In order to use this template as is, you would need to download this plugin and create callouts with the same names (taxon, collection, photo). However, feel free to replace these with any of the supported callouts native to Obsidian by simply changing the callout name between the [! and ] in the first line of each, or create your own custom styles to better suit your needs.
Adding a - after the callout name in brackets automatically collapses each callout when it is rendered. However, here's what the first two would look like if expanded and filled in with a specimen's data:
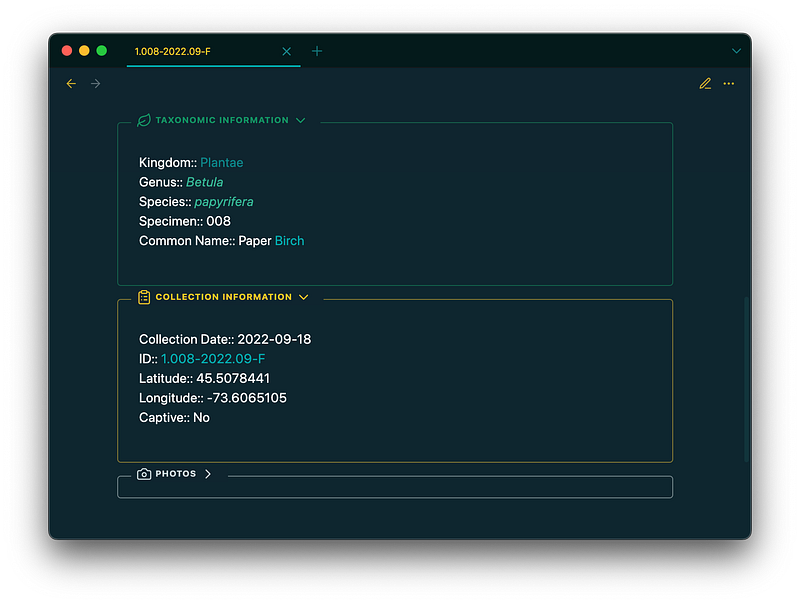
All of this data is entered manually when a note is created for a new specimen, except for the ID value in the Collection Information callout, which uses the same Templater snippet as the H1 header to automatically input the specimen ID as a link from the file title.
The Photos callout is similar, except it contains photos of the specimen:

These photos are added with embed links (i.e., ![[photo.jpeg]]), and the photo I want to include in the table at the top of the note is placed directly after the Photo:: key. For example, here's the source for the above callout:
> [!photo]- Photos
> Photo:: ![[photo-1.008-2022.09-F-a.jpeg]]
> ![[photo-1.008-2022.09-F-b.jpeg]]
A note on my collection data: For those interested, here’s a brief explanation of the data I’m collecting in these callouts. and how I determine the specimen ID number:
- Kingdom — The specimen’s kingdom: “Plantae”, “Animalia”, or “Fungi”.
- Genus — The genus name.
- Species — The species name.
- Specimen — The specimen number for that kingdom. For example, if I currently have 25 “Plantae” specimens, the next one I collect will be number 26 (technically 026).
- Common Name — The common name(s) for the species.
- Collection Date — The date I collected the specimen, in
YYYY-MM-DDformat. - ID — The specimen ID, in the following format:
KingdomNumber.SpecimenNumber-CollectionYear.CollectionMonth-CaptiveStatus
The “Kingdom Number” follows the key: 1 = Plantae, 2 = Animalia, 3 = Fungi.
The “Captive Status” is either: “C” (Captive) or “F” (Free) (more on that below).
So for the Paper Birch example used at the start of this article, from the ID 1.008–2022.09-F alone we can infer: it is a plant (Kingdom Number = 1), it is the eighth plant in my collection (008), it was collected in September 2022 (2022.09), and it was collected from a “free” (F) organism.
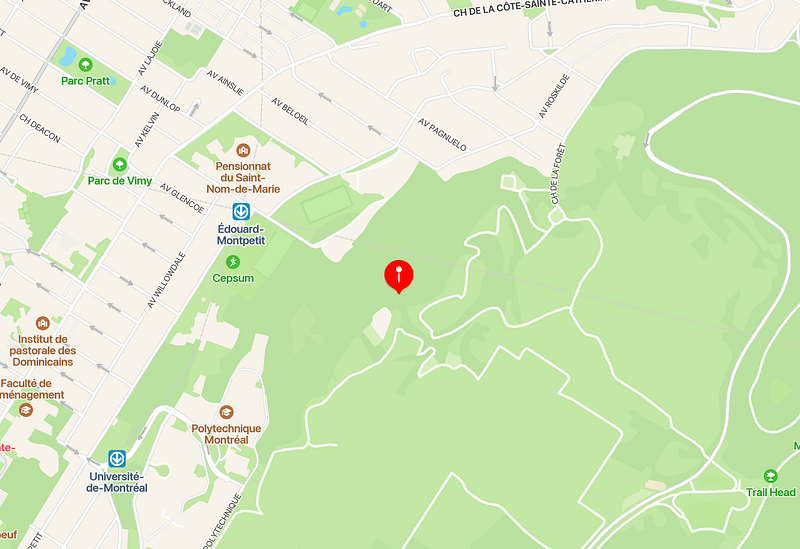
- Latitude and Longitude — The coordinates where the specimen was collected. I typically drop a pin on Google Maps when I pick something up and use the coordinates it gives me.
- Captive — This indicates whether a specimen came from an organism that was “Captive” or “Free”. A specimen is considered captive if it was put in its location by humans and/or if its ability to reproduce or otherwise live a natural life is/was impacted by humans. For example, a planted tree in a manicured park is considered to be captive, since it was physically put in its location by humans and it’s natural processes (e.g., seed production, leaf dropping) are impacted by human activity (e.g., mowing the park grass and removing seedlings). A tree in a forest, whether planted or not, is considered to be free, as it can undergo these processes without direct human interference.
- Photo — Photos of the specimen, usually with a ruler for scale. I name the photos with the specimen ID number. If there are multiple photos, letters are added to the end of the name in alphabetical order.
Note: I do have pending the creation of a similar template geared more toward some rock/mineral specimens I have collected. While I typical classify fossils as an “Animal” specimen, other rocks and minerals require different data than kingdom, genus, and species.
The “Index Card” Table
Now, with all of that out of the way, we can head back up to the table. As I mentioned, this was loosely inspired by those old index cards used to catalog specimens in collections and museums before computers (although they are still used today!). The idea is too automatically include all of the data stored in the callouts in a readable and useful way.
Let’s begin with the first row:
| `=this.genus` `=this.species` | `=this.common-name` |
Here, I use simple dataview inline queries to call the genus and species names in the first column, and the common name(s) in the second.
Now here’s where it gets a bit trickier. The first column of the second row contains this inline dataview function:
`=choice(this.photo, replace(string(this.photo), "]]", " | 200]]"), "This specimen has no photo.")`I’ve just published a short Obsidian Gem explaining this function here, but the short of it is:
- The function checks if there is a value for the
Photokey in the "Photos" callout. - If there is, it takes that value (which is an embed link
![[photo.jpeg]]), converts it to a string, removes the last two brackets and adds| 200]]so that the image is automatically scaled down to 200px in width. - If there is not photo value, the function displays
This specimen has no photo.
Meanwhile, the second column of the second row begins with:
This specimen was collected at `=join(list("[", this.latitude, ",", this.longitude, "](https://gps-coordinates.org/my-location.php?lat=", this.latitude, "&lng=", this.longitude, ")"), "")`This join function, is used to join a list of strings and values into a single string. I've written in more detail about this specific use-case here.
Without getting into the weeds too much, this function combines the latitude and longitude values from the "Collection Information" callout within single brackets for an external link, and links them to a gps-coordinates.org url, wherein the latitude and longitude values are also inserted into the relevant places.
The result, using the coordinates from the Paper Birch example above, would be:
[45.5078441,-73.6065105](https://gps-coordinates.org/my-location.php?lat=45.5078441&lng=-73.6065105)Which renders to this link: 45.5078441,-73.6065105.
Clicking on that link, we are taken to site with a map and a pin dropped on the exact location of the coordinates:
To learn more about why I chose this method for linking the coordinates to an external site, take a look at this post.
Following this link, I’ve also added:
on `=dateformat(this.collection-date, "MMMM dd, yyyy")`.This inserts the date that the specimen was collected on using the “Collection Date” value, adjusting it to a more readable format using dateformat().
Following those functions, I simply include two bold headings for a brief location description and specimen description. These are the only two sections of the table that are inputted manually upon note creation.
Another note: I don’t include some of the values in the callouts, like kingdom, specimen number, or captive status, in the “index card” table because these are all quickly inferred from the specimen ID in the H1 header.
In the end, the result is a clean note with all of the information I need in a succinct and easy to read “card”:
The Workflow & Index
For me, using this template looks like this:
- I bring home a specimen, I open Obsidian, and I create a new note in my “Specimens” folder. I have a Templater folder rule set up so the template is automatically applied to this note.
- I name the file with the specimen ID, taking a look at the files side pane or my “Specimen Collection” index to find the appropriate specimen number.
- I scroll down to the callouts and fill in the information and add photos.
- I scroll back up to the table and add the location and specimen descriptions.
In addition to each specimen note, I also maintain an index of all specimens, using the Minimal theme’s “cards” css-class to further evoke that “index card” motif:
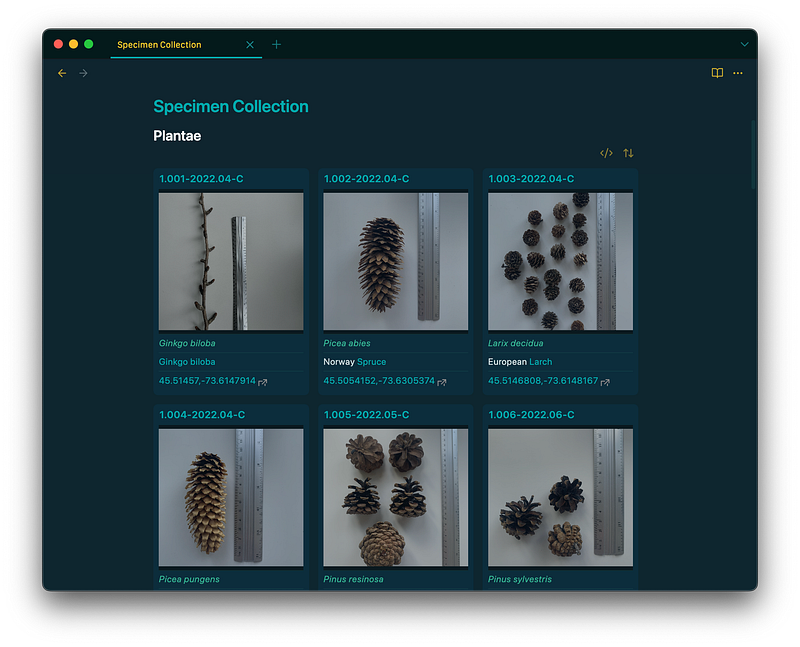
I separate the collection here by kingdom, and use the following dataview query to generate each table, swapping out the kingdom name as needed:
```dataview
TABLE Photo, join(list(genus, species), " "), common-name, join(list("[", latitude, ",", longitude, "](https://gps-coordinates.org/my-location.php?lat=", latitude, "&lng=", longitude, ")"), "")
WHERE parent = [[Specimen Collection]] AND Kingdom = [[Plantae]]
Note that I use a join function to include the genus and species names in the same column/row, and I also use the same function detailed above to include the lat/long coordinates as a link so I can navigate directly to a map for any specimen right from the index.
Final Thoughts
After having been playing around with inline dataview functions and queries for the past few weeks, I have come to love their ability to pull note metadata into the body of a note for a more pleasant and useful experience.
This template exemplifies exactly that, allowing me to hide all of the keys and values in collapsed callouts while including the relevant data in an easy-to-read table that has added utility, like automatically resized images and lat/long coordinates that link to an online map.
You can find the complete markdown file for this Specimen Collection template here.
If you liked this article, you might be interested in some of my other Obsidian-related posts:


