avatarAshok Gelal

Free AI web copilot to create summaries, insights and extended knowledge, download it at here

4709

Abstract

de> command with parallelism.</p><h2 id="9570">Benchmarks</h2><p id="dc98">Benchmarks conducted on four different repositories revealed that a hot mvnd execution, where the daemon is already running, can accelerate builds by up to 50% of builds that do not run tests or static analysis as this is the most common use-case among developers in our organization.</p><figure id="442c"><img src="https://cdn-images-1.readmedium.com/v2/resize:fit:800/0*xot8KoV94usih-4e"><figcaption></figcaption></figure><h2 id="77be">Local vs CI server</h2><p id="ac6e">Using Maven Daemon significantly sped up our local builds, making our engineers’ daily iterations faster and more efficient. However, this solution wasn’t suitable for our CI environment with TeamCity. Since we don’t reuse TeamCity, there was no benefit to starting a daemon process in this context.</p><p id="3916">In response to this limitation, we will be exploring the possibility of reusing agents and investigating potential improvements in a different initiative to better optimize our CI environment.</p><h2 id="c57d">Adoption</h2><p id="8fb7">To ensure every Java team at Picnic could benefit from the increased speed of local builds using Maven Daemon, we created a comprehensive knowledge article outlining the steps and best practices. By sharing this detailed knowledge article, we ensured that all developers in our organization could easily adopt and benefit from using Maven Daemon, leading to faster build times and improved productivity.</p><p id="436d">Currently, we don’t have visibility in the adoption rate here, but we are looking into using OpenTelemetry Maven extensions to get more insights into this to better track and advocate</p><h1 id="aceb">Maven Build Cache</h1><p id="6a2a">One of the best ways to speed up builds is to do less. And the best way to do less is to eliminate duplicate or unnecessary work. Why should we want to rebuild and retest all modules in our project if I change a single test, or a small if-statement in a module no other module depends on? We can use a build cache to only execute Maven goals for modules that changed and modules that depend on these changes.</p><h2 id="f90a">How does it work</h2><p id="5cdc">The Maven Build Cache extension enhances the efficiency of large Maven projects by implementing the following set of features:</p><ol><li><b>Incremental Builds</b>: Only the modified parts of the project graph are rebuilt.</li><li><b>Subtree Support</b>: Allows isolated builds of specific parts in multi-module projects.</li><li><b>Version Normalization</b>: Facilitates version-agnostic caching.</li><li><b>Project State Restoration</b>: Avoids repeating expensive tasks like code generation by restoring previous states from the cache.</li></ol><figure id="5b07"><img src="https://cdn-images-1.readmedium.com/v2/resize:fit:800/0*ehx_WSQV_zw9e68p"><figcaption>The diagram shows that changes in a module (Module 2) lead to it and its dependents (Module 3) being rebuilt, while unchanged modules (Module 1 and Module 4) are retrieved from the cache.</figcaption></figure><h2 id="28f6">Local Build Cache</h2><p id="2678">When working locally, the Maven Build Cache stores the build output artifacts in a designated local cache directory. Here’s a step-by-step breakdown of how it operates:</p><ol><li><b>Initial Build:

  • </b>During the first build, Maven compiles the entire project as usual.
  • For each module, the build cache extension computes a unique hash based on the module’s inputs (source files, Maven configuration, dependencies, etc.).
  • The build outputs (e.g., compiled classes, packaged artifacts) are stored in the local cache directory with the computed key.</li><li><b>Subsequent Builds:
  • </b>Before building a module, Maven checks the local cache directory to see if there is a cached result for the module’s hash.
  • If a match is found, the cached outputs are restored, and Maven goals executed when the cache was constructed are now skipped.
  • If no match is found, Maven rebuilds the module, and the new outputs are cached for future use.</li><li><b>Cache Management:
  • </b>The local cache can be configured to limit its size and manage the retention of cached artifacts.
  • Policies can be defined to periodically clean up old or infrequently used cache entries, ensuring the cache directory remains manageable.</li><li><b>Key Generation:
  • </b>The unique key for each module is generated by hashing the module’s inputs. This includes source code files, project model (POM file), plugin configurations and parameters, and dependency versions and configurations.
  • By including all relevant inputs in the key, the build cache ensures that any change in the inputs results i

Options

n a new key, prompting a rebuild.</li></ol><p id="4903">The build cache uses hashing to generate unique keys for storing and restoring build results. Correctness is maximized by including all relevant files and functional plugin parameters, while reuse is enhanced by filtering non-essential files and minimizing controlled plugin parameters. Configuration involves balancing correctness and performance through an XML file, <code>buildinfo.xml</code>.</p><h2 id="88d2">Usage in CI</h2><p id="6966">In our CI process, we also leverage the Maven Build Cache solution to accelerate our CI builds. However, for CI, we employ <a href="https://maven.apache.org/extensions/maven-build-cache-extension/remote-cache.html">a remote cache</a> stored in an artifactory instead of using a local directory. In our case, cached artifacts are stored in Nexus. This approach has markedly increased the speed of our Java builds. Consequently, our builds finish sooner and build queues are shorter.</p><p id="d0a3">However, in certain situations, users need to perform a full build of their changes. To accommodate this, we introduced a TeamCity parameter called “Use Maven build cache” with the following options:</p><ul><li><code>true</code>: the cache is used</li><li><code>false</code>: the cache is not used</li><li><code>default</code>: the repository-level setting is applied</li></ul><figure id="51f5"><img src="https://cdn-images-1.readmedium.com/v2/resize:fit:800/1*cjBQGpXtPyo_8MeafHw1TA.png"><figcaption></figcaption></figure><p id="76d0">It is good to note that we currently employ the cache only for builds that do not create production artifacts, as we wish to have these as ‘pure’ as possible. As such, we disable the cache for builds on default branches supporting continuous deployments, and in release builds.</p><h2 id="1253">Benchmarks</h2><p id="12d5">In the best-case scenario, the execution time of CI builds dropped by ~ 90% when execution of every module was skipped, this is how it was shown in the build logs:</p><div id="bdae"><pre>[INFO] Skipping plugin execution (cached): <span class="hljs-keyword">install</span>:<span class="hljs-keyword">install</span></pre></div><p id="72cd">Instead of 10 minutes 4 seconds, the build that was fully cached took only 1 minute 22 seconds. 😲</p><p id="fb1e">Of course, this is quite a rare case to run a build that has every module skipped. The average build time improvement across all Java repositories in Picnic is shown in the picture below. It is noticeable that build time dropped by 62% in general.</p><figure id="3fd7"><img src="https://cdn-images-1.readmedium.com/v2/resize:fit:800/1*m9KcQpIhbc66wTHDIvttPQ.jpeg"><figcaption></figcaption></figure><p id="97f1">For some repositories, the build time improvement was more noticeable than for others. Projects with many modules benefit more than projects with only a few modules. This can be seen in the chart below showing P75 build times. Highly modular projects see their build times drop from 10 to 5 minutes. Projects with a few modules only benefit little from this improvement.</p><figure id="8e53"><img src="https://cdn-images-1.readmedium.com/v2/resize:fit:800/0*Qp8AmIXK7M0xzbuc"><figcaption></figcaption></figure><h1 id="d1eb">Conclusion</h1><ol><li><b>Dramatic Build Time Reduction:

  • </b>Build times dropped from 12 minutes to 8 minutes in general. This significant improvement eliminates long waits, allowing developers to maintain focus and productivity.</li><li><b>Enhanced Developer Experience:
  • </b>Faster build times, especially for local builds, lead to fewer interruptions, enabling developers to stay in the zone and work more efficiently. This improvement has contributed to higher job satisfaction and overall happiness among our teams.</li><li><b>Increased Efficiency in CI Pipelines:
  • </b>Using the Maven Build Cache in our CI environment has sped up CI builds, reduced queue times, and made TeamCity agents available more quickly.</li></ol><p id="46a2">These improvements have significantly boosted developer morale and productivity. Reduced build times mean less context switching, quicker feedback, and a more enjoyable workflow.</p><p id="316d">Developers feel more empowered and efficient, resulting in higher-quality code and faster feature implementation.</p><p id="90d2">In summary, the integration of the Maven Build Cache extension and Maven Daemon has transformed our build process, making it faster and more efficient. We are excited to continue leveraging these tools to maintain and further improve our build processes, ensuring our developers have the best possible experience.</p><p id="0bd6">In collaboration with <b>Pieter Dirk Soels</b></p></article></body>

A full-featured multi-tenant app with Laravel Part 7 — Deployment

Photo by Efe Kurnaz

Part 0, Part 1, Part 2, Part3, Part4, Part 5, Part 6, Part 7 👇

In this part of we’ll accomplish the following small tasks:

✅ Provision a DigitalOcean server using Cleavr

✅ Setup a system database and a super admin user

✅ Create a wildcard SSL/TLS supported multi-tenant Laravel site

✅ Setup local git repository for deployments

✅ Create and sync environment variables to remote server

✅ Setup deployment hooks

✅ Deploy

If you are looking for an easy way to provision a server and deploy your Laravel apps, try Cleavr 👇

Need help deploying your Laravel apps? Get some on Cleavr Forum.

Before we march forward to adding more features to our Townhouse app, let’s first learn how to deploy it to a real server. This way we can push new features in small increments as they are done and get feedback quickly. If you have done fair amount of software development, whether web or not, you should know the advantages of such approach.

There are number of ways to deploy a Laravel application. You can also do this manually as well, of course!

Deploying is best left for automation but automating deployments from scratch is going to cost you either money, time, or both.

To address these issues, I’ve written a cross-platform desktop app called Cleaver to help individual developers provision and deploy servers on, for now, DigitalOcean and Vultr, for free. It is still in beta but is stable enough to use for production servers.

Cleaver helps you create servers ready for deploying your web apps with zero downtime.

Cleaver supports not just provisioning and deployments but also managing Let’s Encrypt SSL certificates, Database management, unlimited rollbacks, deployment hooks, jobs scheduling, process monitoring via Supervisor, setting up Nginx redirects and more.

Because I know Cleaver better than any other tool and also it is free (and awesome), I’ll be using it for deploying our multi-tenant app. You should too!

Prerequisites:

  • Have an account on DigitalOcean. If you don’t have it already, using this link to signup will add $10 to your account so that you can follow this tutorial without spending a penny.
  • Download Cleaver. Head to https://getcleaver.com and get Cleaver for the OS of your choice. It’s available for Mac, Windows, and Linux. If you have time, I recommend you going through Cleaver’s Laravel documentation at least once.
  • Have a domain name that is pointed to the nameservers of DigitalOcean (ns1.digitalocean.com, ns2.digitalocean.com, and ns3.digitalocean.com). For this tutorial we will use townhouse.site for the domain. I strongly recommend not adding DNS records manually as Cleaver will do it smartly for you. You may have to wait for few hours to make sure that the DNS entries have been propagated through out the world before creating the site. But don’t worry, Cleaver is smart enough to let you know if you have misconfigured/inaccessible nameservers.

1. Add DigitalOcean Profile

We need to get an API token from DigitalOcean so that Cleaver can provision servers on your behalf. Read here on how to do it: https://docs.getcleaver.com/cloud-providers/digitalocean.html

2. Provision a DigitalOcean Server

Once you have added a profile, it’s time to provision server. Here are the steps: https://docs.getcleaver.com/servers/provisioning.html

Name the server townhouse-server and make sure you have selected MySQL 5.7, NodeJS with NPM, as well as PHP 7.2

Select MySQL 5.7, PHP 7.2 and check Install NodeJS and click Create

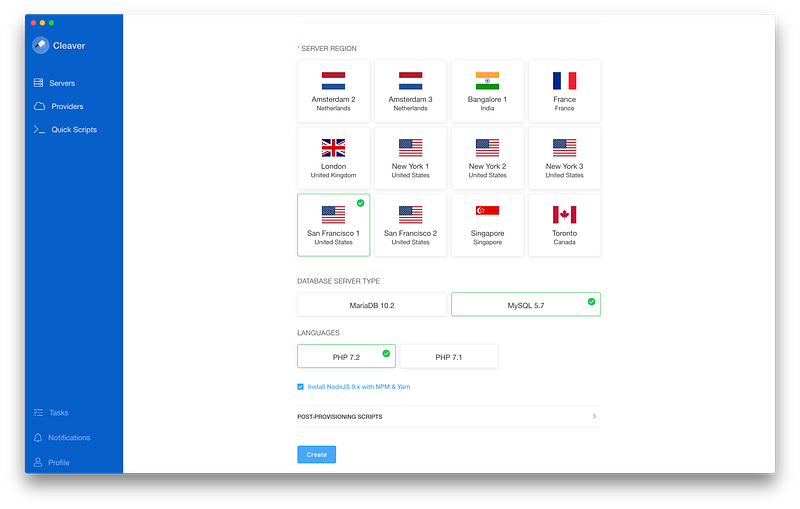
As your server is being provisioned, make note of your database root password. We are going to need this soon. Just FYI, Cleaver copies the passwords to your keychain as well. So don’t worry if you forgot to copy it.

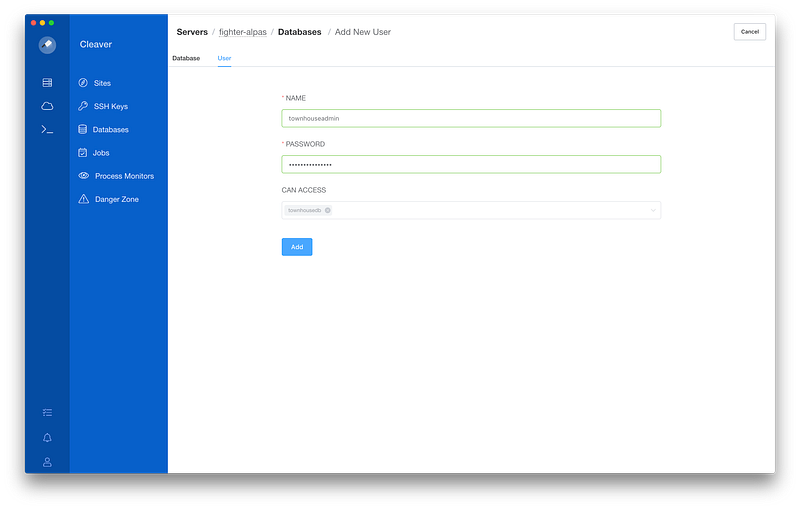
3. Add a Database and a User

Once the server is provisioned and active, select the server and create a database. Call it townhousedb. Once the database is created, create a database user called townhouseadmin and allow it to access townhousedb. The password you entered will be saved in your keychain as well.

With Cleaver creating databases and users is very easy and intuitive

The user townhouseadmin can access townhousedb but we need more privileges for our townhouseadmin user, just like in our database in the first part of this series. If you are using SequelPro, you should be able to do this very easily!

Login using root as shown in the screenshot below. For the SSH key use your private key in ~/.ssh/cleaver/townhouse-server-xxxxxx

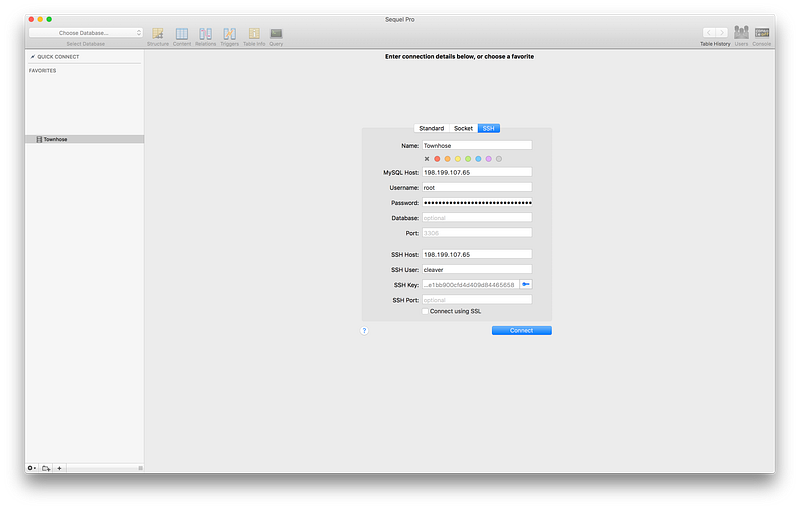
Once you login to your remote database server, give townhouseadmin global privileges so that it can create additional databases and users.

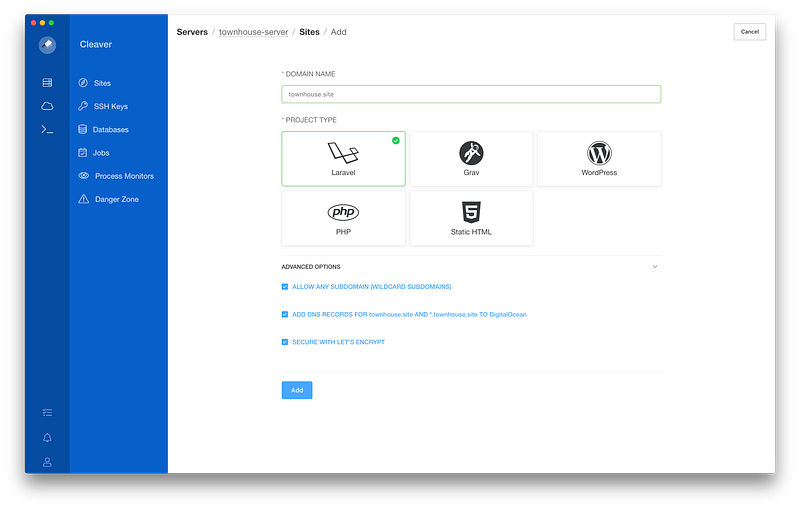
4. Create a secure multi-tenant Laravel site

Select the server you just provisioned and add a Laravel site using your domain name. Make sure to check all three advanced options — allow any subdomain, add DNS records, and secure with Let’s Encrypt.

Really, it takes just this much to get a very secure site created with Cleaver

5. Setup GIT repository for deployments

Now let’s select the local townhouse git repository that we want to deploy. Select the site you created in step 4 and click Repo Settings. Browse the local townhouse git repository directory, give the branch that you’d like to deploy, and hit Done. You can always come back and modify this if you want to.

6. Create and sync environment variables to remote server

Let’s create a dedicated .env file that would hold all our production environment variables. Cleaver will sync this for you and also copy it over every time you deploy. Very handy!

Copy .env file to something like .env.cleaver and modify the variables. Make sure you have edited at least these variables:

APP_ENV=production
APP_KEY=<create a new key>
APP_DEBUG=false
APP_URL_BASE=<your domain name>
APP_URL=https://${APP_URL_BASE}
DB_CONNECTION=system
DB_HOST=127.0.0.1
DB_PORT=3306
DB_DATABASE=<name of database created in step 3>
DB_USERNAME=<name of admin user created in step 3>
DB_PASSWORD=<password for the database created in step 3>
...

Now switch to Environment tab and input the full path to your .env.cleaver file and then hit Sync with Server. Make sure your .env file is not committed otherwise Cleaver won’t copy your .env file during deployments.

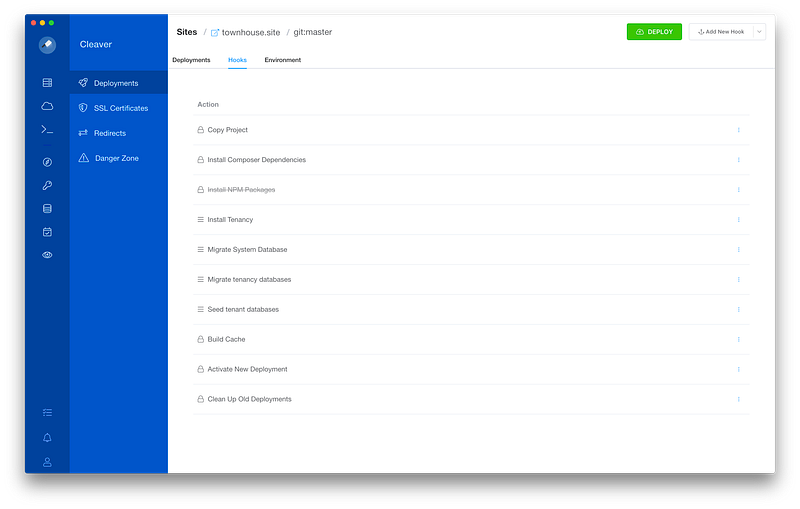
7. Setup deployment hooks

Cleaver auto installs default deployment hooks appropriate for your project type. In our case, we need hook few extra scripts when deploying. Cleaver let’s you add, copy, disable/enable, and reorder hooks so that you could customize your deployment actions.

Switch to Hooks tab and click Add New Hook button. Repeat this process to add following hooks (don’t worry about the order):

  • Name: Install Tenancy
cd {{ release }}
php artisan tenancy:install
  • Name: Migrate System Database
cd {{ release }}
php artisan migrate --force
  • Name: Migrate tenancy databases
cd {{ release }}
php artisan tenancy:migrate --force
  • Name: Seed tenant
cd {{ release }}
php artisan tenancy:db:seed

Once you are done adding all the above hooks, reorder them so that the orders look like this (make sure to hit Save Order button after you are done reordering):

8. Deploy

We are done with the setup and ready to Deploy. Hit that green DEPLOY button and wait a minute or two to see your awesome multi-tenant web app come alive!

It may look like lots of steps for a deployment but remember we did everything from scratch and from this point on you only have to follow Step 8 every time you want to deploy your app.

It’s now time to create a tenant and test it. Fire up your terminal, login to your server, and create a demo tenant:

$ ssh cleaver@<server-ip-address> -i ~/.ssh/cleaver/townhouse-server-xxxxxxxx
$ cd /home/cleaver/<your domain>/current
$ php artisan tenant:create demo [email protected]

Visit https://demo.<your-domain> and you should be greeted by your secure multi-tenant site!

You can also use Cleaver’s Quick Script to create a tenant if you don’t feel like logging into your server using SSH.

Play with Cleaver a bit more and see all its other super powers. If you feel like it is missing some super powers, please join Cleaver’s Slack channel and suggest. You’ll be pleasantly surprised how receptive we are of users’ feedback and comments. See you in the next post!

Laravel
Multitenancy
Tutorial
PHP
Web Development
Recommended from ReadMedium