
A full-featured multi-tenant app with Laravel Part 1 — Setup

Part 0, Part 1 👇, Part 2, Part3, Part4, Part 5, Part 6, Part 7
In this part we’ll accomplish the following tasks:
✅ Create a project
✅ Setup a system database and a user
✅ Install and configure multi-tenant package
✅ Add an artisan command to create a tenant
✅ Add an artisan command to delete a tenant
1. Create a new Laravel project
Let’s get started by actually creating a new Laravel project. This is easy:
$ laravel new townhouse2. Set up a system database
Just like with most any other web apps, townhouse is going to need a database and a database user. But unlike most other web apps this database user is going to be a bit different. Because our app will create 1 database for each tenant, our database user needs special privileges to do so.
Note: The following step for creating a database and a user is only applicable to MacOS+SequelPro users but you should be able to perform these on your choice of OS and your choice of MySQL client in the similar fashion.
If you don’t have it already, download and install SequelPro. Connect as root to your local MySQL server and create a new database name townhousedb.
Create a new user, townhouseadmin, and set the password as secret. Go to Global Privileges tab and click Check All button. Go to Schema Privileges tab and select townhousedb from schema list. Select all Available Privileges by hitting CMD+A keyboard shortcut and click < button to grant all the selected privileges. Finally, click Apply.
Now, let’s make our app aware of this database connection. You may have always left the name of your default database connection just as it is — mysql — but because we’ll be using multiple databases, just calling it mysql may create some confusion in future. So, we’ll call it system instead.
Open config/database.php and change the name of the second connection from mysql to system.
Now open your .env file and make the following changes:
DB_CONNECTION=system
DB_HOST=127.0.0.1
DB_PORT=3306
DB_DATABASE=townhousedb
DB_USERNAME=townhouseadmin
DB_PASSWORD=secret
That’s all we need to do for setting up a system database. The multi-tenant package will take care of rest when it comes to setting up a database for each new tenant.
3. Install and configure multi-tenant package
! Note: This tutorial is only compatible with version 5.1 of Multi Tenancy Package. If you are on 5.2, consult the official upgrade guide.
First, go and read the documentation on the package we’ll be using — Laravel Tenancy. It’s okay if you don’t understand everything right now. Just be familiar with it. Once you are done, add the package:
composer require hyn/multi-tenantBecause we are using MySQL, we need to limit UUID length generated by the multi-tenant package to under 32 characters and this can be set by using an environment variable LIMIT_UUID_LENGTH_32. Set it to true in your .env file:
LIMIT_UUID_LENGTH_32=trueOne more thing before we actually make our app a multi-tenant app (MTA) — we’d like to have each tenant its own users and we need a table for storing them. As you know, Laravel by default comes with two migration files: 2014_10_12_000000_create_users_table.php and 2014_10_12_100000_create_password_resets_table.php
If you want our MTA to automatically migrate these two tables for each tenant, and you want to, then you need to move these migration files to a special folder: database/migrations/tenant
Multi-tenant package will make sure that all the migrations under this folder are run on every tenant’s new website. Handy!
Finally, its time to actually convert own app to an MTA. We’ll use one of the multi-tenant’s built-in commands to do this:
php artisan tenancy:installThis command will migrate all the tables needed to make your app an MTA.
If you now query your townhousedb database, you’ll see few new tables — customers, hostnames, migrations, and websites. Also, notice that there are no users or password_resets table.
4. Add an artisan command to create a tenant
Instead of spending our valuable time working on the UI for the superadmin, the one who can create a new tenant, we can simply create an artisan command. Let’s add one:
php artisan make:command CreateTenantAnd then make it happen:
The class is self-explanatory — we made sure that a tenant doesn’t already exist for the provided name and/or email address. Then we created a customer (tenant), a website, and a hostname for the website. We then created an admin with a randomly generated password and then eventually printed all the info needed for the new tenant and the admin to start using the app.
Notice that we are not setting up any permission for this new user to make her really an admin. We’ll do this in the next part of this series.
There’s one more step you have to perform before you can create a new tenant — assigning a base URL for the hostname’s FQDN (see line#64). We could hard code this but the hostname is going to be different for your dev environment and production environment. That’s why we are going to set it via a config+env variable combo:
// add a new new key in config/app.php: ‘url_base’ => env(‘APP_URL_BASE’, ‘http://localhost'),// modify your .env file: APP_URL_BASE=townhouse.dev APP_URL=http://${APP_URL_BASE}Now let’s create a new tenant:
php artisan tenant:create boise boise@example.comBoom! You should see something like:
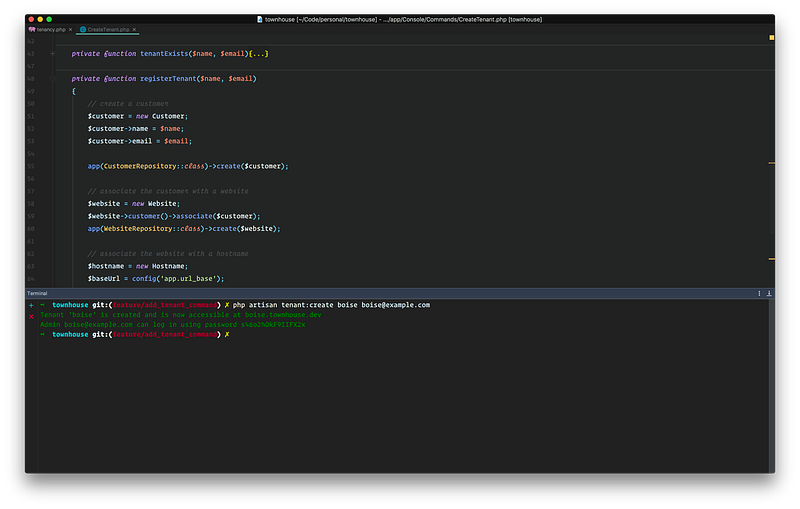
5. Add an artisan command to delete a tenant
You are going to need a way to delete a tenant sooner or later. Maybe not for a live app but a way to delete a tenant is going to be very handy during development unless you want to delete all the databases, users, and folders manually after each test.
So let’s create a new artisan command to do just that:
php artisan make:command DeleteTenantAnd then make it happen:
Notice that we have allowed running this command only in the local environment. You don’t want to accidentally delete a tenant off of your production server.
The above command deletes most of the artifacts generated by the multi-tenant package except for few — tenant’s database, tenant’s user, and tenant’s storage folders. For it to be able to cleanup these artifacts, we have to turn on few settings in tenancy.php vendor config file which we haven’t published yet. Let’s do it:
php artisan vendor:publishThen select:
Provider: Hyn\Tenancy\Providers\Tenants\ConfigurationProvider
This will publish a config/tenancy.php file. Let’s edit it and make two changes:
...'auto-delete-tenant-directory' => env('AUTO_DELETE_TENANT_DIRECTORY', false),...'auto-delete-tenant-database' => env('AUTO_DELETE_TENANT_DATABASE', false),...And set these keys in your .env file:
AUTO_DELETE_TENANT_DIRECTORY=true AUTO_DELETE_TENANT_DATABASE=trueNow we are ready to delete the tenant that we created earlier:
php artisan tenant:delete boiseAll the artifacts related to the tenant boise should now be gone!
Still with me? Good! We got a lot done in this part and made a solid foundation from which we could launch our future posts of this series. In the next post, we’ll see how we can apply roles and permissions to our app as well as seed some data for each tenant.
If you are looking for an easy way to provision a server and deploy your Laravel apps, try Cleavr 👇


