
A full-featured multi-tenant app with Laravel Part 2 — Roles and Permissions

Part 0, Part 1, Part 2 👇, Part3, Part4, Part 5, Part 6, Part 7
In this part of writing a complete Laravel multi-tenant app series, we’ll accomplish the following tasks:
✅ Install and configure a package for managing roles and permissions
✅ Seed the database with some roles and permissions
✅ Give all the power needed for an admin user to administer the new tenant
1. Install and configure a package for managing roles and permissions
We’ll use spatie’s excellent laravel-permission package for managing roles and permissions in our multi-tenant app (MTA). Go and read the documentation first. You don’t need to understand everything right now but just be familiar with some of the concepts and commands.
Once you are done, add the package:
composer require spatie/laravel-permissionNow, we have to make this package aware of multi-tenancy setup by setting proper connection name to the package’s core Eloquent models —Permission and Role.
We obviously don’t want to change these models in the vendor directory to make them multi-tenancy aware. We have to create our own Role and Permission models and let the package know to use these models instead of packaged models. This can be done by configuring the package’s vendor config file. Let’s publish it first:
php artisan vendor:publishThen select:
Provider: Spatie\Permission\PermissionServiceProvider
This will publish two files — config/permission.php and xxxx_xx_xx_xxxxxx_create_permission_tables.php.
The migration file xxxx_xx_xx_xxxxxx_create_permission_tables.php needs to be moved to database/migrations/tenant folder. Go ahead and move it.
Let’s make the changes we need to config/permission.php:
'models' => [
    'permission' => App\Permission::class,
    'role' => App\Role::class,
],
As you can see, we told the package to use App\Permission::class and App\Role::class Eloquent models for permission and role respectively. These models don’t exist yet so let’s make them:
php artisan make:model Permission
php artisan make:model Role
These two new models are bare-bones Eloquent models, which, as they are, not going to do any good for us. We have to make them aware of both laravel-permission package and our multi-tenancy setup.
For the first, we’ll use the magic of inheritance and for the latter, we’ll use a trait.
Let’s edit Permission.php model first:
And then Role.php model:
2. Seed the database with initial roles and permissions
We’d like a tenant’s database to be seeded with some roles and permissions whenever the tenant is created. The multi-tenant package already supports this out-of-the-box. All we have to do is to tell it which seeder to use. Edit config/tenancy.php file and make a small change:
...
'tenant-seed-class' => TenantDatabaseSeeder::class,
...
This will run database/seeds/TenantDatabaseSeeder.php class after a tenant’s database is created. Let’s create this seeder first:
php artisan make:seeder TenantDatabaseSeederAnd then make our changes:
As you can see, we added three “admin permissions”, created an admin role and applied those permissions to the admin role. We also created a role for our regular users. Don’t worry about the specifics of what permissions and roles we added. In the future, we’ll come back and add more permissions and roles as needed.
Before moving forward, make sure that have moved database/migrations/xxxx_xx_xx_xxxxxx_create_permission_tables.php file to database/migrations/tenant folder.
3. Make our user an admin with new role and permissions
In part 1 of this series, we added an admin user but we didn’t load the user with any “super powers” to brag about being an admin. We’ll do that now!
But before that we need to make our User model be aware of multi-tenancy as well as Roles and Permissions, which means it needs both UsesTenantConnection and HasRoles traist. Go ahead and apply both traits to User.php model.
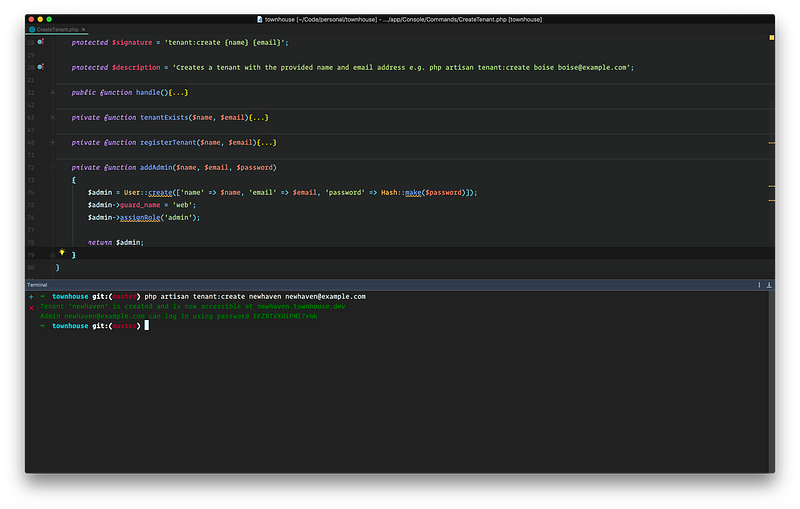
Now, edit CreateTenant.php file and modify addAdmin method so that it looks like this:
...
private function addAdmin($name, $email, $password)
{
    $admin = User::create(['name' => $name, 'email' => $email, 'password' => Hash::make($password)]);
    $admin->guard_name = 'web';
    $admin->assignRole('admin');

    return $admin;
}
...
We added two lines of code — the first line is needed because laravel-permission package supports guards so that you could have different roles for, say, web and API. If you were to use a web UI to add an admin, you wouldn’t need to this but because we are creating a tenant using an artisan command, we need to set this manually.
The second line is what makes the user an admin — the role admin.
Now, go ahead and create a new tenant:
php artisan tenant:create boston boston@example.comYou should see this lovely message:
Also, browse the tenant’s database and you’ll notice few new tables — model_has_permissions, model_has_roles, role_has_permissions, and roles.
In future, when we have a UI for managing users and contents, the work we have done in this post is really going to pay off.
In the next post, we’ll see how we can welcome the new admin with an email invitation as well as let her set her own password.
If you are looking for an easy way to provision a server and deploy your Laravel apps, try Cleavr 👇


