
Show an Array of Identifiable Items in a List
Build an App Like Lego, with SwiftUI — Tutorial 13

1. Introduction
In Swift and most programming languages, an ordered sequence of items is called an Array. In SwiftUI, we often want to display an array of items in a List. An Array is a model structure. A List is a view structure.
A List needs to uniquely identify each item. In other words, it needs the items in an Array to be Identifiable. For example, we could identify each item by a unique name or a unique number. Then the List can control the items’ positions and perform animations automatically, with no extra coding work.
In the previous Tutorial 12, we displayed an article in each news cell in our list. But each cell showed the same article.
In this Tutorial 13, we will show one NewsCell for each unique Article in an Array. We will make the articles Identifiable so we can display then in a List.
We will pick up here where the last tutorial left off. Ideally, you have completed the previous tutorials in this series. Or, you can download the prepared project, ready to start this tutorial.
2. Create an Array
First, let’s create an array of articles, using the mock articles that we created earlier.
👉 Open the Article+Mock.swift file that we created in an earlier tutorial. At the end of that file, add a blank line and then this code:
Your code should then look like this:
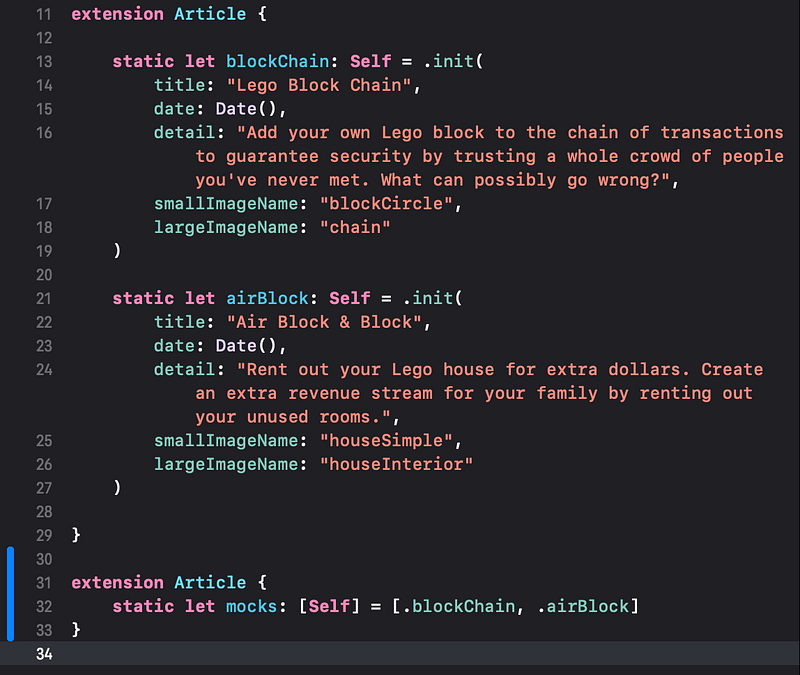
ℹ️ Here’s a quick overview of this new code:
- The second extension is separated just for visual clarity. We could have combined all of the code in this file into one extension.
Selfinsideextension Articleis the same as explicitly writingArticle.- When inside
extension Article,[Self]means the same as[Article], which is an “array” of articles. The square brackets around a type (like[Article]or[Self]) means an array of that type. An array is just a sequence of items, in order. For example, an array of fruits could belet fruits: [Fruit] = [.apple, .orange, .banana]. - We’ve chosen the variable name
mocksfor the array of mock articles. Arrays are usually named as a plural. - We wrap the items in the array in square brackets, with the items separated by commas.
- We’ve assigned
mocksto be the array of[.blockChain, .airBlock], which contains the two instances already defined above.
3. Show an Array in a List
Now we will show the information from our mocks array of articles in a List.
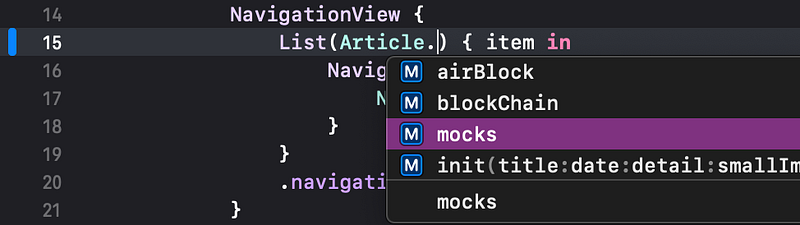
👉 In ContentView.swift, in the List(...), click on the template 0...<5 to select it.
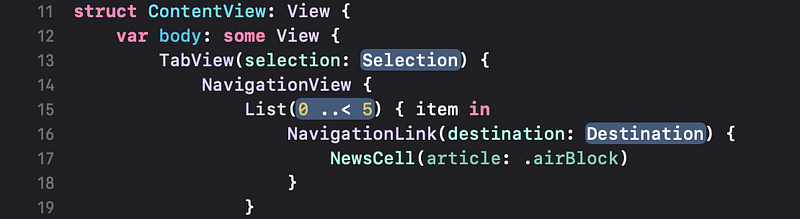
👉 Replace it with Article.mocks. As you type, Xcode will prompt to autocomplete, so you don't have to type the whole thing.


4. Identifiable
👁 As you can see, Xcode shows an error popover.
👉 Click on the red stop sign icon in the error popover to reveal all of the words in the error description.
Xcode is saying that the List won’t accept an array of articles, because Article does not “conform to Identifiable”. But what does that mean?
It means that List needs a way to identify each article as distinct from the other articles in the mocks array. The simplest way to do that is to just add a unique identifier to each article. It could be a unique name string, but we will just number them.
👉 Open the Article.swift file (by selecting it in the File navigator in the left pane).
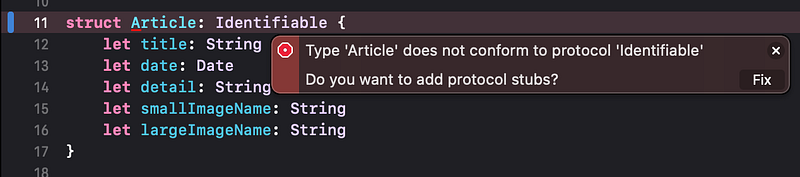
👉 After struct Article, add : Identifiable. This tells Xcode that we promise to make Article “conform” to the Identifiable protocol.
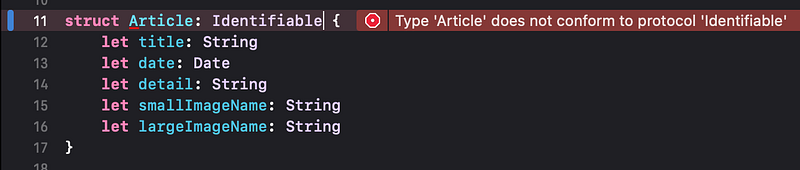
👁 Xcode keeps us to our promise, by complaining that Type 'Article' does not conform to protocol 'Identifiable'. Note that this stop sign contains a dot, not a cross like previous errors.
👉 Click on the stop sign containing the dot.
👁 The error popover expands and offers to Fix the error by adding protocol stubs.
👉 Click on the Fix button in the popover.
👁 Xcode adds placeholder code to fix the error.
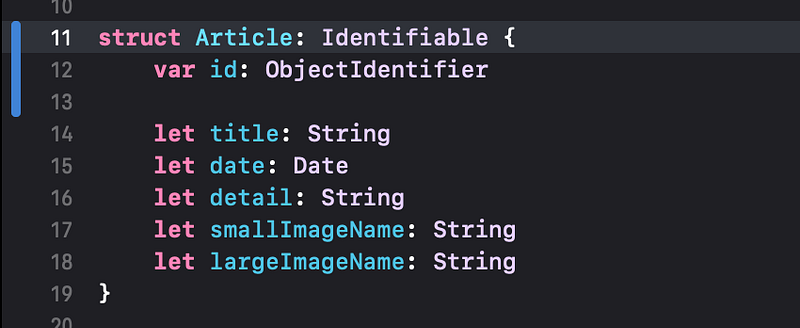
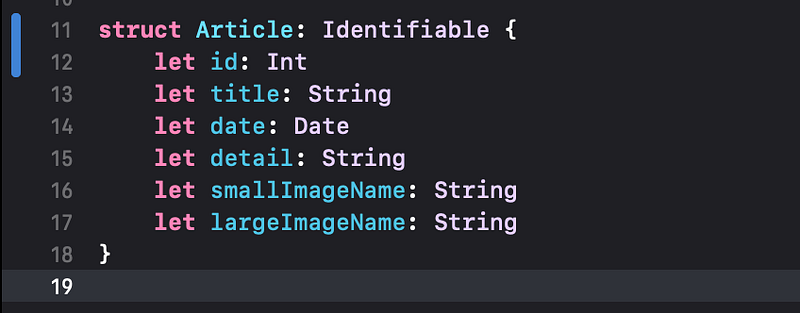
👉 Since we will use simple integers (whole numbers) for the id, replace ObjectIdentifier with Int.
👉 Since we will not change (vary) the id of each article, once assigned, change var to let.
👉 Delete the blank line.
👉 Build the app (in the Products menu).
5. Add missing arguments
👁 Now Xcode complains about errors in the Article+Mock.swift file.

👉 Switch to the Article+Mock.swift file by selecting it in the error popup menu.
👁 Xcode shows two occurrences of the same error: Each mock article is missing an argument (value) for the new id parameter (property) that we added.
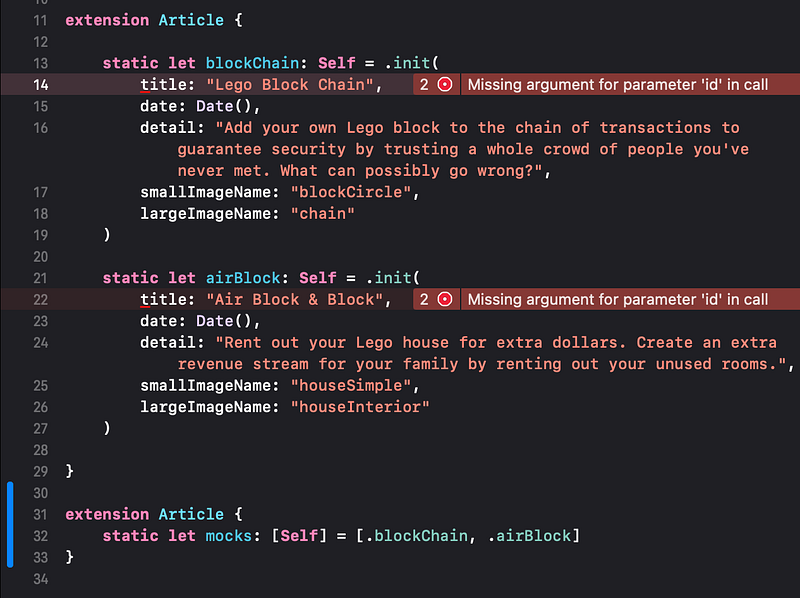
👉 Tap on the stop sign containing the dot. In the popover error detail, click on the Fix button.
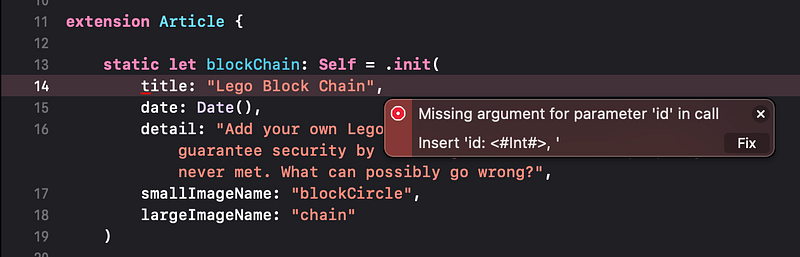
👁 Xcode adds the missing id parameter with a placeholder for the expected Int value.

👉 Replace the Int placeholder with the value 1. Click after the comma and hit Return to separate the parameters onto their own lines.

👉 Similarly, in the second instance, add id: 2.

👉 Build the app again and check that there are now no errors.
6. Array in a List
👉 Switch to the ContentView.swift file, which contains our List. If necessary, Resume the preview.
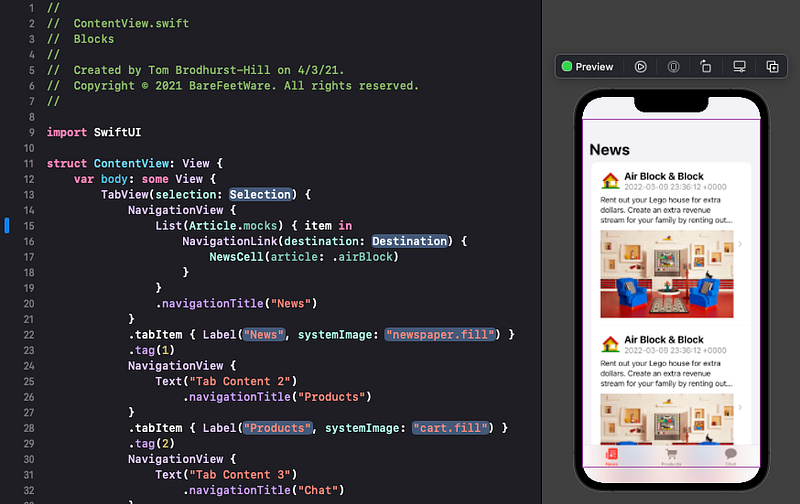
👉 Click on the Live Preview button in the top preview bar, just after Preview.
👉 When the preview is running, scroll the News scene by dragging it up and down.
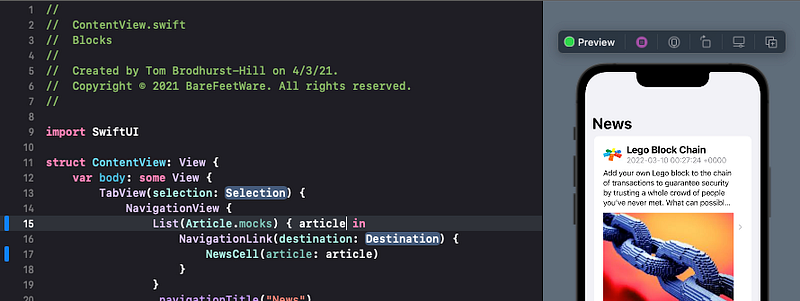
👁 You should see that there are now just two news cells displayed in the list. Recall that the previous template code showed six cells.
The List(Article.mocks) tells SwiftUI to make a list containing one cell/row for each item in the Article’s mocks array, which is just two.
But the preview is still displaying all news cells with only the .airBlock article. That makes sense, since the NewsCell code inside the List has the argument .airBlock). We need to replace that static (unchanging) instance with each item that the List provides.
👉 In the NewsCell(…),replace the .airBlock with item.
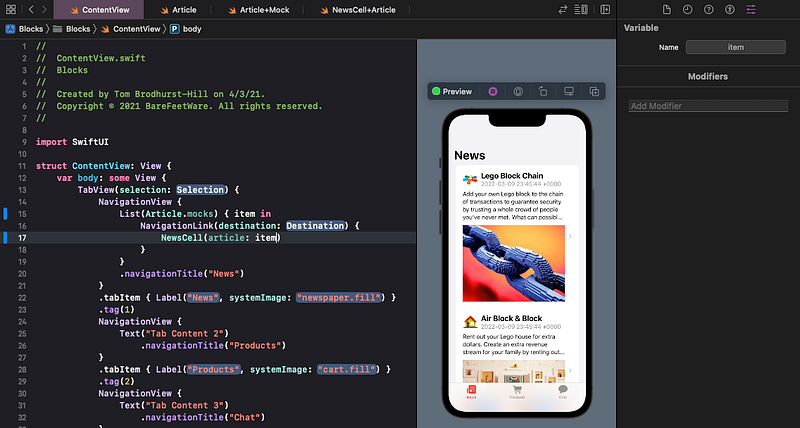
👁 The preview now shows two news cells populated with different articles. You can scroll up and down to check.
7. Rename a Variable
The variable name item is pretty generic. As our code gets more complex, naming variables descriptively becomes increasingly important.
Let’s rename the item variable here to be article. We could simply manually type to replace the two occurrences, but this is a good time to use one of Xcode's refactor tools.
👉 Control click on either of the item occurrences in the List code.
👉 In the popup menu, select Refactor > Rename....
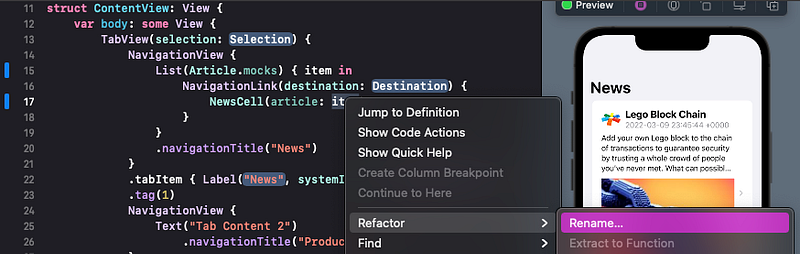
👁 Xcode focuses on the code that will be affected and selects both occurrences of item.
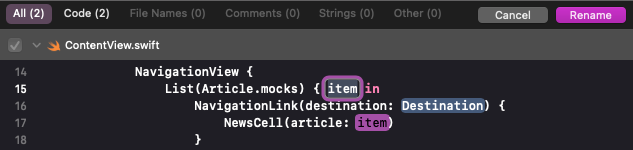
👉 With the item text still selected, type to replace it with article. You should see both instances change as you type.
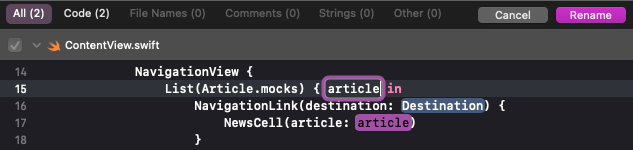
👉 Click on the Rename button.
👉 Build to check that there are no new errors.
8. Commit Changes
As you’ve done before:
- 👉 Choose
Commitfrom theSource Controlmenu. - 👉 Enter a description such as:
Article: Identifiable and mocks - 👉 Click on the
Commitbutton.
9. Next…
Congratulations! The list of news articles is now visually complete. It is showing all the currently available articles.
Next, in Tutorial 14, we will build a ProductCell, using all the tools you’ve learned so far.
See upcoming tutorials in the table of contents. Follow the author to be notified of more articles. If you liked this article, clap for it (up to 50 times).
💬 If you have any questions or comments, please add a response below.
This series is released via Next Level Swift. Subscribe to keep updated and never miss a new Tutorial of this series!

We are always looking for talented and passionate Swift developers! Check out our writer’s section and find out how you can share your knowledge with the Next Level Swift Community!


