
Your guide to a MicroService architecture, building your first microservice using spring boot and spring cloud, PART 1.

In this part one of a series of tutorials, we will be building our very own microservices project, responsible for handling students registrations
To build our microservice project we will be using spring boot specifically spring cloud, but first a little introduction to microservices architecture in general.
Why use Microservices?
Microservices help you develop and deploy your application components independently which makes it easy to scale the services based on each microservice requirement.
Netflix, Google, Amazon, and other tech leaders have successfully switched from a monolithic architecture to microservices, some advantages a microservice architecture provides over a monolithic one:
Better scalability: Each microservice can be scaled independently based on the requirement of that microservice only.
Easier understanding: Splitting the application into smaller and simpler components, a microservice application is easier to understand and manage, for large teams.
Independent components: Each microservice can have its own dependencies and can be updated independently which gives more flexibility, the maintenance of the application along with fixing bugs becomes easier, as a bug in a microservice only has an impact on that service alone, adding features also becomes much simpler.
This being said nothing comes without a price, for all the advantages microservices offer, they have some big disadvantages, such as the extra complexity added, and all the pain that comes from figuring out how to make them communicate with each other, so in the end, you will just have to figure for your self if the good outweighs the bad and if a microservice architecture is what you need for your application.
Now we understand a little bit what microservices are and why we need them let’s talk about the tools and technologies we will be using.
Tools and project setup
Like I mentioned earlier we will be using spring boot which I assume you must be familiar with or else you won’t be here also, spring cloud which I will explain a little bit why we need it.
According to the spring documentation:
Spring Cloud provides tools for developers to quickly build some of the common patterns in distributed systems (e.g. configuration management, service discovery, circuit breakers, intelligent routing, micro-proxy, control bus, one-time tokens, global locks, leadership election, distributed sessions, cluster state).
In other words, spring cloud will save us, developers, a lot of trouble when it comes to managing the configuration of the project along with the ports and what requests must be sent to which microservice on what port when we have for example multiple instances of the same microservice, so spring cloud is a must to get our distributed environment up and quickly running.
As for the tools I will be using the IntelliJ idea but feel free to use whatever idea you are familiar with, JDK 17 is also required, let’s go ahead and create a maven project
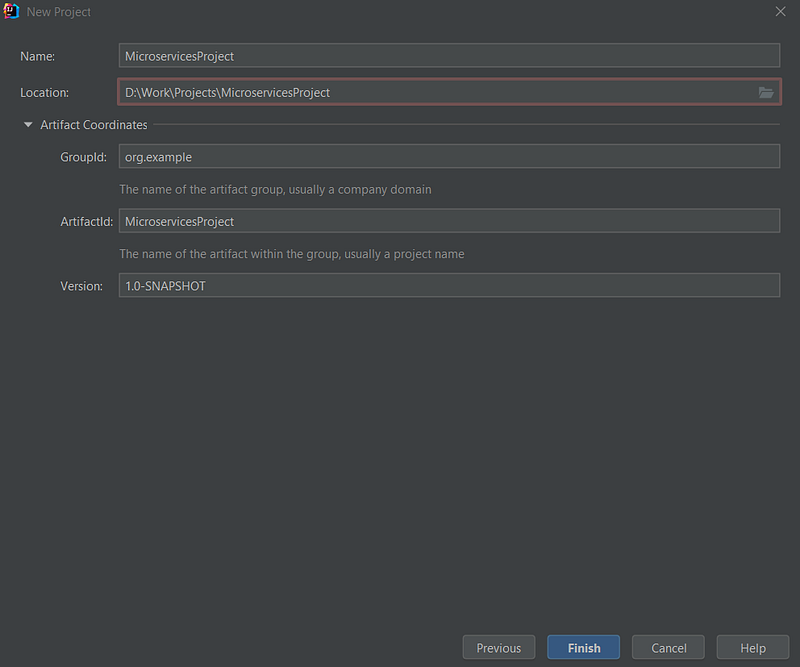
groupId: a unique base name of the company or group that created the project for our case, just leave “org.example”
artifactId: a unique name of the project
Click Finish to create the project.
Inside the maven project we just created let's go ahead and delete the src folder we won’t be needing it, for now, also inside the pom.xml remove all dependencies, in between the
Adding project dependencies
When it comes to adding dependencies to our microservices we will be using two approaches, some will be included under
I will explain the difference below:
dependencies vs dependencyManagement:
In the parent POM (pom.xml file), the main difference between the <dependencies> and <dependencyManagement> is this:
- Dependencies specified in the
<dependencies>the section will ALWAYS be included as a dependency of the child module(s), for example, if we want all our microservices or child modules to have the Lombok dependency we will include it in the<dependencies>section. - Dependencies specified in the
<dependencyManagement>the section will only be included in the child module if they were also specified in the<dependencies>section of the child module itself.
This is great because you specify the version and/or scope in the parent, and you can leave them out when specifying the dependencies in the child's POM. This can help you use unified versions for dependencies for child modules, without specifying the version in each child module.
Now you understand the difference let’s go ahead and add the spring boot dependency under <dependencyManagement> and the Lombok dependency under <dependencies> along with the spring-boot-maven-plugin under <plugins>
So basically your pom.xml for the main module will look like this
<?xml version="1.0" encoding="UTF-8"?>
<project xmlns="http://maven.apache.org/POM/4.0.0"
         xmlns:xsi="http://www.w3.org/2001/XMLSchema-instance"
         xsi:schemaLocation="http://maven.apache.org/POM/4.0.0 http://maven.apache.org/xsd/maven-4.0.0.xsd">
    <modelVersion>4.0.0</modelVersion>

    <groupId>org.example</groupId>
    <artifactId>MicroservicesProject</artifactId>
    <packaging>pom</packaging>
    <version>1.0-SNAPSHOT</version>
    <modules>
    </modules>

    <dependencyManagement>
        <dependencies>
            <dependency>
                <groupId>org.springframework.boot</groupId>
                <artifactId>spring-boot-dependencies</artifactId>
                <version>${spring.boot.dependencies.version}</version>
                <scope>import</scope>
                <type>pom</type>
            </dependency>
        </dependencies>
    </dependencyManagement>
    <dependencies>
        <dependency>
            <groupId>org.projectlombok</groupId>
            <artifactId>lombok</artifactId>
            <version>1.18.22</version>
            <scope>provided</scope>
        </dependency>
        <dependency>
            <groupId>org.springframework.boot</groupId>
            <artifactId>spring-boot-starter-test</artifactId>
            <version>2.6.3</version>
            <scope>test</scope>
        </dependency>
    </dependencies>
    <build>
        <pluginManagement>
            <plugins>
                <plugin>
                    <groupId>com.springframework.boot</groupId>
                    <artifactId>spring-boot-maven-plugin</artifactId>
                    <version>${spring.boot.maven.plugin.version}</version>
                </plugin>
            </plugins>
        </pluginManagement>
    </build>

    <properties>
        <maven.compiler.source>17</maven.compiler.source>
        <maven.compiler.target>17</maven.compiler.target>
        <spring.boot.maven.plugin.version>2.5.7</spring.boot.maven.plugin.version>
        <spring.boot.dependencies.version>2.5.7</spring.boot.dependencies.version>
        <spring.cloud-version>2020.0.3</spring.cloud-version>
    </properties>

</project>
Creating your first microservice
Let’s go ahead and create our student module ( microservice )
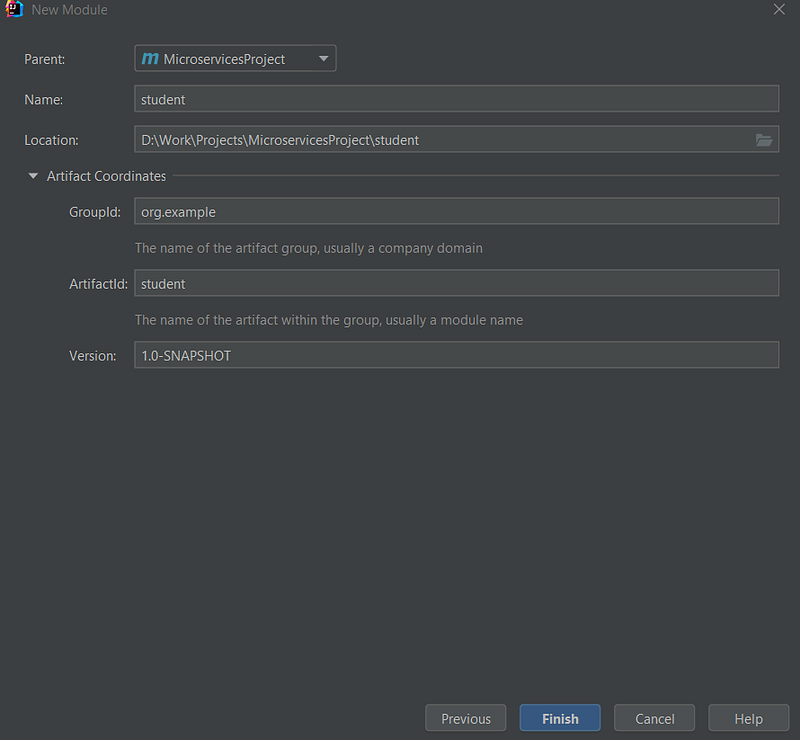
Inside the pom.xml of the parent, we will find the following added automatically
<modules>
    <module>student</module>
</modules>
Inside the pom.xml file of our student module let’s go ahead and add a dependency for spring web
<?xml version="1.0" encoding="UTF-8"?>
<project xmlns="http://maven.apache.org/POM/4.0.0"
         xmlns:xsi="http://www.w3.org/2001/XMLSchema-instance"
         xsi:schemaLocation="http://maven.apache.org/POM/4.0.0 http://maven.apache.org/xsd/maven-4.0.0.xsd">
    <parent>
        <artifactId>MicroservicesProject</artifactId>
        <groupId>org.example</groupId>
        <version>1.0-SNAPSHOT</version>
    </parent>
    <modelVersion>4.0.0</modelVersion>

    <artifactId>student</artifactId>

    <properties>
        <maven.compiler.source>17</maven.compiler.source>
        <maven.compiler.target>17</maven.compiler.target>
    </properties>

    <dependencies>
        <dependency>
            <groupId>org.springframework.boot</groupId>
            <artifactId>spring-boot-starter-web</artifactId>
        </dependency>
        <dependency>
            <groupId>org.example</groupId>
            <artifactId>students</artifactId>
            <version>1.0-SNAPSHOT</version>
            <scope>compile</scope>
        </dependency>
    </dependencies>
</project>
Basically, your pom.xml for the student module will look like this
Inside the student, module let's go ahead and create a package called org.example.student, and inside it let’s create a java file called StudentApplication and add the following code :
package org.example.student;

import org.springframework.boot.SpringApplication;
import org.springframework.boot.autoconfigure.SpringBootApplication;

@SpringBootApplication
public class StudentApplication{
    public static void main(String[] args) {
        SpringApplication.run(StudentApplication.class, args);
    }
}
After that we create a new file called application.yml inside the resources folder and add the following code :
server:
  port: 8080

spring:
  application:
    name: student
And that’s it we have our first microservice it doesn’t do anything but we can get it up and running.
This should do it for our first part of the tutorial, in the second part, we will create other microservices and see how we can make them communicate with each other ✌.
The second part of this tutorial is up, you can find it right HERE.