
Your guide to a MicroService architecture, building your first microservice using spring boot and spring cloud, PART 2.

In the first part of this series you can find it HERE if you haven’t already, we created our first module or microservice called student, now we will add some stuff to it starting with the student model, so inside the org.example.student package let’s go ahead and create our student model, which will have an id, a first name, the last name, and an email.
package org.example.student;import lombok.Builder;
import lombok.Data;@Data
@Builder
public class Student{
private Integer id;
private String firstName;
private String lastName;
private String email;
}I take it you are familiar with Lombok's annotations but if you are not, I will go over them quickly :
@Data: generates getters and setters for all the fields as well as a constructor
@Builder: enables us to use the Builder pattern without writing boilerplate code
Then let’s create the student controller, and add the studentController class to the org.example.student package
package org.example.student;
import lombok.AllArgsConstructor;
import lombok.extern.slf4j.Slf4j;
import org.springframework.web.bind.annotation.PostMapping;
import org.springframework.web.bind.annotation.RequestBody;
import org.springframework.web.bind.annotation.RequestMapping;
import org.springframework.web.bind.annotation.RestController;
@Slf4j
@RestController
@RequestMapping("api/v1/students")
@AllArgsConstructor
public class StudentController {
private final StudentService studentService;
@PostMapping
public void registerStudent(@RequestBody StudentRegistrationRequest studentRegistrationRequest) {
log.info("new Student registration {}", studentRegistrationRequest);
studentService.registerStudent(studentRegistrationRequest);
}
}Okay that seems like a lot so I will stop and explain, the studentController class will receive a post request of the type StudentRegistrationRequest (a record container for the fields related to the student) and calls the method registerStudent inside the studentService, in order to register the student.
Okay now must create the StudentService and the StudentRegistrationRequest classes
package org.example.student;
@Service
@AllArgsConstructor
public class StudentService {
private final StudentRepository studentRepository;
public void registerStudent(StudentRegistrationRequest request) {
Student student = Student.builder().firstName(request.firstName()).lastName(request.lastName()).email(request.email()).build();
}
}As for StudentRegistrationRequest record
package org.example.student;
public record StudentRegistrationRequest(String firstName, String lastName, String email) {
}If you are not familiar with the use of records, I included a small explanation below, if you already are just skip it.
What exactly are records
A record is a special type of class declaration aimed at reducing the boilerplate code, introduced as of java 14, a record class declares a sequence of fields, and then the appropriate accessors, constructors, equals, hashCode, and toString methods are created automatically, therefor reducing what could be 100 lines of code to a few.
now we got that out of the way, back to work…
Next, we need to get the database up and running and configure our application so we can store the student in our database.
At the root of our project create a file called docker-compose.yml and add the following code ( assuming you have docker installed if not get it from here https://docs.docker.com/desktop/install/windows-install/ ) :
services:
postgres:
container_name: postgres
image: postgres
environment:
POSTGRES_USER: admin
POSTGRES_PASSWORD: password
PGDATA: /data/postgres
volumes:
- postgres:/data/postgres
ports:
- "5432:5432"
networks:
- postgres
restart: unless-stopped
pgadmin:
container_name: pgadmin
image: dpage/pgadmin4
environment:
PGADMIN_DEFAULT_EMAIL: ${PGADMIN_DEFAULT_EMAIL:[email protected]}
PGADMIN_DEFAULT_PASSWORD: ${PGADMIN_DEFAULT_PASSWORD:-admin}
PGADMIN_CONFIG_SERVER_MODE: 'False'
volumes:
- pgadmin:/var/lib/pgadmin
ports:
- "5050:80"
networks:
- postgres
restart: unless-stoppednetworks:
postgres:
driver: bridge
volumes:
postgres:
pgadmin:you can run the docker-compose file from your terminal using the following command, cd into the directory with the YAML file and run this :
docker compose up -dthe -d means to detach and it will pull the image for Postgres and pgadmin in the background, running the command also brings the containers up for you, so you will be all set.
you can either check the containers you have from your docker dashboard if you’re on windows or mac and use the following command if you are on Linux:
docker compose ps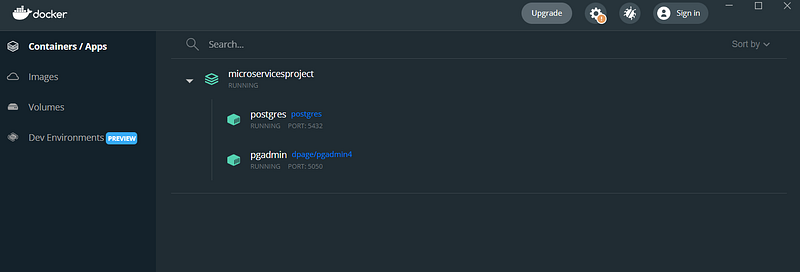
now the database is up, you can connect to it on the following URL: localhost:5050 this will bring out the user interface for pgadmin, and you can create a new server
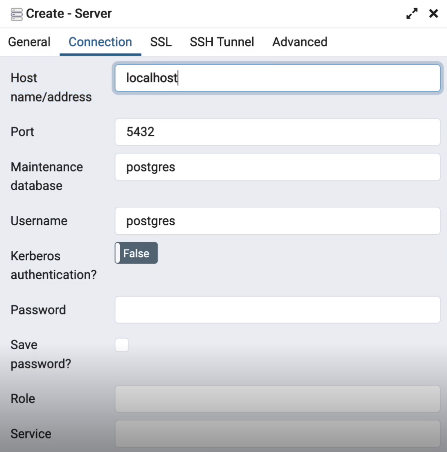
As a username, you can put in “admin” and as a password, you can put in “password”, once you save you will be able to connect to your database.
Now we have our database let’s make our microservice connect to it.
Add the following code inside our application.yml
server:
port: 8080spring:
application:
name: student
datasource:
password: password
url: jdbc:postgresql://localhost:5432/student
username: admin
jpa:
hibernate:
ddl-auto: update
properties:
hibernate:
dialect: org.hibernate.dialect.PostgreSQLDialect
format_sql: 'true'
show-sql: trueSimilarly, inside our pgadmin we have to create the student database.
in order to be able to perform queries and interact with our database, we must add the dependency for spring JPA along with the Postgres driver, in the student ms pom.xml file like the following:
`<dependency>
<groupId>org.springframework.boot</groupId>
<artifactId>spring-boot-starter-data-jpa</artifactId>
</dependency>
<dependency>
<groupId>org.postgresql</groupId>
<artifactId>postgresql</artifactId>
<scope>runtime</scope>
</dependency>Next, we must add a couple of things to our student model
package org.example.student;import lombok.AllArgsConstructor;
import lombok.Builder;
import lombok.Data;
import lombok.NoArgsConstructor;
import javax.persistence.*;
@Entity
@Data
@Builder
@AllArgsConstructor
@NoArgsConstructor
public class Student{
@Id
@SequenceGenerator(
name = "student_id_sequence",
sequenceName = "student_id_sequence"
)
@GeneratedValue(
strategy = GenerationType.SEQUENCE,
generator = "student_id_sequence"
)
private Integer id;
private String firstName;
private String lastName;
private String email;
}Now we have our entity, we can go ahead and create our repository
package org.example.student;

import org.springframework.data.jpa.repository.JpaRepository;
import org.springframework.stereotype.Repository;

@Repository
public interface StudentRepository extends JpaRepository<Student,Integer> {
}
And inside our StudentService, we are going to inject this repository so we would be able to save our students to the database
package org.example.student;


@Service
@AllArgsConstructor
public class StudentService {
    private final StudentRepository studentRepository;

    public void registerStudent(StudentRegistrationRequest request) {
Student student = Student.builder().firstName(request.firstName()).lastName(request.lastName()).email(request.email()).build();studentRepository.saveAndFlush(customer);
}
}So now we basically have our microservice connected to its own database, which can be tested by sending a post request with some JSON data to the controller we have built, which will call the service and pass the request to the repository that does the saving inside the Student table.
Now we can create our second microservice, the grade model
The grade microservice
Similarly to what we did for the student model, we can go ahead and create a new module for the grade, for the pom.xml also we will have something similar to what we had on the student ms.
so once done if you navigate to the parent pom.xml you will be able to find under modules the following:
<modules>
    <module>student</module>
    <module>grade</module>
</modules>
When creating your grade microservice make sure inside the application.yml to pick a different port than 8080 because that one is already taken by the student microservice.
server:
  port: 8081
spring:
  application:
    name: grade
You can try to start your grade ms along with the student ms, to make sure they are working, if not go back and see what you might have missed.
Once you have your grade microservice up, we will need to create a database for it same as what we did for the student ms.
In a typical microservice, each microservice has its own database, having a bunch of containers however but for each microservice will use up too many resources, for the sake of the tutorial we can use the same Postgres container for our second microservice as well.
So inside our application.yml for the grade ms we will have the following:
server:
  port: 8081
spring:
  application:
    name: grade
  datasource:
    password: password
    url: jdbc:postgresql://localhost:5432/grade
    username: admin
  jpa:
    hibernate:
      ddl-auto: create-drop
    properties:
      hibernate:
        dialect: org.hibernate.dialect.PostgreSQLDialect
        format_sql: true
    show-sql: true
eureka:
  client:
    service-url:
      defaultZone: http://localhost:8761/eureka
      fetch-registry: false
      register-with-eureka: false
Next, we will create the grade entity like this:
package org.example.grade;

import lombok.AllArgsConstructor;
import lombok.Builder;
import lombok.Data;
import lombok.NoArgsConstructor;

import javax.persistence.*;
import java.time.LocalDateTime;

@Data
@Builder
@Entity
@AllArgsConstructor
@NoArgsConstructor
public class Grade {
    @Id
    @SequenceGenerator(
            name = "grade_id_sequence",
            sequenceName = "grade_id_sequence"
    )
    @GeneratedValue(
            strategy = GenerationType.SEQUENCE,
            generator = "grade_id_sequence"
    )
    private Integer id;
    private Integer gradeId;
    private Boolean isRepeating;
    private LocalDateTime createdAt;
}
Once done, we can restart the grade ms to make sure everything works.
In the next tutorial, you can find it HERE we will build the controller the service, and the repository and try to make the two microservice communicate, so stay tuned ✌️.


