
Blazing-fast Shell
What is a starship shell, and how is it configured?
Starship is a minimal, blazing-fast, customizable prompt shell built with rust language.
Starship is a blazing-fast shell base terminal prompt powered by rust language. It provides features like an auto-complete command, syntax highlight, cross-shell prompt, etc.
Starship Shell enhances your working experience with a terminal, and you feel fresh with a fantastic terminal.
The best feature of a starship is a cross-shell prompt. What is the meaning of the cross-shell prompt?
Starship works with every shell, like bash, zsh (z shell), Nushell, PowerShell, etc.
You do not need to install any additional software to configure Starship Prompt.
Content
∘ Demo ∘ What problem does Starship Shell solve? · Steps ∘ Installation ∘ Config to Starship ∘ Remove starship · Conclusion ∘ Additional Articles
Demo
What problem does Starship Shell solve?
For better understanding, if you know about zsh and oh my zsh framework. Zsh is an enhanced version of bash.
Lots of people use zsh as a default Shell. But the issue is that zsh only works with the Oh My zsh framework.
Configuring zsh is tricky to avoid all the steps or problems developers use on my zsh framework with zsh (z shell).
Even if you install zsh and Oh my zsh framework, it does not have a beginner-friendly configuration. On the other hand, Starship prompt config with one line of code.
You must install the zsh and oh my zsh framework to achieve productivity.
You run several commands one by one to install and configure the zsh and oh my zsh framework locally.
Coolly, the starship installation process is much easier than other shell prompts.
Steps
∘ Installation ∘ Config to Starship ∘ Remove starship
Installation
To install Starship, you run the following command.
curl -sS https://starship.rs/install.sh | sh
There are some other methods to install Starship locally. Check out the installation docs page.
Command output looks like this.
$ curl -sS https://starship.rs/install.sh | sh

  Configuration
> Bin directory: /usr/local/bin
> Platform:      unknown-linux-musl
> Arch:          x86_64

> Tarball URL: https://github.com/starship/starship/releases/latest/download/starship-x86_64-unknown-linux-musl.tar.gz
? Install Starship latest to /usr/local/bin? [y/N] y
! Escalated permissions are required to install to /usr/local/bin
[sudo] password for rajdeepsingh:
> Installing Starship as root, please wait…
✓ Starship installed

> Please follow the steps for your shell to complete the installation:
  bash
  Add the following to the end of ~/.bashrc:

 eval "$(starship init bash)"

  zsh
  Add the following to the end of ~/.zshrc:

 eval "$(starship init zsh)"

  ion
  Add the following to the end of ~/.config/ion/initrc:

 eval $(starship init ion)

  tcsh
  Add the following to the end of ~/.tcshrc:

 eval `starship init tcsh`

  xonsh
  Add the following to the end of ~/.xonshrc:

 execx($(starship init xonsh))

  fish
  Add the following to the end of ~/.config/fish/config.fish:

 starship init fish | source

  elvish
  Warning Only elvish v0.17 or higher is supported.
  And add the following to the end of ~/.elvish/rc.elv:

 eval (starship init elvish)

  nushell
  Warning This will change in the future.
  Only Nushell v0.78 or higher is supported.
  Add the following to the end of your Nushell env file (find it by running $nu.env-path in Nushell):

 mkdir ~/.cache/starship
 starship init nu | save -f ~/.cache/starship/init.nu
  And add the following to the end of your nu config file (find it by running $nu.config-path in Nushell):

 use ~/.cache/starship/init.nu

  PowerShell
  Add the following to the end of Microsoft.PowerShell_profile.ps1:
  You can check the location of this file by querying the $PROFILE variable in PowerShell.
  Typically the path is ~\Documents\PowerShell\Microsoft.PowerShell_profile.ps1 or ~/.config/powershell/Microsoft.PowerShell_profile.ps1 on -Nix.

 Invoke-Expression (&starship init powershell)

  Cmd
  You need to use Clink (v1.2.30+) with Cmd. Add the following to a file starship.lua and place this file in Clink scripts directory:

 load(io.popen('starship init cmd'):read("*a"))()
Config to Starship
The next step is to complete the starship installation process by adding the following line script to the .bashrc file.
# .bashrc

eval "$(starship init bash)"
Please copy the following line and paste it into the .bashrc file. If .bashrc a file is not present, then create it. You can use any IDE like Nano, VS Code, Vim, etc.
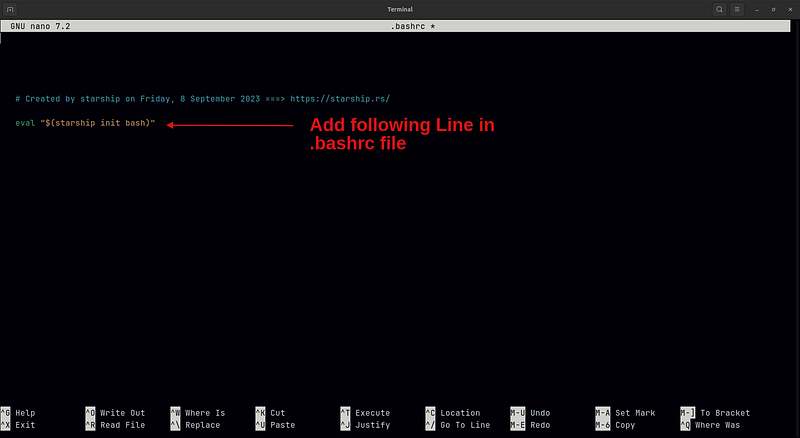
If you install or use Starship with zsh, your configuration script changes. In zsh, you need to add the following line of code in your .zshrc file. If .zshrc a file is not present, then create it.
# .zshrc

eval "$(starship init zsh)"
The starship configuration guide is shown when your installation process is complete.
Remove starship
If Starship were installed using the installation script, the following command would delete the Starship binary.
sh -c 'rm "$(command -v 'starship')"'Conclusion
Starship is easy to install and configure as compared to other Shell prompts.
Starship prompts provide the same functionality as the Oh My Zsh framework.
If you install the Oh My Zsh framework locally, you need the same basic to advance knowledge about Linux commands and configuration.
But with Starship Prompt, you do not need any other stuff. You can use Starship Prompt with bash.
There is only one problem: using the starship prompt with bash autosuggestion may not work like zsh-autosuggestions.
Checkout two solution autosuggestion with bash:
- https://www.cyberciti.biz/faq/add-bash-auto-completion-in-ubuntu-linux/
- https://unix.stackexchange.com/questions/55203/bash-autocomplete-first-list-files-then-cycle-through-them/55632#55632
You can share and follow me on Twitter and LinkedIn. I write tons of articles related to frontend development and Linux.
If you are interested in those topics, follow me on Medium, officialrajdeepsingh.dev, join the Linux and frontend web publication, and sign up for my free newsletter.


