
Uploading and Reading Files with Streamlit
Allow Your Streamlit Dashboard Users to Upload Their Own Data

Streamlit is an awesome open-source Python library that can be used to create interactive dashboards and applications. This can help simplify the data science workflow. If you are just starting out with Streamlit, at some point you are going to want to allow users to upload their own data. This is easily achieved with the file_uploader function.
Within this short article we are going to cover the essentials of the file_uploader function from Streamlit. We will go through the basics of using it to upload single files, multiple files and how to read the uploaded files.
This article forms part of a series of articles I have created on Streamlit. You can explore the other articles at the links below.
- Getting Started With Streamlit Web Based Applications
- Creating True Multi-Page Streamlit Apps — The New Way (2022)
- Getting Started With Streamlit: 5 Functions You Need to Know When Starting Out
- The Streamlit Colour Picker: An Easy Way to Change Chart Colours on Your Streamlit Dashboard
- How to Use Streamlit’s st.write Function to Improve Your Streamlit Dashboard
Setting Up Streamlit
The Streamlit library can easily be installed via your Terminal or Command Prompt using pip.
pip install streamlit
After Streamlit has been installed, we can create a new file called app.py . This is where we will be adding our code.
Before we begin coding our app, we first need to import the Streamlit library, which is shortened to st.
import streamlit as stTo run your Streamlit app, all we need to do is type the following into the terminal.
streamlit run app.py
A new browser window / tab will open up with a blank Streamlit app. If you make changes to your app, you can rerun the app by click on the Rerun button that appears at the top of the window.
Uploading a Single File with st.file_uploader
For many applications and use cases, we are likely to have our data stored within a single file. This makes things simple when uploading the data to our Streamlit app.
To upload a file, we can create a new variable called uploaded_file and assign it to st.file_uploader(). The file_uploader function takes several arguments, but we are only interested in applying a label.
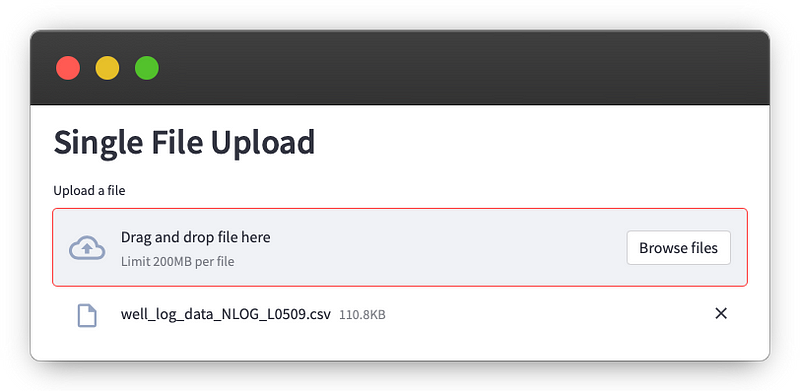
st.header('Single File Upload')
uploaded_file = st.file_uploader('Upload a file')
After rerunning our Streamlit app, we will see the file uploader widget.

When we click on Browse Files, we can find the file we want to use and select it.
Once a file has been selected, we will see the file listed below the upload widget.
Reading a Single CSV File
After the file has been uploaded, we can move on to reading the file's contents. As we are working with a single CSV file, this process is relatively simple.
We import pandas and read the CSV file like so:
import pandas as pd

df = pd.read_csv(uploaded_file)
st.write(df)
When we rerun the Streamlit app, we can see the dataframe ( df )that we created.

Uploading Multiple Files with st.file_uploader
There may be occasions where we have multiple files, such as sensor data that has been written to new files daily. If we have multiple files that we want to load into our Streamlit app, we need to add the argument accept_multiple_files and set it to True.
st.header('Multiple File Upload')
uploaded_files = st.file_uploader('Upload your files',
 accept_multiple_files=True)
When we rerun the Streamlit app, we will see that the wording has changed slightly on the file uploader widget from “file” to “files”.

When we then click on Browse Files, we can select multiple files. These will then be listed underneath the file uploader widget.

We can check our uploaded_files objects by looping over them.
for f in uploaded_files:
    st.write(f)
Which returns an UploadedFile object with details about the file, including its name, type and size.

Reading Data of Multiple Uploaded CSV Files in Streamlit
We can also use pandas to read the data from the uploaded files.
To do this, we first create an empty list and then loop over each of the files within uploaded_files.
The data can then be read using pd.read_csv() and added onto the data_list.
Once the loop is completed, we can concatenate the data together using pandas concat method.
data_list = []
for f in uploaded_files:
    data = pd.read_csv(f)
    data_list.append(data)

df = pd.concat(data_list)
We can then work with a single dataframe for further analysis or machine learning.
Restricting Files Allowed by Extension Types
If we are planning to publish our dashboard or app to other users, we may want to restrict the file types that the end user can upload.
This is easily achieved by setting the type parameter and passing in a list of file extensions we want to allow.
In the example below, we restrict the types to .png and .pdf. Notice that we do not have to include the period before the file extension.
st.header('Restricted File Extensions')
uploaded_files = st.file_uploader('Upload your files',
 accept_multiple_files=True, type=['png', 'pdf'])
After rerunning the Streamlit app, we will see the file extensions within the uploader widget.

When we try to browse for files, we will only be able to select the file types that we explicitly mentioned above. On macOS, the files we cannot select will be shown in greyed-out text, as seen below.

Summary
The Streamlit file uploader is a great way to improve your dashboards. Within this short tutorial we have seen how to add the file uploader to our Streamlit dashboard, and set it to accept single or multiple files. Try adding it to your next Streamlit dashboard.
Thanks for reading. Before you go, you should definitely subscribe to my content and get my articles in your inbox. You can do that here! Alternatively, you can sign up for my newsletter to get additional content straight into your inbox for free.
Secondly, you can get the full Medium experience and support thousands of other writers and me by signing up for a membership. It only costs you $5 a month, and you have full access to all of the fantastic Medium articles, as well as the chance to make money with your writing.
If you sign up using my link, you will support me directly with a portion of your fee, and it won’t cost you more. If you do so, thank you so much for your support.


