
Upload Files to ChatGPT And Work with Them Using This Free Alternative to Code Interpreter
Here’s how to easily upload files to ChatGPT and analyze them in seconds.
Currently, the only way to upload files to ChatGPT is by using the Code Interpreter plugin.
Unfortunately, most ChatGPT Plus subscribers like me still don’t have access to this plugin, so, in this article, I’ll show you a free workaround I found to upload files to ChatGPT and work with them as if you’re using the Code Interpreter plugin.
This tutorial is pretty straightforward, so let’s get started!
If you don’t feel like reading, you can watch my video below.
Demo
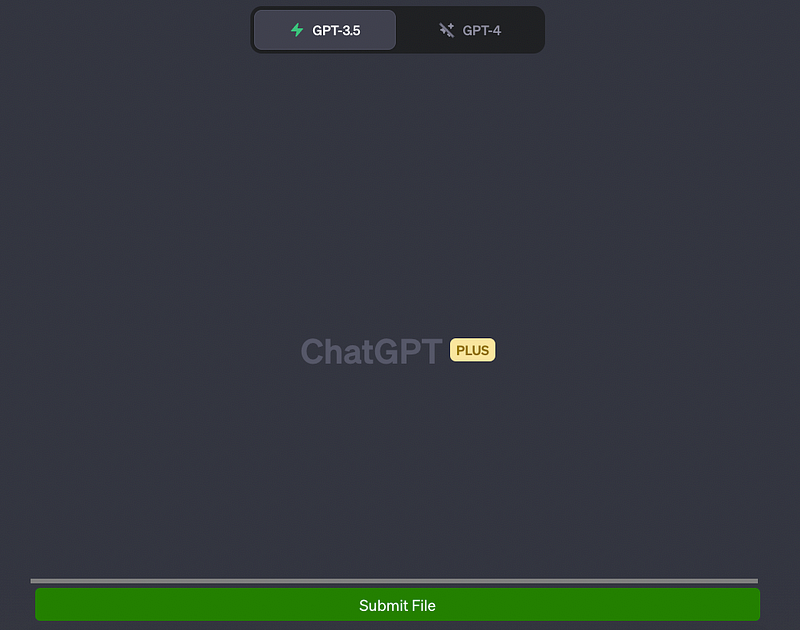
We’ll add a “Submit File” button on the ChatGPT website that will allow us to upload different types of files.
The result will look like the image below.
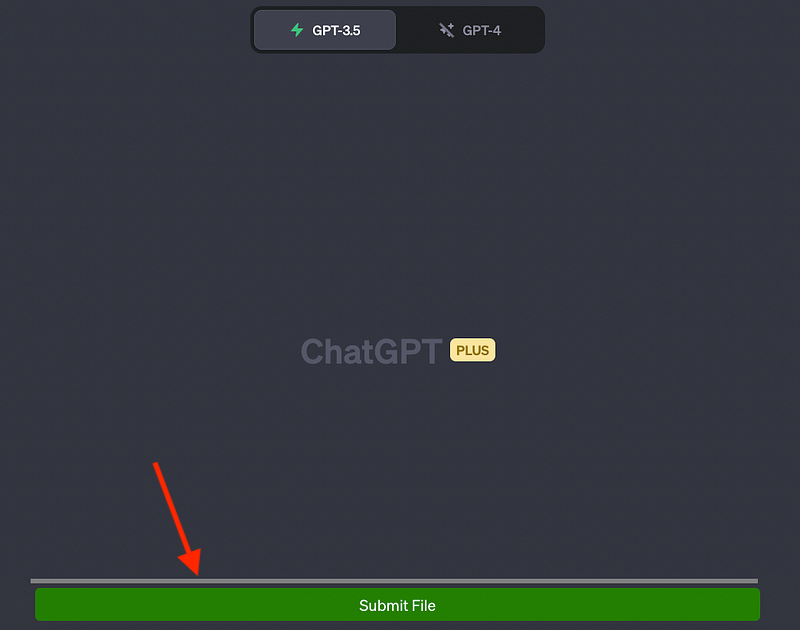
Once the button is on the website, we can click on it, select the file we want to upload and ChatGPT will read it. If the file is large, the data inside will be split into many chunks.
Note that the file extensions supported are ‘.txt’, ‘.js’, ‘.py’, ‘.html’, ‘.css’, ‘.json’ and ‘.csv’
How to do it
To add that green button, first, we have to add some code to the console of our browser. You don’t need to know to code for this, but simply ask ChatGPT to generate the code that creates this “Submit File” button and then paste that code on the console.
It takes less than a minute!
Here’s the prompt we’ll use to generate the code of the “Submit File” button (Credits to “Automate My Life”)
“Generate a Js script that creates a button with the text ‘Submit File’ and inserts it into the DOM before an element with the class ‘.flex.flex-col.w-full.py-2.flex-grow.md\:py-3.md\:pl-4’. The button should have a green background color, white text color, 5px padding, no border, 5px border radius and 5px margin. The script should also create a progress element and insert it into the DOM before the same element. The progress element should have a width of 99%, height of 5px and a grey background color. Inside the progress element, there should be another div element representing the progress bar with a width of 0%, height of 100% and blue background color. When the button is clicked, it should create an input element of type ‘file’ that accepts ‘.txt’, ‘.js’, ‘.py’, ‘.html’, ‘.css’, ‘.json’ and ‘.csv’ files. Once a file is selected, using an async it should be read as text and split into chunks of size 15000. using async Each chunk should be submitted into a conversation by doing the following:
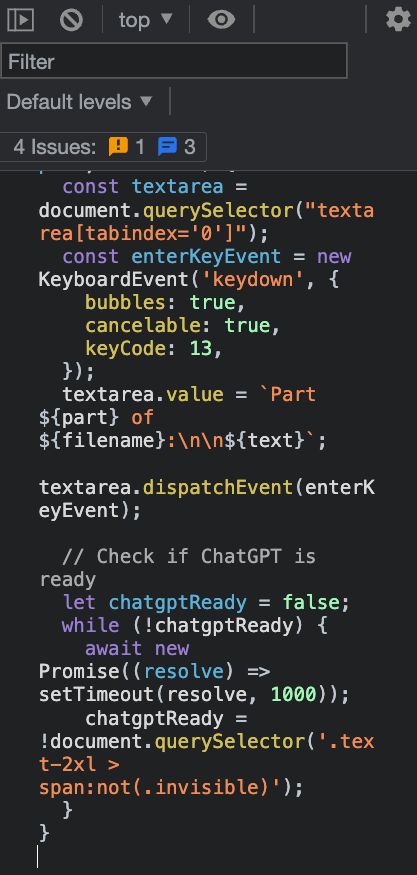
 async function submitConversation(text, part, filename) {
        const textarea = document.querySelector("textarea[tabindex='0']");
        const enterKeyEvent = new KeyboardEvent("keydown", {
          bubbles: true,
          cancelable: true,
          keyCode: 13,
        });
        textarea.value = `Part ${part} of ${filename}: \n\n ${text}`;
        textarea.dispatchEvent(enterKeyEvent);
      }.
The progress bar should be updated after each chunk is submitted within the for loop as follows
progressBar.style.width = `${((i + 1) / numChunks) * 100}%`;
 and should also check if chatgpt is ready with this code:
chatgptReady = false;
      while (!chatgptReady) {
        await new Promise((resolve) => setTimeout(resolve, 1000));
        chatgptReady = !document.querySelector(
          ".text-2xl > span:not(.invisible)"
Once all chunks have been submitted, the progress bar should turn blue.”
That’s all the prompt!
Basically, this prompt tells ChatGPT to create a “Submit file” button, what formats are supported, and to split our file into chunks of size 15000 characters if necessary.
After running the prompt above you should get the following code (feel free to copy it in case the one you got doesn’t work):
// Create the button
const button = document.createElement('button');
button.textContent = 'Submit File';
button.style.backgroundColor = 'green';
button.style.color = 'white';
button.style.padding = '5px';
button.style.border = 'none';
button.style.borderRadius = '5px';
button.style.margin = '5px';

// Create the progress element
const progress = document.createElement('progress');
progress.style.width = '99%';
progress.style.height = '5px';
progress.style.backgroundColor = 'grey';

// Create the progress bar inside the progress element
const progressBar = document.createElement('div');
progressBar.style.width = '0%';
progressBar.style.height = '100%';
progressBar.style.backgroundColor = 'blue';

// Append the progress bar to the progress element
progress.appendChild(progressBar);

// Find the target element
const targetElement = document.querySelector('.flex.flex-col.w-full.py-2.flex-grow.md\\:py-3.md\\:pl-4');

// Insert the button and progress element before the target element
targetElement.parentNode.insertBefore(progress, targetElement);
targetElement.parentNode.insertBefore(button, targetElement);

// Add click event listener to the button
button.addEventListener('click', async () => {
  // Create the file input element
  const fileInput = document.createElement('input');
  fileInput.type = 'file';
  fileInput.accept = '.txt, .js, .py, .html, .css, .json, .csv';

  // Function to handle file selection
  fileInput.addEventListener('change', async (event) => {
    const file = event.target.files[0];
    if (file) {
      const reader = new FileReader();
      reader.onload = async (e) => {
        const fileContent = e.target.result;
        const chunks = chunkText(fileContent, 15000);
        const numChunks = chunks.length;

        for (let i = 0; i < numChunks; i++) {
          const chunk = chunks[i];
          const part = i + 1;

          await submitConversation(chunk, part, file.name);
          progressBar.style.width = `${((i + 1) / numChunks) * 100}%`;
        }

        progressBar.style.backgroundColor = 'blue';
      };

      reader.readAsText(file);
    }
  });

  // Trigger the file input dialog
  fileInput.click();
});

// Function to split text into chunks
function chunkText(text, chunkSize) {
  const chunks = [];
  for (let i = 0; i < text.length; i += chunkSize) {
    chunks.push(text.slice(i, i + chunkSize));
  }
  return chunks;
}

// Function to submit a conversation
async function submitConversation(text, part, filename) {
  const textarea = document.querySelector("textarea[tabindex='0']");
  const enterKeyEvent = new KeyboardEvent('keydown', {
    bubbles: true,
    cancelable: true,
    keyCode: 13,
  });
  textarea.value = `Part ${part} of ${filename}:\n\n${text}`;
  textarea.dispatchEvent(enterKeyEvent);

  // Check if ChatGPT is ready
  let chatgptReady = false;
  while (!chatgptReady) {
    await new Promise((resolve) => setTimeout(resolve, 1000));
    chatgptReady = !document.querySelector('.text-2xl > span:not(.invisible)');
  }
}
Now right-click on any part of the website and select “Inspect.”
Developer tools will pop up. Search for “Console” and then click on the clean button highlighted below to clean any message in the box.
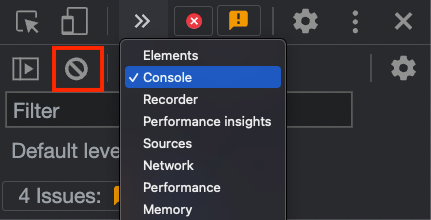
The box should be empty now.
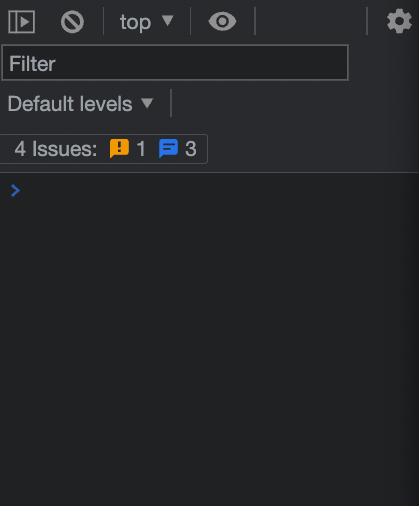
Now paste the code and press enter.
Finally, you should see the green button “Submit File” on the ChatGPT site.
Now you can close developer tools. Just remember that if you go to another ChatGPT chat, the button will disappear and you’ll have to follow the previous steps again.
Analyzing a CSV File with ChatGPT
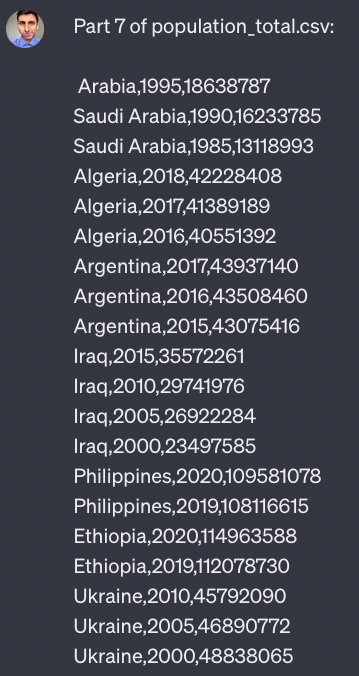
For this demo, I’ll upload a CSV file called population_total.csv that contains more than 4000 rows of population data (that you can download here). Since the file has way more than 15000 characters ChatGPT will automatically split it into 7 chunks after uploading the file.
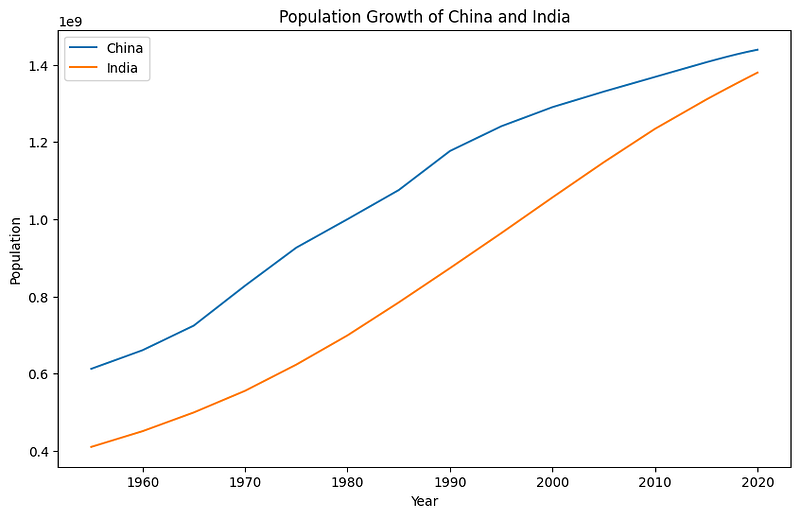
After the 7 chunks were uploaded, I can start with my analysis. I’ll start by making a lineplot of the population growth for China and India.
Here’s the prompt I’ll use:
read the 7 parts of population_total.csv into a dataframe using python and make a lineplot of the population of china and India
Here’s the code it generated.
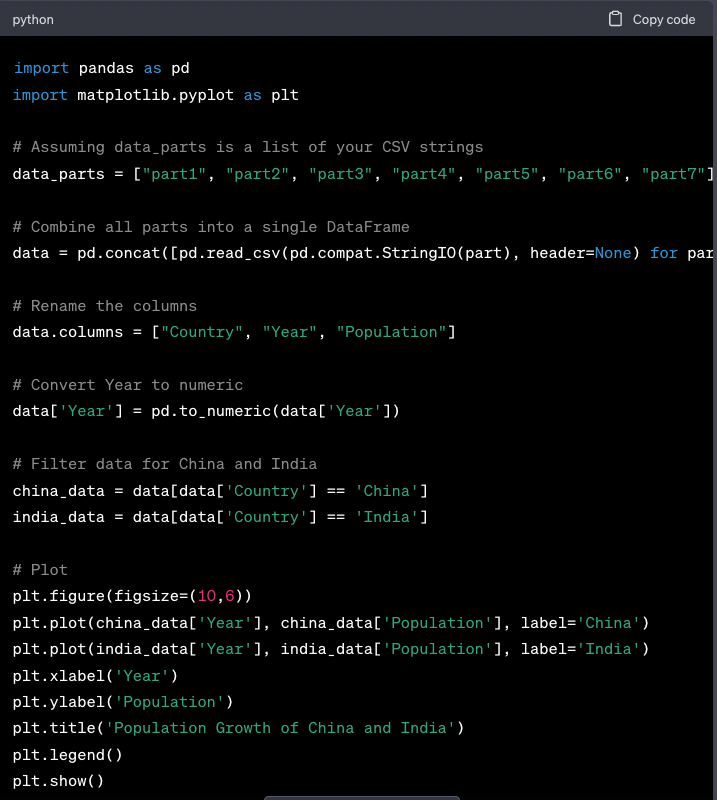
And here’s the visualization I got after running the code.
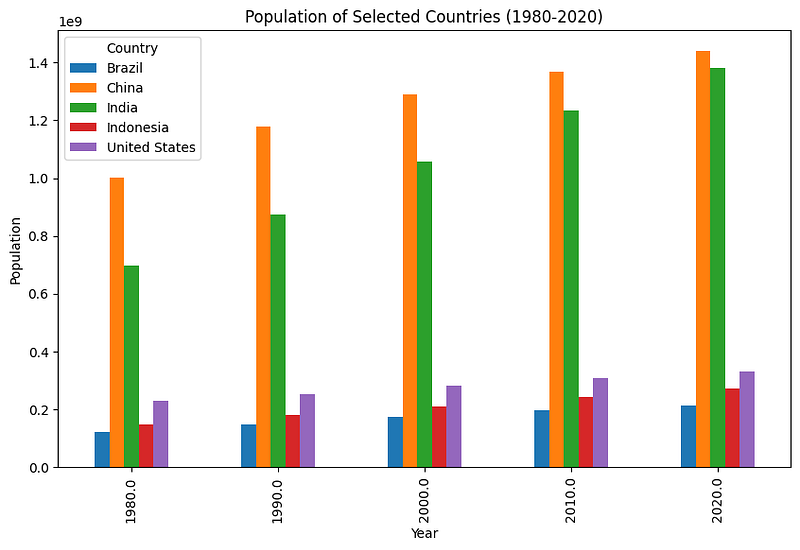
I also made a barplot using the prompt below.
make a barplot that shows the population of the United States, India, China, Indonesia and Brazil for the years 1980, 1990, 2000, 2010, and 2020

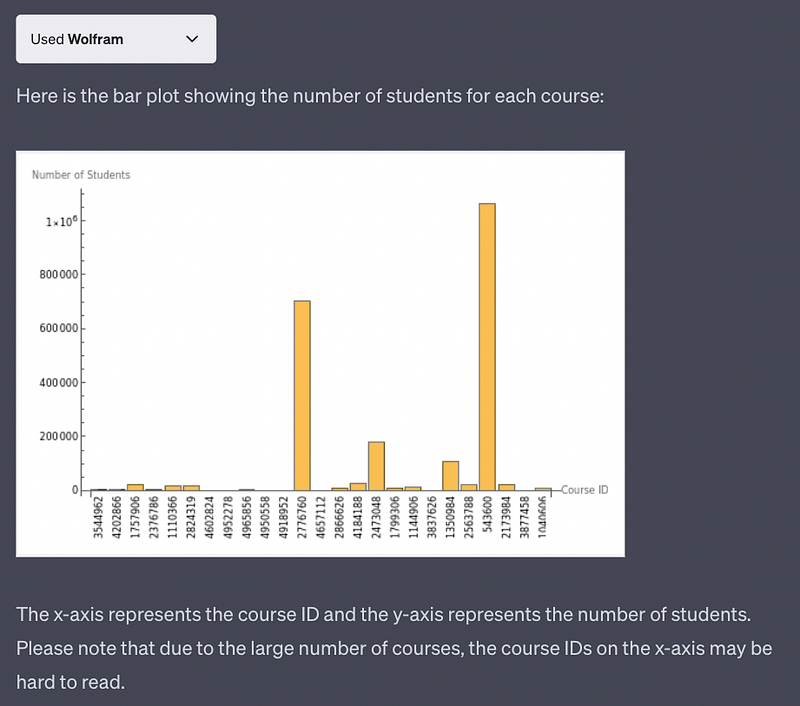
Note that if you’re using GPT-4, you can turn on the Wolfram plugin and make ChatGPT make the plot and show it on its website without having to copy/paste the code to your code editor (to know more about the Wolfram plugin check this article)
Here’s a test I did with another CSV file.
The only drawback is that GPT-4 might read the data slowly and also it has a cap of 25 messages every 3 hours.
Artificial Corner’s Free ChatGPT Cheat Sheet
We’re offering a free cheat sheet to our readers. Join our newsletter with 20K+ people and get our free ChatGPT cheat sheet.
If you enjoy reading stories like these and want to support me as a writer, consider signing up to become a Medium member. It’s $5 a month, giving you unlimited access to thousands of Python guides and Data science articles. If you sign up using my link, I’ll earn a small commission with no extra cost to you.


