
Back-End Development
Understanding Docker and Kubernetes Configurations for .NET Microservices Deployment
From understanding Docker and Kubernetes to deploying .NET microservices with a hands-on case study, discover the key to efficient, scalable, and manageable applications in today’s digital world.
Introduction

Hello there, curious learner! If you’re looking to understand Docker, Kubernetes, and how they work with .NET microservices, you’re in the right place, because in this article, I’ll explain what they are in a comprehensive way, and why they’re important when working with .NET microservices, and then I’ll show you how to set up and use Docker and Kubernetes step by step.
At last, we’ll build a simple .NET microservice together, package it with Docker, and then use Kubernetes to deploy it, so you can see exactly how all things work, and how they can help with your .NET microservices. Let’s get started!
Docker and Kubernetes

Docker and Kubernetes (K8s) are essential tools for deploying microservices, where docker is a tool that lets you create, deploy, and run applications in containers, and K8s is a container orchestration platform, meaning it helps manage how and where those containers run.
A container is like a small, self-contained machine that runs your application and everything it needs, like certain versions of libraries and the operating system, and they help to make your application run the same way no matter where it’s running: on your laptop, on a coworker’s machine, or on a cloud server.
Docker in .NET Microservices Deployments

Creating a Docker Image for .NET Microservice
To use docker with a .NET application, you will need a Dockerfile. This file tells docker how to build an image of your application; here’s an example of what a Dockerfile for a .NET application might look like:
# Use Microsoft's official build .NET image.
FROM mcr.microsoft.com/dotnet/sdk:5.0 as build
WORKDIR /source

# Copy project files, restore dependencies and publish the application
COPY . .
RUN dotnet restore
RUN dotnet publish -c release -o /app --no-restore

# Final stage, create runtime image
FROM mcr.microsoft.com/dotnet/aspnet:5.0
WORKDIR /app
COPY --from=build /app ./
ENTRYPOINT ["dotnet", "YourApp.dll"]
This Dockerfile does several things:
- Uses the .NET SDK image to build your application: this is a ready-to-use Docker image provided by Microsoft that contains the .NET SDK.
- Sets a working directory and copies your application files into it.
- Restores any dependencies your application needs and publishes your application; the published files are placed into a directory named ‘/app’.
- Uses the .NET Runtime image to run your application, and again, this is a ready-to-use image provided by Microsoft; it doesn’t have the SDK (which is needed to build applications, but not run them), so it’s smaller.
- Copies the published files from the build image to the runtime image.
- Sets the command to run your application when the container starts up.
Running the Docker Image
Once you have your Dockerfile, you can create an image by running:
docker build -t my-app .
And then run it with:
docker run -p 8000:80 my-app
The -p 8000:80 part tells docker to forward any traffic going to port 8000 on your machine to port 80 inside the container.
Kubernetes in .NET Microservices Deployments
K8s takes docker’s concept of containers and allows you to run and manage many containers across many machines, and it uses a file (usually in YAML format) to describe how the application should run.
A K8s deployment configuration might look like this:
apiVersion: apps/v1
kind: Deployment
metadata:
  name: my-app
spec:
  replicas: 3
  selector:
    matchLabels:
      app: my-app
  template:
    metadata:
      labels:
        app: my-app
    spec:
      containers:
      - name: my-app
        image: my-app:latest
        ports:
        - containerPort: 80
This configuration file tells Kubernetes to:
- Create a deployment called ‘my-app’.
- Run 3 replicas of your application, meaning that there will always be three copies of your application running.
- Use the ‘my-app:latest’ image, which is the image you built with Docker.
- Listen on port 80 inside the container.
Applying the Kubernetes Configuration
To apply this configuration to your Kubernetes cluster, you would save it to a file (for example, ‘deployment.yaml’), then run:
kubectl apply -f deployment.yaml
This command tells Kubernetes to create the resources described in the ‘deployment.yaml’ file, and in this case, that’s a deployment with three running instances of your application.
Creating a .NET Microservice Locally Using Docker and Kubernetes: A Case Study

In this section, we will create a simple but attractive .NET microservice — a basic web API, and then package this service in a docker container and deploy it locally using K8s.
Building a Simple .NET Web API
Let’s create a new .NET Web API project by running the following command in your preferred terminal:
dotnet new webapi -n NetDeploymentMicroservice
This will create a new .NET Web API project named “NetDeploymentMicroservice”; in this project, you’ll find the usual WeatherForecastController that returns a list of weather forecasts, and it's simple, but it's enough to demonstrate deploying a .NET microservice.

Dockerizing the .NET Web API
Next, we will create a Dockerfile in the root of the project, which is used to build a Docker image of our application; here’s a basic Dockerfile for a .NET application:
FROM mcr.microsoft.com/dotnet/sdk:7.0 AS build-env
WORKDIR /app

# Copy everything and build
COPY . ./
RUN dotnet publish -c Release -o out

# Build runtime image
FROM mcr.microsoft.com/dotnet/aspnet:7.0
WORKDIR /app
COPY --from=build-env /app/out .
ENTRYPOINT ["dotnet", "NetDeploymentMicroservice.dll"]
To build this docker image, navigate to the directory containing the Dockerfile and execute the following command:
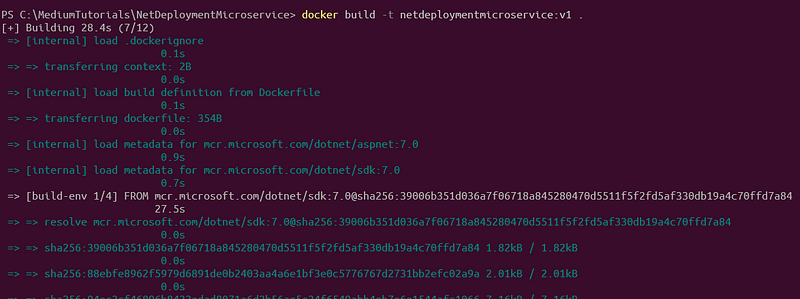
docker build -t netdeploymentmicroservice:v1 .
This command creates a docker image named netdeploymentmicroservice with a v1 tag.
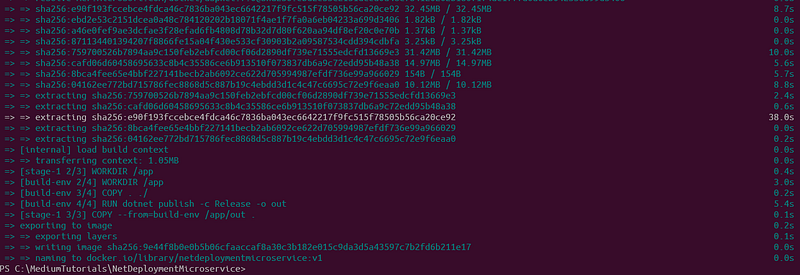
To check if your image is built, you can list the docker images on your machine using docker images.
Creating a Kubernetes Deployment
With the docker image created, we can now move onto deploying this image using K8s, so we need a deployment configuration:
apiVersion: apps/v1
kind: Deployment
metadata:
  name: netdeploymentmicroservice-deployment
spec:
  replicas: 2
  selector:
    matchLabels:
      app: netdeploymentmicroservice
  template:
    metadata:
      labels:
        app: netdeploymentmicroservice
    spec:
      containers:
      - name: netdeploymentmicroservice
        image: netdeploymentmicroservice:v1
        ports:
        - containerPort: 80
This configuration will instruct K8s to pull the netdeploymentmicroservice:v1 image we created, run 2 replicas (instances) of it, and expose port 80 on each container.
To apply this configuration, save it to a file called k8s-deployment.yaml and use the following command:
kubectl apply -f k8s-deployment.yaml

Creating a Kubernetes Service
The deployment is up, but it’s not accessible yet, so to access it, we need a Kubernetes service; here’s a simple configuration:
apiVersion: v1
kind: Service
metadata:
  name: netdeploymentmicroservice-service
spec:
  selector:
    app: netdeploymentmicroservice
  ports:
    - protocol: TCP
      port: 80
      targetPort: 80
  type: LoadBalancer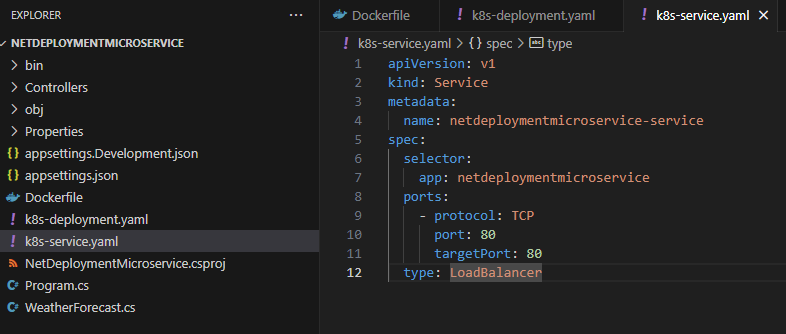
This configuration creates a service that exposes our deployment to external traffic, and to make it work, save this to a file called k8s-service.yaml and apply it with:
kubectl apply -f k8s-service.yaml

Testing the Deployment
To test if everything is working, we can use kubectl to get our services:
kubectl get services
You should see your netdeploymentmicroservice-service in the list; there's a column named "EXTERNAL-IP" which you can use to access your service from a web browser.

So, that’s it! We’ve created and deployed this .NET microservice example locally using Docker and Kubernetes.
Final Thoughts

So, we’ve explored the world of docker and kubernetes for deploying .NET microservices, demystifying these powerful tools, and with this step-by-step guide and hands-on case study, you’ve seen how to bring a .NET microservice to life, from creation, through dockerizing it, to deploying.
Take your learning to the next level with our other article titled “.NET 7 & Docker: Crafting High-Performance Microservices Architecture”, where I dig deeper into how to revolutionize your software development with cutting-edge, containerized microservices powered by .NET 7 and Docker.
I’ve included a detailed case study of a video streaming platform, so you can see these concepts in action in a real-world scenario, so it’s a must-read if you want to supercharge your .NET microservices deployments with the latest techniques and tools.
Keep learning, keep exploring, and keep deploying those impressive .NET microservices!

📕 Gentle nudge: Deciding to purchase this book equates to backing my endeavors, all without any extra cost to you. Your support is deeply acknowledged! 🏆


