
Back-End Development
.NET 7 & Docker: Crafting High-Performance Microservices Architecture
Revolutionize your software development with cutting-edge, containerized microservices powered by .NET 7 and Docker with a video streaming platform case study
Introduction to Microservices
Imagine the challenges faced by a popular video streaming platform as it grows: millions of concurrent users, countless streams of data, and an ever-evolving set of features. To stay ahead of the competition and ensure a seamless user experience, they need a flexible, scalable, and maintainable system. This is where microservices come in.

What are Microservices?
Microservices are a software architecture pattern that breaks down a monolithic application into small, independent, and loosely-coupled services. Each microservice is responsible for a specific functionality, operates independently, and communicates with other services through well-defined interfaces. With this approach, teams can develop, deploy, and scale individual components of the system without affecting the rest of the application.
Benefits of Microservices
Some key benefits of adopting a microservices architecture include:
- Scalability: Microservices can be scaled independently, allowing you to allocate resources only where they’re needed. This is especially valuable for our video streaming platform case study, where different services may experience varying levels of demand.
- Agility and faster time-to-market: Smaller, focused teams can work on each microservice independently, making it easier to implement new features and respond to changing business requirements.
- Resilience: When a microservice fails, it’s less likely to impact the entire system. This isolation helps maintain the overall stability and performance of the application.
- Easier maintenance and updates: Microservices can be updated or replaced individually, without affecting the rest of the system, facilitating continuous improvement and reducing technical debt.
- Technology diversity: Each microservice can be built using the most suitable technology stack, enabling teams to choose the best tools for their specific needs.
With these benefits in mind, it’s easy to see why many organizations are turning to microservices. But how do .NET 7 and Docker fit into the picture?
Why .NET 7 and Docker for Microservices?

In our video streaming platform case study, we need a reliable technology stack to build and deploy our microservices architecture: .NET 7 and Docker are a perfect combination of performance, flexibility, and ease of use. Let’s explore why these two technologies are ideal for building microservices.
Advantages of .NET 7
.NET 7, the latest version of Microsoft’s open-source, cross-platform development framework, offers several benefits that make it well-suited for building microservices:
- Performance: .NET 7 brings significant performance improvements over previous versions, allowing applications to run faster with fewer resources.
- Cross-platform compatibility: With support for Windows, Linux, and macOS, .NET 7 enables you to build and deploy microservices across various platforms.
- C# language features: C# is a versatile, modern, and powerful programming language that simplifies the development of complex applications. Its features, such as asynchronous programming and pattern matching, make it an excellent choice for building microservices.
- Robust ecosystem: .NET 7 provides a rich ecosystem of libraries, frameworks, and tools that simplify the development, testing, and deployment of microservices.
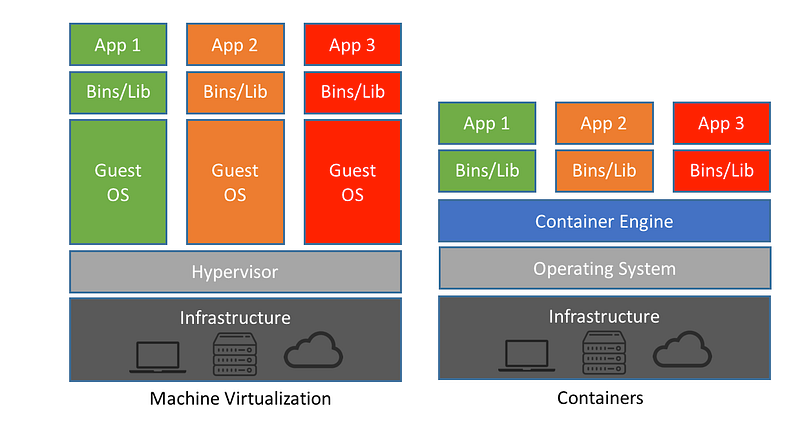
Docker: Containerization Made Easy
Docker is a platform that simplifies the process of containerizing applications. Containers package an application and its dependencies together, ensuring consistent behavior across different environments. This is particularly beneficial for microservices, as it allows each service to have its own isolated environment. Some key advantages of using Docker include:
- Consistent environments: Docker containers eliminate the “it works on my machine” problem, ensuring that your microservices behave the same way in development, testing, and production environments.
- Resource efficiency: Containers are lightweight and share the host system’s resources, making them more resource-efficient than traditional virtual machines.
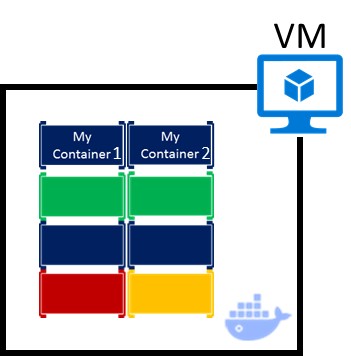
- Isolation: Docker provides isolation between microservices, preventing them from interfering with each other and improving security.
- Easier deployment and scaling: Docker enables you to easily deploy, scale, and manage your microservices, simplifying the overall development and maintenance process.
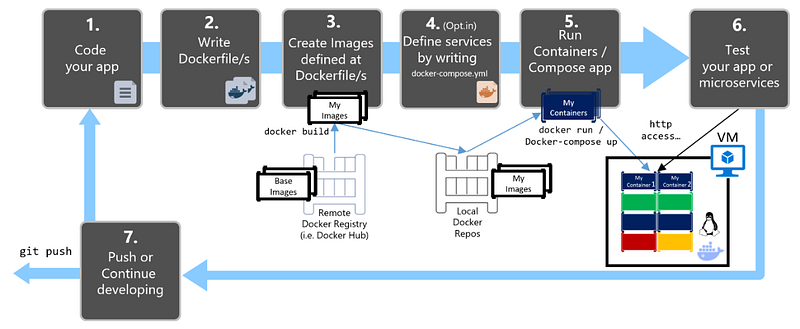
Getting Started with .NET 7 and Docker

In this section, I’ll guide you through setting up your development environment and creating your first microservice using .NET 7 and Docker. As we progress, we’ll also explore how our video streaming platform case study leveraged these technologies to create a scalable and high-performing architecture.
Setting Up Your Environment
Before diving into building your microservices, it’s crucial to have a properly configured development environment. Follow these steps to set up your workspace:
- Install .NET 7 SDK: Download and install the .NET 7 SDK from the official Microsoft website. This SDK will provide you with the necessary tools and libraries to build .NET 7 applications.
- Install Docker: Download and install Docker Desktop for your operating system (Windows, macOS, or Linux) from the Docker website. Docker Desktop includes the Docker Engine, Docker CLI, and Docker Compose, which are essential for working with containers.
- Choose an IDE: Select an Integrated Development Environment (IDE) that supports .NET 7 development. Popular options include Visual Studio, Visual Studio Code, and JetBrains Rider.
- Configure Docker for .NET 7: Ensure that your IDE is configured to work with Docker and .NET 7. You might need to install extensions or plugins to enable this integration, depending on your chosen IDE.
With your development environment in place, you’re ready to create your first microservice!
Creating Your First Microservice
To create a microservice using .NET 7 and Docker, follow these steps.

Step 1: Create a new .NET 7 Web API project
Open your terminal and navigate to the directory where you want to create your microservice project. Run the following command to create a new .NET 7 Web API project called “VideoStreaming”:
dotnet new webapi -n VideoStreaming
This command will create a new folder called “VideoStreaming” and generate the necessary files for a .NET 7 Web API project.
Step 2: Add a Dockerfile
Navigate to the newly created “VideoStreaming” folder:
cd .\VideoStreaming\Create a new file called “Dockerfile” in the root of your project and add the following content:
FROM mcr.microsoft.com/dotnet/sdk:7.0 AS build
WORKDIR /src
COPY . .
RUN dotnet restore
RUN dotnet publish -c Release -o /app

FROM mcr.microsoft.com/dotnet/aspnet:7.0
WORKDIR /app
COPY --from=build /app .
ENTRYPOINT ["dotnet", "VideoStreaming.dll"]
Step 3: Build and run the Docker container
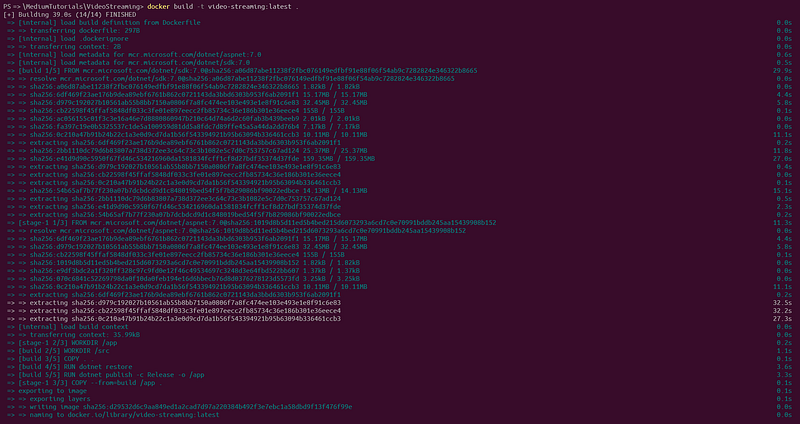
In your terminal, navigate to the “VideoStreaming” folder if you haven’t already. Build the Docker image for your microservice using the following command:
docker build -t video-streaming:latest .
This command will create a new Docker image with the tag “video-streaming:latest”.
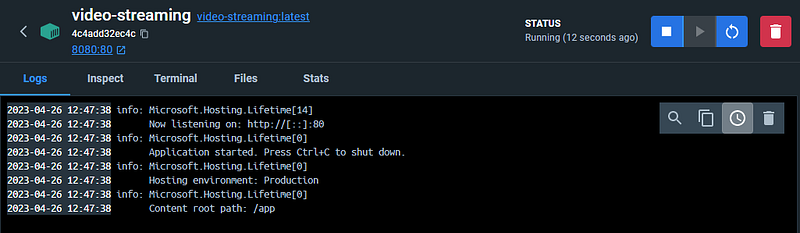
Next, run the Docker container using the following command:
docker run -d -p 8080:80 --name video-streaming video-streaming:latest
This command will start a new container named “video-streaming” using the “video-streaming:latest” image, mapping the host port 8080 to the container port 80.
Step 4: Implement business logic
Now that you have the basic infrastructure in place, you can start implementing the specific functionality for your video streaming microservice. For example, you might add endpoints to stream video content, upload new videos, or delete videos.
As you build out the features for your video streaming platform, you can create additional microservices for other aspects of the system, such as user authentication, video recommendations, and analytics.
Designing Scalable Microservices Architecture

Decomposing a Monolithic Application
Imagine we’re working on a popular video streaming platform that started as a monolithic application. As the platform grows, we can face various challenges, such as long build times, complex deployment processes, and inflexible architecture. To overcome these challenges, we should decide to transition to a scalable, microservices-based architecture.
We can identify the distinct functionalities within the application, such as video streaming, user authentication, recommendations, and analytics. We can then separate these functionalities into independent, loosely-coupled services, each with its own codebase, data storage, and deployment pipeline.
For our video streaming platform, let’s identify different services, such as VideoService, UserService, and RecommendationService. So, create separate projects for each service using .NET 7.
dotnet new webapi -n VideoService
dotnet new webapi -n UserService
dotnet new webapi -n RecommendationService
Service Communication Patterns
With the new microservices architecture in place, we need to establish efficient communication between services. Let’s consider several communication patterns, such as RESTful APIs, gRPC, and message queues, and ultimately choose a combination of RESTful APIs for synchronous communication and message queues for asynchronous communication.
For our case, RESTful APIs are enough, so we can create controllers in each service to expose their functionalities. For example, in the VideoService project, create a VideosController to handle video-related requests:
// VideoService/Controllers/VideosController.cs

[ApiController]
[Route("[controller]")]
public class VideosController : ControllerBase
{
    [HttpGet("{id}")]
    public async Task<ActionResult<Video>> GetVideo(Guid id)
    {
        // Fetch the video by ID and return the result
    }

    [HttpPost]
    public async Task<ActionResult<Video>> UploadVideo([FromBody] VideoUploadRequest request)
    {
        // Process the video upload and return the uploaded video information
    }
}
To call the VideoService from the RecommendationService, we use an HttpClient:
// RecommendationService/Services/VideoServiceClient.cs

public class VideoServiceClient
{
    private readonly HttpClient _httpClient;

    public VideoServiceClient(HttpClient httpClient)
    {
        _httpClient = httpClient;
    }

    public async Task<Video> GetVideo(Guid id)
    {
        var response = await _httpClient.GetAsync($"/videos/{id}");
        response.EnsureSuccessStatusCode();

        return await response.Content.ReadFromJsonAsync<Video>();
    }
}
And, for asynchronous communication with message queues, we can use RabbitMQ:
// VideoService/Services/VideoUploadedEventProducer.cs

public class VideoUploadedEventProducer
{
    private readonly IConnection _connection;
    private readonly IModel _channel;

    public VideoUploadedEventProducer()
    {
        var factory = new ConnectionFactory() { HostName = "localhost" };
        _connection = factory.CreateConnection();
        _channel = _connection.CreateModel();
        _channel.QueueDeclare(queue: "video_uploaded", durable: false, exclusive: false, autoDelete: false, arguments: null);
    }

    public void PublishVideoUploadedEvent(Video video)
    {
        var message = JsonSerializer.Serialize(video);
        var body = Encoding.UTF8.GetBytes(message);

        _channel.BasicPublish(exchange: "", routingKey: "video_uploaded", basicProperties: null, body: body);
    }
}
Data Storage Strategies
As we transition the video streaming platform to a microservices architecture, we need to rethink our data storage strategy. We require a storage solution that can scale and adapt to the unique requirements of each microservice.
For our polyglot persistence approach, let’s use different data storage technologies for each service. For example, we can use Entity Framework Core with PostgreSQL for the UserService:
// UserService/Models/UserContext.cs

public class UserContext : DbContext
{
    public DbSet<User> Users { get; set; }

    protected override void OnConfiguring(DbContextOptionsBuilder optionsBuilder)
    {
        optionsBuilder.UseNpgsql("Host=localhost;Database=UserServiceDb;Username=user;Password=password");
    }
}

// UserService/Models/User.cs

public class User
{
    public Guid Id { get; set; }
    public string Username { get; set; }
    public string Email { get; set; }
}
For the VideoService, we canuse MongoDB for storing video metadata and a distributed file system like MinIO for storing video files.
First, let’s set up MongoDB for VideoService:
// VideoService/Models/VideoContext.cs

public class VideoContext
{
    private readonly IMongoDatabase _database;

    public VideoContext()
    {
        var client = new MongoClient("mongodb://localhost:27017");
        _database = client.GetDatabase("VideoServiceDb");
    }

    public IMongoCollection<Video> Videos => _database.GetCollection<Video>("Videos");
}

// VideoService/Models/Video.cs

public class Video
{
    public ObjectId Id { get; set; }
    public string Title { get; set; }
    public string Description { get; set; }
    public string FileName { get; set; }
    public DateTime UploadedAt { get; set; }
}
Next, let’s configure MinIO for storing video files:
// VideoService/Services/MinioStorageService.cs

public class MinioStorageService
{
    private readonly MinioClient _minioClient;
    private const string BucketName = "videostreaming";

    public MinioStorageService()
    {
        _minioClient = new MinioClient("localhost:9000", "minioadmin", "minioadmin");
    }

    public async Task UploadFileAsync(string fileName, Stream fileStream)
    {
        await _minioClient.MakeBucketAsync(BucketName);
        await _minioClient.PutObjectAsync(BucketName, fileName, fileStream, fileStream.Length);
    }

    public async Task<Stream> DownloadFileAsync(string fileName)
    {
        return await _minioClient.GetObjectAsync(BucketName, fileName);
    }
}
In the VideoService, we can now use the MinioStorageService to store the video files and MongoDB for video metadata. This combination allows us to efficiently store and serve video content.
These code snippets illustrate the core concepts of designing a scalable microservices architecture for our video streaming platform. Remember, in a real-world implementation, more details and additional components would be necessary. However, this example should give you a solid foundation to build upon for your own projects.
Designing a Scalable Architecture
By decomposing the monolithic application, implementing efficient service communication patterns, and adopting a flexible data storage strategy, we can successfully build a highly scalable, resilient, and high-performing architecture for our video streaming platform.
This new architecture allows the platform to handle millions of concurrent users, reduce deployment complexity, and rapidly iterate on new features.
Testing Microservices in .NET 7 and Docker

Unit Testing
In our video streaming platform case study, we need to ensure that each microservice works as expected. To achieve this, let’s write unit tests for each microservice. We can use xUnit, a popular testing framework for .NET applications.
For example, let’s test the VideoService:
// VideoService.Tests/VideoServiceTests.cs

public class VideoServiceTests
{
    private readonly VideoService _videoService;
    private readonly Mock<IVideoRepository> _videoRepositoryMock;

    public VideoServiceTests()
    {
        _videoRepositoryMock = new Mock<IVideoRepository>();
        _videoService = new VideoService(_videoRepositoryMock.Object);
    }

    [Fact]
    public async Task GetVideoAsync_ReturnsExpectedVideo()
    {
        // Arrange
        var videoId = ObjectId.GenerateNewId();
        var expectedVideo = new Video { Id = videoId, Title = "Test Video" };
        _videoRepositoryMock.Setup(repo => repo.GetAsync(videoId)).ReturnsAsync(expectedVideo);

        // Act
        var result = await _videoService.GetVideoAsync(videoId);

        // Assert
        Assert.Equal(expectedVideo, result);
        _videoRepositoryMock.Verify(repo => repo.GetAsync(videoId), Times.Once);
    }
}
In this unit test, we check if the GetVideoById method from the VideoService class retrieves the correct video data based on the provided ID. We just created a mock video repository and set up a test video object. Then, we'll invoke the GetVideoById method with the test video's ID and assert that the returned video has the same ID and title as the test video.
Integration Testing
Integration tests check how microservices interact with each other and with external systems, such as databases or messaging services. In our video streaming platform, we need to verify that our microservices work together seamlessly.
For example, let’s write an integration test to ensure that the UserService and VideoService interact correctly when a user adds a video to their favorites:
// VideoStreaming.Tests/IntegrationTests/UserVideoIntegrationTests.cs

public class UserVideoIntegrationTests : IClassFixture<WebApplicationFactory<Startup>>
{
    private readonly WebApplicationFactory<Startup> _factory;

    public UserVideoIntegrationTests(WebApplicationFactory<Startup> factory)
    {
        _factory = factory;
    }

    [Fact]
    public async Task AddVideoToFavorites_ReturnsUpdatedUser()
    {
        // Arrange
        var client = _factory.CreateClient();
        var userId = "123";
        var videoId = "456";

        // Act
        var response = await client.PostAsync($"/api/users/{userId}/favorites/{videoId}", null);

        // Assert
        response.EnsureSuccessStatusCode();
        var updatedUser = JsonConvert.DeserializeObject<User>(await response.Content.ReadAsStringAsync());
        Assert.Contains(videoId, updatedUser.FavoriteVideoIds);
    }
}
In this integration test, we verify that the VideoController and VideoService work together to return the correct video data when a user requests a specific video. First, we create a test video and add it to the in-memory database. Then, we' set up the VideoController with the VideoService and invoke the GetVideo action with the test video's ID.
Finally, we assert that the returned ActionResult contains the expected video data, including the correct ID and title. This test ensures that the components involved in retrieving video data work together as expected.
End-to-End Testing
In the end, end-to-end tests simulate user interactions with the system to ensure that the entire application works as expected from the user’s perspective. For our video streaming platform, we could use a tool like Selenium to automate browser interactions and test the user interface.
For example, let’s write an end-to-end test to ensure that a user can search for a video and play it:
// VideoStreaming.Tests/EndToEndTests/VideoPlaybackTests.cs

public class VideoPlaybackTests : IDisposable
{
    private readonly IWebDriver _webDriver;

    public VideoPlaybackTests()
    {
        _webDriver = new ChromeDriver();
    }

    [Fact]
    public void SearchForVideoAndPlay()
    {
        // Arrange
        _webDriver.Navigate().GoToUrl("https://www.example.com");
        var searchBox = _webDriver.FindElement(By.Id("searchBox"));

        // Act
        searchBox.SendKeys("Test Video");
        searchBox.Submit();
        var videoTitle = _webDriver.FindElement(By.CssSelector(".video-title"));
        videoTitle.Click();
        var playButton = _webDriver.FindElement(By.CssSelector(".play-button"));
        playButton.Click();

        // Assert
        var videoPlayer = _webDriver.FindElement(By.CssSelector(".video-player"));
        Assert.True(videoPlayer.Displayed);
    }

    public void Dispose()
    {
        _webDriver.Quit();
    }
}
This end-to-end test example uses Selenium WebDriver to interact with the web application as a user would. It navigates to the homepage, searches for a video, selects the video, and then clicks the play button.
Finally, it asserts that the video player is displayed, ensuring that the user can watch the video. This test verifies that the entire application works correctly from the user’s perspective.
Deployment and Monitoring Best Practices

Continuous Integration and Continuous Deployment (CI/CD) Pipelines
One of the challenges we face in our video streaming platform project is ensuring smooth deployments with minimal downtime. To address this, we need to implement Continuous Integration and Continuous Deployment (CI/CD) pipelines, streamlining the process of building, testing, and deploying our microservices.
CI/CD pipelines automate the deployment process, ensuring that code changes are consistently integrated, tested, and deployed to production. This reduces the risk of errors, speeds up the release cycle, and enables us to iterate more quickly.
For our video streaming platform, let’s use Azure DevOps to create our CI/CD pipelines. Here’s a brief overview of the pipeline we should follow:
- Commit code changes to the source control repository (such as Git).
- Trigger the Continuous Integration (CI) pipeline, which compiles the code, runs unit and integration tests, and packages the microservice into a Docker container.
- If the CI pipeline is successful, initiate the Continuous Deployment (CD) pipeline, deploying the Docker container to a staging environment for further testing.
- Once the tests pass in the staging environment, the CD pipeline deploys the container to production, ensuring a smooth release with minimal downtime.
Observability and Monitoring Tools
Monitoring and observability are critical for maintaining the health, performance, and stability of our microservices. As we work on the video streaming platform, we need to leverage various monitoring tools to gain insights into our system and proactively address issues.
Here are some key monitoring tools and techniques we should consider:
- Logging: Implement structured logging to collect detailed information about our application’s behavior, making it easier to diagnose issues and analyze trends. In .NET 7, we can use the built-in logging framework, which can be easily integrated with popular log aggregation tools like Elasticsearch and Logstash.
- Metrics: To track the performance of our microservices, we should collect and analyze metrics like request rates, error rates, and response times. We can use tools like Prometheus and Grafana to store and visualize these metrics, helping us identify bottlenecks and optimize performance.
- Distributed Tracing: With many microservices interacting with each other, it’s essential to trace requests across service boundaries. We should implement distributed tracing using OpenTelemetry, enabling us to follow the flow of requests through our system and pinpoint any latency issues or errors.
- Alerting: To proactively detect and respond to issues, we need to set up alerting rules based on our monitoring data. We can use tools like PagerDuty to send notifications when specific thresholds are exceeded, ensuring that we can quickly address any problems.
By implementing these monitoring best practices, we can maintain a high level of performance, reliability, and user satisfaction in our video streaming platform, even as our user base grows to millions of concurrent users.
Check this article to learn more about ElasticSearch integration in .NET!
Key Takeaways and Next Steps for Your Microservices Journey

As we reach the end of our journey exploring the creation of a scalable microservices architecture using .NET 7 and Docker, let’s pause to reflect on the key takeaways and consider the next steps to continue building and refining our video streaming platform.
Key Takeaways:
- Microservices offer numerous benefits, such as improved scalability, resilience, and flexibility, making them an ideal choice for modern, complex applications like our video streaming platform.
- .NET 7 provides a powerful and feature-rich framework for building microservices, while Docker simplifies containerization and deployment.
- Decomposing a monolithic application into microservices involves careful consideration of service boundaries, communication patterns, and data storage strategies.
- Testing microservices in .NET 7 and Docker requires a multi-layered approach, including unit, integration, and end-to-end testing to ensure the highest quality.
- Implementing CI/CD pipelines and utilizing observability and monitoring tools are crucial for maintaining smooth deployments and the overall health of our microservices.
Next Steps for Your Microservices Journey:
With a solid foundation in place, we’re now ready to tackle new challenges and continue refining our video streaming platform. Here are some next steps to consider:
- Dive deeper into advanced topics, such as API Gateway patterns, service mesh technologies, and security best practices for microservices.
- Keep up to date with the latest developments in .NET and Docker, ensuring that you’re leveraging the newest features and best practices.
- Experiment with different tools and platforms for managing and orchestrating your containers, such as Kubernetes, to optimize resource usage and streamline operations.
- Seek out and learn from the experiences of others who have successfully built and scaled microservices architectures, attending conferences, workshops, and webinars to expand your knowledge.
- Engage with the developer community, sharing your experiences and learnings, and contributing to open-source projects related to microservices.
By following these next steps, you’ll continue to grow as a developer and gain valuable experience in building scalable, resilient, and high-performing microservices architectures.
Further Reading: Explore My Other Microservices Articles

To help you deepen your understanding of microservices and their real-world applications, I highly recommend checking out these my other three related articles on Medium. These articles cover essential topics that complement what we’ve discussed in this article, providing you with a well-rounded perspective on microservices architecture.