
Learning Android Development
Understand Drawing Arc of A Path In Jetpack Compose Canvas
Custom Make A Graphical Component with Rounded Side on Jetpack Compose
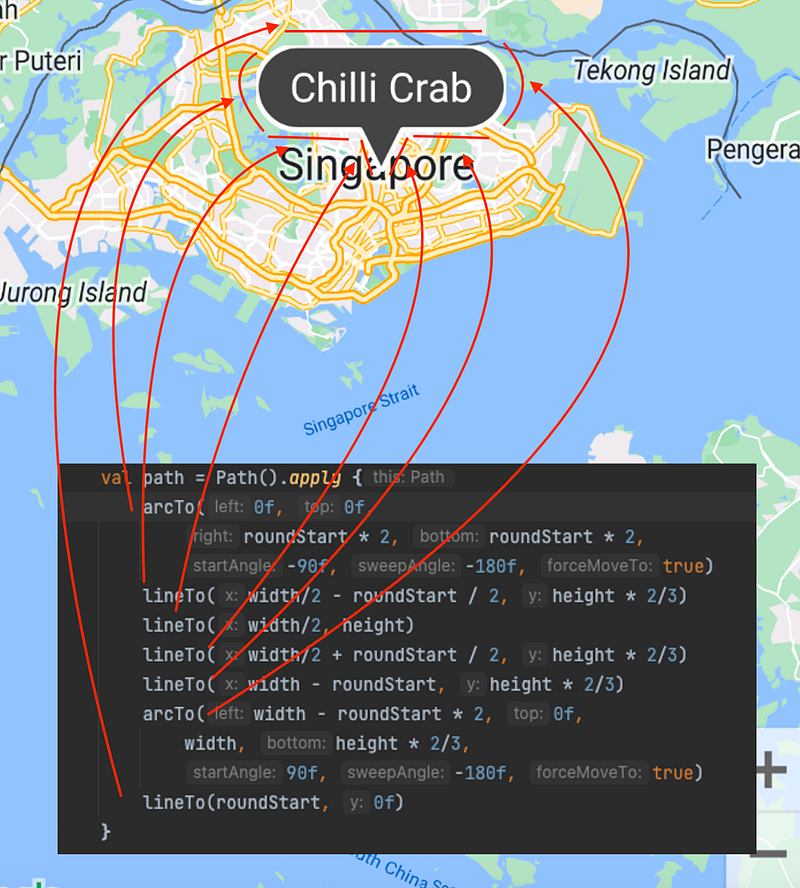
This month, I wrote an article showing Map View on Jetpack Compose. In it, I draw a custom map marker like a cartoon conversation dialog box shown below.
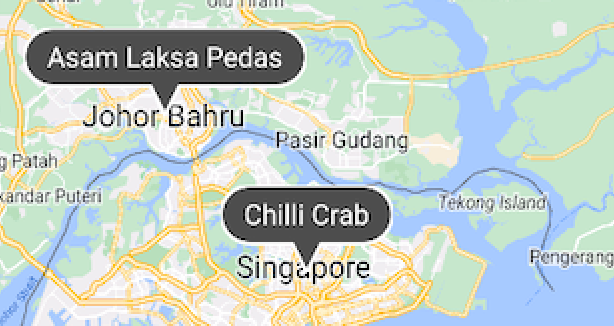
How do I draw this cartoon-style dialog for the marker? We have available functions that draw Circles, Ovals, Rectangle, and even Rounded Rectangle. Still, none of them fit a semi-circle rectangle, with a pointy, like cartoon- dialog as shown above. Hence we’ll have to draw ourselves using primitive path drawing.
I have previously explored all Canvas drawing functions as below.
However, since I like to have everything drawn together, I’m going to use Path to draw out everything in the cartoon dialog instead.
So I made a simple one as below, so I can fill it, or draw its border easily as drawing one path instead of calling multiple drawing functions.
Path drawing idea
The simple idea is as below, having a path of 7 path points.
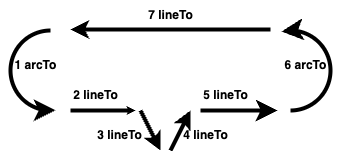
A lineTo and moveTo are easily understood in Path.
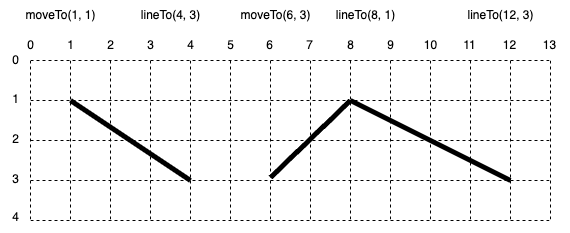
A simple Canvas Path drawing code as below
Canvas(
    modifier = Modifier
        .fillMaxWidth()
        .height(height)
        .background(Color.Yellow)
) {
    drawPath(
        Path().apply {
            moveTo(1f, 1f)
            lineTo(4f, 3f)
            moveTo(6f, 3f)
            lineTo(8f, 1f)
            lineTo(12f, 3f)
        },
        Color.Black,
        style = Stroke(2.dp.value)
    )
}
But for arcTo provided, it is different, as it doesn’t have any starting or ending coordinate of the arc we can provide.
Arc drawing function
If we look at arcTo function
fun arcTo(
rect: Rect,
startAngleDegrees: Float,
sweepAngleDegrees: Float,
forceMoveTo: Boolean
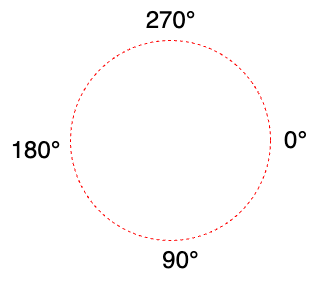
)Start Angle Degrees
The angle starts at the most right side, as 0°. Then move clockwise as it goes to 90° till it reaches 359°. (of course one can also have a negative value, to move anti-clockwise)
Sweep Angle Degrees
After having the start angle degree, next, we’ll define the sweep angle degree. This is to start drawing. The bigger the degree, the longer the arc will be.
Below are 3 examples
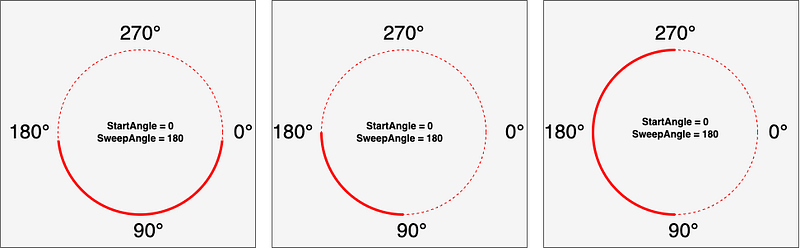
Of course, one can have negative sweep angles. This is for one to draw anti-clockwise. The direction of the drawing will determine how the arc will connect to its previous path (link to the beginning of the arc) and next path (link from the end of the arc).
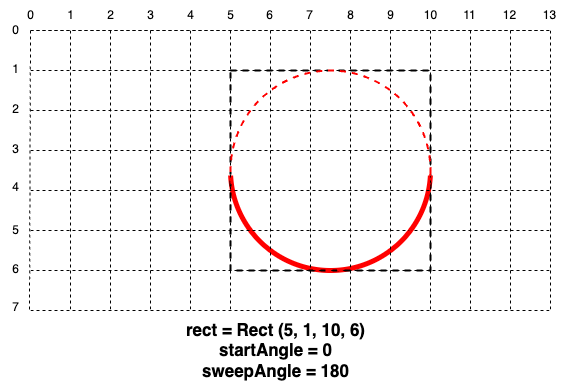
Rect
This is simply where to position the Arc.
If we have a square rectangle, the arc will match well with a semi-circle shape as below.
But we can also have an elongated rectangle, where we will draw an arc as part of an oval.
Force Move to
This is a little trickier part.
Since arcTo doesn’t have a start arc point, as it is determined by the start degree, in a path, we usually want it to be connected to its previous path.
Assuming we have a path that draws as below with forceMoveTo = true
moveTo(1, 1)
lineTo(6, 1)
arcTo(Rect(5, 1, 10, 6), 0, 180, true)
It will draw as below. This is because, after drawing the line, it will moveTo draw the arc, without connecting the line and the arc.
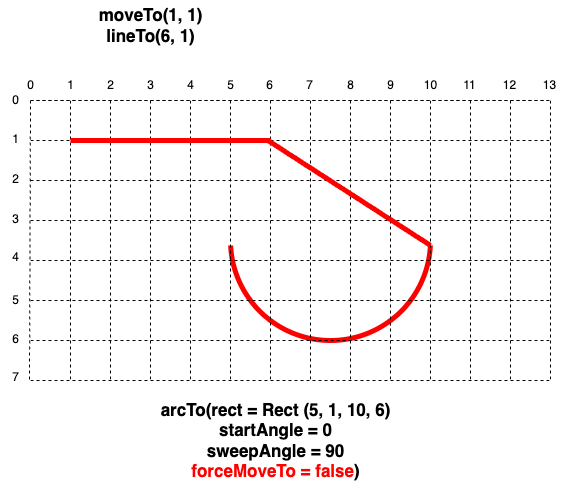
However, if we set the forceMoveTo = false
moveTo(1, 1)
lineTo(6, 1)
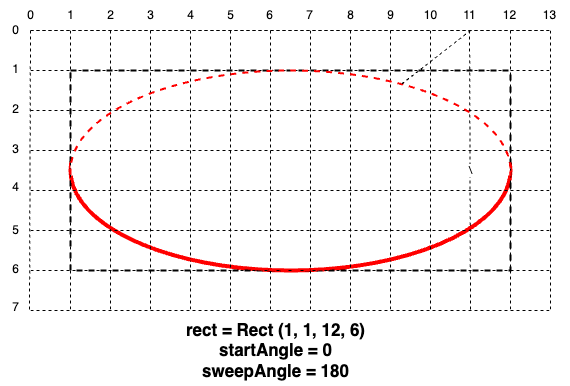
arcTo(Rect(1, 1, 12, 6), 0, 180, false)It will then draw a line connecting the end of lineTo to the start of arcTo as shown below
The reason the line is connected there, it’s because it is connected to the start of the Arc

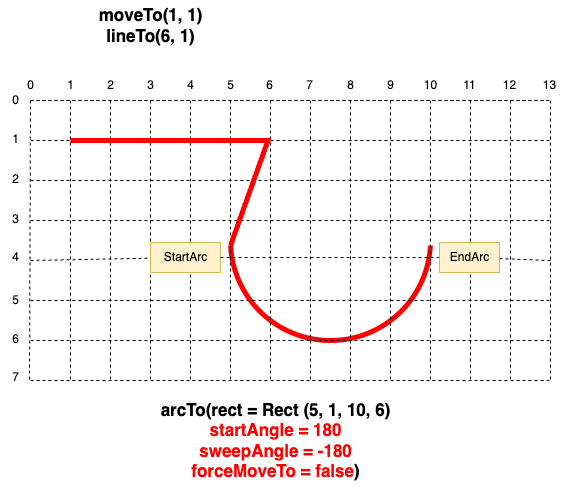
So, if we want to connect the other point of the arc instead, we have to reverse or arc draw. Instead of starting drawing from 0°, we will start drawing from 180°, and draw in the reverse direction with a sweep angle of -180°.
Drawing the Cartoon Dialog Marker.
With the above understood, we can now easily draw the cartoon dialog marker, with the code below.
Here I’m drawing the into a normal Bitmap Canvas instead of Jetpack Compose canvas, as originally I design this for MapView which requires a BitmapDescriptor descriptor to draw its marker.
private fun setCustomMapIcon(message: String): Bitmap {
    val height = 150f
    val widthPadding = 80.dp.value
    val width = max(200f, paintTextWhite.measureText(message, 0, message.length) + widthPadding)
    val roundStart = height/3
    val path = android.graphics.Path().apply {
        arcTo(0f, 0f,
            roundStart * 2, roundStart * 2,
            -90f, -180f, true)
        lineTo(width/2 - roundStart / 2, height * 2/3)
        lineTo(width/2, height)
        lineTo(width/2 + roundStart / 2, height * 2/3)
        lineTo(width - roundStart, height * 2/3)
        arcTo(width - roundStart * 2, 0f,
            width, height * 2/3,
            90f, -180f, true)
        lineTo(roundStart, 0f)
    }

    val bm = Bitmap.createBitmap(width.toInt(), height.toInt(), Bitmap.Config.ARGB_8888)
    val canvas = android.graphics.Canvas(bm)
    canvas.drawPath(path, paintBlackFill)
    canvas.drawPath(path, paintWhite)
    canvas.drawText(message, width/2, height * 2/3 * 2/3, paintTextWhite)
    return bm
}
With this, you can easily understand how the below are linked
To get to MapView with this marker, you can get the design from the article
To explore drawing Arc, as shown above, you can get the design here.
Interested to learn more sophisticated Path drawing with bezier, check out


