
Two-way Data Binding in ASP NET Core Blazor
Using @bind=“@field”, @bind=”@property”, @bind:event=”oninput”
Table of Contents
· Introduction · Getting Two-Way Data Binding · OnChange Event · Using @bind:event = "oninput" · Creating Components · Summary · References

Introduction
One-way data-binding binds a field or property in the C# @code block to the output element in the HTML block. The HTML block automatically displays any changes in field value or property value in the C# @code block. We discussed it in the previous article.
Two-way data binding binds an input element in an HTML block to a field or property in a C# @code block and vice versa. The input element displays the value of the field or property. Conversely, changing the value of the input element in the HTML block changes the field value or property value in the C# @code block.
Getting Two-Way Data Binding
- Add
@bind = "@field"or@bind = "@property"into the input element in the HTML block to bind it to a field or property in the C#@codeblock. - For example, see the following component file, DateDay.razor.
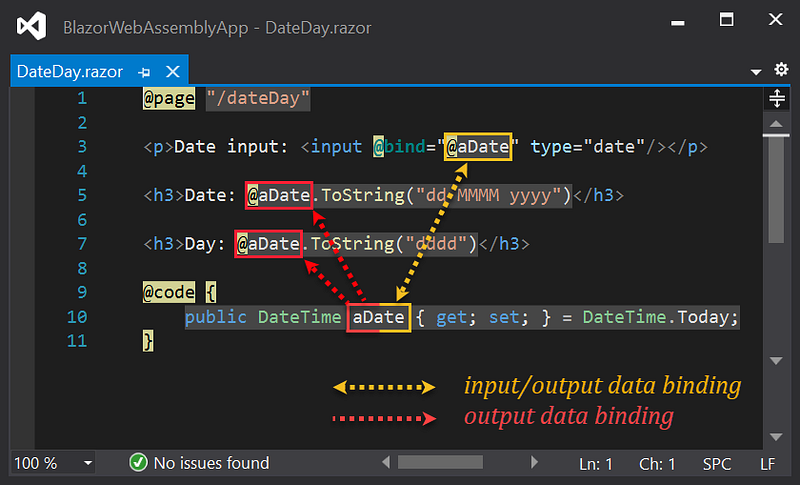
- Notice the yellow arrow in the figure above. The input element in the HTML block on line 3 displays the current date and day by default, i.e., the
aDatevalue in the C#@codeblock. So, it is the output data binding. If you enter a new value into the input element on line 3, it changes theaDatevalue on line 10. It is the input data binding. Thus, the yellow arrow indicates two-way data binding. - Let’s look at the two red arrows. The elements on lines 5 and 7 show the
aDatevalue on line 10, so it’s one-way data binding. - The following is the default page display.
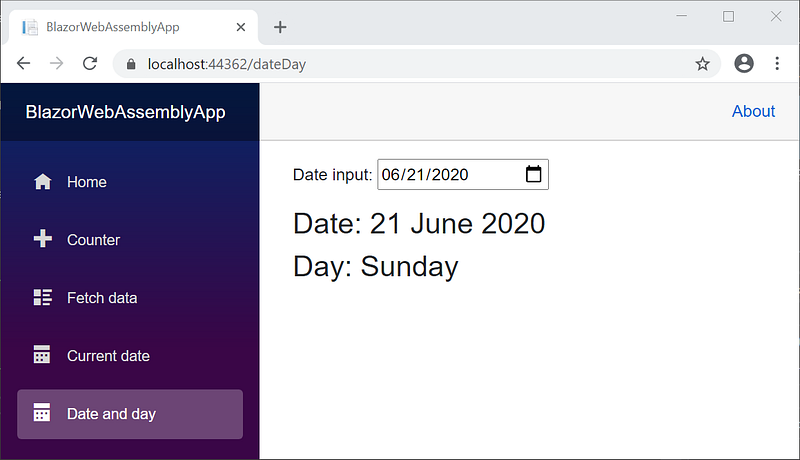
- The output change automatically follows the date input change.

OnChange Event
- Blazor will update the output value after the onchange event occurs.
- The onchange event occurs after the input box loses focus so that when typing input data — means the focus is still in the input box — the output does not change immediately.
- For example, see the component to calculate the exchange rate of dollars to rupiah stored in the following component file, DollarToRpV1.razor.

- Let’s look at the two red dotted line arrows in the figure above. The input elements on lines 5 and 7, by default, display the initial value from line 16. So, it is the output data binding. If you input
@eRateon line 5, it changes theeRatevalue on line 16. Input@dollaron line 7 changes thedollarvalue on line 16. It is the input data binding. Thus, the two red dotted line arrows indicate two-way data binding. - The three red continuous line arrows are one-way data binding. The elements on lines 11 and 13 show the values of the fields on line 16.
- The two yellow dotted line arrows indicate event binding. At run time, clicking the
Click to calculatebutton will processCalculate()method.
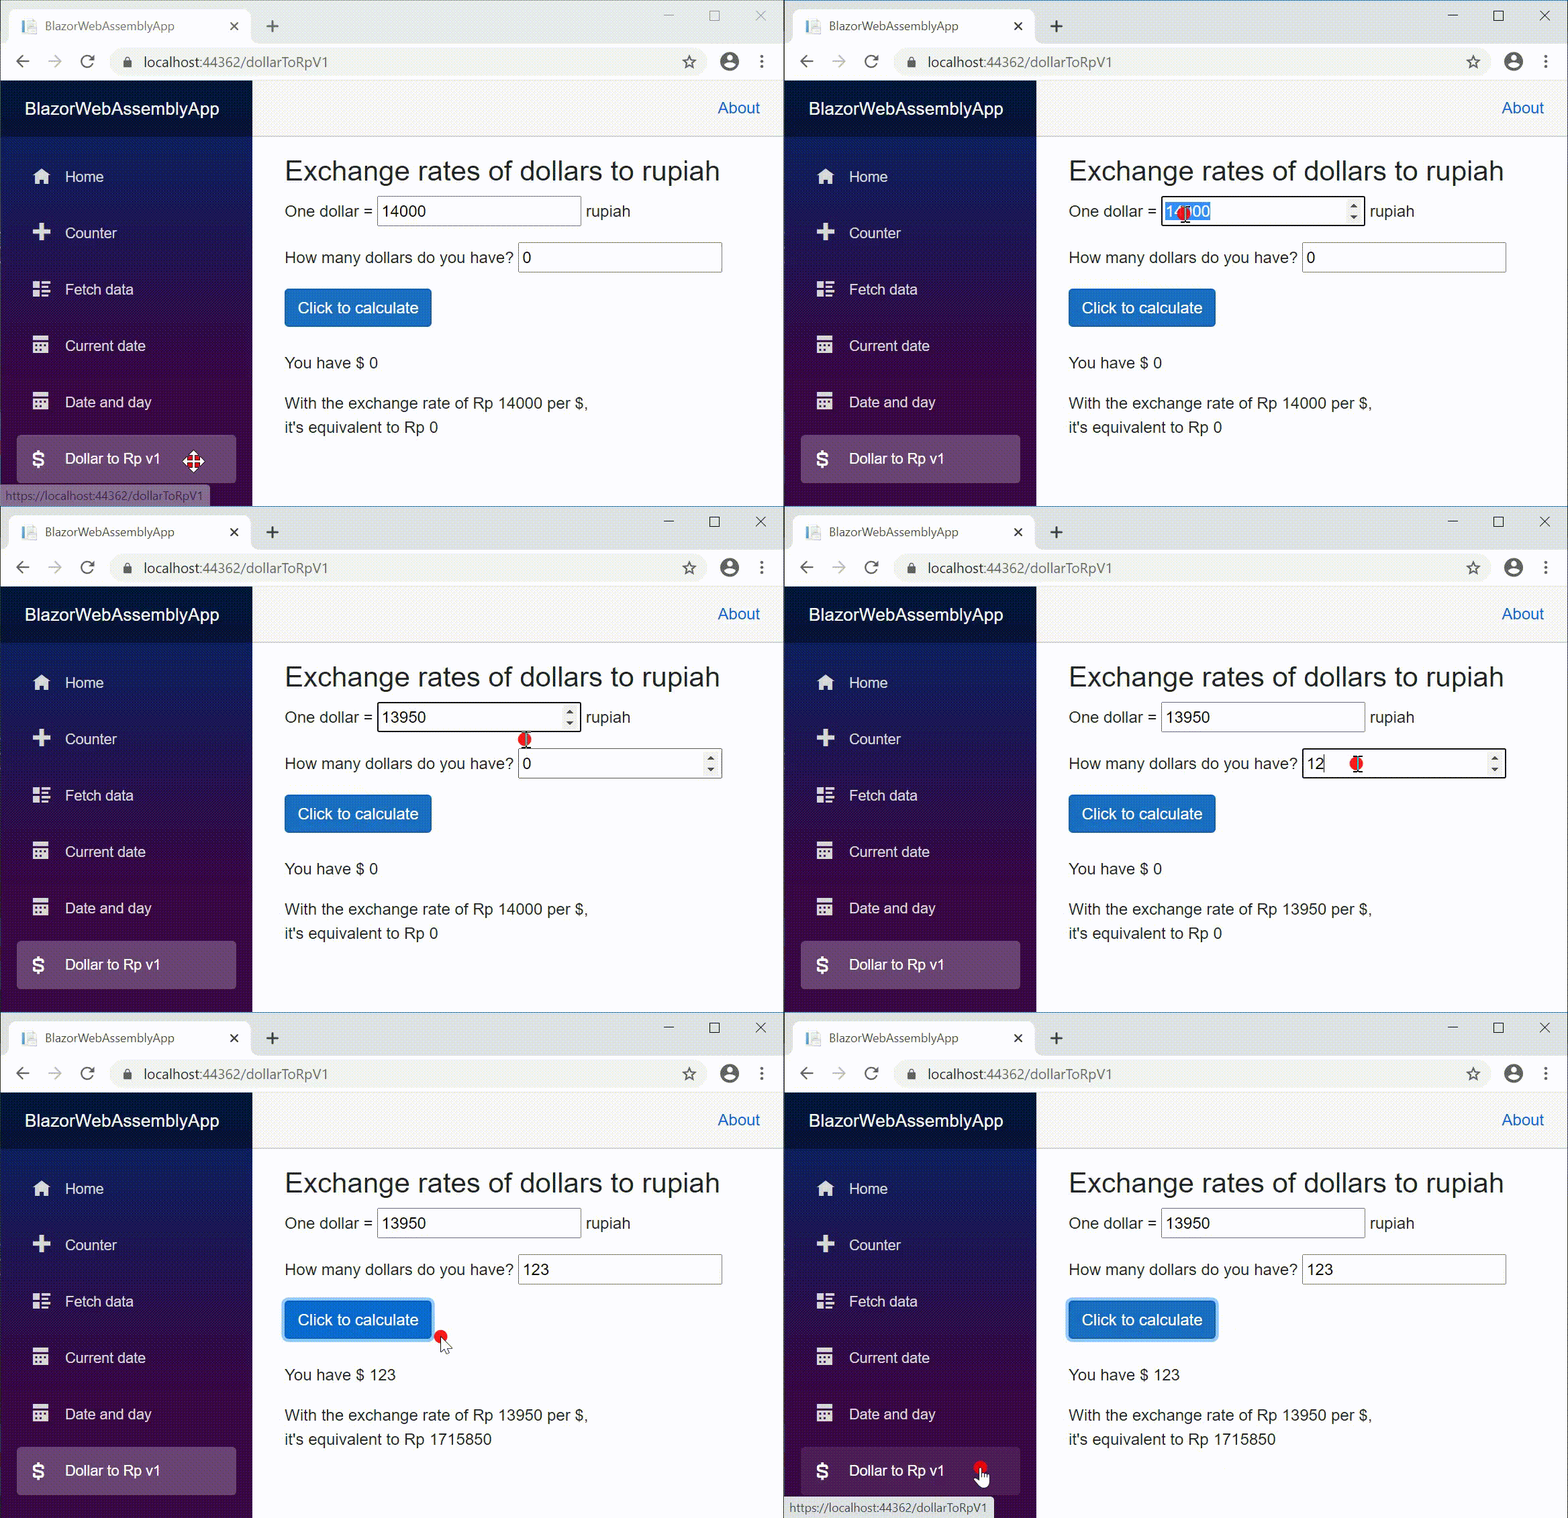
- Typing 13950 in the first input box does not change the output immediately; it remains 14000. The output changes to 13950 after the focus moves to the second input box.
- Likewise, when you enter 123 in the second input box, the output does not change immediately; it remains 0. The output changes to 123 after the focus moves to the
Click to calculatebutton. - It happens because the onchange event occurs after the input box loses focus.
Using @bind:event = "oninput"
- The onchange event can be replaced to the oninput event using the statement:
@bind:event = "oninput"so that each typing in the input box automatically changes the output. - For example, see the following component file, DollarToRpV2.razor.

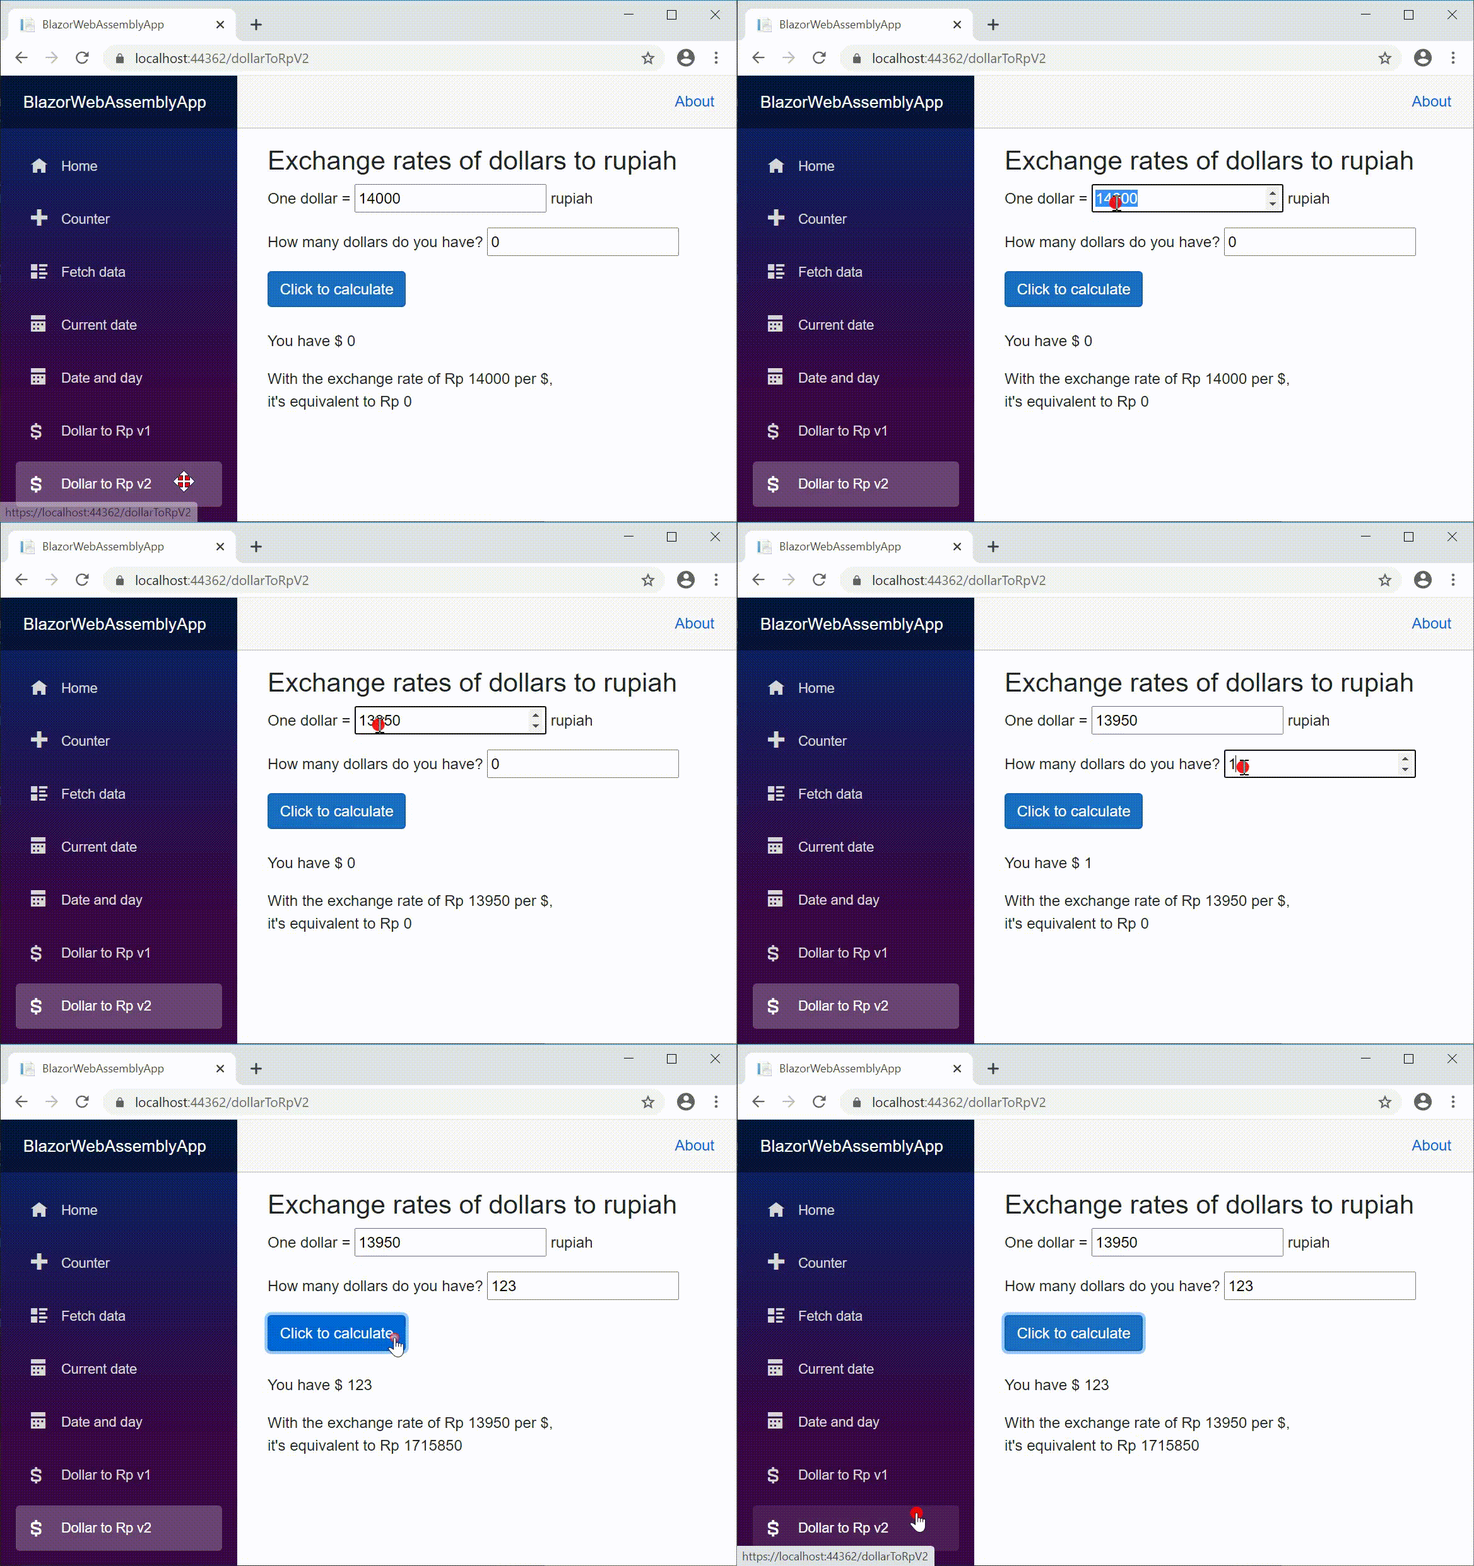
- Pay attention to the
@bind:event="oninput"attribute on lines 5 and 7. When you type in the input box, theoninputevent occurs and triggers the input data binding so that each typing in the input box automatically also types in the output. - By clicking on the
Click to calculatebutton, theonclickevent occurs and triggers theCalculate()method.
Creating Components
To make it easier to create the components above, copy the following code, then paste it into the component file in Visual Studio.
Listing 1 DateDay.razor
@page "/dateDay"<p>Date input: <input @bind="@aDate" type="date"/></p><h3>Date: @aDate.ToString("dd MMMM yyyy")</h3><h3>Day: @aDate.ToString("dddd")</h3>@code {
public DateTime aDate { get; set; } = DateTime.Today;
}Listing 2 DollarToRpV1.razor
@page "/dollarToRpV1"<h3>Exchange rates of dollars to rupiah</h3><p>One dollar = <input @bind="@eRate" type="number" /> rupiah</p><p>How many dollars do you have?
<input @bind="@dollar" type="number" /></p><button class="btn btn-primary"
@onclick="Calculate">Click to calculate</button><p><br>You have $ @dollar </p><p>With the exchange rate of Rp @eRate per $,
<br>it's equivalent to Rp @rupiah</p>@code {
int dollar = 0, eRate = 14000, rupiah = 0; void Calculate()
{
rupiah = dollar * eRate;
}
}Listing 3 DollarToRpV2.razor
@page "/dollarToRpV2"<h3>Exchange rates of dollars to rupiah</h3><p>One dollar = <input @bind="@eRate" type="number"
@bind:event="oninput" /> rupiah</p><p>How many dollars do you have? <input @bind="@dollar"
type="number" @bind:event="oninput" /></p><button class="btn btn-primary"
@onclick="Calculate">Click to calculate</button><p><br>You have $ @dollar </p><p>With the exchange rate of Rp @eRate per $,
<br>it's equivalent to Rp @rupiah</p>@code {
int dollar = 0, eRate = 14000, rupiah = 0; void Calculate()
{
rupiah = dollar * eRate;
}
}Listing 4 NavMenu.razor
<div class="top-row pl-4 navbar navbar-dark">
   <a class="navbar-brand" href="">BlazorWebAssemblyApp</a>
   <button class="navbar-toggler" @onclick="ToggleNavMenu">
      <span class="navbar-toggler-icon"></span>
   </button>
</div><div class="@NavMenuCssClass" @onclick="ToggleNavMenu">
<ul class="nav flex-column">
<li class="nav-item px-3">
<NavLink class="nav-link" href="" Match="NavLinkMatch.All">
<span class="oi oi-home" aria-hidden="true"></span> Home
</NavLink>
</li>
<li class="nav-item px-3">
<NavLink class="nav-link" href="counter">
<span class="oi oi-plus" aria-hidden="true">
</span> Counter
</NavLink>
</li>
<li class="nav-item px-3">
<NavLink class="nav-link" href="fetchdata">
<span class="oi oi-list-rich" aria-hidden="true">
</span> Fetch data
</NavLink>
</li>
<li class="nav-item px-3">
<NavLink class="nav-link" href="CurrentDate">
<span class="oi oi-calendar" aria-hidden="true">
</span> Current date
</NavLink>
</li>
<li class="nav-item px-3">
<NavLink class="nav-link" href="dateDay">
<span class="oi oi-calendar" aria-hidden="true">
</span> Date and day
</NavLink>
</li>
<li class="nav-item px-3">
<NavLink class="nav-link" href="dollarToRpV1">
<span class="oi oi-dollar" aria-hidden="true">
</span> Dollar to Rp v1
</NavLink>
</li>
<li class="nav-item px-3">
<NavLink class="nav-link" href="dollarToRpV2">
<span class="oi oi-dollar" aria-hidden="true">
</span> Dollar to Rp v2
</NavLink>
</li>
</ul>
</div>@code {
private bool collapseNavMenu = true;
private string NavMenuCssClass => collapseNavMenu ?
"collapse" : null; private void ToggleNavMenu()
{
collapseNavMenu = !collapseNavMenu;
}
}Summary
Add @bind="@field" or @bind="@property" into the input element in the HTML block to bind it to a field or property in the C# @code block and vice versa. The input element displays the value of the field or property. Conversely, changing the value of the input element changes the field value or property value.
Thanks for reading, and feel free to comment.


