
Tools for layering web pages

Return to book table of contents
You may have noticed that I use the terms tactics and tools a lot. I try to use the term tactics when describing instructional strategies used by educators and learning strategies applied by learners. I use the term tools to describe technology-based services used to implement these tactics. There are things educators and students can learn both to make effective use of tools and to apply tactics. Whatever I might suggest, there will always be more to learn and whatever is learned will likely be implemented in many different ways depending on the creativity of the teacher and learner. The chapter entitled Generative tactics focused mostly on tactics. This chapter and the next will describe examples of tools and offer brief tutorials on the use of these tools.
Considerations when selecting tools
Any given tool I describe may or may not be appropriate for your situation. This is why I will offer two examples for each of what I consider a tool category and I will provide additional options in my online resources (http://learningaloud.com). Here are some issues that may influence your choices:
▪ Devices available to students — Schools make a wide variety of technology devices available to students and students may want to use other devices of their own. Educators may expect students to do their work on a specific device or assume students will want to use different devices. Any given tool may not work with every category of device — computer, chromebook, tablet, phone — or with the various operating systems used within a category of devices.
▪ Preferred browser — As a reminder, we are focusing here on online resources. We most frequently access these resources using a browser. Some tools only work with certain browsers. It can get a little more complicated. Sometimes, tools are also available as tablet apps, but the apps may not have the same capabilities as the browser-based tool.
▪ Budget — Simply put — some tools are free and some are not. Free tools are not always the best option. Developers can put more into a tool that generates revenue. I think it is also important to recognize the layered services require an ongoing infrastructure commitment by the developer. Even when the work of creating a service is finished, developers must maintain active servers that hold the content and user data necessary to add the educational layer to other online content. Someone must pay for this infrastructure. So, your choice may depend on whether you want to dabble or make a commitment you assume you can rely on for some time with the assumption that the service will be available and well-maintained.
▪ Student sophistication / time that can be allocated to master a tool — Tools will vary in how many things they can do and in what it takes to install the tool and learn to use it. Using a sophisticated tool that requires the investment of considerable time to learn the tool but that will be applied in a limited way is likely the wrong choice.
Basics of how most layering tools work
Many layering tools are browser extensions. A browser extension is computer code that adds some capability to the browser. Typically, you will see a modification of the browser toolbar to include a new icon when adding an extension for layering. In most cases, clicking on this icon will activate the capabilities the extension provides and may allow access to more specific controls. Clicking the same icon again will typically deactivate the service.
It has become far easier to add an extension to your browser. Often, you simply search online for the name of the extension and the extension can be installed from the company website. You do want to be careful when adding a capability to your browser and be certain you are obtaining such code from trusted sources. It is also worth learning how to turn an extension on and off and how to remove it from your browser should you decide the extension will not be used. I cannot really include explanations for how to do these things for every browser, but I will offer a quick description of how to do this with the Chrome browser on a computer.
The version of the Chrome browser I use includes a vertical line consisting of three dots in the area at the top of the browser window just to the right of the area showing the address for the web page that is presently displayed. Selecting this three-dot icon should provide two ways to get at the installed extensions — one option is provided as a More Tools option and the other where it says Settings. Selecting extensions from either location should reveal the list of installed extensions and offer a way to remove a specific extension. Look for one more useful icon from this page. At the bottom under the list of extensions, you should find an icon for the Chrome store (Web Store) with the text “Get more extensions”. Using the Chrome store is a second way to find and install extensions. Most options for the Chrome browser available from company sites should also be available from the Chrome store and the Chrome store should be a trusted source.
Adding a layer to a web page
Hypothes.is
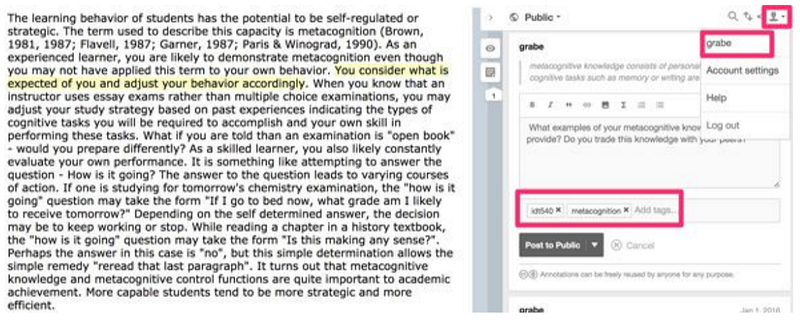
4.1 Typical Hypothesis screen display. Example of an annotation appears within the red box.
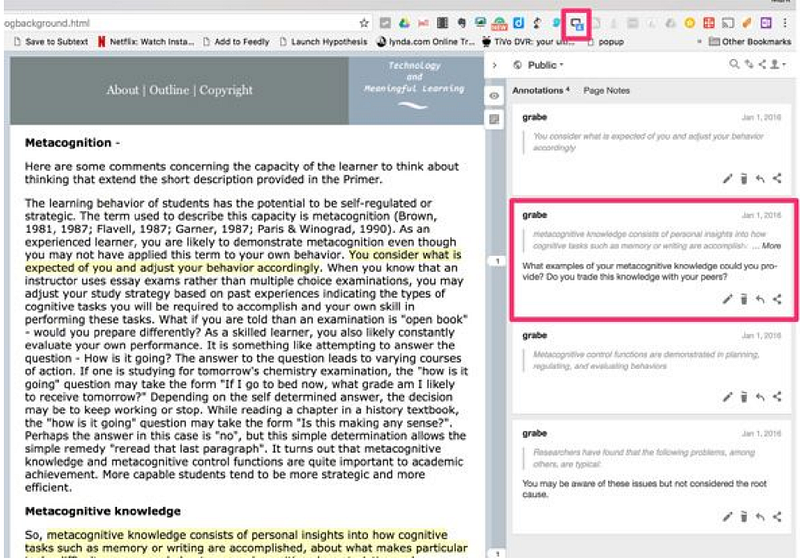
What you see here is the result of highlighting and annotating a web page using Hypothes.is. This is what is visible when Hypothes.is is active. The section on the left side is the highlighted web page. The section on the right side contains annotations that have been linked to specific content from the web page. A red box within the section of the image has been added to point out one annotation. Two text segments appear in this box. The top is the highlighted text. The bottom segment is the note that has been added. When Hypothes.is is not active, all you would view in the browser would be the web page without any modifications — the part of 4.1 on the left. Multiple individuals can annotate the same page and annotated pages can be private (annotations only available to the individual who added the highlights and notes), public (annotations visible to anyone viewing the page with Hypothes.is active), or shared with a group (annotations are visible to designated users when these group members have Hypothes.is active).
Basics of operation
Chrome is the browser of choice for Hypothes.is, but the company does provide a way to make possible use of the service using other browsers. As I described previously, browser extensions can often be located in several ways (company site, browser-specific “store”). Connecting to the company site (https://hypothes.is/) will cause the browser in use to be recognized as the page is loaded and should then suggest a way to add the Hypothesis extension. With Chrome, you should encounter an install button that makes installation a one-click process. With other browsers, you should encounter an easy way to add a “bookmarklet” to the bookmark toolbar. A bookmark icon should appear on the page you are viewing and you then drag this icon to the bookmark toolbar at the top of your browser (make certain the toolbar is visible). Once installed, all browsers should display an icon in the toolbar. In the image included above, the Hypothes.is icon added to the toolbar has been enclosed in a red square (see 6.1) for easy identification. This icon is clicked to activate and deactivate the service.
Once the Hypothes.is extension has first been added to a browser, the next logical step is to register for an account. Hypothes.is must be able to identify you to keep track of your personal annotations and the groups you have joined. In educational systems, logging in and out of a service is important because several individuals may use the same device. The link to the page to create an account appears at the top of the same Hypothes.is page used to add the extension to your browser. Students will also be required to register to participate.
I understand that student online activity is regarded as controversial by some. Hypothes.is is not an ad-based service so this deals with one of the concerns. Ads would still appear on the original unlayered content. I have already explained the issue of whether a layering service shows the content exactly as intended by the content creator and why I think this is important. If the public visibility of student contributions is an issue, Hypothes.is could still be used to view documents annotated by others and the option of sharing with a group would also limit who would have access to student comments. In other words, the same content can be viewed as annotated by the public and as annotated by a group. How to move between these views is described at a later point. When Hypothes.is is active, the screen view looks like this (See Figure 4.2).
4.2 Hypothes.is — icons visible after selecting text
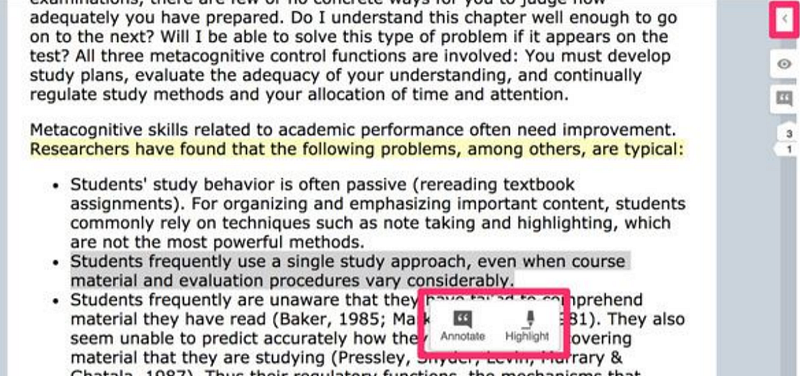
When Hypothes.is is active, the cursor becomes a highlighter. Once text has been highlighted, what happens will vary depending on the OS and browser you are using. Small icons for highlight or annotate may appear near the highlighted text (see 4.2). Selecting highlight will add color to the text. Selecting the note icon, will open a window for associating a note with the highlighted text (see image above). Alternatively, a small icon aligned with the highlight content will appear in the right margin of the page. Selecting the icon will allow a note to be associated with the highlighted text. The red box in the right-hand margin of the image indicates the icon used to open and close the annotation display panel.
Working with groups
One of the most important processes educators or team leaders using Hypothes.is will want to master is the creation of groups.
4.3 Hypothes.is groups
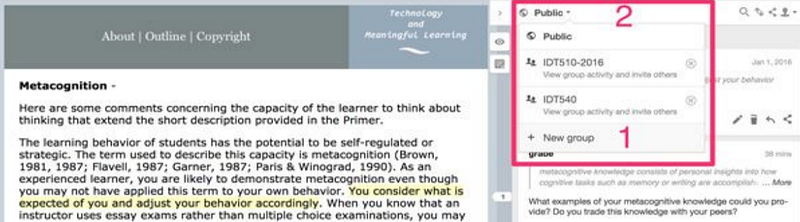
To create a group, open the annotation panel and locate the drop-down menu appearing at the top left of this panel. This menu is important for several reasons. First, it allows you to create a new group (see 1 within the red box). Second, it shows you which group is presently active. In the image above, the active group is public. Public means anyone with Hypothes.is active viewing a page I have annotated will see my public notes. The active group always allows you two options for each annotation you create — the group and private. Note that “public” is treated as any other group, but is made up of all Hypothes.is users. Once you have become a member of a group and want to view the annotations generated by that group, you first go to this menu and select the group (the options will include Public and all other groups to which you belong). You will only see annotations generated by members of the group selected and only members of that group will be able to see annotations you have generated. As an instructor, you may want to create multiple groups for the same assignments and view the work of each group separately by selecting the different groups. Failing to remember to switch to a desired group when viewing a page can be a problem. You may create annotations no one else sees or find nothing when you expect to see the work created by others. When you as the instructor create a group (see + new group in the image Figure 4.3), you name the group and are provided an access code to share with students. The access code will look something like this https://hypothes.is/groups/XBYz5V/idt540 (this is no longer a valid link). The group name should be the last part of the address. When others use this link, they will be given the opportunity to join the group. Once a member, participation is simple. Activate the group with Hypothes.is active to begin participating. Yes, it would be possible that someone receiving the validation link could share this link. If this somehow becomes a problem, as group founder, you can get a list of those who have activated an invitation and exclude someone if necessary. You will have to decide whether these features allow adequate security.
Highlight and annotate as a group member. When contributing an annotation, even if the appropriate group has been selected, make certain that the group name and not Private is active in the annotation window for that note. The way the selection of group or private works is that Hypothes.is remembers the last selection used. You may want to combine annotations for yourself and annotations contributed to the group, so it is important to check which has been selected before finalizing an annotation. The button you press will be labeled with the option that will be applied (e.g., Public or Private, groupname or Private), but once you start adding annotations it is easy to forget to look. Search for the active group in 4.4. In this case the group is Public.
4.4 Hypothes.is text tools including links
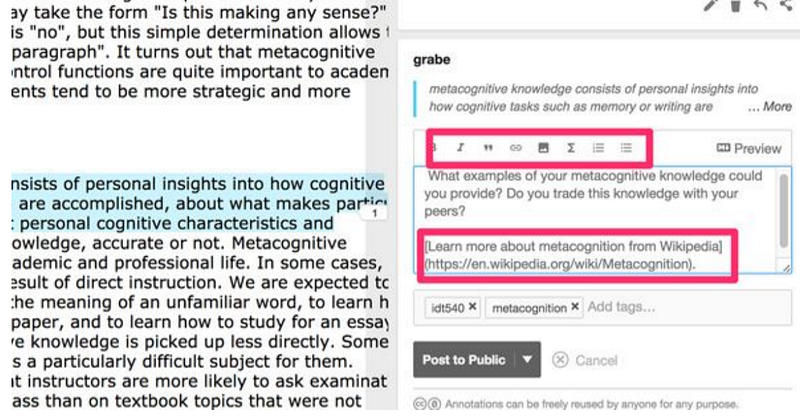
The annotations tool offers capabilities beyond that of entering pure text. You can add web links, images, and video to the annotation (top box). When you enter a web link, what appears in the box before saving (lower box) may be a little different from what you are familiar with from other online media tools. You will still see the address for the linked content even though you tried to add a link to the designated text within your annotation. Don’t worry, when saved the linked address will not be visible and the text associated with the link will be displayed in a different color (blue).
Consider some of the ways adding links as annotations could be used. Since you are layering annotations on top of pre-existing content that is probably not your own, you might want to have your students read content from another source to address some issue. For example, it would be easy to add “For more information on xxxx, I want you to also read this entry in Wikipedia”. Students could also add links for peer use or in response to a specific request from the teacher. Perhaps, you or a student might want to link to a source presenting an opposing point of view when annotating a segment of the original content (e.g., A very different conclusion is reached by xxxx. See her argument from this web page.). By the way, this skill of cross-checking when taught as an information literacy skill is often called lateral reading. Images, your own, student-generated, or open-source, could also be added within an annotation.
There is one additional detail I need to explain. You can either highlight or attach an annotation to highlight text. Hypothesis is designed so that highlights without annotations are private by default. At first, this struck me as a flaw. I have already explained that modeling highlighting and assigning a highlighting task (highlight the most important idea within each paragraph) can be useful activities. It might seem that such tasks would not be possible with this tool. I asked the company about this issue and was told that this was intended. The explanation was that the simultaneous highlighting by a group would create a mess with all highlights visible. If multiple annotations are added to highlights of the same text, the amount of highlighted content is less and the annotations by different individuals are visible and can be differentiated. There is a work around for sharing highlights with a group — highlight and then enter a space as an annotation. This hack will trick the system into displaying the annotation.
If you are a social media user, you are likely familiar with the use of tags. In many types of social media (e.g., Twitter), a tag is called a hashtag because the tag is preceded by the # symbol. The hash (pound sign) is not necessary when attaching a tag to a Hypothes.is note. It is convenient to think of a tag as a label. Techie-types might call it metadata. Labels and metadata mean pretty much the same thing — data about data or “you can classify these things as this”. A given item can be classified with multiple labels at the same time — a book can be classified by author, genre, reading level, etc. Tags are particularly useful for searching digital content. This works best if the author or authors of tags use a given tag in a consistent way.
Tags for personal use. Hypothesis has been designed so that tags can be used in several ways. For example, assume I have read and annotated 40–50 web pages in preparation for writing this book. Now I want to write. How might I have initially processed the 40–50 web pages knowing I would eventually want to reference the specific pages with information about specific topics? How would I find the pages that contain information about annotating video? How would I find the pages that are considered free services?
As the amount of content reviewed for a project increases, the value of organization becomes more and more important. Tagging is an important information literacy skill when tasks require the organization of ideas across multiple sources. The flexibility of adding tags is both a strength and a liability. I have already indicated that using a tag in a specific, consistent way is a challenge. On the positive side, a tagging strategy offers great flexibility. Major projects often require that you adapt as you go. You adapt because you learn. When I began this writing project, I started with the concept (tag) of layering. The more I read the more subcategories of layering emerged. The potential of describing augmented reality as layering information on the physical world was not something I even considered when I began thinking about online annotation and highlighting. It was easy to add the tag “virtual” to relevant content once this category occurred to me and because I had tagged all content reviewed from the beginning as “layered” I could quickly search to determine if I should add the tag to any other source. Tags are a way to actively process and reprocess content in working toward an emergent goal.
Collaborative Tagging. Twitter (X) users often tag their tweets. They don’t typically do this because they want to locate their own tweets. Tags within Twitter are a way to communicate a theme to followers or to indicate a shared interest. Often this is done just to be clever or funny, e.g., #happyday. However, it can also serve a very useful organization function for a group. For example, groups of educators sometimes gather at a specific time for a discussion sometimes called a Twitter chat. Twitter was not really designed for a group, real-time conversation, but the use of tags make this possible. You can search all of Twitter using hashtags. This means you can search Tweets generated by those you follow and by others not on your friend list. So, at a given time, those involved in a chat begin adding a specific tag to their tweets, e.g., #gfedchat. Following a stream of tweets with this hashtag by searching for the identifying tag allows Twitter users to have a group chat separate from would appear in these users’ normal Twitter stream.
Hypothes.is can work in the same way and has the advantage that annotations are not limited to the 280 characters available to Twitter users. Consider the many ways this might be useful. A common tag would allow a teacher to follow the students in his or her classes and would allow students to follow each other. This sharing would not be limited to reactions to one document, but could allow the sharing of annotations associated with multiple documents associated with one or more assignments. Classrooms with an Internet connection located anywhere could react to a common document as long as those reactions used a common tag.
Here is how tagging works. The image below shows several tags and the method for adding tags. If you look below the annotation already added, you should see a rectangular red box identifying two tags and the “add tags” link. Selecting add tags link opens up a dialog box allowing another tag to be added. Technically, your username and a group name for members operating in group mode also operate as tags. Tags function as search terms. Clicking on a tag will take the user to “the stream” showing chronologically ordered annotations associated with that tag.
4.5 Hypothes.is tags
The stream
The stream allows the use of tags to search the content generated by users of Hypothes.is. To understand how this works, remember I just said that tags can be added to any annotation, a group name can be thought of as a tag, and every annotation is tagged with the username of the individual generating that annotation.
To get to the stream, I recommend clicking the “person” icon appearing in the top, right-corner of the annotation panel. This action should reveal a drop-down menu and you can select your username to reveal the stream.
The image that follows displays a small portion of what Hypothes.is means by the stream. The stream lists Internet pages with a designated tag or combination of tags ordered by the date on which the most recent annotations were added.
4.6 Hypothes.is stream
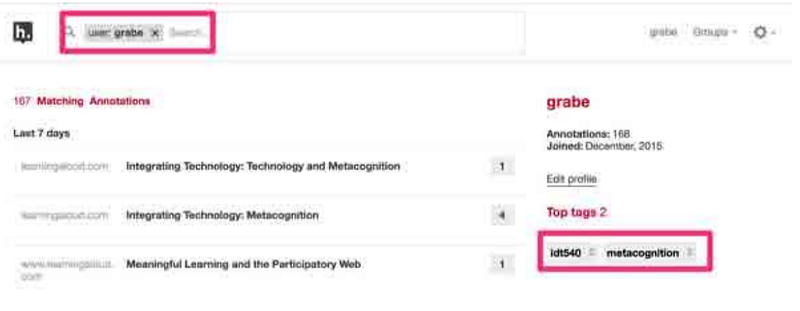
At the top of the page displaying the stream, you should see a search icon and a search text box. Within the search text box is my username because I used my username to move to the stream. When I use my username to open the stream, I see the ordered list of the web pages I have annotated.
If you look closely at my username, you should also see that there is a removal x. Clicking this x would remove my username from the search box. Doing this produces an interesting result, it generates a list of all Hypothes.is pages tagged by Hypothes.is users using the public tag. Searches in Hypothes.is list annotated pages based on the combination of whatever tags appear in the search box. I could add idt540 to the search box to locate all pages added by students from my idt540 group (one of my classes). I could add idt540 and metacognition to find all web pages tagged by students from the class also tagged with metacognition. You should get the idea.
The Hypothes.is Guide for Teachers suggests that students make use of a single “composite” tag. In contrast to using two tags, this would mean something like “idt540metacognition” would be suggested for students in my class reading the assigned readings dealing with metacognition. Both systems work.
4.7 Address for annotated text from stream
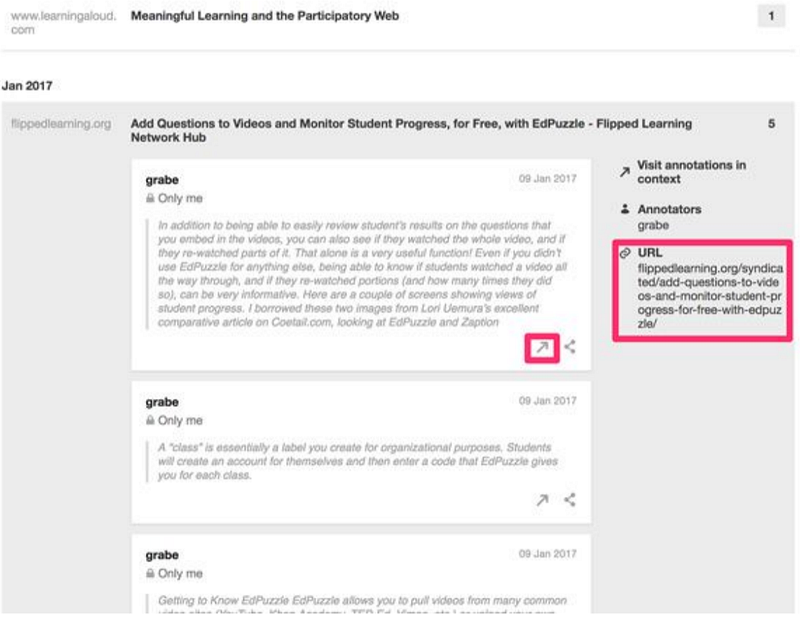
Clicking on one of the page names from the Stream reveals the annotations added to this page with the designated tag or tags. This collection of annotations appears with a link to the annotated page allowing easy access to the original content (see larger red box) or to the specific content associated with the annotation (see smaller red box with the arrow). This specificity allows for many creative uses. For example, if I wanted students to locate quality web pages on a designated topic, I could require they use a tag unique to this assignment and then I could search class tag, username tag, and assignment tag to locate the specific pages a student had identified and annotated. If I wanted to have students highlight a specific type of information within a designated web page, I could make that assignment and then search by class tag and username tag to see and evaluate the specific content the students annotated in response. I would use the “annotation within context” link within an annotation to see both what the student had to say and what in the original content was linked with that statement. (Note: I am assuming there that an assignment tag would not be necessary as the most recent annotated content would appear at the top of the stream meeting the other tags).
I am going to move on to another layering tool for web pages and then I will provide some summary comments.
InsertLearning — an annotation tool designed for K-12
InsertLearning is a service designed specifically to prepare content for processing by K-12 students. Each layered page is assigned to classes to which students have been assigned. The service differentiates the roles of teacher/designer and student with the teacher/designer having control of some layering tools that cannot be accessed by students. Among these unique tools is one that adds questions — multiple choice or open-ended — to the web page. Responses to these questions are stored online and can be accessed using the instructor dashboard.
The following material will describe InsertLearning in detail, but I wanted to establish from the start that of the two web annotation services described here InsertLearning was designed for a classroom setting so teachers may see immediately how it would fit with their way of doing things. The two services described in this chapter were selected because each offers different capabilities and are examples from an even greater pool of services educators could use.
InsertLearning is not a free service. For $100 dollars a year a teacher can create as many layered documents for as many students as desired. If the teacher wants to use InsertLearning for some projects over a more limited amount of time, the charge is $20 per month. The company provides a trial account allowing the creation of 5 lessons at no cost so if what you read here sounds interesting you can explore the capabilities of this service in depth at no cost.
InsertLearning is a chrome extension requiring a Google account. The ideal setting would be a school making use of Google Classroom, but individual Google accounts work as well. Schools already making use of Google Classroom would be able to integrate InsertLearning with greater efficiency. The chrome browser is cross-platform so no operating system is excluded. The service does run on the chromebook popular in so many schools.
Setup — InsertLearning makes setup easy. Visiting the company home page should reveal a way to install the extension. The big button tells you exactly what to do. Click the button to automatically install the necessary chrome extension and complete a simple form to create an account. Again, you will need a Google account and you will be required to use your Google ID to connect to this service.
Here is a simple description of how classes, assignments, and students end up organized as intended by the instructor. Each step will eventually be described in greater detail. The teacher/designer sets up an InsertLearning account. The teacher then identifies and labels a class or classes. When a class is created, a unique 4 character code is generated to identify that class. This code is provided to students and students use the code to enroll themselves in a class. Layered lessons are generated by the teacher and then associated with a class or classes. Students then have access to work on the layered lessons assigned to their class or classes.
Creating a layered page
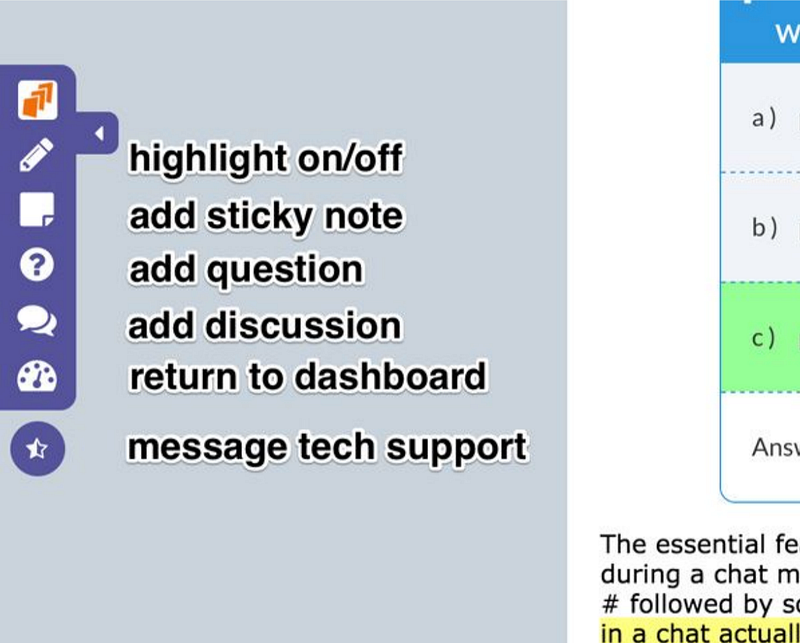
4.8 InsertLearning tools for teacher
The extension for InsertLearning is activated and deactivated using an icon that is added to the chrome toolbar when the extension is installed (see small red box located in upper right-hand corner of Figure 4.8). The process of layering the different InsertLearning components on a web page begins by selecting the icon to activate the service while viewing the web page to be annotated. When selected, a toolbar providing access to the various tools will appear in the margin of the browser window (see red box on left-hand side of Figure 4.8).
The following image (Figure 4.9) shows the palette of tools available to the teacher/designer. The palette includes a tool for highlighting, adding sticky notes, adding questions (multiple choice and open-ended), adding discussion prompts, and accessing the dashboard (for access to classes and lessons). The student palette is more limited including the highlighting and sticky note tools only.
4.9 InsertLearning teacher tools
Highlight and note tools. The highlight and sticky note tools are available to both teacher and student. What is highlighted or added as notes can be easily differentiated because the additions will appear in different colors (see image below Figure 4.10). A student will see teacher highlights, but not the highlights added by other students in the class. Note, seeing or not seeing the highlights of other students is one difference between Hypothes.is and InsertLearning. There are two ways to initiate highlighting. You can either select text and then click the highlight icon or click the highlight icon and then select text. To remove a highlight, you select highlighted content a second time and then click on the highlight. Two icons, a trash can and a + should appear. The trash can removes the highlight. The + opens a small window for adding a comment to the highlighted section (see purple comment image appearing in Figure 4.10). The comment will disappear when clicking in the body of content to move on. The presence of comments is difficult to see in the image below, but is indicated by a narrow line of color over the band of highlighted text. Clicking in this area will reveal the comment.
4.10 InsertLearning comments and sticky notes
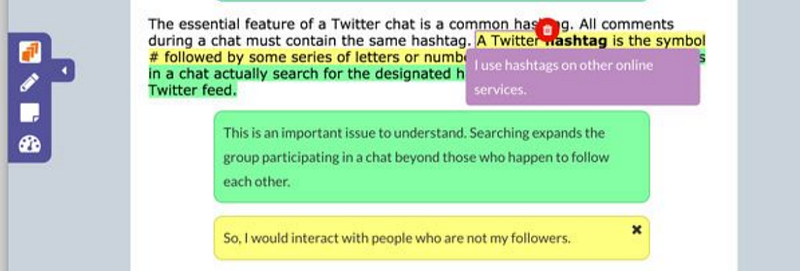
The larger bodies of text that can be added and will appear between paragraphs of the original content are the sticky notes. The sticky notes can be used to add text suited to a wide variety of purposes. The text as used by the designer can provide instructions, emphasize a possible application for the content being read, remind students of information presented in class and how it is related to what the student is reading, remind students of metacognitive strategies they are to be applying, and similar functions recommended in the chapter Generative tactics. Students can take notes to summarize what they are reading for review or respond to tasks they have asked to complete as they read. Sticky notes have one other major function that has nothing to do with taking notes or adding comments. The note window gives the user a way to insert other content almost as if the user was reauthoring the web page. It is easy to insert links to other web content within the note window. So, the instructor might ask the student to read from a second source and then compare the perspective taken with the way the same issue is addressed within the content the student was originally reading. Images and video can be inserted. Perhaps the teacher/designer thinks an illustration would help students understand the text material. Perhaps the student is asked to open a note window and add an image of their own to provide an example in response to a request from the teacher (also included as a note).
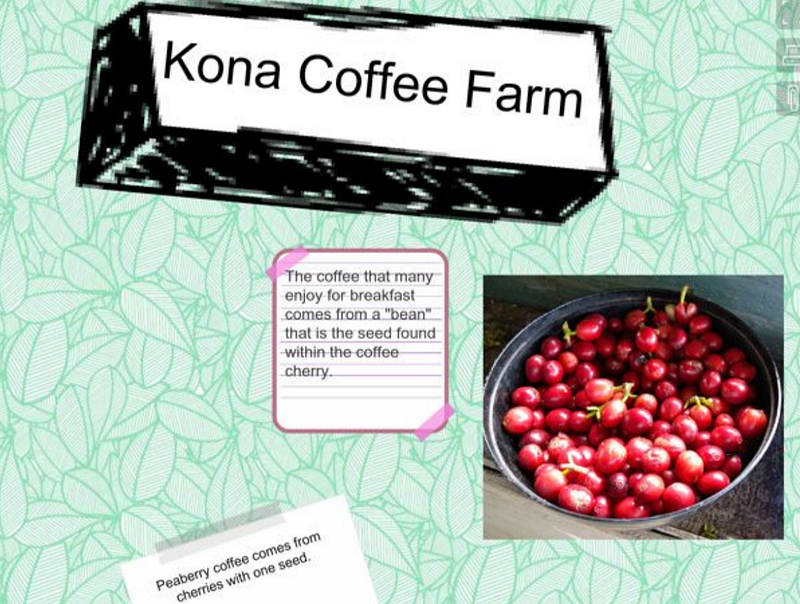
The possibilities go beyond these examples to include what I think is appropriate to describe as a mashup — basically the inclusion of a tool within a tool. Here is an example. As an educator, you may be familiar with another service called Glogster. Glogster allows the creation of what I like to call multimedia posters (see Figure 4.11). Glogs (the individual posters) can be added to other content using what is called an embed code. Many services provide for this process of adding their content or service. The service provides a way of generating the code and the user then copies the embed code and in this case would paste the code into the note window provided by InsertLearning. Here is a short list of some other services you might recognize that are compatible with InsertLearning using the embed code process (Padlet, Pinterest, Thinglink, Google tools). InsertLearning provides a complete and expanding list.
Embed code associated with the glog
width=”480" height=”650" frameborder=”0" scrolling=”no”
marginheight=”0" marginwidth=”0" style=”overflow:
hidden;”>
4.11 Partial image of a glog
Question and discussion tools — The tools to include questions and discussions are available only to the teacher/designer. Both are inserted in a similar fashion to the sticky note — you click a paragraph and then the tool. The question or discussion component will be added below the paragraph selected.
Discussion tool
4.12 Discussion tool
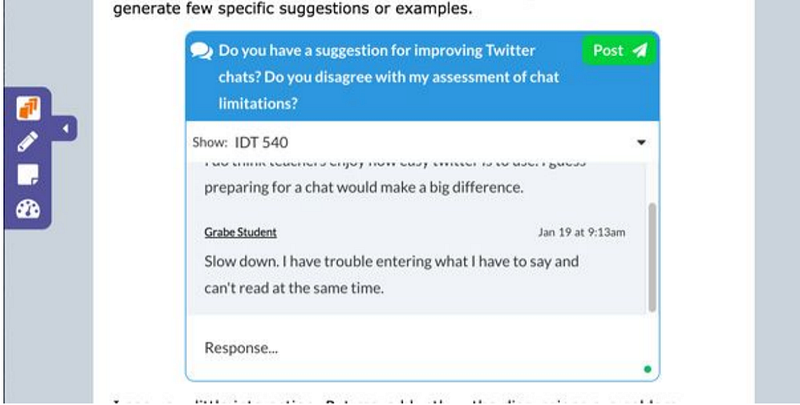
The image above (Figure 4.12) shows the discussion tool. Once a discussion tool has been added, the teacher/designer enters the prompt for the discussion. Students then can enter a response (see area of the tool indicating where a response… is to be added). Once the text has been entered, the post button is selected to add the response. This is not a hierarchical discussion tool that makes it easy to add a comment to a specific existing peer response. Each response is added to the list of the existing responses. Students and the teacher can return to scroll through to read the responses that have been added.
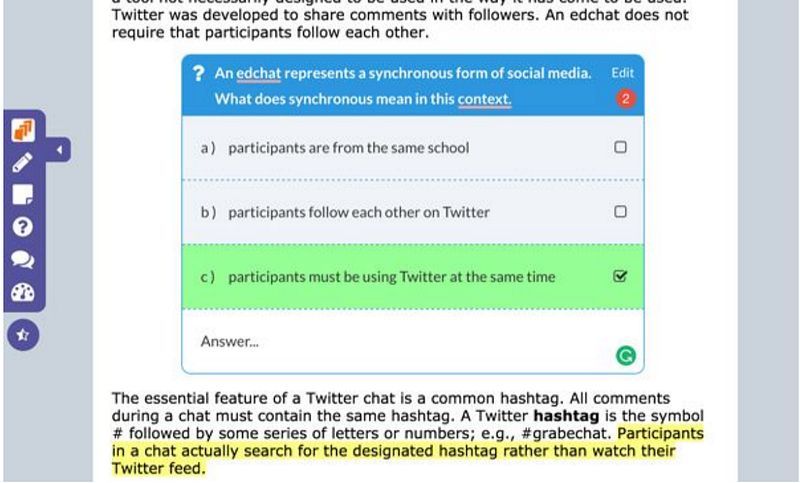
Question tool — The question tool allows the designer to add open-ended or multiple-choice questions. The addition of both question types begins in the same way. The question tool is used to add the question component at the desired location. The teacher/designer then enters the question stem. If the teacher then saves the question, the tool assumes the question type is open-ended and the student will be given a response area in which to enter a response. If the teacher/designer enters a response option rather than saving the question, the tool knows the question type is multiple choice. Response alternatives can continue to be added until the question is saved. A check box associated with each response allows the designation of the correct response.
Student users select a response until they find the correct response. There is presently not an alternative to this approach. The number of points awarded for the correct response declines with each selection.
4.13 InsertLearning question tool
Grade book — InsertLearning does a nice job of saving and organizing data on student responses to inserted questions in the gradebook. The gradebook allows the data generated by question responses to be examined in a variety of ways by applying filters (class, lesson, question, student) in different combinations. A point value based on the number of tries a student took to identify the correct answer will be stored. The teacher will have to score each open-ended response and enter a score.
4.14 InsertLearning grades
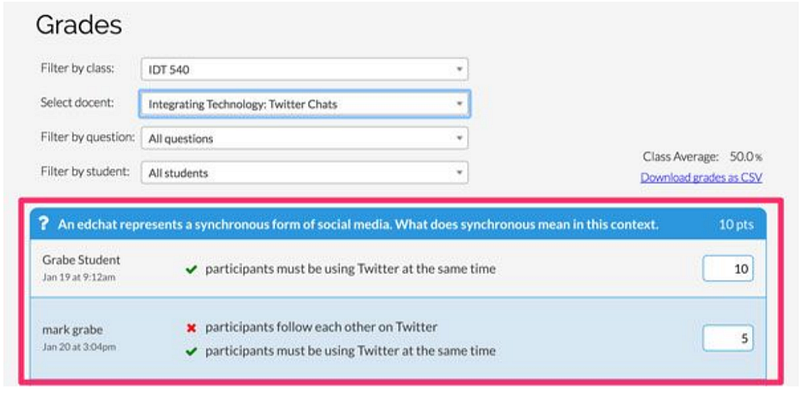
The teacher can use these data in different ways. The teacher may intend the inserted questions to provide a form of formative assessment and simply want to see that students had read the material and responded. The teacher may want to use the recorded data as part of the evaluation procedure for the class.
The teacher/designer may form other useful insights by considering the stored data. The system stores all responses to multiple-choice questions. So, for example, if the same wrong answer is selected repeatedly, the teacher/designer may want to examine the question to see if it is misleading in some way or consider the content to determine if students have in some way been misled.
Setting up classes, creating a lesson, and assigning lessons to classes
Most administrative tasks are accomplished from the dashboard (Figure 4.15).
4.15 InsertLearning dashboard
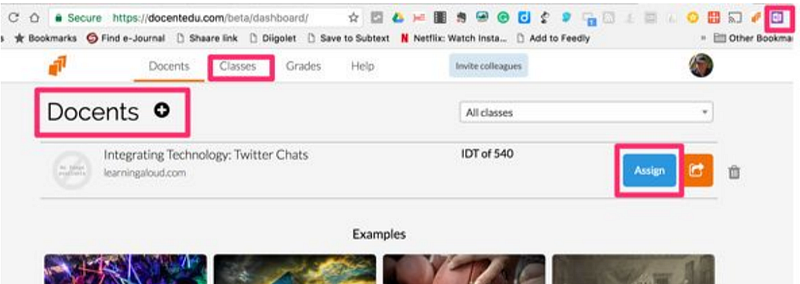
The categories of administrative tasks are shown as drop-down menus (lessons, classes, grades). Selecting “Grades” provides access to the filtering system you apply to specify the examples of student question performance you want to examine (see Figure 4.14). The image displayed above shows the display from the selection of “lessons”. This display provides access to the lessons already created and provides the button (red box around lessons +) for creating a new lesson. Alternatively, you can create a lesson by simply selecting the bookmark bar icon (red box in the upper right corner of the image) while viewing a web page you want to turn into a lesson. Lessons take on the title of the web page turned into a lesson. You should also note the “Assign” button enclosed in a red box. This button is used to assign a lesson to a class or classes.
The class menu opens up a page that lists the names of the classes that have been created. When the classes page is open, a button “Classes +” appears at the top of the page in the same location as the Lessons + button on the lessons page. Selecting Classes + allows the teacher/designer to name a new class. When named, an access code is provided. This code is provided to students who use it to add their names to the class list.
Summary
This chapter describes two services for layering useful content on web pages. Again, these are not necessarily web pages originally generated by the teacher/designer. The services described can be used to work with more than this category of content, but this ebook deals only with online content. Exploring the online resources provided by the companies responsible for these tools explain the full range of capabilities of their products. There are also other services that allow educators and students to do similar things. The two selected for description have a history of use in education settings and are different enough to explore how each might be best suited to different purposes.
There are no perfect technology services and if there were they would be too bloated and complicated to use effectively. I do urge educators to consider tools with enough flexibility that the time spent in class can be mostly spent on learning activities and not on learning the next tool. So, there are decisions to be made and educators should personally invest some time in exploration before assigning tools and tasks.
Here are a few observations based on my own observations and experiences using one of these services with my own students. One issue you might want to consider is whether the tactics that interest you are more focused on collaboration or personal experiences and if collaboration is the goal what type of interaction is desired. Hypothes.is operates in two modes: private or group (actually also public which would be even more open than group). InsertLearning is open to the teacher and an individual student with the exception of the discussion tool. The discussion tool allows the educator greater control of student interaction. Hypothes.is offers users equal control and could be more student-centered. Hypothes.is offers a greater emphasis on peer collaboration when it comes to annotation and highlighting. InsertLearning would offer an opportunity for “expert” modeling and annotation.
The idea of public scholarship and authentic audience comes up in many discussions of student authoring to learn. Hyothes.is originated with a broader goal than K-12 application. Efforts have been made to annotate public documents of all types (e.g., party platforms and the inauguration speech from the 2016 Presidential election). The company uses the slogan “The Internet, Peer Reviewed” and the company just passed the million public annotation mark when I was writing this ebook. The opportunities for argumentation seem obvious. What does any given individual identify as important in a third-party document and what argument is made based on what is deemed important. Of course, the opportunities for chaos and incivility also seem possible. There is possibly something to learn from either outcome and the opportunities taken may depend on the maturity of the students and the topics being considered.
InsertLearning’s inclusion of questions and the system allowing instructors to view and possibly assign credit based on performance is unique. I would probably not recommend that the level of performance be heavily weighted when it comes to assigning grades, but the potential for formative assessment, the mathemagenic value of questions, and the possibility of feedback to the teacher/designer would argue for the value of the question tool.
Both systems described here offer a way to connect to external content. Links to other web pages to expand a point or contest a point made in the original document under consideration offer both teacher and students a useful opportunity. The InsertLearning opportunities of this type are a little more sophisticated, but the location and use of embed statements does require some experience.