
Three Solutions for Updating your GitLab Repository Fork
Updating a project fork from GitLab can be a helpful way to keep your own copy of a repository in sync with the original project. This can be particularly useful if you plan on contributing back to the original project or if you simply want to stay up-to-date with the latest changes. In this blog post, we’ll take a look at three possible solutions to updating a project fork from GitLab.
A few basics
Before we begin, it’s important to note that in order to update a project fork from GitLab, you will need to have your own copy of the repository on GitLab, and you will need to have forked the original repository. If you haven’t already done this, you can follow the steps outlined in GitLab’s documentation on forking a project.
In my case, I have forked the Gitlab.com / www-gitlab-com repository.

As a general rule, in your fork, you don’t commit to a protected branch, like master or main. If you want to contribute back to the original, you do that by creating a branch and subsequently a merge request.
There are three possible solutions that I know of and I will demonstrate them in this tutorial:
- Solution #1 — Using repository mirroring
- Solution #2 — Using Git in your terminal
- Solution #3 — Using a GitLab CI pipeline
Let’s dig into them.
Solution #1 — Using repository mirroring
Once you have your own copy of the repository on GitLab and you have forked the original project, you can begin the process of updating your fork.
This is a very convenient solution as you don’t need to leave your browser to update the repository. However, this is a paid feature that requires a GitLab Premium subscription.
Use can use this feature by going to the forked project and selecting “Settings” > “Repository,” and expanding the “Mirroring repositories” section.

If “Mirror direction” is disabled, it means that you are on the free plan on GitLab.com plan or are using GitLab CE.
Solution #2 — Using Git in your terminal
In this case, I am making the assumption that you already have configured Git on your computer to work with your GitLab server. If not, please visit these resources depending on your OS:
- How to set up your SSH key for GitLab on Windows
- How to set up your SSH key for GitLab on Linux
- How to set up your SSH key for GitLab on macOS
The first thing you’ll need to do is to clone the forked repository using git clone. Replace the branch master with main if needed in all upcoming commands. So the command will look something like this:
git clone [email protected]:YOUR-USERNAME/FORKED-REPO-NAME.gitOnce this is complete, we will add the original repository as a remote. To do this, navigate to the local directory where you have just cloned the fork. Then, enter the following command:
git remote add upstream https://gitlab.com/ORIGINAL_OWNER/ORIGINAL_REPOSITORY.gitReplace ORIGINAL_OWNER with the username of the owner of the original repository and ORIGINAL_REPOSITORY with the name of the original repository. This command will add the original repository as a remote to your local copy of the repository.In my case, the command looks like this:
git remote add upstream https://gitlab.com/gitlab-com/www-gitlab-com.gitNext, you’ll need to fetch the latest changes from the original repository. To do this, enter the following command:
git fetch upstream masterThis command will retrieve all of the latest commits made in the master branch from the original repository.
Let’s first make sure we are in the right branch:
git checkout master
Once you have fetched the latest changes, you can merge them into your own repository by entering the following command:
git pull upstream master
This command will pull the latest changes from the original repository into your own repository.
Now let’s push these changes to your own fork of the repository on GitLab. To do this, enter the following command:
git push origin masterThat’s all there is to it! Okay, I admit, these are a few commands to remember. But with these simple steps, you can easily update your project fork from GitLab and keep your repository in sync with the original project.
Now let’s put everything in a single command you can run from within the directory of the repository so that next time, you don’t have to time so much:
git checkout master && git fetch upstream master && git pull upstream master && git push origin masterCreating well-researched and to-the-point content requires a lot of time and energy. If this was helpful and you wish to support me, please leave a comment, share, and press that 👏 a few times (up to 50 times). And consider subscribing to Medium.
Solution #3— Using a GitLab CI pipeline
Since now we have a bunch of commands we need to run to update this repository, why not automate everything with a GitLab CI pipeline?
This way, if we use WebIDE for making changes, we don’t need to keep a local copy of the repository. This particular repository is quite large and occupies around 8.5 GB on the disk, so I am anyway not very keen on keeping it.
First of all, let’s create a new branch. I will name mine update-from-upstream.
Use WebIDE to open the .gitlab-ci.yml file.

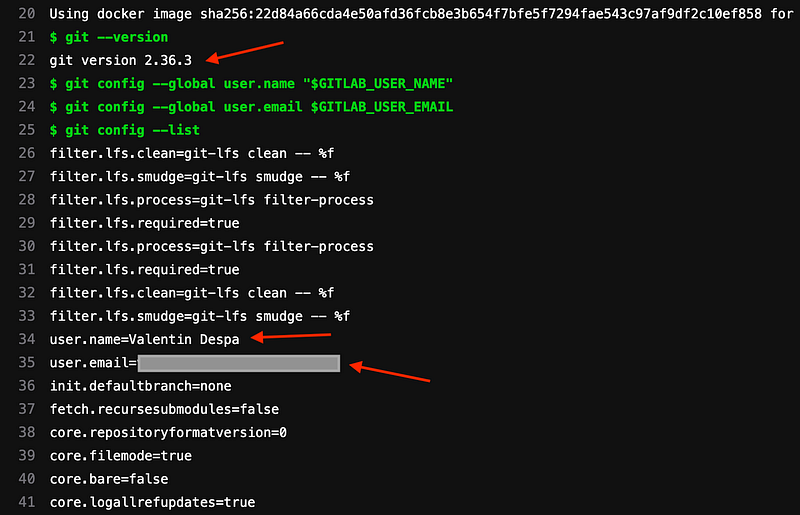
Let’s replace the content with a very basic pipeline configuration using alpine/git, a lightweight Docker image. To make Git happy, we will also configure the user name and email.
update fork:
  image:
    name: alpine/git
    entrypoint: [""]
  script:
    - git --version
    - git config --global user.name "$GITLAB_USER_NAME"
    - git config --global user.email $GITLAB_USER_EMAIL
    - git config --list
Commit the changes, and you should see the pipeline running in “CI/CD” > “Pipelines.”

What we should see in the logs is that we have configured Git properly.
If you want to learn how to build pipelines in Gitlab CI, I have created an online course that starts with the basics of Gitlab CI and YAML and helps you understand the fundamentals of CI/CD. Learn more about the course.
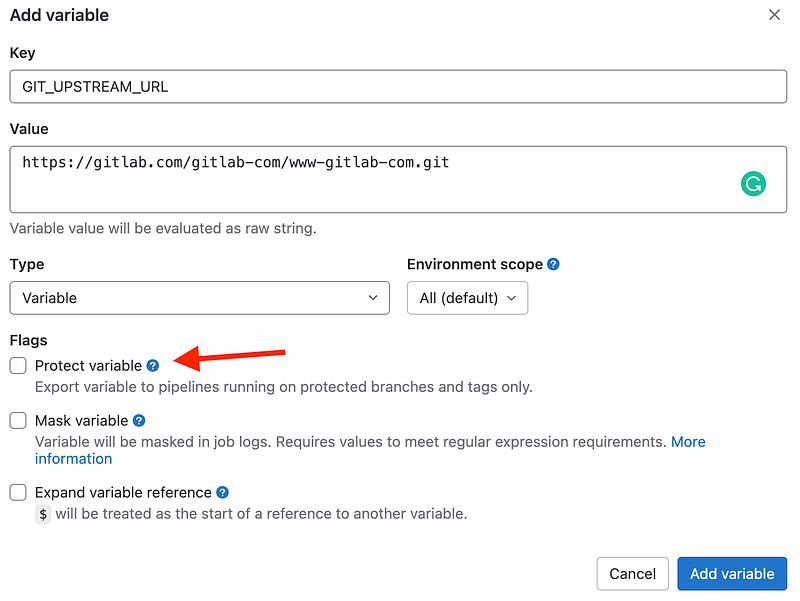
We should try to keep our .gitlab-ci.yml file free for any hardcoded URLs. For this reason, let’s store the remote URL in a variable.
Click on “Settings” in the left menu, then click on the “CI/CD” option. Expand the “Variables” section and click on the “New Variable” button. Use the key GIT_UPSTREAM_URL and provide the value of your upstream repository (the one you have forked from).
Important: since this pipeline is running on a branch, make sure the “Protect variable” flag is disabled. Otherwise, we won’t be able to access this value.
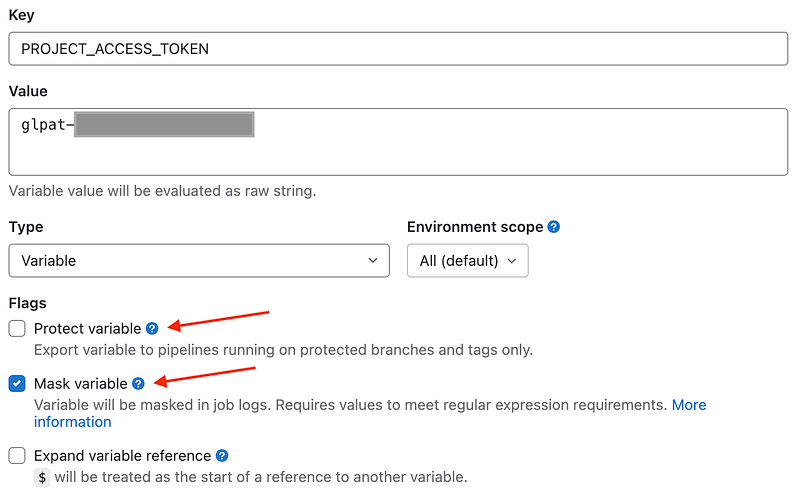
In a GitLab pipeline, we can checkout the project Git repository, but we don’t have permission to make changes to the code. For that reason, we will create a project access token which has write permissions only to this project. For security reasons, this is a better approach then creating a Personal Access Token as it limits access to only the resources that we need.
Click on the “Settings” option in the left menu, then click on the “Access Tokens” option. Click on the “New Access Token” button.
Give your access token a name (it does not matter, something for you to remember why you created it), and remove any expiration date. Select the role of the access token to “Maintainer”. We will only need write permissions to the repository, so from the list of scopes, select write_repository.

Your access token will be displayed on the page. This token will be shown only once and cannot be retrieved again. If you lose it, you will need to create it again and delete the old token.

Go ahead and store this token in a GitLab variable named PROJECT_ACCESS_TOKEN. Make sure the “Protect variable” flag is disabled and the the variable’s value is masked.
Now we have everything in place to complete our .gitlab-ci.yml pipeline:
update fork:
  image:
    name: alpine/git
    entrypoint: [""]
  script:
    - git --version
    - git config --global user.name "$GITLAB_USER_NAME"
    - git config --global user.email $GITLAB_USER_EMAIL
    - git config --list
    - git checkout $CI_DEFAULT_BRANCH # this needs to happen before adding the upstream remote
    - git remote add upstream $GIT_UPSTREAM_URL
    - git fetch upstream $CI_DEFAULT_BRANCH
    - git pull upstream $CI_DEFAULT_BRANCH
    - git remote set-url origin https://$GITLAB_USER_LOGIN:$PROJECT_ACCESS_TOKEN@${CI_REPOSITORY_URL#*@}
    - git push origin $CI_DEFAULT_BRANCH
By using a combination of predefined GitLab variables and two variables defined by us, we have a GitLab CI YAML without any hardcoded values.
Let’s run it and take a look at the result:

You can trigger this pipeline manually whenever you need it or you can define a schedule.
From “CI/CD” option in the left menu, let’s select “Schedules” to schedule an execution according to your needs. Don’t forget to select a timezone and the update-from-upstream branch.
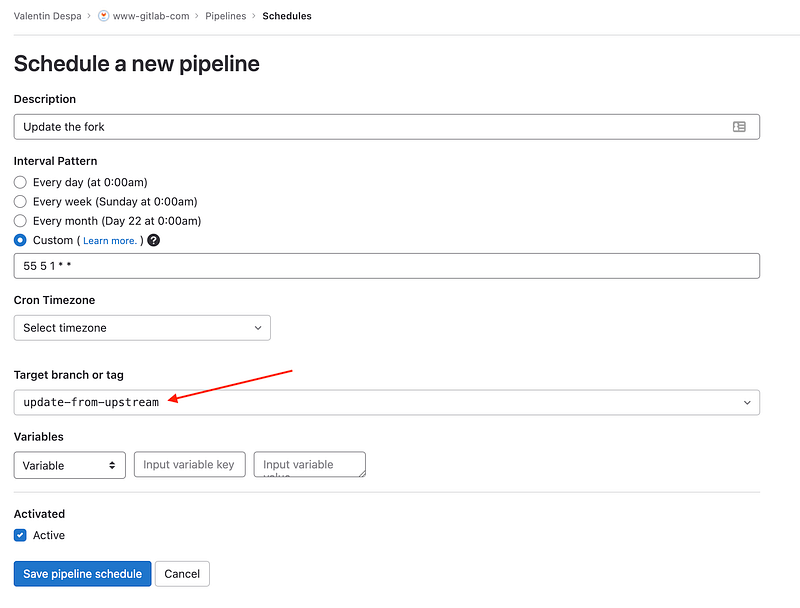
With a total execution time of about 10 minutes, I am not very keen on running this job very often as it would be a waste of resources. So I’ve scheduled it to run only once per month, on the first day of every month at 5:55.
Troubleshooting
You are not allowed to upload code
While pushing back to your fork, you may get the error:
remote: You are not allowed to upload code.
fatal: unable to access ‘https://gitlab.com/vdespa/www-gitlab-com.git/': The requested URL returned error: 403
This error indicates that the user attempting to push code to the GitLab repository does not have sufficient permissions to do so. The user used by GitLab is only allowed to checkout the code, but can’t make changes to it.
I recommend creating a project access token with the right permissions.
remote: GitLab: You are not allowed to push code to protected branches on this project.
This error message usually occurs when you are trying to push code to a protected branch on a GitLab repository. Protected branches are branches that have certain restrictions applied to them, and are usually used to prevent accidental or unauthorized changes to the codebase. Such branches are typically master or main.
Typically only users with the Maintainers role are allowed to push to this branch.
You can manage branch protection rules and permissions in the repository’s Settings > Repository > Protected branches.

You can either unprotect the branch or use a user that has the Maintainers role.
Conclusion
I hope this tutorial helped you find the best way to update your GitLab fork. Leave a comment in the section below if you have any questions. I would love to hear from you!
Thank you for sticking with this article until the end. If you enjoyed it, please leave a comment, share, and press that 👏 a few times (up to 50 times). It will help others discover this information, and maybe it will help someone else as well.
Follow me on Medium and YouTube if you’re interested in more tutorials like this.
Want to learn more about Gitlab CI?
I am not only writing here on Medium, but I am also an online instructor. So if you are interested in learning more about Gitlab CI, maybe you want to take a look at my Gitlab CI: Pipelines, CI/CD, and DevOps for Beginners online course.
References
[1] GitLab (n.d.). Repository mirroring. GitLab Docs. Retrieved January 7, 2023, from https://docs.gitlab.com/ee/user/project/repository/mirror/
[2] Van den Berg, M. (n.d.). GitLab Repo Mirror Pull Sync — Docker Image + GitLab Scheduled Pipeline. GitHub. Retrieved January 7, 2023, from https://github.com/danger89/repo_pull_sync_docker_image
[3] Schinagl, O. (2019, March 25). Cannot push from gitlab-ci.Yml. Stackoverflow. Retrieved January 7, 2023, from https://stackoverflow.com/a/55344804/766177


