
New MVC: Single Responsibility Principle and Delegation
A different way of implementing MVC in your iOS apps

Last weekend, I was tinkering with the idea of a correct MVC architecture implementation in iOS apps. Having heard many developers complaining about Apple’s suggested design pattern, I decided to come up with my own solution, trying to address these common issues:
- The notorious “Massive View Controller.”
- Vague separation of responsibilities.
- Tight coupling between controller and a view.
- A dumb and plain model that does almost nothing.
Having had hands-on experience with MVP, MVVM, and VIPER, I could see a way to improve an MVC design pattern, keeping the nuances of these architectures in mind.
Let’s Start
Let’s take a look at this diagram:
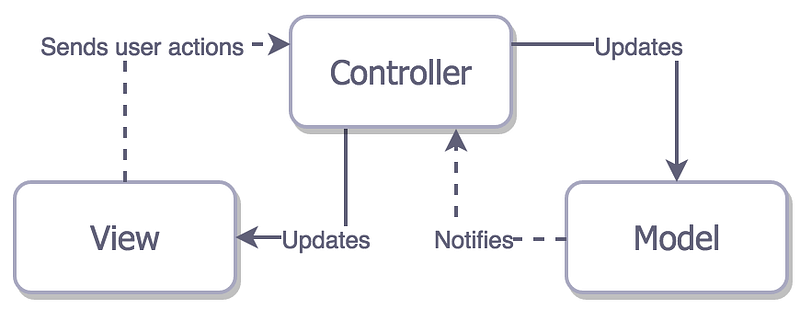
This is how the ideal MVC should be implemented. We can clearly see that each component does its own unique task, then sends a message to another one to do a different task, and the cycle repeats. Overall, it represents a bidirectional data flow:
Viewsends a user action to aController.Controllertells aModelto perform a certain task based on that user action.Modelforwards the result of the task back to theController.Controllersends the displayable result back to theView, which refreshes itself with fresh data.
Example Project
The sample project is a simple app that allows you to add items to the list, display them in a UITableView, and perform Create, Read, and Delete operations with them using the Realm Database.
The source code of the app is available on GitHub.

Project Structure
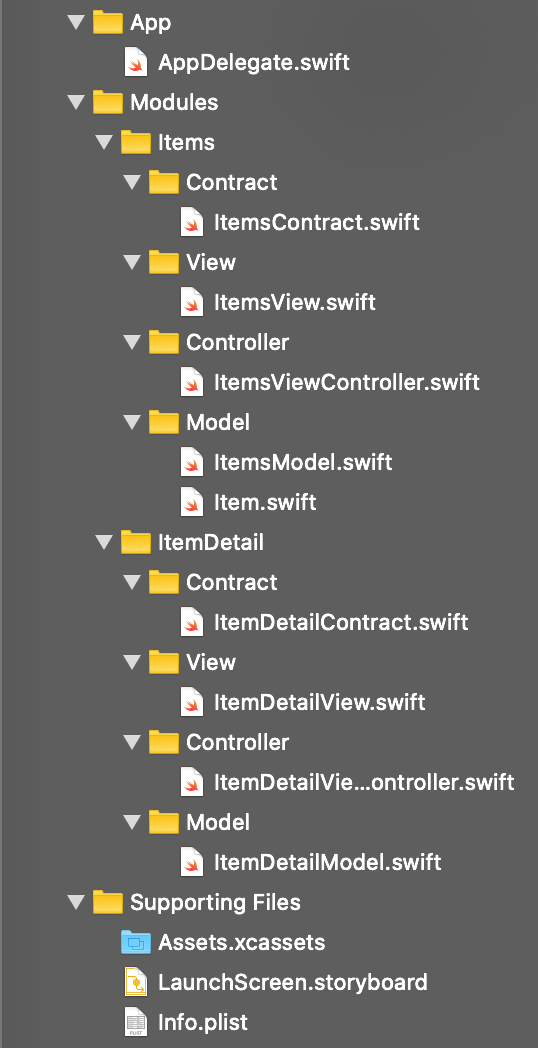
The root of the project is divided into three folders: App, Modules, and Supporting Files. App contains the AppDelegate.swift file, while Supporting Files folder has Assets.xcassets, LaunchScreen.storyboard, and an Info.plist. Our main focus here is the Modules folder.
This is what each module is comprised of:
Contracthas a file containing four protocols thatView,Controller, andModelconform to. Each protocol defines the responsibilities ofModel,View, andController.Viewcontains all our UI elements that subclass fromUIView. All it does is performing layout of its subviews, waiting for theController’s response with fresh data, then refreshing itself with that data.Controllercontains aUIViewControllersubclass that’s a mediator betweenViewandModel. Its responsibility is to respond to UI events by firing relevant methods in theModel, receiving the result from theModel, then transforming it into a UI-displayable format and sending it back to theView.Modelcontains simple objects and is responsible for performing operations with them. It doesn’t assume anything about how these objects will be transformed to be layout in the view. After it does a needed operation, like fetching from a database, it sends the raw result to theController.
With that clear, let’s explore the architecture in practice.
ItemsContract
Let’s define four protocols that describe all the rules that Model, View, and Controller will follow:
ItemsContract.swift
Here’s an elaborate description of each protocol:
ItemsViewInputcontains methods that theItemsViewwill fire in response to user actions or its lifecycle events.ItemsViewControllerwill conform to this protocol.ItemsControllerInputhas methods that will be run in response toItemsViewInput. For example, when aViewloads, it fires theonViewLayout()method, which leads toControllertriggeringretrieveItems()method.ItemsModelwill conform to this protocol.ItemsModelOutputis comprised of methods, which will be fired when theItemsModelcompletes its task. For instance, whenretrieveItems()method was run and items were fetched, it runs theonItemsRetrieval(_ items: Results<Item>)method which sends the raw result back to theItemsViewController.ItemsViewControllerwill conform to this protocol.ItemsControllerOutputhas methods that will be called when theItemsViewControllerreceives the result fromItemsModeland transforms it into a suitable format for theItemsViewto display.ItemsViewwill conform to this protocol.
Note that Controller has strong references to the View and Model, while both View and Model have a weak controller property. This way we avoid potential memory leaks.
AppDelegate
Let’s create and set up the rootViewController for the window:
ItemsView
We create all our UI elements here.
ItemsView.swift
Here’s how we send a message to the controller when the view was layout:
Let’s take a closer look at the ItemsControllerOutput protocol conformance:
As I wrote before, these methods will be fired inside the ItemsViewController.swift file when the ItemsModel sends a particular result to it.
ItemsViewController
Here we should conform to two protocols: ItemsViewInput and ItemsModelOutput. We will receive user actions through the ItemsViewInput, call needed methods in the ItemsModel, then receive the result through the ItemsModelOutput.
ItemsViewController.swift
First, we assign the controller’s view property to the ItemsView:
Now, let’s explore how we handle user actions:
As you can see, when a user taps on the “Add” bar button, ItemsView fires the onAddTap method which signals the ItemsViewController to present an alert. Or, when the “Save” button is tapped on the alert, ItemsViewController tells the ItemsModel to save an item with a title in the Realm database.
And this is how we work with Model’s operation result:
onItemsRetrieval method is an example of result transformation and forwarding it to the view. We receive a list of Item objects from the ItemsModel, transform it into an array of String and send this array to the ItemsView.
onUUIDRetrieval method is also interesting. Here, we don’t want the ItemsView to do anything. All we care about is navigating to the new screen that displays the selected item’s title. We simply build up a new module, and push the ItemDetailViewController onto the navigation stack.
ItemsModel
We need to create an Item object here and provide methods for working with it.
Item.swift
Represents a simple Realm object:
ItemModel.swift
This is where all the interaction with Item will happen:
We can see that ItemsModel is responsible for fetching, adding, and deleting items. On completion of each task, it invokes a relevant method inside the ItemsViewController:
As a result, we have the following workflow:
ItemsViewloads and thelayoutSubviews()method is triggered.ItemsViewcallscontroller?.onViewLayout().ItemsViewControllercallsitemsModel?.retrieveItems().ItemsModelretrieves items from theRealmdatabase then callscontroller?.onItemsRetrieval()passing in the items property as a parameter.ItemsViewControllertransformsitemsinto an array ofString, then callsitemsView?.onItemsRetrieval()passing in the titles array as a parameter.ItemsViewreacts to the new data inside theonItemsRetrieval()method by assigning titles property and reloading thetableView.
With that, we’ve completed the Items module.
ItemDetail
The implementation here is very similar.
ItemDetailContract.swift
As before, we define four protocol for our ItemDetailView, ItemDetailViewController, and ItemDetailModel to conform to:
ItemDetailView.swift
Similar to how we did it in the ItemsView , here the ItemDetailView waits for the ItemsDetailViewController’ss response using the onItemRetrieval method:
ItemDetailViewController.swift
Waits for the ItemDetailView input and ItemDetailModel output:
ItemDetailModel.swift
Model receives the command from the Controller, performs an item fetching, then forwards the result back to the Controller:
Wrapping Up
As a result, we have separated responsibilities inside our app between three components:
Viewsends user actions and updates itself on theController’s response.Controllerreceives theViewinput and tellsModelwhat to do based on that input, afterward receiving theModelresponse, transforming it into a View-suitable format and sending it back to theView.Modelperforms a needed business logic task, sending the raw result back to theController.
Note that to set up a new module, we had to repeat some steps. For that purpose, I created an Xcode File template that generates an MVC module. Instructions on how to add it to Xcode are described in the README.md file of this repo:
If you’re interested in different architectural patterns, feel free to check out my other relevant pieces:
Thanks for reading!


