
SUPERALGOS PROJECT
The Power of Free and Open-Source Decentralized Social Trading
How to use Superalgos to automatically follow the trading bots of seasoned algorithmic traders, free of charge!

Trading is Not Easy
Superalgos is the most powerful trading automation platform out there, first on GitHub, and is community-owned, free, and open source. The platform democratizes access to state-of-the-art trading technology and helps make retail traders stronger, faster, and smarter.
However, leveraging the platform to design, test, and deploy strategies is not trivial.
Profitable trading requires a profound understanding of the market, and markets are extremely complex adversarial systems. You are competing against apex predators! Adding an automation layer on top can only add more complexity.
Superalgos is a robust and extremely flexible platform that provides the right tools for the job. It is to be expected that is somewhat technically demanding!
Don’t let commercial trading bot platforms fool you into believing that profitable trading is easy! They are after your money, like everyone else in the market!
In contrast with the adversarial nature of markets and the perverse incentives of commercial trading bot platforms, the Superalgos Project is predicated on collaboration. We build technology and share intelligence that empowers the community.
Our Collaborative Social Trading Paradigm
In that context, we devised a social trading paradigm by which seasoned traders may benefit from letting others follow their bots and copy their trades.
In a nutshell, traders are incentivized with the native Superalgos $SA Token to broadcast their bots’ trading activity so that less-experienced Superalgos users may follow and copy their trades automatically.
The more followers traders amass, the more tokens they earn.
This incentivizes traders to produce profitable strategies and protect followers from loosing money — otherwise, they would stop following!
Contributing Your Fair Share
Superalgos is a collaborative project, and we expect you to contribute your fair share. The platform is free and open-source, but you need to chip in to access these premium community services!
To follow trading signals, you will need to hold some Superalgos $SA Tokens.
How many depends on the signal provider, as it is them who define the requirement for each of their signals. The more profitable the strategy, the more tokens may be required. At this point, the requirement ranges between SA 50K and 2.5M, depending on the strategy.
Notice that you don’t need to spend your tokens to follow a signal. You just need to hold tokens in your account.
If you’re unhappy with the results, you can always use your tokens for something else or sell them in the market.
Please read the article below to understand your role as a member of the community. It explains how signal providers offer their service and what you can expect from them and the project as a whole. It’s important that you read it so that you start with the right expectations!
The TL;DR version is we all do our best on a voluntary basis. No one is paid to run signals or the infrastructure. If something doesn’t work as expected, we’ll try to find solutions. The project is a collective, voluntary effort and everyone is expected to contribute for things to work—including you.
Token Power
Token Power is the abstraction within the Governance System that enables you to use your tokens without spending them. For each token that you hold in your account, you get one unit of Token Power. Then you allocate the Token Power — not the tokens — to follow signals. The actual tokens remain in your wallet, always under your control.
Token Power is not reusable. If you wish to follow more than one signal, you will need enough tokens to cover the combined Token Power requirement of all the signals you may be interested in.
Distribution of Signals
It’s worth noting that users who allocate the most Tokens Power to follow a signal get the signal first. The requirement is the minimum you need to access the signal, but you may choose to allocate more if you wish. Theoretically, being first increases the potential profitability as your orders hit the order book first.
Any given signal is distributed among all followers within one minute.
That is, the follower with the most Token Power gets the signal immediately, while the follower with the least power gets the signal up to sixty seconds after the first one.
How to Get Superalgos $SA Tokens
Users get tokens as rewards for contributing to the project or may buy tokens from the market if they can’t contribute.
Contributing to the open-source project benefits everyone for obvious reasons — the system improves for everyone the more people contribute!
Buying tokens from the market directly supports the people bringing you this magical collaboration. This is why…
The project doesn’t sell tokens; it distributes the token exclusively among open-source contributors!
When you buy the token from the market, you buy it directly from the people advancing the open-source project.
NOTE: Our token distribution model makes the token available to everyone willing to contribute value, and not just to those who have money. All in all, it’s a brilliant all-win, positive-feedback-loop design of incentives!No Trust Required
Everything runs on your premises, meaning on computers you control, and you trade from your account at the exchange of your choice. This is — of course — by design, as Superalgos strives to serve the community and not third parties, VCs, or anything of the sort.
You won’t need to trust anyone with your funds, your exchange keys, or your personal information.
If someone appearing or claiming to be a developer with Superalgos, a Core Team member, or an admin in the Superalgos Community group, ever contacts you in private, it’s a scam. In fact, we will never ask you — and you should never need — to trust us in any way.
Getting Started With Superalgos
In a nutshell, to participate in our free and open-source decentralized social trading network, you need to:
- Install Superalgos. Again, it’s free and open source. Follow the instructions on the repository’s README, and join the Telegram Support group in case you need any help. I suggest the Installation for Developers and Contributors as it’s the most flexible and the one that most people use, so will be easier to get help if you need any. You should be up and running in 20 minutes if everything goes well. Ask for help if you run into any trouble!
- Learn the basic operation. As soon as you launch the platform for the first time, the Welcome to Superalgos! in-app interactive tutorial launches. Complete this tutorial and the two other tutorials in the Getting Started Tutorials workspace to learn all the basics. Don’t skip stuff lightly. You will need the operational knowledge later on. On the contrary, feel free to do the tutorials more than once until you feel comfortable playing around with the system. This should take you anything from two to four hours.
- Create your user profile. You do this by following the Creating Your User Profile tutorial in the Token Distribution Superalgos workspace.
The above is what you would do as first steps anyway if you intended to work on your own strategies.
Now, let’s talk social trading!
Quick Checklist to Follow Signals
Once you are familiar with the platform and have contributed your User Profile, then you may start with the trading setup.
Some of the terminology I will use from now on may not be self-explanatory. Still, I won’t explain every detail in this post as the meaning of certain terms will become clear once you do the first few tutorials. Also, every detail is further explained in the in-app documentation.
I will expand on each point later on, but, in a nutshell, this is the bird’s-eye-view of the setup:
- Load the signal provider’s plugin workspace.
- Load your User Profile into the workspace.
- Create some specific nodes in your User Profile to define what services you wish to connect to.
- Drive Token Power to the appropriate nodes.
- Use the Profile Constructor to install the required Signing Accounts that will authenticate you in the peer-to-peer network.
- Contribute your User Profile so that Network Nodes may pick up the new definitions.
- Link up the corresponding reference nodes under the Data and Trading Tasks to the new definitions in your User Profile.
- Set up your exchange API Key and make sure you have enough funds at the exchange.
- Run your Data Tasks to fetch candles from the exchange.
- Run your Trading Task to connect to the network.
- Run your Live Trading Session to start trading.
The above bullet points serve as a checklist every time you wish to follow a new signal provider. Now let’s dive into the details!
NOTE: If you’re not familiar with Superalgos yet, I suggest you install the software and complete your basic education before continuing to read this guide. It won’t make much sense to you otherwise!Running Your First Live Social Trading Test
We set up a test signal so that you may familiarize yourself with the setup the first time. Once you grasp how everything works, then you’ll be ready to start following the pros!
The testing signal has Token Power requirement of zero, meaning you can test your setup even if you have no tokens in your account.
The process to follow real signals is virtually the same, but for those you will need some Token Power!
1. Load the Test Plugin Workspace
Load the Trading Signals Follower Test Plugin Workspace. Later on, when you follow real signals, you will load the specific workspace for that signal, supplied by the signal provider.
The Trading Signals Follower Test workspace features the typical setup that signal providers offer users who wish to follow their bots. The main difference is that it fetches signals from a test strategy that is not intended to be profitable. Instead, it’s optimized to run a quick test, placing a few orders for a small amount of money within a short period, for testing purposes.
2. Load Your User Profile
This is the User Profile you created while doing the Creating Your User Profile tutorial in the Token Distribution Superalgos workspace.
There are two ways to load your User Profile into the workspace: using the Plugins hierarchy or the drag and drop feature.
Plugin Hierarchy Method:
Go to the Plugins node, expand the Governance Plugin Project, and select Add Specified User Profile option on the menu of the Plugin User Profiles node. Select your User Profile from the list.
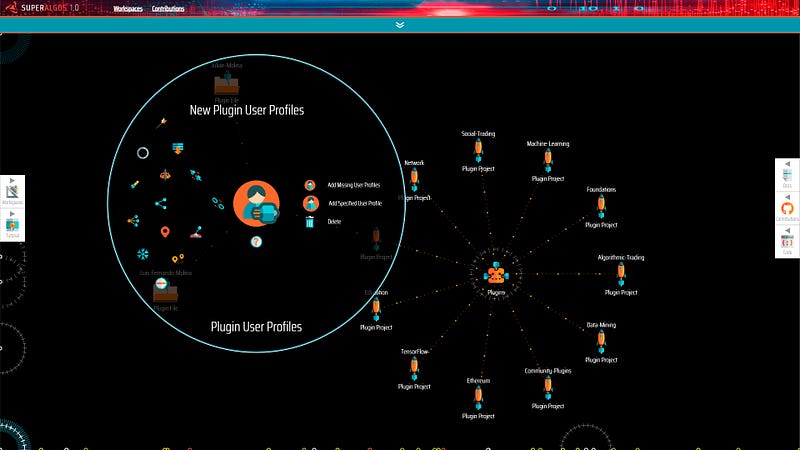
A Plugin File is added with your name.
Now save the workspace and refresh the page. Once you do, your User Profile should load into the workspace.
Drag & Drop Method:
In your file system, go to the following location:
\Superalgos\Plugins\Governance\User-Profiles
Find your User Profile, drag it and drop it on the Design Space.
In your User Profile menu, select Install As Plugin, save the workspace, and refresh the browser.
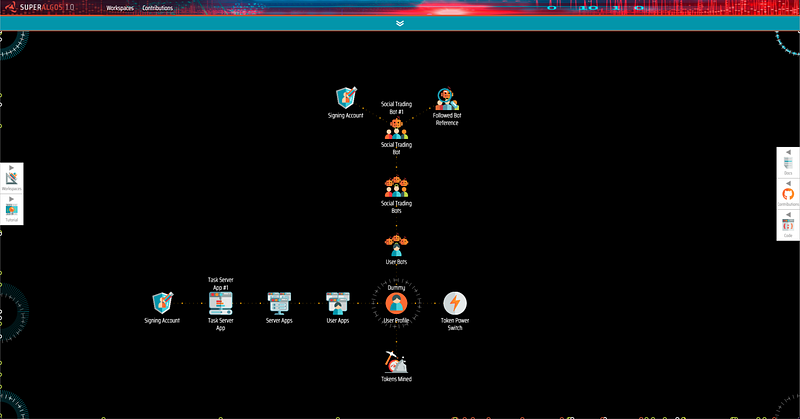
3. Set Up Your User Profile
In the menu of your User Profile, and click your way through the following path:
- Add Child → Add User Apps
- User Apps → Add Server Apps
- Server Apps → Add Task Server App
Now go back to the User Profile node to build this other branch of the hierarchy:
- Add Child → Add User Bots
- User Bots → Add Social Trading Bots
- Social Trading Bots → Add Social Trading Bot
- Social Trading Bot -> Add Followed Bot Reference
You should end up with the following structure of nodes:
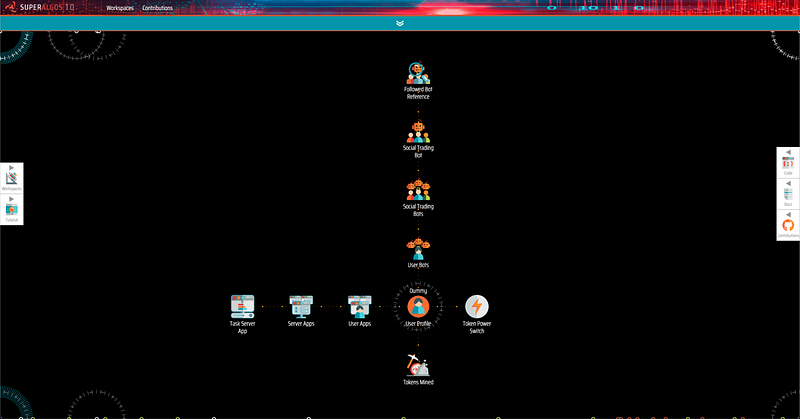
Hover over your new Followed Bot Reference node at the end of the chain and select Create Reference from the menu on the left side.
Choose the Signal Testing Bot from the list.
Later on, when you follow real signals, the signal provider should make the name of the bot available so that you may point this reference to the correct bot.
4. Drive Token Power to the Followed Bot Reference Node
You don’t really need to do this for testing, as the testing signal has zero Token Power requirement. But let’s do it anyway so that you learn how to do it for when you get to follow real signals later on.
The power required for listening to the signal needs to flow down to the Followed Bot Reference node. You can manipulate Token Power flows by adding either percentage or amount parameters to the Configure section of nodes on the path.
Note: For each node, you need to decide using either percentage or amount. Both must never be used together within the same node configuration!
In our example, the testing signal requires an allocation of 0 Token Power. To allocate the required power in an easy way, hover over the User Bots node, click on Configure and add “amount”: 0 to the configuration. Other parameters which may already exist within the section remain unchanged — apart from comma you may need to add in front of the new parameter! In our example, after adding amount, the configuration section of the User Bots node looks like this:
{
    "socialHandle": "",
    "bio": "",
    "amount": 0
}
With correctly configured Token Power allocations, the result should look similar to this:
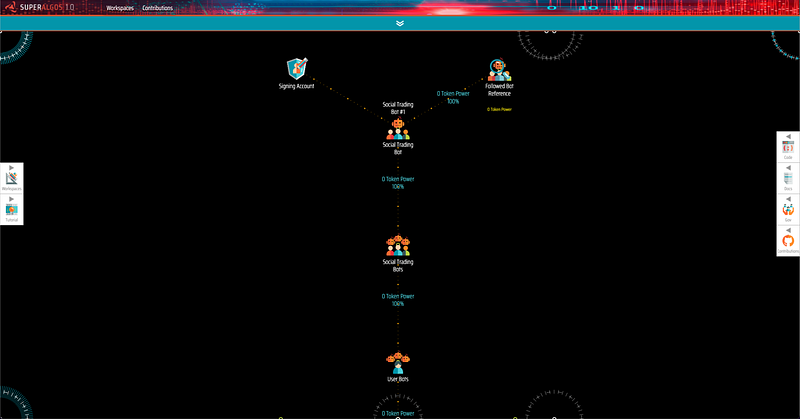
Note: If you don’t see any display of Token Power, this is due to Governance functions not being loaded in the workspace. You can change this by hovering over the Workspace node at the center of the Design Space, selecting Add Specified Project and choosing Governance from the list. Save the workspace, and refresh.
5. Install Your Signing Accounts
Find the Profile Constructor node in the workspace and click the Create Reference button on the menu.
Then select your User Profile from the list.
Now that the Profile Constructor is linked to your User Profile, select Install Signing Accounts from the menu.
Go to your User Profile node and verify that two Signing Account nodes were created, one under the Task Server App node, and the other one under the Social Trading Bot node. This will allow you to authenticate on the peer-to-peer network.
The system stores the authentication signatures in the /My-Secrets folder, in a file called SigningAccountsSecrets.json.
NOTE: If you set up the signatures on a computer but later wish to do your trading connecting to the peer-to-peer network from a different computer, you will need to copy the signatures file to the later one!6. Contribute Your User Profile
Now that you’ve finished the setup in your User Profile, you must contribute the changes so that nodes in the network may pick up the new definitions.
Save your User Profile using the Save Plugin option on the menu, and submit it to the repository using the Contributions tab or whatever external Git tool you prefer.
7. Set Up Data and Trading Tasks
Notice the Social Trading Bot Reference node under your Sensor Bot Instance in the Data Tasks section of your Network Node. You must link or reference this node to the Social Trading Bot in your User Profile.
Use the same technique you used to link the Profile Constructor to your User Profile (the Create Reference Button on the node’s menu).
Then notice the Task Server App Reference node next to it, under the Exchange Raw Data Task node. Link this one to the Task Server App node in your profile.
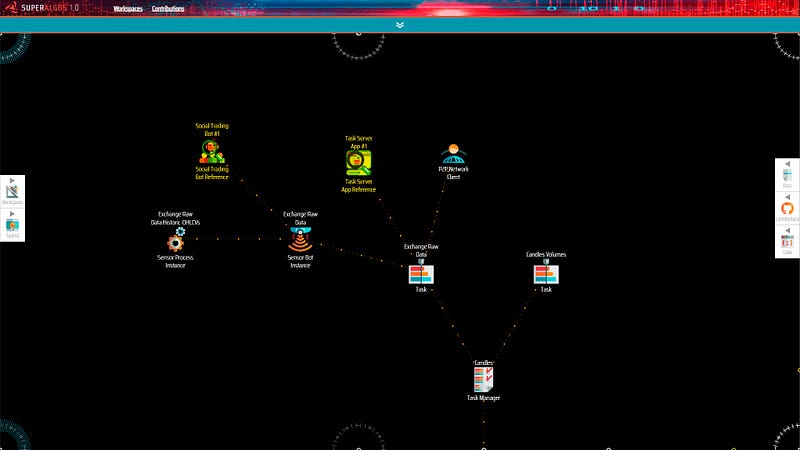
Now go to the Production Trading Tasks section of your Network Node and find the same two reference nodes under the Trading Bot Instance and Lightning Strike Receiving Signals Task node respectively. These two nodes must also reference the corresponding nodes in your User Profile. Go ahead and establish the references.
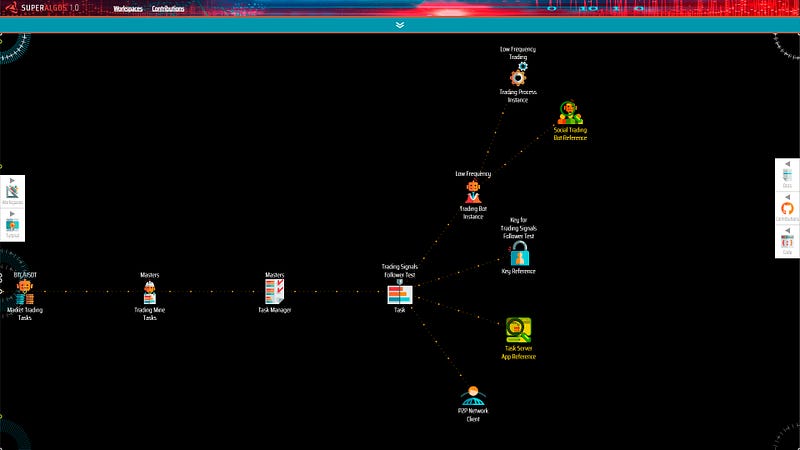
This sets up your Network infrastructure to work with the definitions in your User Profile.
8. Set Up Your Exchange API Key and Funds
Go to the Crypto Ecosystem hierarchy and find the Key for Trading Signal Follower Test Exchange Account Key node. Enter your credentials in the configuration. If you don’t have an exchange key, you must go to your exchange and create one.
The test workspace is set up to work with Binance.com. If you intend to use a different exchange, find the Crypto Exchange node and change the configuration to the exchange of your choice.
If you haven’t tested trading live on the particular exchange of your choice using Superalgos before, you may run into issues. If that is the case, search the Docs for Community Effort to Test Exchanges. The page offers valuable guidance in that regard.
The test works with the Trading Signals Test trading system built specifically for testing the typical follower social trading setup. The strategy works on the BTC/USDT market placing a Market Buy Order to take a position, and a Market Sell Order to close it on the following candle.
You will need at least 60 USDT in your exchange to run the test. Ideally, you will do at least a complete round trip buying 50 USDT worth of BTC and then selling the BTC to close the round trip.
Remember, the trade is not supposed to be profitable! It’s just a test! This means you may potentially lose a few cents or even a few dollars in the process.
9. Run Your Data Tasks
As you can see from the structure of nodes within the Data Tasks section of your Network Node, following other users’ bots still requires extracting raw market data from the exchange and building candles with the Candles Volumes indicator.
The purpose of the references you created earlier is to synchronize your data mining operation with the data mining of the signal provider.
This is how it works:
The signal provider sends a package of signals for every candle that the bot you are following evaluates. Once you run your Data Tasks, the Sensor Bot Instance remains idle for some time until it gets the first signal. Then it starts running. This ensures the best possible synchronization, so that the Trading Bot Instance may act upon the signals received as soon as possible.
NOTE: Before you run your Data Tasks, notice that it may take up to 10 minutes since you contributed your User Profile for nodes in the peer-to-peer network to pick up the changes. Make sure that at least 10 minutes have passed before you proceed.The Sensor Bot is configured to extract market data starting on September 2022. Feel free to change the configuration as per your convenience.
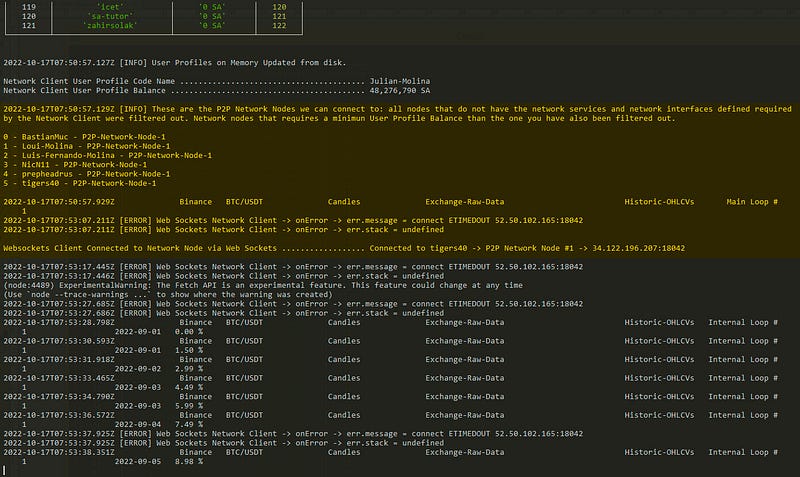
NOTE: Remember that if you already have data for the BTC/USDT market in Binance and you run the Sensor Bot with a different date range, you will lose your existing data. If you are new to Superalgos, you may disregard this note, as it is most likely not relevant to you. Read the Sensor Bot help page for more information.So, go ahead and run your Data Tasks, and feel free to check your console to see the action!
You should get an [INFO] showing your token balance and another [INFO] log will show the available Network Nodes that the system may connect to. These are the nodes that make up the peer-to-peer network used to distribute signals in a decentralized and censorship-resistant manner.
10. Run Your Trading Task
Before running your Trading Task, it is crucial to wait for your Data Tasks to be up to date!
If you run the Trading Task before Candles Volume is up to date, you will start accumulating trading signals which may be executed all at once later on! This is undesirable!
So, once your Candles Volume indicator is up to date, go ahead and run your Trading Task!
This will trigger a similar process as your Data Tasks did earlier, connecting your trading infrastructure to the peer-to-peer network.
You must wait until the connection is established before you run the Live Trading Session! So check your console and be patient!
Wait until you see the Low-Frequency | Trading Waiting for Live Trading Session log before you proceed.
11. Run Your Live Trading Session
Drum rolls!
Yes! You’re almost ready to go!
Before you launch the trading session, go and check the Session Quoted Asset parameter under the Trading Parameters node. Verify that the initialBalance property is set to 50.
Not that it’s necessary for the case of the test, as the parameters are pre-configured, but it’s good to develop the habit of checking the initial balance before you start following any trading bot!
Now, go ahead and run the Trading Signals Follower Test Live Trading Session!
That’s it! You should be up and running!
Now, as you did during your initial Superalgos education, go and check the console, making sure there are no errors.
Then open the Charting Space and dive into the trading simulation to check if orders are placed. It may take a few minutes before you see the first few orders.
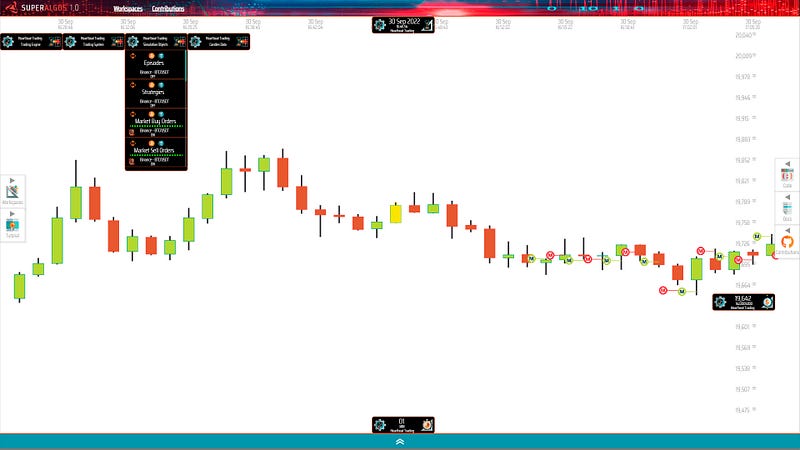
Once you see the orders in the simulation, go to your exchange and verify that the orders are effectively being placed.
Remember that the test strategy places a Market Buy Order to buy BTC, followed by a Market Sell Order to buy back USDT on the following candle, and keeps doing this in an infinite loop.
IMPORTANT: One round trip is enough for testing purposes, so feel free to stop the Trading Task or the Live Trading Session as soon as the first round trip is complete. Otherwise, you risk loosing a few more cents or dollars if you keep the strategy running longer than necessary.The Real Deal
The Superalgos ecosystem is growing and the first few signal providers are starting to emerge as the peer-to-peer network and trading signals features go through the beta-testing phase.
The Superalgos Platform ships with plugin workspaces set up by signal providers pre-configured with the definitions users need to follow their bots. Find them as plugin workspaces on the main navigation menu under Workspaces > Plugin Workspaces > Trading Signals.
You may also want to join the Superalgos Trading Telegram group to discuss everything related to trading signals and providers!
The article below introduces one of the first trading systems by the Data Mining Team available for copy trading. There are a few more to choose from!
I have personally tested the Trend Soaring signal and wrote this review after three weeks of live trading:
IMPORTANT: The signals feature is in beta stage. Expect some hiccups!
Do not engage with signals at this stage if you're not willing to
experience some instability. You may join at a later stage if so you wish!
And please, remember that none of the above is financial advice. Trading is inherently risky and you may lose all or part of your capital.
Also notice that performance in backtesting is not an indication of live trading performance and that live performance is not an indication of future performance!
Copy trade at your own risk!