
The Android Job Interview: cracking the (take home) code challenge or how to get your code to a senior developer level.
Part 1 of a 3 part series on how to (quickly) setup your code challenge code in a way that shows your next employer that you have knowledge of the fundamentals of professional grade Android development.
Recently I have been applying to Android Developer positions again. One of the challenges everyone will encounter when applying for a development job is that the employer will want to asses your technical skills.
There are a couple of ways that I have seen employers do this so far. Some I like better than others, both from the standpoint of the developer being able to show their skill as the employer being able to effectively asses the developer’s skillset. To name a few:
- A coding challenge via a site like Codility where you have to solve a couple of (algorythmic) problems within a set time frame (usually 60–90 mins.)
- A live coding/pair programming session (usually up to an hour) where you’ll sit together with one or two developers from the hiring company and where you’re asked to solve/work on a common (Android related) task.
- A take home challenge to write a small Android app usually around common tasks like getting some data from the network that then needs to be displayed on a (overview & detailed) screen.
- Interview where you will be interviewed by one or two (senior) developers an can be asked to talk about your knowledge and experience with app architecture, dependency injection, unit testing, concurrency, etc.
- A combination of any of the above
I personally like the “take home” coding challenge very much as it deals with a real world/every day environment and it gives me the opportunity the show that I have knowledge of best practices like usage of mvvm architecture, networking (retrofit usage), livedata/coroutines/rxjava, dependency injection, unit testing, etc. and might give the developers I will be working with quickly the confidence that I would be a person that can actually get the job done. This in contrast to something like a Codility challenge where you might have to solve a couple of algorythimic problems you might never encounter in your normal every day app development environment (and catch you ‘of guard’) which you then also have to solve outside of your IDE in a sandbox where you’re only allowed to write in Java and without using external libraries.
A major downside of the take home code challenge though, for the applicant as well as the employer, is that it is also the most time consuming and writing an app from scratch where you show off knowledge of the above mentioned and doing this well quickly takes up a whole afternoon (if not way longer). Only when one company once told me, when I asked why the don’t use coding challenges during their interview process, that more than 60% of their applicants bailed out on the interview process did I realise that it can also be relatively quite “costly” for employers, looking at the market shortage, to miss out on developers that would otherwise be a good fit just because they don’t want to spent a whole day working on a task when they are given the option by other employees to just spent an hour on the technical interview part of the whole job interviewing process.
Whether the percentage is accurate and whether it would (sometimes) be a good thing or a (sometimes) bad thing needs be seen, but it sure made me think about whether (from a company’s perspective) it’s smart to hand out these kind of coding challenges.
They are occasionally handed out though. And when they are wouldn’t it be great to be able to have it done as fast as possible? Wouldn’t it be great to have some kind of “cheat sheet” / map / some kind of structure you can follow that helps you with that? In this article series I hope to help you with that. So for now let’s focus on how to crack the coding challenge:
The coding challenge
Consider that the company that wants to hire hands out the following coding challenge:
Write an app that gets data from an API through an endpoint [xxx]. Show the data in a scrolling list in a overview screen & when the user selects an item from the list it navigates to a detail screen where additional info on that item is shown.
There might be some additional requirements to this task (like write unit tests f.e.) but this is the basic gist of it.
I like these coding challenges as it quickly gives the developer(s) reviewing the code isight into at what level the developer that wrote the code is. A real junior developer might start off not using any architectural pattern at all, maybe use 2 activities, maybe call the network directly from an activity or fragment, might even write the app in java because they haven’t picked up Kotlin yet, etc. Another developer might show off that they have knowledge of usage of (the industry standard) mvvm architecture with usage of livedata/coroutines etc. but then, when you look at their network layer implementation, instead of using Retrofit to automatically handle the parsing of the api response into the used data models, they are manually handling the creation and parsing of network requests/responses (yes.. I have seen that twice over the last year..). Or another developer might show some competence in all the above, but might not show any knowledge of dependency injection (di) and the usage of di-frameworks and you’ll notice by the way they are providing/instantiating dependencies in their components that they lack knowledge of this and/or don’t keep testability in mind.
In the following sections I will discuss what some of the things I think are important in order to show that you are capable of setting up a professional level application and explain some of the best practices as promoted by Google’s Android development documentation. We’ll take a look at some of the following:
- How to make use of the MVVM architecture and what to take in consideration?
- Basic setup for each of the standard components in the layers in mvvm architecture. In this case activity & fragment for the ui layer. The viewmodels and it’s standard ways of interacting with the ui and data layer (via a repository). And the data layer that delivers data to the viewmodel via repositories & the handling of network requests through retrofit.
- When and what considerations to make when using livedata & coroutines?
- Why and how to use Hilt for dependency injection?
- Considerations to make when unit testing and how to test livedata and coroutines?
- Additional pointers regarding good coding practices
I’ll also give you a link to the github repo of one of my own coding challenges where all the ideas and techniques are applied so you can have a look at a full application if you want.
In the upfollowing posts I will not be breaking down every detail of the app but I will only be mentioning the key ideas of how you could set up your own application when making a code challenge:
Setting up your project structure
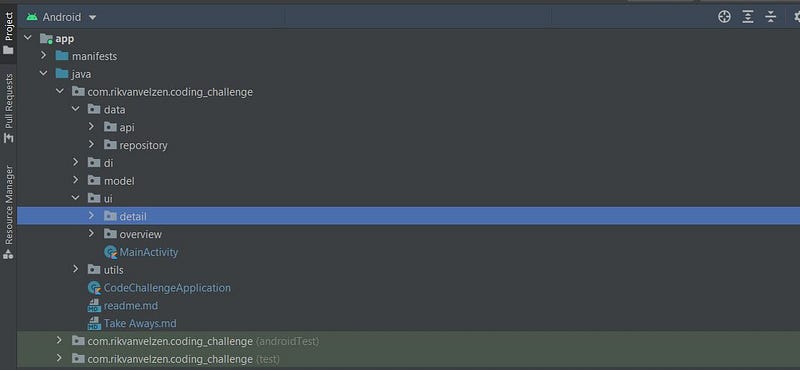
While different people might have different preferences regarding how to set up the project structure, I usually like to set it up something like how you see it above in the screenshot.
A data folder containing, in this case an api subfolder holding Retrofit services and the data class for the api response. And a repository sub folder containing the Repository classes calling on the Retrofit services the make api requests and possibly containing imlementations for caching/pagination etc.
A di folder containing dependency injection related classes. More on that later in the ‘Dependency Injection with Hilt’ section.
A model folder containing the domain specific data models (e.g. not the data classes related to database or api responses).
A ui folder in which I create sub folders for every screen that groups all the specific screen related components together. It will usually contain a fragment and a viewmodel and in case the screen displays a RecyclerView some adapter and view holder(s). I prefer it that way over (what I have occasionally see other people do) having a separate folder for ViewModels or ViewHolders, etc. that cause them to browse through different folders when working on a specific screen.
A util folder containing helper classes.
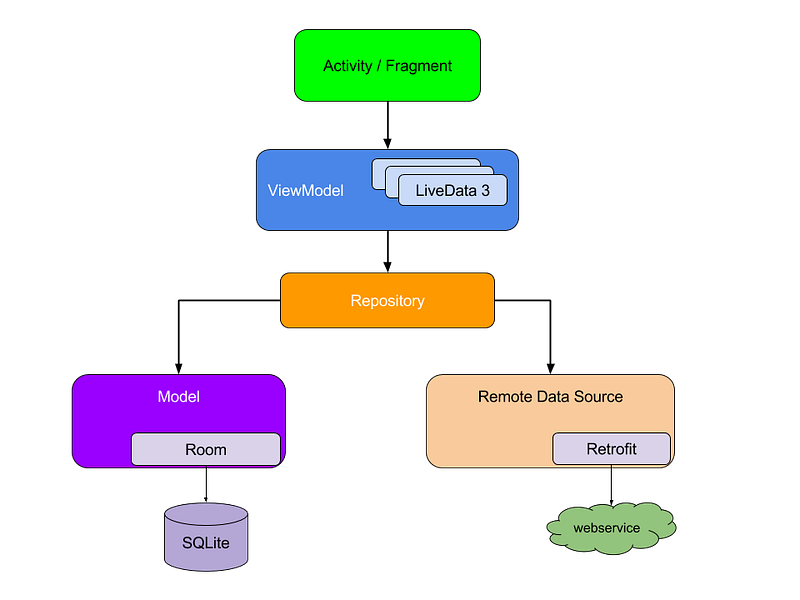
MVVM — structuring the app in 3 main parts
When thinking about an mvvm app’s structure I like to think about it in 3 main parts or layers:
- The view layer: consisting of the fragments and activity (sort of the main view controllers) and all other ui related components. It interacts with the viewmodel to handle events on the ui and to get informed about the ui state.
- The viewmodel: that determines the state of the ui and contains logic regarding user events. It interacts with a repository to set or get data from cache (memory or local storage) or on the network.
- The data layer: represented by (in this case) a repository that is responsible for delivering data to the app (and server) and contains logic regarding network requests, caching, etc.
Lets start with:
The view layer: activity and fragments
As you can see in the screenshot of the project overview the ui folder contains 2 sub folders. One for the overview screen and one for the detail screen. Plus the MainActivity, which is the entry point into our app, in the root.
For this code challenge project the MainActivity should contain as little logic as possible regarding what the overview and the detail screen’s ui should like. That would be the responsibility of their respective fragments. The only responsibilities I let the MainActivity handle here is laying out the parent layout for the fragments and setup the NavController which handles which fragment is shown first and the navigating between them.
Notice btw. that here the naming of Overview- and DetailFragment is highly generic. I only allow myself this here because it’s a sample app containing just 2 fragments. In general I would urge you to make you and your fellow developers lives as easy as possible and to try to be as specific as possible when it comes to naming of classes and functions so that when a developer reads the name of a class it’s immediately clear to what screen/what component it relates to, what it does, etc. so we need to spent as little time as possible investigating the implementation details to figure out what a component/function actually does.
Below here you’ll find gists for the basic setups of the Overview and Detail fragments:
A couple of things to notice here:
- First of all view binding is used to create a reference to the R.layout.main_fragment layout. To enable viewBinding make sure that view binding is enabled in your gradle file.
buildFeatures {
    viewBinding = true
}- by ViewModels() provide the view model to the fragment and tie the ViewModel’s lifecycle to a scope (by default the Fragment scope is used).
When navigating from overview to detail fragment the NavController allows for passing a Bundle to the created Fragment which, in this case, is used to inform the Detail Fragment of the ID of the item that needs to be shown on the detail screen (see line 17).
Notice that when subscribing to the viewModel’s detailInformation property the LiveData returns a Result object that contains 3 states for Loading, Success and Error. It is good practice to do it this way so that the UI can show some loading indication when fetching data from the network is taking some time and the user can be informed and isn’t left in the dark when an error occurs.
Stripped down the sealed class would look something like this:
Now that we have the basics for the view layer layed out lets have a look at:
The ViewModel
A basic setup for a Viewmodel might looks something like the following:
The basic components of a ViewModel would look something like the above:
- The ViewModel usually needs to get some data from a repository.
- There ViewModel exposes a (LiveData) property that a view layer component can subscribe to in order to update the ui state.
- There is a function that gets data from the repository (through a coroutine).
There are a couple of things to consider here. If you are wondering why the repository is declared in the constructor and not for example as a property within the class than I suggest you keep reading because there is some valuable knowledge to pick up here. In part 3 we’ll look deeper into dependency injection and testing.
You might also notice the use of the _detailInformation backing property. Maybe you think this looks ugly (I do) and wonder why have 2 properties that basically store the same value? This is part of the best practices: only expose immutable LiveData so that components outside of the view model aren’t able to change the property’s value. This create more robust code and that way when there are bugs/issues that involves this property it’s easier to troubleshoot and you now where to look.
The function call to get data (asynchronously) from the repository is done within a coroutine launched using the viewModelScope. As you’ll see in the next section repositories expose suspend functions whenever long running/asynchronous work is performed (like network or database calls). The good thing to know here is that since the coroutine is tied to the viewModelScope, whenever the viewModel is destroyed and it’s onCleared() method is called (f.e. the user navigates back and the fragment using the view model gets detroyed) the coroutine job wil automatically be cancelled preventing crashes and unnecessary use of resources.
For simplicity sake, when providing data asynchronously to another component, the easy setup here is to have the ViewModel expose LiveData to the View layer and have the data layer do that via suspend functions & coroutines. You don’t necessarily need to do that though and there could be more complex use cases that that would prefer usage of and exposing a StateFlow to the view layer. What to use and in which use case might be a bit more complex and we’ll look deeper into that in part 2 of this series. For now lets keep it simple. If you want to read up on Flows/StateFlow here are 2 interesting articles that might help you wrap your head around in better:
- https://readmedium.com/migrating-from-livedata-to-kotlins-flow-379292f419fb
- https://developer.android.com/kotlin/flow/stateflow-and-sharedflow
Then for now the last layer out of our 3 part architecture:
The Data Layer: repository and retrofit service
In real life apps usually there would be some kind of caching layer storing data retrieved from the network locally in a database or in SharedPreferences or even an in-memory cache. For the sake of simplicity and since writing a coding challenge application like this usually doesn’t require you to also add some kind of local storage mechanism due to time constraints, I will stick to the bare minimum here.
Below you’ll find an example of what a Repository class for our code challenge could look like: 2 functions, 1 for getting a collection of items and 1 for getting details about a specific item.
Couple of things here to notice. The constructor contains 2 parameters. One so that the RetrofitService necessary to make the api calls can be provided to the Repository. And one for a CoroutineDispatcher with a default value set to Dispatchers.IO
Once again, if you are not sure why they are provided to the repository via the constructor, then definitely check out part 3 of this series on dependency injection. For now let’s look at the getItemDetails() suspend function. Fetching the data from the service is wrapped in withContext(ioDispatcher) call. What this does is that it moves the execution of the coroutine to be dispatched on the IO thread. Wrapping the returned api call in awithContext(Dispatchers.IO) call is a standard (best practices) way to ensure that this function is main-safe, meaning the coroutine that is calling this function from a view model is now ensured that the code that is making the network call is not accidentally executed from and blocking the Main-Thread.
Here you see that the result (error or data) is returned again wrapped in their respective Result classes.
If you’ll look at the example code of the full code challenge project in the GitHub repo you’ll see that the getItems() related function in my project isn’t returning a suspend function, but a ‘normal’ function that returns a Flow with PagingData as part of the code challenge requirements where to implement pagination. I won’t be going deeper into the Paging Library (v3) as it has enough complexity to it to fill a big article by itself. But if you’d like to have a deeper look, you can check out the documentation or the codelab:
- https://developer.android.com/topic/libraries/architecture/paging/v3-overview
- https://developer.android.com/codelabs/android-paging#0
We’ll dive a little deeper into Flow in the 2nd part though. Last but not least the Retrofit service:
Here you see a basic setup for a Retrofit interface with two functions annotated to create GET requests for the 2 use cases we need in our app (getting a list of items and getting detailed information about an item).
It also contains a companion object with a create() function that instantiates the service adding a HttpLoggingInterceptor which logs network traffic to the logcat output and adds a GsonConverterFactory that automatically takes care of parsing the successful api response into the DetailInfoResponse & CollectionResponse that we define ourselves.
If the actual data that we need comes back from the api wrapped in an object with some metadata I like to create a …Response data class for it like you can see below. The network response data class I’d place under the api folder. The domain model contains the values I need for my app and could look something like DetailInfo and I’d like to place this data class in the model folder.
Wrap up part 1
So that’s the setup of the project structure and basic classes for each of the 3 main layers of an mvvm app. In the next part I’ll dig a little bit deeper into usage of LiveData, Flows, dispatchers, the retrofit service configuration and more. And part 3 will be about setting up and the basics of dependency injection (using HILT) and unit testing. If you like this article please hand out some claps, click on the follow button and if you have some improvements I’d love to hear about it.
If you’d like to get in contact or buy me a coffee follow one of the following links!
Links:
Dependency Injection:
- https://developer.android.com/training/dependency-injection/hilt-android
- https://dagger.dev/hilt/view-model.html
- https://developer.android.com/codelabs/android-hilt#0
Couroutines:
- https://developer.android.com/codelabs/kotlin-coroutines#0
- https://developer.android.com/kotlin/coroutines
- https://developer.android.com/codelabs/advanced-android-kotlin-training-testing-survey#0
ViewModels & LiveData/StateFlow
- https://developer.android.com/topic/libraries/architecture/viewmodel?hl=hu
- https://developer.android.com/kotlin/flow/stateflow-and-sharedflow
- https://readmedium.com/migrating-from-livedata-to-kotlins-flow-379292f419fb
- https://developer.android.com/jetpack/guide
Android Paging Library


