
Telemetry Analysis for F1 Enthusiasts | Chapter II: Basic Usage of FastF1
Chapter II: Basic Usage of FastF1
- Understanding the data structure and available data fields: In this section, we’ll explore the structure of telemetry data in FastF1, including the available data fields and how they can be used to analyze performance.
- Accessing telemetry data for a specific driver: Here, we’ll go over the basics of accessing telemetry data for a specific driver or team, including how to extract data for a specific lap or section of the track.
Requirements
To get a better understanding of this section you can read previously the previous article, Telemetry Analysis for F1 Enthusiasts | Chapter I: Introduction.
FastF1
FastF1 is a Python library for analyzing telemetry data from Formula One (F1) races. It provides a wide range of functionalities for working with F1 telemetry data, including loading telemetry data from files, converting data to Pandas DataFrames, and visualizing telemetry data with Matplotlib.
In this article, we will cover the basic usage of FastF1, with a focus on understanding the data structure and accessing telemetry data for a specific driver.
We are going to use the python code that we wrote in Google Colab, in the previous chapter of this series, Telemetry Analysis for F1 Enthusiasts | Chapter I: Introduction.
!pip install fastf1

import fastf1

from google.colab import drive
drive.mount('/content/drive/')

%cd '/content/drive/MyDrive/Colab Notebooks/'

fastf1.Cache.enable_cache('Cache')

year= 2023
gp = 'Saudi Arabia'
event = 'R'
session_race = fastf1.get_session(year, gp, event)
session_race.load()

session_race.results
If you want the Google Colab notebook is available in github:
Understanding the Data Structure and Available Data Fields
Before we can start analyzing telemetry data with FastF1, it’s important to understand the data structure and available data fields. Telemetry data in F1 racing is collected from a variety of sensors on the car, including sensors for speed, acceleration, braking, tire temperature and pressure, and engine performance, among others.
FastF1 organizes telemetry data into a hierarchical data structure, with the top level being the Session object. The Session object contains information about the race, such as the track, weather conditions, and the number of laps. Within each Session object, there are one or more Lap objects, which represent each lap of the race. Each Lap object contains a series of DataFrame objects, which contain the telemetry data for that lap.
As we can see in the previous code block all the information about the race (Race Results from 2023 Saudi Arabia Grand Prix ), is storage in the session_race FastF1 object.
session_race = fastf1.get_session(year, gp, event)
session_race.load()
If we want to access to all the information lap per lap of each driver we can use the following command
session_race.laps

To identify tha available information of each lap, we can use the following command:
session_race.laps.columns
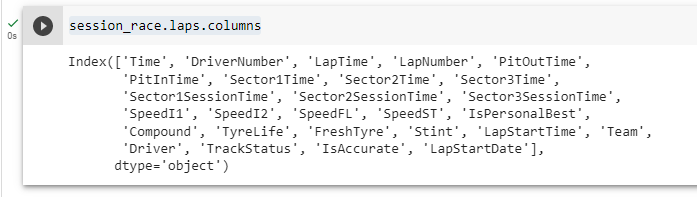
FastF1 provides a wide range of data fields for each telemetry parameter, such as speed, throttle position, and brake pressure, among others. These data fields can be accessed using the FastF1 API, allowing users to extract specific pieces of telemetry data for analysis.
The next step before to get the telemetry data, is to get the data of the fastest lap using the following command:
fastest_lap = session_race.laps.pick_fastest()
fastest_lap

As you can see we go from the general to the particular, at first we start with the general information of the race, then we obtain information from all the laps of the race, now we get the data of the fastest lap, and in the following step, we are going to get the data from the fastest lap of an specific driver, including the data of his car.
Accessing Telemetry Data for a Specific Driver
One of the key features of FastF1 is its ability to access telemetry data for a specific driver. This allows users to analyze the performance of individual drivers and compare their performance to other drivers in the race.
To access telemetry data for a specific driver, we can use the FastF1 API to filter the telemetry data based on the driver’s name. For example, to access telemetry data for Sergio Perez, we can use the following code:
driver ='PER'
fastest_lap_per = session_race.laps.pick_driver(driver).pick_fastest()
fastest_lap_per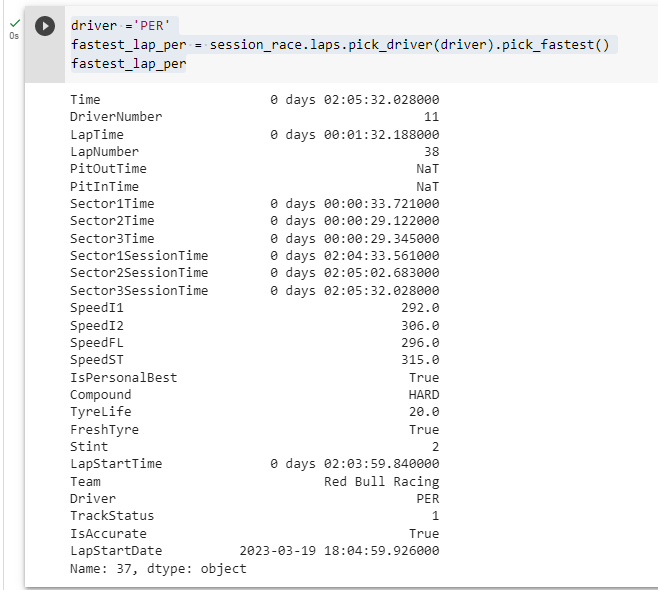
In the FastF1 object fastest_lap_per we have all the information about the fastest lap of Segio Perez performed in the race (2023 Saudi Arabia Grand Prix), I mean we can obtain the information of the Qualifying or of any Practice 1, Practice 2 or Practice 3. Right now we are working with the information from the race.
Now to get the telemetry, we need to get the data from the Sergio’s Perez Car, so we use the following code to get this information considering the fastest lap of Sergio Perez.
per_car_data = fastest_lap_per.get_car_data()
per_car_data
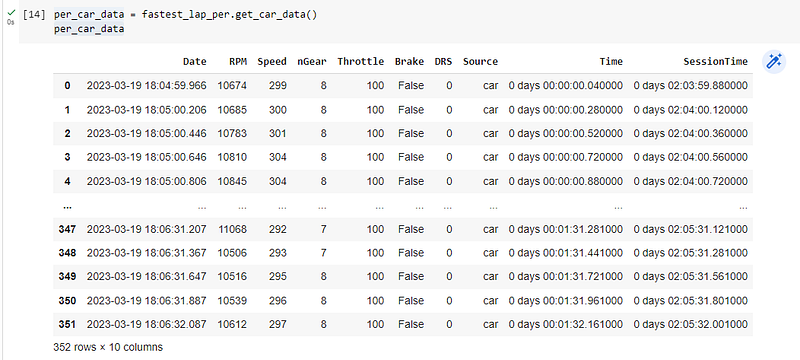
We can see the available information from the Sergio’s Perez car using the following command:
per_car_data.columns

At this point we have all the information from the specific race that we are analyzing, including the information of each lap, of an specific driver and the telemetry of his car.
with all this infromation we can perform different analysis, comparisons, explanations, stastical inferences, and if we include historical data from several previous years, we can build a machine learning model to make some predictions using machine learning tools.
In the next chapter of this series we are going to work with data visualizations to understand the performance of an specific driver in any specific circuit, and remember that all the information that we are analyzing is available for any f1 event (Practice 1, Practice 2, Practice 3, Qualifying and Race).
The Google Colab Notebook with all the commands that we used in this chapter is available in github:
If you have an specific doubt or if you want to perform a specific analysis please free to contact me. For more information, please visit RacingDataLab Website:
Follow me in my Social Networks:
Don’t forget this is a race week¡¡ Round 03: Australia | Season 2023