

Step-by-Step Guide: Installing Zabbix on Ubuntu for Efficient Infrastructure Monitoring
Hey Mate! Welcome another one. In this blog, we go through the process of installing Zabbix on the Ubuntu server in an easy way.
Why Monitoring?
In today's IT world, we have many devices to operate to ensure our infrastructure is stable and High availability for our customers.
without monitoring our networks, systems, Firewalls, and endpoints we are vulnerable to potential threats. To operate our service 24/7, we must monitor our infrastructure for efficient handling, health checks, alerts, and logs.
Zabbix
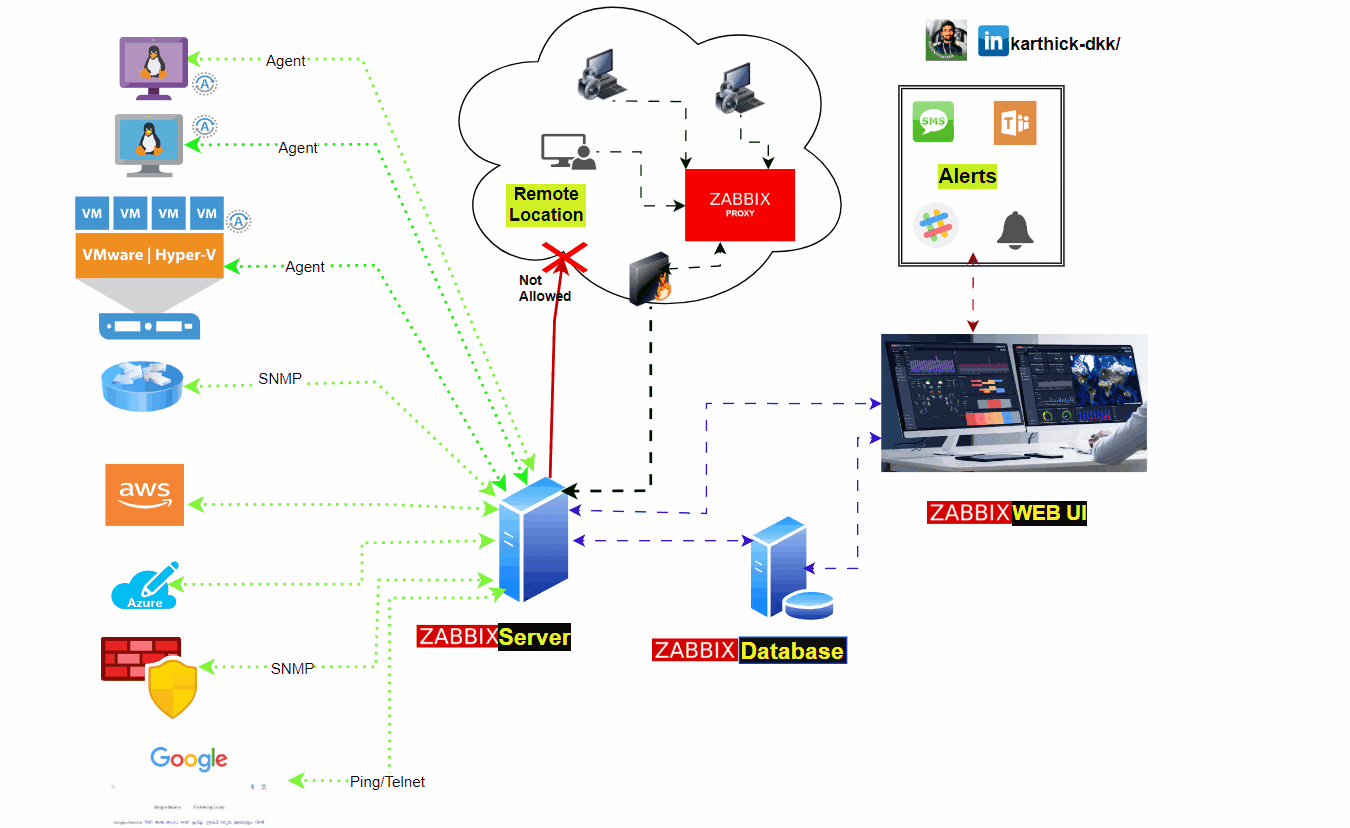
By Zabbix, we can monitor Networks, Systems, and IoT devices. Due to open source, we can use Zabbix free of cost and monitor our infrastructure efficiently.
For more about Zabbix check below and visit: https://www.zabbix.com/
System Requirements:
- Linux (Debia, Ubuntu)
- 2v CPU and 8GB of Memory (more for production systems)
- 20 GB Space Minimum ( based on usage )
- Root Access
Note: Actual configuration depends on the number of active items and refresh rates very much (see database size section of this page for details). It is highly recommended to run the database on a separate server for large installations.
Software Zabbix Used:
MySQL /MariaDB
PHP, Nginx
Ports Zabbix Used:
Web UI: 80/443
Server: 10051
Steps to Install Zabbix Server:
- Add Repository
- Install the Zabbix Server packages
- Set-up Database
- Import Zabbix Schema
- Configure Zabbix server
- Configure web server
- Install agent
- Login to Dashboard UI
Zabbix Data Flow
1. Login to Root and Add Repository:
First, we need to root access for ultimate power 😊, the add the repository.
#Login into root user
sudo su

wget https://repo.zabbix.com/zabbix/7.0/ubuntu/pool/main/z/zabbix-release/zabbix-release_7.0-2+ubuntu24.04_all.deb
dpkg -i zabbix-release_7.0-2+ubuntu24.04_all.deb

# Update packages
apt update -y
2. Install Zabbix server, frontend, and agent
Packages are necessary to install on Zabbix server, which includes MySQL, PHP, and Nginx
apt install -y zabbix-server-mysql zabbix-frontend-php zabbix-nginx-conf zabbix-sql-scripts zabbix-agent3. Database set-up
Make sure you have the database server up and running. We can MySQL or MariaDB and supported Databases.
Once Set up Database, Run the following on your database host or Zabbix server.
Note: If your going to monitor for 100+ servers (Very High Infrastruture), I would recommend to use Database as separete instances.
mysql -uroot -p

password
mysql> create database zabbix character set utf8mb4 collate utf8mb4_bin;
mysql> create user zabbix@localhost identified by 'myPassW0rd';
mysql> grant all privileges on zabbix.* to zabbix@localhost;
mysql> set global log_bin_trust_function_creators = 1;
mysql> quit;
4. Import Schema
On the Zabbix server, necessary to import the initial schema and data.
zcat /usr/share/zabbix-sql-scripts/mysql/server.sql.gz | mysql --default-character-set=utf8mb4 -uzabbix -p zabbix
Disable the log_bin_trust_function_creators option after importing the database schema.x
# mysql -uroot -p
password

mysql> set global log_bin_trust_function_creators = 0;
mysql> quit;
5. Configure the database for the Zabbix server
Edit file /etc/zabbix/zabbix_server.conf
DBPassword=myPassW0rd #Your Zabbix Database password6. Configure PHP for Zabbix frontend
Edit file /etc/zabbix/nginx.conf uncomment and set ‘listen’ and ‘server_name’ directives.
listen 8080;
server_name example.com;
Note: Make sure 8080 is Allowed on AWS Security Groups. if your in AWS.
Start Zabbix server and agent processes:
systemctl restart zabbix-server zabbix-agent nginx php8.3-fpm
systemctl enable zabbix-server zabbix-agent nginx php8.3-fpm
Allow Port on Firewall
sudo ufw allow 8080/tcp
sudo ufw allow 10051/tcp

sudo ufw status  # Check ufw status
Check the port 8080 is running
ss -tunlp | grep 80807. Install and Configure Zabbix agent
We need the Zabbix agent to send the metrics to the Zabbix server and install the agent by following the below instructions.
a. Install Zabbix repository
# wget https://repo.zabbix.com/zabbix/7.0/ubuntu/pool/main/z/zabbix-release/zabbix-release_7.0-2+ubuntu24.04_all.deb
# dpkg -i zabbix-release_7.0-2+ubuntu24.04_all.deb
# apt update
b. Install agent
apt install zabbix-agent
c. Configure zabbix agent
Open /etc/zabbix/zabbix_agentd.conf, Navigate to Server and add the Zabbix server IP.
Server="192.168.1.3" #Here Replace zabbix ServerIP
ServerActive="192.168.1.3" #Here Replace zabbix ServerIP
d. Restart the services:
systemctl restart zabbix-agent
 systemctl enable zabbix-agent
8.Open the Zabbix UI web page
URL: HTTP://
The URL for Zabbix UI when using Nginx depends on the configuration changes you should have made.
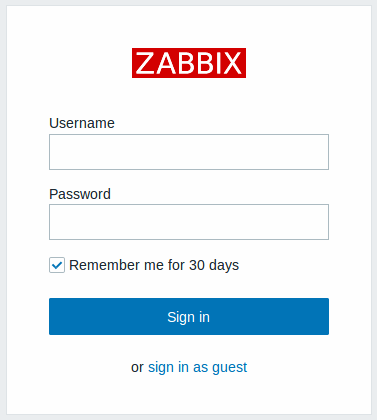
Default username : Admin ,Password: zabbix
✅✅If you have any issues regarding this, feel free to connect with us.
LinkedIn: https://www.linkedin.com/in/karthick-dkk/
Follow my Medium Account (To get valuable information)
For more updates: subscribe to this medium account.
Follow for more: ✌️
LinkedIn: https://www.linkedin.com/in/karthick-dkk/
Medium: https://karthidkk123.medium.com/
Github: https://github.com/karthick-dkk/
Social: https://dev.to/karthickdkk


