
SQL Tutorial. Installing MySQL Workbench and MySQL Server on Windows
Walkthrough on how to install MySQL Workbench on Windows.

In this article, we go over the process of installing MySQL and MySQL workbench for Windows. MySQL and MySQL workbench offer a platform where you can work on and edit databases. MySQL workbench is very intuitive and easy to use and offers a number of tools that make SQL statements easy to write.
The are no requirements for installing MySQL. You simply need an Internet connection and free space on one of your disks.
If you have a Mac, I have a separate guide here.
To start, let’s navigate to the MySQL workbench page and click on “DOWNLOADS”.

On the next page, you will choose your OS which in this case will be Microsoft Windows and click the download button at the bottom.

If it prompts you to create an Oracle account, just click on “No thanks, just start my download” at the bottom of the page.
In the Setup Wizard you will be asked whether you want the complete or custom setup. I chose the complete set up for this guide. Once the setup is complete, you can launch MySQL Workbench. You should see a screen like this if everything was set up right

Now to add a MySQL server, we are going to navigate to the MySQL community download page installer. Select Microsoft Windows as the operating system and select the lower release for installation.

When you reach the product page, you will select "Add ..." located on the sidebar.

This will lead you to the Select Products page, where you will select the version of your MySQL server. To do so, browse the MySQL server product tree to the final version which will be named “MySQL Server 8.0.29 — X64” select it by clicking on it. This will cause the arrow pointing right in the middle to highlight green, which will enable you to add it to the "Products to Install" box. Once that is done, click on “Next” to continue.

Then you will get a screen that lists your MySQL server in a product list. Click "Execute" to install.

Once the installation is done click “Next”.
On the "Product Configuration" page, if your server says "Ready to set up" click "Next".

On the “Type and Networking” page you can leave the settings as they are unless you want to change the port number or pipelines. When you’re done click “Next”.

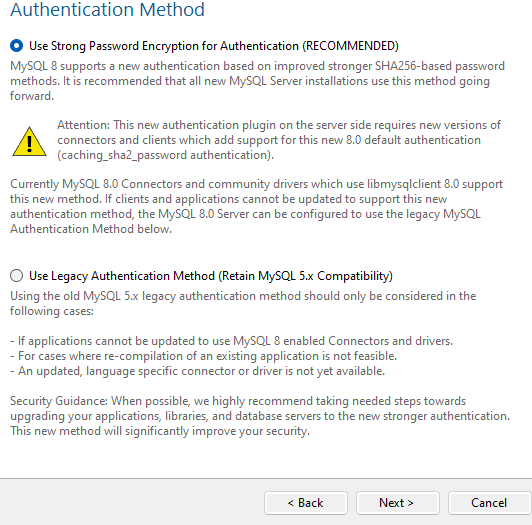
In “Authentication Method” I always use “Strong Password Encryption” but you can use the Legacy version if you prefer. When you’re done click “Next”
In “Account and Roles” enter a secure password that you will not forget. In the “MySQL User Accounts” section at the bottom you can leave that blank because a default user name “root” will be created.

Next in the “Windows Service” page you can leave all the setting as default and click on “Next”

On the "Apply Configuration" page, click Execute to carry out your modifications. When everything is done, you ought to get this screen.

Click on “Finish” and in the next page, click on “next” and you should get the “Installation Complete” page, which means you are done!

Now come back to your MySQL Workbench and click the "Rescan Servers" button at the bottom of the page. If you did everything well, your server will appear.

DoubleClick your server and enter the password you created at the time of installation and you will have access to the workbench.

Congratulations, you have successfully installed MySQL on your system. I hope you found this guide useful. If you have more questions, please leave a comment and I will answer as soon as I can.
Have a great day!


