
Some Linux Commands That Can Boost Your Work Efficiency Dramatically
Learn some handy and advanced Linux commands from practical examples

As a software developer, Linux commands are a must-have technique. Even though you may use Windows or macOS, you will always find occasions when Linux commands are needed. For example, most Docker images are based on Linux systems. You need to be good at Linux, at least some common commands, to carry out DevOps work.
In this post, I will introduce some commands that I use every day. This post can be helpful if you are new to Linux or if you want to refresh or improve or knowledge of Linux commands. However, this post won’t focus on the very fundamentals like cd or ls, but some more advanced ones learned from practice.
Customize bash prompt
Well, this topic can itself be a lengthy post. However, we don’t need to learn everything. In most cases, we just need to change the PS1 variable which specifies what is displayed before each command. If you don’t change it, it will show the path in the prompt, which is very inconvenient when we are deep inside a folder. I prefer to only show the user name and the current folder in the prompt, which can be set with this command:
export PS1="[\u@\W]\$"Here \u represents the current user name and \W the current working directory. [, ], and @ are shown as they are. For \$ , $ will be shown if the current user is not root, otherwise, # will be shown.
Note, this command and the ones shown below should be added to ~/.bashrc if you want to persist with the changes.
If you want to customize other prompt strings like PS0, PS2, PS3, etc., please refer to this post.
Find files or folders
It’s a very common request to find files or folders, which can be done by the find command:
# Find a file:
find ~ -type f -name data-model.ts

# Find a folder:
find ~ -type d -name angular15
Note that the first parameter is the path to find the target file or folder. The type is defaulted to everything if not specified.
It seems a bit too simple 😏. Let’s do something a bit more complex. Let’s find some files and count the number of lines for each file:
# Find all the .html files and count the number of lines for each file:
find src/app/ -name "*.html" -exec wc -l {} \;
Note the magic syntax here. The -exec specifies a command to run for each file found. The curly brackets {} is a placeholder for the file found and the escaped semicolon \; is used as a delimiter that marks the end of the command to be executed for each file found by find.
We can also use a plus sign + for this purpose as well:
find src/app/ -name "*.html" -exec wc -l {} +The output will be slightly different. The total will be printed if the command ends with +.
Change permissions of files and folders
It’s also a common task to change file/folder permissions. And we can easily get confused with the permission codes. Here we will only demonstrate the most common ones:
# Share a folder with others so they can check the contents in the folder:
chmod 755 <path-to-your-folder>

# Share a non-executable file with others:
chmod 644 <path-to-your-file>

# Share an executable file with others:
chmod 755 <path-to-your-file>

# Make a file read only:
chmod 400 <path-to-your-file>

# Make a file executable:
chmod +x <path-to-your-file>
Custom rm to move files to Trash
If you accidentally remove some files on a Linux system, it will be very difficult to restore them. Therefore, it’s a safe strategy to set the rm command to move files or folders to the Trash rather than to delete them. We can empty the Trash when needed later.
This customization can be done with aliasing, which is a very handy tool on Linux (more on this later):
alias rm='gio trash'Use aliases to save some typing
If you have a long command with a lot of parameters or if you have chained commands which should be executed together, using an alias is very convenient:
# Set aliases for long commands:
alias dc="docker compose"
alias prettier="npx prettier -w"
alias eslint="npx eslint --fix"
alias pre="pre-commit run --files"

# Chain some commands together:
alias update-container="docker-compose pull <service-name> && docker-compose stop <service-name> && yes | docker-compose rm <service-name> && docker-compose up -d <service-name>"
Extracting data from input with awk
awk is a very powerful tool in Linux. You can even write scripts with awk, though the issue of readability and maintenance is another story. As software developers, we normally use awk to get the field we need from the input file or output of a previous command.
For example, let’s ping google.com and get the time for each ping:
ping google.com -c 2 | grep -iE 'time=.*ms' | awk 'BEGIN {FS="="} {print $NF}'Important notes for this command:
- We use
-iEto specify a regular expression forgrep, so only the messages matched by the pattern will be further processed. - For
awk,BEGINspecies the command to be executed before the text is processed. Here, we specify that the field separator (FS) should be an equal sign. Besides,NFstands for the number of fields and$NFwill return the last field.
The above command can also be simplified as follows:
ping google.com -c 2 | grep -iE 'time=.*ms' | awk -F"=" '{print $NF}'
ping google.com -c 2 | awk -F"=" '/time=.*ms/ {print $NF}'
In these simplified versions, we make use of another two features of awk:
- The field separator can be specified directly with the
-Foption. - The regular expression pattern can be specified in
awkas well before the curly brackets.
Build commands with xargs
We have shown the -exec option can be used to build commands for the find command. A better tool is xargs which can be used to build any command in a more flexible way.
# Check the size of each file in the current folder:
ls | xargs -I % du -sh %

# Find some files and copy them to a new location:
find ~/Downloads/ -name "*.jpeg" | xargs -I {} cp {} ~/Pictures/

# Change the permissions of all folders and subfolders to 755:
find . -type d | xargs -I {} chmod 755 {}

# Change the permissions of all files in the current folder and subfolders to 644:
find . -type f | xargs -I {} chmod 644 {}
Note that, the -I (--replace=) option specifies a placeholder that can be used wherever needed. The placeholder can be any valid string with % and {} being the most common ones.
Setting environment variables for a script
Sometimes we need to set some environment variables for a script. Those variables can be specified on the command line before the command runs the script. For example:
# some_script.sh
echo mysql -u ${USERNAME} -p${PASSWORD}

# On the command line:
USERNAME=johndoe PASSWORD=12345 bash some_script.sh
This is especially important for some scripts running in some Cloud environments such as Cloud Build where the variables can be injected automatically.
If many variables are required for a script, it becomes cumbersome to specify all of them on the command line. In this case, they can be stored in a file and get read and set when running the script:
# variables.env
USERNAME=johndoe
PASSWORD=12345

# On the command line:
env $(grep -v '^#' variables.env | xargs) bash some_script.sh
Note that with this command, the variables are read from the target file (excluding comments) and executed with the xargs command. The env command is used to run the script in a modified environment, rather than the current shell environment.
Redirect STDOUT and STDERR
The output and error of a command are written to the standard out (STDOUT) and standard error (STDERR). The file descriptors for STDOUT and STDERR are 1 and 2, respectively. By default, both STDOUT and STDERR go to the console. However, we can redirect them to a file or to void (/dev/null) meaning discarding them.
# Let's assume existing.txt exists, whereas non-existing.txt does not.

# Redirect STDOUT to a file. This is the most common use case.
ls -al existing.txt 1>out.log
# The file descriptor for STDOUT is optional.
ls -al existing.txt >out.log

# Redirect STDOUT to a file and STDOUT to another file.
ls -al existing.txt non-existing.txt 1>out.log 2>error.log

# Rdirect both STDOUT and STDERR to the same file:
ls -al existing.txt non-existing.txt 1>combined.log 2>&1
# And it can be simplified as:
ls -al existing.txt non-existing.txt &>combined.log

# Ignore the output and error of the command:
ls -al existing.txt non-existing.txt 1>/dev/null 2>&1
ls -al existing.txt non-existing.txt &>/dev/null
Note that the &> syntax is not supported by all the shells. It’s supported by BASH which is commonly used.
Command-line fuzzy finder
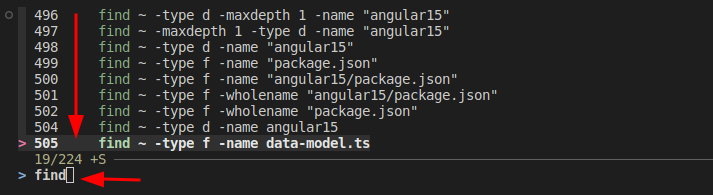
We can press CTRL-R to find the historical commands we have used. However, by default, it only displays one command when we type, which is not convenient to find the one we want.
Luckily, fzf enhanced the function of CTRL-R dramatically. fzf is a general-purpose command-line fuzzy finder and enables fuzzy searches of historical commands. And most importantly, it displays the matching commands as a list which makes it extremely convenient to find the one we want:
The installation of fzf is very simple:
# Linux:
git clone --depth 1 https://github.com/junegunn/fzf.git ~/.fzf
~/.fzf/install  # You can accept all the default settings.

# MacOS:
brew install fzf
$(brew --prefix)/opt/fzf/install
If you have never tried fzf before, it’s definitely worth a shot and you will love it immediately 😍.
In this post, some handy Linux commands are introduced which can boost your efficiency if you don’t know them already. It’s impossible to cover all the Linux commands in a single post. However, we don’t need to learn everything and normally only need to learn what’s actually needed in our work. I hope this post can be a helpful reference for your work.
Related article:
- Learn Handy Vim Commands and Operations That Can Increase Your Efficiency Dramatically
- Build a Docker image automatically with Cloud Build in Google Cloud Platform
Level Up Coding
Thanks for being a part of our community! Before you go:
- 👏 Clap for the story and follow the author 👉
- 📰 View more content in the Level Up Coding publication
- 🔔 Follow us: Twitter | LinkedIn | Newsletter
🚀👉 Join the Level Up talent collective and find an amazing job