avatarLynn G. Kwong

Free AI web copilot to create summaries, insights and extended knowledge, download it at here

3952

Abstract

angular block with the arrow keys.</li></ul><h2 id="eaf0">Navigate to different lines with shortcuts</h2><ul><li>Type <code>:set nu</code> in the Vim editor to show the line numbers</li><li>Type uppercase <code>G</code> to go to the last line of the current file.</li><li>Type lowercase <code>g</code> <i>twice</i> to go to the first line of the current file.</li><li>Type the colon and the line number to go to a specific line. For example, type <code>:10</code> to go to the 10th line.</li></ul><h2 id="448e">Find and replace texts in Vim</h2><ul><li>You can press the slash key <code>/</code> and then type some search string to find some texts in the current file. Press the <code>ENTER</code> key after the text to search for is typed. When multiple occurrences are found, you can press <code>n</code> or <code>N</code> to go to the next and previous one, respectively.</li><li>The syntax for replacing texts in Vim is similar to that of <code>sed</code>. Below are some patterns that are commonly used:</li></ul> <figure id="70ff"> <div> <div>

            <iframe class="gist-iframe" src="/gist/lynnkwong/77758f9e279a19b0d1c461318618a20b.js" allowfullscreen="" frameborder="0" height="undefined" width="undefined">
          </div>
        </div>
    </figure></iframe></div></div></figure><h2 id="3f60">Edit in column mode in Vim</h2><p id="2660">This is an advanced field for beginners. However, since you are here, you will find it’s actually not as complex as you think.</p><ul><li>To copy/cut/delete columns, press <code>CTRL</code> + <code>v</code> to enter the block selection mode, then use the arrow keys to select the columns you want to copy, cut, or delete. As mentioned above, once the columns are selected, you can press <code>y</code>, <code>c</code>, or <code>d</code> to copy, cut or delete the columns.</li><li>After some columns are copied or cut, move your cursor to the place where the copied/cut columns should be inserted, then press <code>P</code> or <code>p</code> to insert the columns before or after the cursor.</li><li>To insert some data into all columns is a bit magical:
  • First, move the cursor to the place where the new data should be inserted.
  • Then press <code>CTRL</code> + <code>v</code> to select the single character of all rows (anchor points) before or after which the new data should be inserted.
  • When the anchor points are selected, you can press <code>SHIFT</code>+<code>i</code> ​to insert text before the anchor points, ​<code>SHIFT</code>+<code>a</code> ​to append text, ​<code>r</code> ​to replace the anchor points, ​<code>d</code> ​to delete them, ​<code>c</code> ​to change them with free text. Do play with these shortcuts to have some hands-on feelings for them.
  • Finally, and very importantly, don’t forget to press <code>ESC</code> to apply the changes to all columns.</li></ul><h2 id="e1aa">Install a spell checker for Vim</h2><p id="e410">When you use Vim to write Git commit messages, you would want Vim to highlight obvious spelling errors so you can correct them as soon as possible. Actually, Vim has a built-in spell-checking feature, which can be turned on by typing <code>:setlocal spell</code>. However, the built-in spell-checking feature may not do a good job of checking spelling errors sometimes.</p><p id="4bfd">Some third-party Vim plugins do a much better job in spell-checking. Two good ones I have tried are <i>vim-grammarou</i>s and <i>Spelunker.vim</i>. <i>vim-grammarous</i> is more powerful but requires Java8+ which may not be available for many people. On the other hand, <i>Spelunker.vim</i> does not have such a system requirement and also does a good job of spell-checking. Therefore, it will be used as a demo in this post.</p><p id="3e8b">To install <i>Spelunker.vim</i>, we need to install <i>vim-plug</i>, which is a Vim plugin manager. This command is used to install <i>vim-plug</i>:

Options

</p> <figure id="c78b"> <div> <div>
            <iframe class="gist-iframe" src="/gist/lynnkwong/0e2394f75939f630e79d7fd61ca6182e.js" allowfullscreen="" frameborder="0" height="undefined" width="undefined">
          </div>
        </div>
    </figure></iframe></div></div></figure><p id="36a0">Then we need to update <code>.vimrc</code> for <i>vim-plug</i> and specify which plugin should be installed:</p>
    <figure id="9bac">
        <div>
          <div>
            
            <iframe class="gist-iframe" src="/gist/lynnkwong/c44654ae80d5e65bf3c175fc04ea4805.js" allowfullscreen="" frameborder="0" height="undefined" width="undefined">
          </div>
        </div>
    </figure></iframe></div></div></figure><p id="60cb">After that, type <code>vim</code> on the command line to open the Vim editor. Then type <code>:PlugInstall</code> to install the plugin. When the plugin is successfully installed, press <code>:q</code> to exit the plugin installation window.</p><figure id="79bb"><img src="https://cdn-images-1.readmedium.com/v2/resize:fit:800/1*5YVYS_a2rFilC1LTvRyZPA.png"><figcaption></figcaption></figure><p id="3461">Now when we type something in the Vim editor and <b><i>save it</i></b> (note you must save it otherwise <i>spelunker.vim</i> won’t check it), you can see the grayed-out texts with underlines which have spelling errors:</p><figure id="311a"><img src="https://cdn-images-1.readmedium.com/v2/resize:fit:800/1*wtC5kkd4SL2Z2AntJgez5g.png"><figcaption></figcaption></figure><p id="5c58">You can type <b><i>uppercase</i></b> <code>ZN</code>/<code>ZP</code> to jump to the next/previous spelling errors. And when the cursor is on a spelling error, you can type <code>ZL</code> to show a list of suggestions for the error:</p><figure id="213c"><img src="https://cdn-images-1.readmedium.com/v2/resize:fit:800/1*pblpIoZyUb5cJzSjlnmnbA.png"><figcaption></figcaption></figure><p id="1fad">If you don’t want some texts to be shown as errors, for example, some custom acronyms, you can add them to the user’s allowlist in <code>~/.vimrc.</code> Let's add “<i>thiss</i>” as a white list word:</p>
    <figure id="3fe9">
        <div>
          <div>
            
            <iframe class="gist-iframe" src="/gist/lynnkwong/172c199f94256a316f4f5c9d13ca092c.js" allowfullscreen="" frameborder="0" height="undefined" width="undefined">
          </div>
        </div>
    </figure></iframe></div></div></figure><p id="4253">Now when you check the file in Vim again, you will see “<i>thiss”</i> is not marked as a spelling error anymore:</p><figure id="1458"><img src="https://cdn-images-1.readmedium.com/v2/resize:fit:800/1*AusTJItKGINHpDl4v2Gv5A.png"><figcaption></figcaption></figure><p id="bc5b">There are quite a few other configurations for <i>spelunker.vim</i> on its <a href="https://github.com/kamykn/spelunker.vim#22-options">GitHub page</a>. You can check them if needed. However, above we have covered the ones that are most commonly used.</p><p id="aa40">In this post, we introduced some practical tricks for using Vim. Basic operations like yanking, deleting, inserting, etc are introduced with simple and easy-to-follow instructions. We also introduced how to perform column mode editing and how to replace texts in Vim which are a bit more advanced. Finally, we introduced how to perform spell checking in Vim which is handy for writing Git commit messages.</p><p id="3520">Related articles:</p><ul><li><a href="https://lynn-kwong.medium.com/organize-your-commits-like-a-pro-with-git-rebase-and-git-commit-amend-efaa78763cc3">Organize your commits like a pro with git rebase and git commit — amend</a></li><li><a href="https://levelup.gitconnected.com/some-tips-to-make-your-vs-code-more-efficient-db77ec7071f8">Some tips to make your VS Code more efficient</a></li></ul></article></body>

Learn Handy Vim Commands and Operations That Can Increase Your Efficiency Dramatically

Vim is not dying and can be very useful sometimes

Image by geralt (Time, Businessman, Tablet) in Pixabay

I have always been reluctant to learn Vim because I prefer to have a graphical IDE like VS Code for coding. I think coding is not a typing job. It requires logical and creative thinking rather than fancy and magical shortcuts that let you type faster. However, Vim is not dying and there exist some cases where Vim is more suitable than a graphical IDE. For example, inside Docker containers, online or bare metal consoles where a graphical IDE is not available. Besides, I have been used to writing Git commit messages with Vim, which I think is more convenient than graphical tools.

In this post, I will share the most common commands or operations for Vim that I learned from daily coding practice and use every day. Hopefully, you won’t get scared of Vim anymore and can also use it more efficiently in your work.

Install Vim

If you use Linux or Mac, normally you don’t need to install Vim manually as it is shipped with your OS. However, if your OS is a very old version, you may only have vi rather than Vim installed. As a side note, Vim is the enhanced version of vi and should be used in most cases. In this case, you need to install Vim manually:

$ sudo apt update
$ sudo apt install vim

Basically, you need to run the above commands wherever vi/Vim is not available on a Linux system.

For Windows, you need to install Gvim which is a Windows version of Vim.

Once Vim is installed, you can type vi or vim to open the editor, or run them before a file name to open a file:

Configure Git to use Vim

Vim is a great tool for writing Git commit messages. You don’t need to have an IDE to write commit messages which are plain texts. To configure Git to use Vim as the default editor, run this command:

$ sudo git config --system core.editor vim

Basic editing commands in Vim

Below we will introduce some shortcuts in Vim. Don’t worry, only the most common ones will be introduced. You don’t need to remember all of them, and I don’t 😅. You can bookmark this post and check the commands whenever needed.

  • Press colon : and you can start to type commands. The most common ones are q — quit, w — write, q! — quit without saving, wq — write and then quit.
  • When the colon is not pressed, in the Vim editor, you can press a or i to enter the editing mode to insert texts.
  • When in the editing mode, you press ESC to exit this mode. You can also press u to undo the changes just made.
  • Press lowercase v and then use the arrow keys to select text. After some text is selected, you can press y to yank/copy it, x to cut it, or d to delete it. If you press y or x, you can press P or p to paste the copied/cut text before or after the cursor.
  • Press uppercase V to select the whole line, or CTRL + v to select text in a rectangular block with the arrow keys.

Navigate to different lines with shortcuts

  • Type :set nu in the Vim editor to show the line numbers
  • Type uppercase G to go to the last line of the current file.
  • Type lowercase g twice to go to the first line of the current file.
  • Type the colon and the line number to go to a specific line. For example, type :10 to go to the 10th line.

Find and replace texts in Vim

  • You can press the slash key / and then type some search string to find some texts in the current file. Press the ENTER key after the text to search for is typed. When multiple occurrences are found, you can press n or N to go to the next and previous one, respectively.
  • The syntax for replacing texts in Vim is similar to that of sed. Below are some patterns that are commonly used:

Edit in column mode in Vim

This is an advanced field for beginners. However, since you are here, you will find it’s actually not as complex as you think.

  • To copy/cut/delete columns, press CTRL + v to enter the block selection mode, then use the arrow keys to select the columns you want to copy, cut, or delete. As mentioned above, once the columns are selected, you can press y, c, or d to copy, cut or delete the columns.
  • After some columns are copied or cut, move your cursor to the place where the copied/cut columns should be inserted, then press P or p to insert the columns before or after the cursor.
  • To insert some data into all columns is a bit magical: - First, move the cursor to the place where the new data should be inserted. - Then press CTRL + v to select the single character of all rows (anchor points) before or after which the new data should be inserted. - When the anchor points are selected, you can press SHIFT+i ​to insert text before the anchor points, ​SHIFT+a ​to append text, ​r ​to replace the anchor points, ​d ​to delete them, ​c ​to change them with free text. Do play with these shortcuts to have some hands-on feelings for them. - Finally, and very importantly, don’t forget to press ESC to apply the changes to all columns.

Install a spell checker for Vim

When you use Vim to write Git commit messages, you would want Vim to highlight obvious spelling errors so you can correct them as soon as possible. Actually, Vim has a built-in spell-checking feature, which can be turned on by typing :setlocal spell. However, the built-in spell-checking feature may not do a good job of checking spelling errors sometimes.

Some third-party Vim plugins do a much better job in spell-checking. Two good ones I have tried are vim-grammarous and Spelunker.vim. vim-grammarous is more powerful but requires Java8+ which may not be available for many people. On the other hand, Spelunker.vim does not have such a system requirement and also does a good job of spell-checking. Therefore, it will be used as a demo in this post.

To install Spelunker.vim, we need to install vim-plug, which is a Vim plugin manager. This command is used to install vim-plug:

Then we need to update .vimrc for vim-plug and specify which plugin should be installed:

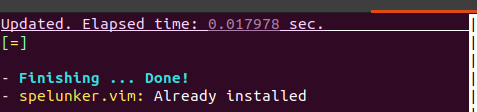
After that, type vim on the command line to open the Vim editor. Then type :PlugInstall to install the plugin. When the plugin is successfully installed, press :q to exit the plugin installation window.

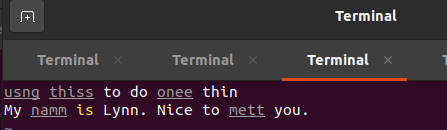
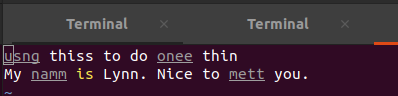
Now when we type something in the Vim editor and save it (note you must save it otherwise spelunker.vim won’t check it), you can see the grayed-out texts with underlines which have spelling errors:

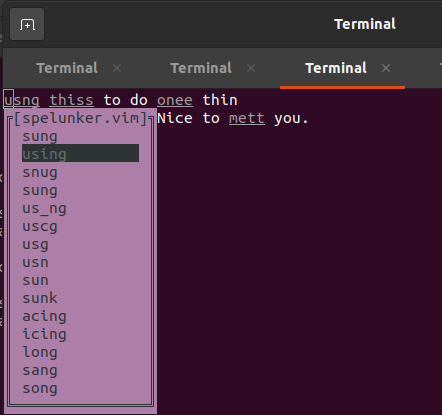
You can type uppercase ZN/ZP to jump to the next/previous spelling errors. And when the cursor is on a spelling error, you can type ZL to show a list of suggestions for the error:

If you don’t want some texts to be shown as errors, for example, some custom acronyms, you can add them to the user’s allowlist in ~/.vimrc. Let's add “thiss” as a white list word:

Now when you check the file in Vim again, you will see “thiss” is not marked as a spelling error anymore:

There are quite a few other configurations for spelunker.vim on its GitHub page. You can check them if needed. However, above we have covered the ones that are most commonly used.

In this post, we introduced some practical tricks for using Vim. Basic operations like yanking, deleting, inserting, etc are introduced with simple and easy-to-follow instructions. We also introduced how to perform column mode editing and how to replace texts in Vim which are a bit more advanced. Finally, we introduced how to perform spell checking in Vim which is handy for writing Git commit messages.

Related articles:

Vim
Spell Check
Hands On Tutorials
Software Development
Editor
Recommended from ReadMedium