
Setting up Multi-Source MySQL Replication with Docker Images
In today’s fast-paced digital world, data replication has become a crucial component of many businesses. Multi-source replication, in particular, has become a popular way to keep data synchronized across multiple databases, which can improve availability, performance, and scalability. However, setting up and managing multi-source replication can be a daunting task, especially when dealing with large amounts of data. Docker images provide a convenient and efficient way to deploy and manage MySQL replication. In this article, we will explore the steps involved in setting up multi-source MySQL replication using Docker images and discuss some of the benefits and challenges of this approach.
⭐️ Setting up MySQL Replication with Docker MySQL images ⭐️
Overview
To begin setting up multi-source MySQL replication with Docker images, the first step is to create a Docker network that will be used to connect the different nodes in the replication topology. In this case, the network is named “replicanet”.
Once the network is created, the next step is to pull the MySQL 8.0 image from Docker Hub. Docker Hub is a public registry of Docker images that allows users to easily find and share container images. The MySQL 8.0 image is one of the most commonly used images for running MySQL in a Docker container.
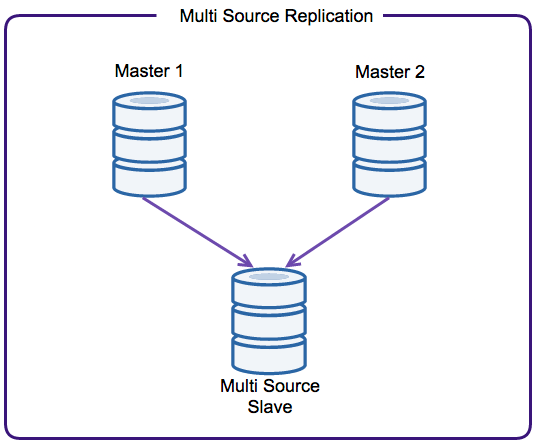
After pulling the MySQL 8.0 image, the next step is to create a replication topology with three nodes: two masters and one slave. Each node will be deployed on a different host. The two master nodes will be responsible for writing data to their respective databases, while the slave node will be used for reading data from the masters and keeping its database in sync. This type of replication topology is known as a “multi-master, single-slave” topology, and is commonly used in scenarios where high availability and read scalability are important.
Overall, these steps lay the foundation for setting up a multi-source MySQL replication environment using Docker images. By using Docker, it becomes easier to deploy and manage multiple MySQL instances across different hosts, and allows for greater flexibility and scalability.
Pulling MySQL Image
To pull the MySQL Community Edition image, the command is:
docker pull mysql/mysql-server:tag
If :tag is omitted, the latest tag is used, and the image for the latest GA version of MySQL Server is downloaded.
Examples:
$ docker pull mysql/mysql-server
$ docker pull mysql/mysql-server:5.7
$ docker pull mysql/mysql-server:8.0
In this example, we are going to use mysql/mysql-server:8.0
Creating a Docker network
Fire the below command to create a network:
docker network create replicanetYou just need to create it once, unless you remove it from Docker.
To see all Docker networks:
docker network lsCreating 3 MySQL containers
Run the commands below in a terminal.
docker run -d --rm --name=master1 --net=replicanet --hostname=master1 \
  -v $PWD/d0:/var/lib/mysql -e MYSQL_ROOT_PASSWORD=mypass \
  mysql/mysql-server:8.0 \
  --server-id=1 \
  --log-bin='mysql-bin-1.log' \
  --relay_log_info_repository=TABLE \
  --master-info-repository=TABLE \
  --gtid-mode=on \
  --enforce-gtid-consistency

docker run -d --rm --name=master2 --net=replicanet --hostname=master2 \
  -v $PWD/d1:/var/lib/mysql -e MYSQL_ROOT_PASSWORD=mypass \
  mysql/mysql-server:8.0 \
  --server-id=2 \
  --log-bin='mysql-bin-1.log' \
  --master-info-repository=TABLE \
  --relay_log_info_repository=TABLE \
  --gtid-mode=on \
  --enforce-gtid-consistency

docker run -d --rm --name=slave --net=replicanet --hostname=slave \
  -v $PWD/d2:/var/lib/mysql -e MYSQL_ROOT_PASSWORD=mypass \
  mysql/mysql-server:8.0 \
  --server-id=3 \
  --master-info-repository=TABLE \
  --relay_log_info_repository=TABLE \
  --gtid-mode=on \
  --enforce-gtid-consistency
It’s possible to see whether the containers are started by running:
docker ps -a
CONTAINER ID   IMAGE                        COMMAND                  CREATED         STATUS                            PORTS                       NAMES
56746f3a15d2   mysql/mysql-server:8.0       "/entrypoint.sh --se…"   4 seconds ago   Up 2 seconds (health: starting)   3306/tcp, 33060-33061/tcp   slave
6bba84f81550   mysql/mysql-server:8.0       "/entrypoint.sh --se…"   5 seconds ago   Up 3 seconds (health: starting)   3306/tcp, 33060-33061/tcp   master2
184739efc662   mysql/mysql-server:8.0       "/entrypoint.sh --se…"   6 seconds ago   Up 4 seconds (health: starting)   3306/tcp, 33060-33061/tcp   master1
Servers are still with status (health: starting), wait till they are with state (healthy) before running the following commands.
56746f3a15d2   mysql/mysql-server:8.0       "/entrypoint.sh --se…"   55 seconds ago   Up 53 seconds (healthy)    3306/tcp, 33060-33061/tcp   slave
6bba84f81550   mysql/mysql-server:8.0       "/entrypoint.sh --se…"   56 seconds ago   Up 54 seconds (healthy)    3306/tcp, 33060-33061/tcp   master2
184739efc662   mysql/mysql-server:8.0       "/entrypoint.sh --se…"   57 seconds ago   Up 54 seconds (healthy)    3306/tcp, 33060-33061/tcp   master1
Configuring masters and slave
Master 1
Now we’re ready start our instances and configure replication.
Let’s configure in master1 node the replication user “repl1”.
docker exec -it master1 mysql -uroot -pmypass \
  -e "CREATE USER 'repl1'@'%' IDENTIFIED BY 'slavepass';" \
  -e "GRANT REPLICATION SLAVE ON *.* TO 'repl1'@'%';" \
  -e "SHOW MASTER STATUS;"
Output:
mysql: [Warning] Using a password on the command line interface can be insecure.
+--------------------+----------+--------------+------------------+------------------------------------------+
| File               | Position | Binlog_Do_DB | Binlog_Ignore_DB | Executed_Gtid_Set                        |
+--------------------+----------+--------------+------------------+------------------------------------------+
| mysql-bin-1.000003 |      692 |              |                  | 264b9156-e356-11ed-94cd-0242ac130002:1-2 |
+--------------------+----------+--------------+------------------+------------------------------------------+
Master 2
Let’s configure in master2 node the replication user “repl2”.
docker exec -it master2 mysql -uroot -pmypass \
  -e "CREATE USER 'repl2'@'%' IDENTIFIED BY 'slavepass';" \
  -e "GRANT REPLICATION SLAVE ON *.* TO 'repl2'@'%';" \
  -e "SHOW MASTER STATUS;"
Output:
mysql: [Warning] Using a password on the command line interface can be insecure.
+--------------------+----------+--------------+------------------+------------------------------------------+
| File               | Position | Binlog_Do_DB | Binlog_Ignore_DB | Executed_Gtid_Set                        |
+--------------------+----------+--------------+------------------+------------------------------------------+
| mysql-bin-1.000003 |      692 |              |                  | 267550ec-e356-11ed-93be-0242ac130003:1-2 |
+--------------------+----------+--------------+------------------+------------------------------------------+
Slave
Let’s continue with the slave instance.
M1 ⭢ S
docker exec -it slave mysql -uroot -pmypass \
  -e "CHANGE MASTER TO MASTER_HOST='master1', MASTER_USER='repl1', \
    MASTER_PASSWORD='slavepass', MASTER_AUTO_POSITION = 1 \
    FOR CHANNEL 'master1';"
M2 ⭢ S
docker exec -it slave mysql -uroot -pmypass \
  -e "CHANGE MASTER TO MASTER_HOST='master2', MASTER_USER='repl2', \
    MASTER_PASSWORD='slavepass', MASTER_AUTO_POSITION = 1 \
    FOR CHANNEL 'master2';"
Let’s start replication and check whether it’s working..
docker exec -it slave mysql -uroot -pmypass -e "START SLAVE;" -e "SHOW SLAVE STATUS\G"Slave output:
*************************** 1. row ***************************
               Slave_IO_State: Queueing master event to the relay log
                  Master_Host: master1
                  Master_User: repl
                  Master_Port: 3306
                Connect_Retry: 60
              Master_Log_File: mysql-bin-1.000003
          Read_Master_Log_Pos: 595
               Relay_Log_File: slave-relay-bin-master1.000002
                Relay_Log_Pos: 203
        Relay_Master_Log_File: mysql-bin-1.000003
             Slave_IO_Running: Yes
            Slave_SQL_Running: Yes
                             ...
*************************** 2. row ***************************
               Slave_IO_State: Waiting for master to send event
                  Master_Host: master2
                  Master_User: repl
                  Master_Port: 3306
                Connect_Retry: 60
              Master_Log_File: mysql-bin-1.000003
          Read_Master_Log_Pos: 595
               Relay_Log_File: slave-relay-bin-master2.000001
                Relay_Log_Pos: 4
        Relay_Master_Log_File: mysql-bin-1.000003
             Slave_IO_Running: Yes
            Slave_SQL_Running: Yes
                             ...
You can see that both Slave_IO_Running: Yes and Slave_SQL_Running: Yes are running.
Inserting some data
Now it’s time to test whether data is replicated to slave.
We are going to create a new database named TEST1 in master1 and TEST2 in master2.
docker exec -it master1 mysql -uroot -pmypass -e "CREATE DATABASE TEST1; SHOW DATABASES;"Master1 output:
mysql: [Warning] Using a password on the command line interface can be insecure.
+--------------------+
| Database           |
+--------------------+
| information_schema |
| TEST1              |
| mysql              |
| performance_schema |
| sys                |
+--------------------+
docker exec -it master2 mysql -uroot -pmypass -e "CREATE DATABASE TEST2; SHOW DATABASES;"Master2 output:
mysql: [Warning] Using a password on the command line interface can be insecure.
+--------------------+
| Database           |
+--------------------+
| information_schema |
| TEST2              |
| mysql              |
| performance_schema |
| sys                |
+--------------------+
Run the code below to check whether the database was replicated.
docker exec -it slave mysql -uroot -pmypass \
  -e "SHOW VARIABLES WHERE Variable_name = 'hostname';" \
  -e "SHOW DATABASES;"
Slave output:
mysql: [Warning] Using a password on the command line interface can be insecure.
+---------------+-------+
| Variable_name | Value |
+---------------+-------+
| hostname      | slave |
+---------------+-------+
+--------------------+
| Database           |
+--------------------+
| information_schema |
| TEST1              |
| TEST2              |
| mysql              |
| performance_schema |
| sys                |
+--------------------+
Stopping containers, removing created network and image
Stopping running container(s):
docker stop master1 master2 slaveRemoving the data directories created (they are located in the folder were the containers were run):
sudo rm -rf d0 d1 d2Removing the created network:
docker network rm replicanetRemoving MySQL image:
docker rmi mysql/mysql-server:8.0
Conclusion
Multi-source MySQL replication with Docker images offers a powerful and flexible solution for keeping data synchronized across multiple databases. With Docker, it becomes easier to deploy and manage multiple MySQL instances across different hosts, while also allowing for greater scalability and flexibility. In this article, we explored the steps involved in setting up multi-source MySQL replication using Docker images, including creating a Docker network, pulling the MySQL image from Docker Hub, and creating a replication topology with two masters and one slave.
While there are certainly challenges involved in setting up and managing multi-source MySQL replication, Docker images can help simplify the process and make it easier to scale and manage your database infrastructure. By following the steps outlined in this article, you should be able to get started with multi-source MySQL replication using Docker images, and take advantage of the benefits that this approach offers.
Additional Readings
References
https://dev.mysql.com/doc/refman/8.0/en/replication-multi-source.html
Thanks for reading
- 👏 Please clap for the story (50 claps) to help the article to be spread
- 🌐 Share the story on Social Media
- ➕More stories about Programming, Career, AI and more.
- 🔔 Follow me: Medium | LinkedIn | Twitter
- ✉️ Subscribe to the newsletter


