
Setting up Orchestrator and MySQL Replication using Docker
Simplifying High Availability and Replication Management with Orchestrator and Docker
Orchestrator is a MySQL high availability and replication management tool, runs as a service and provides command line access, HTTP API and Web interface. Orchestrator supports:
- Discovery: Orchestrator actively crawls through your topologies and maps them. It reads basic MySQL info such as replication status and configuration, and provides a slick visualisation of your topologies, including replication problems, even in the face of failures.
- Refactoring: Orchestrator understands replication rules. It knows about binlog file:position, GTID, Pseudo GTID, Binlog Servers.
- Recovery: Orchestrator uses a holistic approach to detect master and intermediate master failures. Based on information gained from the topology itself, it recognises a variety of failure scenarios.
The following sections outline the steps for cloning Orchestrator from GitHub and discovering a MySQL replication topology.
1. Cloning Orchestrator
Just run:
$ git clone https://github.com/github/orchestrator.git
2. Building Orchestrator Docker Image
script/dock is a convenience script to build/spawn each of these docker images, but we are just going to build the image in this step.
$ cd orchestrator
$ docker build . -f docker/Dockerfile -t orchestrator:latest
$ docker images
➜  orchestrator git:(master) docker images
REPOSITORY                                                                      TAG                    IMAGE ID       CREATED         SIZE
orchestrator                                                                    latest                 f7c849be7cb1   5 minutes ago   33.5MB
3. Creating a Docker Network:
Let’s create a Docker network so we can specify the IPs from each node:
$ docker network create --subnet=172.20.0.0/16 orchnetTo check whether the network was created, run:
$ docker network ls
4. Orchestrator as a container
We will create a container with Orchestrator image, define its network and set its IP:
$ docker run -d --name orchestrator --net orchnet --ip 172.20.0.10 -p 3000:3000 orchestrator:latest5. Replication Topology using MySQL in containers
Let’s set up a replication topology M→S1, M→S2. You just need to run the commands below:
To create 3 MySQL servers as containers:
for N in 1 2 3
  do docker run -d --name=node$N --hostname=node$N --net orchnet --ip "172.20.0.1$N" \
  -e MYSQL_ROOT_PASSWORD=mypass \
  mysql/mysql-server:8.0 \
  --server-id=$N \
  --enforce-gtid-consistency='ON' \
  --log-slave-updates='ON' \
  --gtid-mode='ON' \
  --log-bin='mysql-bin-1.log'
done
To see whether the MySQL Containers are ready, run:
$ docker ps -a
The MySQL containers must be with status (healthy) and NOT (health: starting) to go the next step.
Setting master replication in node1:
docker exec -it node1 mysql -uroot -pmypass \
  -e "CREATE USER 'repl'@'%' IDENTIFIED WITH mysql_native_password BY 'slavepass';" \
  -e "GRANT REPLICATION SLAVE ON *.* TO 'repl'@'%';" \
  -e "SHOW MASTER STATUS;"
The output is:
mysql: [Warning] Using a password on the command line interface can be insecure.
+--------------------+----------+--------------+------------------+------------------------------------------+
| File               | Position | Binlog_Do_DB | Binlog_Ignore_DB | Executed_Gtid_Set                        |
+--------------------+----------+--------------+------------------+------------------------------------------+
| mysql-bin-1.000003 |      660 |              |                  | 50c17f4e-d61f-11ed-bedc-0242ac14000b:1-2 |
+--------------------+----------+--------------+------------------+------------------------------------------+
Setting slave replication on node2 and node3:
for N in 2 3
  do docker exec -it node$N mysql -uroot -pmypass \
    -e "CHANGE MASTER TO MASTER_HOST='172.20.0.11', MASTER_PORT=3306, \
        MASTER_USER='repl', MASTER_PASSWORD='slavepass', MASTER_AUTO_POSITION = 1;"

  docker exec -it node$N mysql -uroot -pmypass -e "START SLAVE;"
done
Checking whether slaves are replicating, Slave_IO_Running: Yes and Slave_SQL_Running: Yes :
$ docker exec -it node2 mysql -uroot -pmypass -e “SHOW SLAVE STATUS\G”
$ docker exec -it node3 mysql -uroot -pmypass -e “SHOW SLAVE STATUS\G”
Grant access to the Orchestrator so it can see the topology:
docker exec -it node1 mysql -uroot -pmypass \
  -e "CREATE USER 'orc_client_user'@'172.20.0.10' IDENTIFIED BY 'orc_client_password';" \
  -e "GRANT SUPER, PROCESS, REPLICATION SLAVE, RELOAD ON *.* TO 'orc_client_user'@'172.20.0.10';" \
  -e "GRANT SELECT ON mysql.slave_master_info TO 'orc_client_user'@'172.20.0.10';"
6. Orchestrator commands: discover and topology
Now it’s time to run the commands in Orchestrator container so it can find the topology:
To discover the topology:
$ docker exec -it orchestrator ./orchestrator -c discover -i 172.20.0.11:3306 --debugTo see the topology:
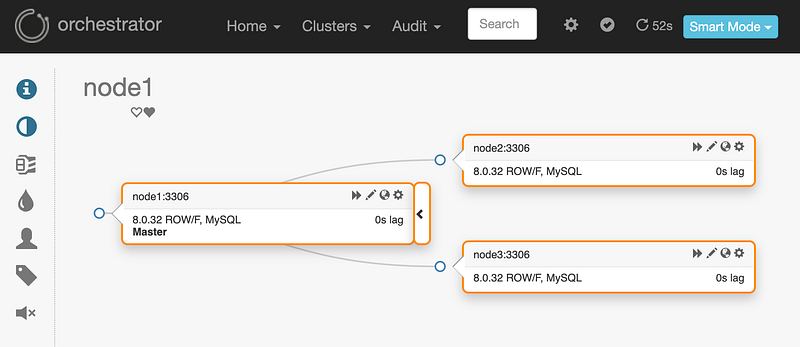
$ docker exec -it orchestrator ./orchestrator -c topology -i 172.20.0.11:3306You can also see it accessing: http://localhost:3000
7. Cleaning up
Stopping and removing the containers:
$ docker rm -f orchestrator node1 node2 node38. Conclusion
Setting up Orchestrator and MySQL Replication using Docker can greatly simplify the process of managing and monitoring database replication. With the use of Docker, you can easily spin up and down containers, making it easy to test, deploy and scale your database infrastructure.
Thanks for reading
- 👏 Please clap for the story (50 claps) to help the article to be spread
- 🌐 Share the story on Social Media
- ➕More stories about Programming, Career, AI and more.
- 🔔 Follow me: Medium | LinkedIn | Twitter
- ✉️ Subscribe to the newsletter


