
Secure Angular 11 App with Code Flow PKCE and IdentityServer4

Update: On May 12, 2021, Google released Angular version 12. The sample Angular app in this tutorial has been upgraded from version 11 to 12. You can find the upgraded source code in the ng-12-upgrade branch. The master branch is still at version 11.
I have worked with the Angular framework since version 2. Over the years, I figured that building robust security into Single Page Application (SPA) is complex and repetitive. If you are a developer who is looking for instructions to secure your Angular application using JSON Web Token (JWT), this story is for you.
To demonstrate how easy it is to secure Angular, I will start an application from scratch and then secure it with the OpenID Connect (OIDC) library. The task is divided into two parts:
Part 1: Scaffold an Angular app using starter kit Ngx-Rocket
Part 2: Install an OIDC client library and configure Code Flow Proof Key for Code Exchange (PKCE)
If you are creating new apps I would definitely recommend using PKCE over the Implicit flow. The OAuth Working Group has published some new guidance around the Implicit flow and JavaScript-based apps, specifically that the Implicit flow should no longer be used.
Online Demo
Developers love to see working source code. We all like to experiment with how something works, and then decide whether we want to spend our valuable time learning it. Check out the live demo. Log in with the account (janedoe, Pa$$word123)
OIDC Connectivity Overview
Figure 1 depicts the logical design of the modern application stack, showing connectivity and the relationship between Clients (apps), Token Service, and API Resources (REST API). In this tutorial, we will accomplish the following:
- Setting up an Angular app to run on https://localhost:4200
- Initiating Code Flow PKCE and connecting to the Token Service https://cat-token-identity.azurewebsites.net to log in and obtain the JWT token
- Making HTTP GET to REST API server https://cat-netcore-api.azurewebsites.net/api/v1 to retrieve a sample JSON data for display
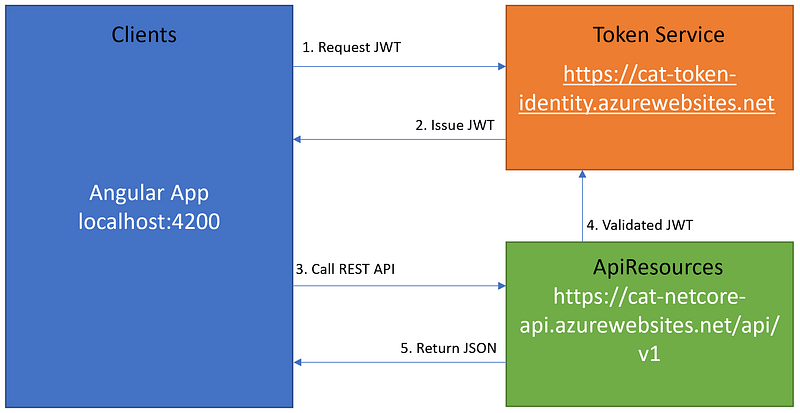
For more information about Clients-ApiResources-TokenService architecture for building scalable and maintainable modern applications, see CAT architecture pattern for modern app SPA/Mobile.
Opensource Project Highlights
The following high-quality opensource projects will be put into use.
- Ngx-Rocket —this project has 1,300+ stars on Github. It is an extensible Angular 11+ enterprise-grade project generator based on angular-cli with top practices from the community, including PWA, Cordova & Electron support, coding guides, and more. The developer of this project is Yohan Lasorsa who is a code artist and OSS maintainer.
- angular-auth-oidc-client — this is a TypeScript project with 550+ stars on Github. It is a javascript library that is certified for OpenID Connect & OAuth2. The developer for this project is damienbod, who is one of the best application security experts.
One way you can show your appreciation to opensource project developers is by giving them a “star” on Github.
For this story, I reached out to Yohan Lasorsa, the creator of Ngx-Rocket generator for his comments. See below for Yohan’s response. Bless his heart!
I created ngx-rocket during my consulting days, when I saw new Angular projects started almost every week in different teams, with every team struggling with the same problems: how to define the project architecture, how to integrate mobile support, API proxy, different environments and so on… Initially, the starter kit was created as a way to integrate everything needed to kickstart an “enterprise-grade” project quickly, and was refined over time based on the experience from multiple project teams. As time passed, this project has grown way beyond its initial goal thanks to the awesome Angular community :)
Yohan Lasorsa Creator of Ngx-Rocket Generator
Prerequisite
- Visual Code
- Angular CLI
- Secure Token Service
- REST API
Notice that the Secure Token Service and REST API referenced in this story is covered in the following tutorials
Let’s get started!
Part 1 — Create Angular app with Ngx-Rocket template
Ngx-Rocket is a high-quality starter template that Angular developers can use to quickly scaffold an Angular app with boilerplate code. The included enterprise features are responsive design, routing, authentication, HTTPS service extensions, i18n support, and more.
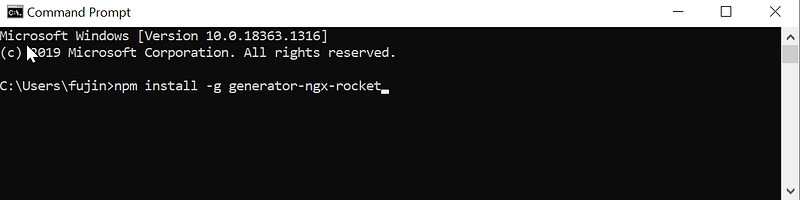
Task 1.1 — Install Ngx-Rocket generator
To install Ngx-Rocket generator (see Figure 2 for visual aids):
- Open command prompt
- Type in npm install -g generator-ngx-rocket
- Hit Enter key
Task 1.2 — Scaffold new Angular app
To scaffold a new Angular app using Ngx-Rocket generator, follow these steps:
- Create folder C:\apps\devkit\Clients\AngularId4
- Open the command prompt and change to C:\apps\devkit\Clients\AngularId4
- Type in “ngx new” and hit Enter
- When prompt for input parameters, use the settings as shown in Figure 3
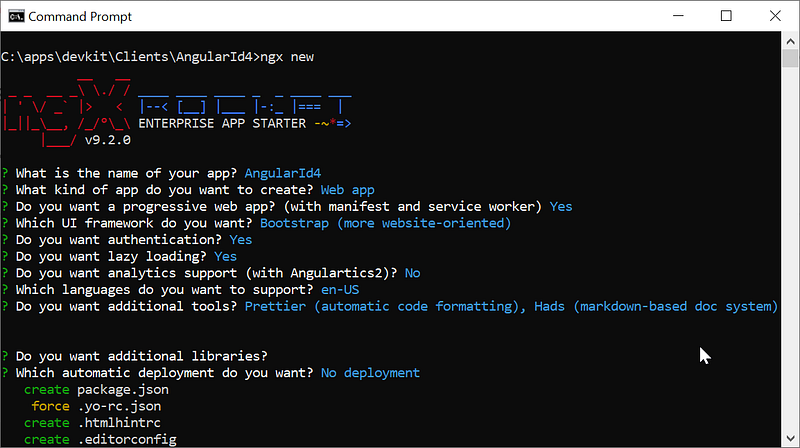
The Ngx-Rocket generator will first scaffold the Angular app and then automatically run npm -install command to restore npm packages afterward.
Task 1.3 — Test Run Angular App
Once the installation is done, you can run ng serve -o to compile and open the app in the browser. See Figure 4 for visual aids.
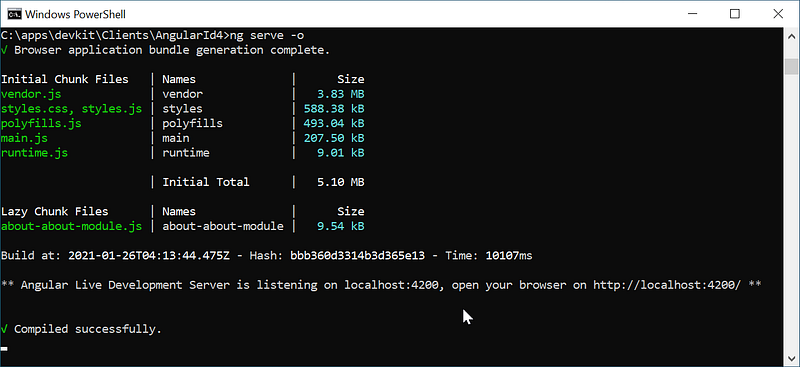
Notice that with the option “ -o”, it will automatically open the app in the browser and present a login screen as shown in Figure 5.
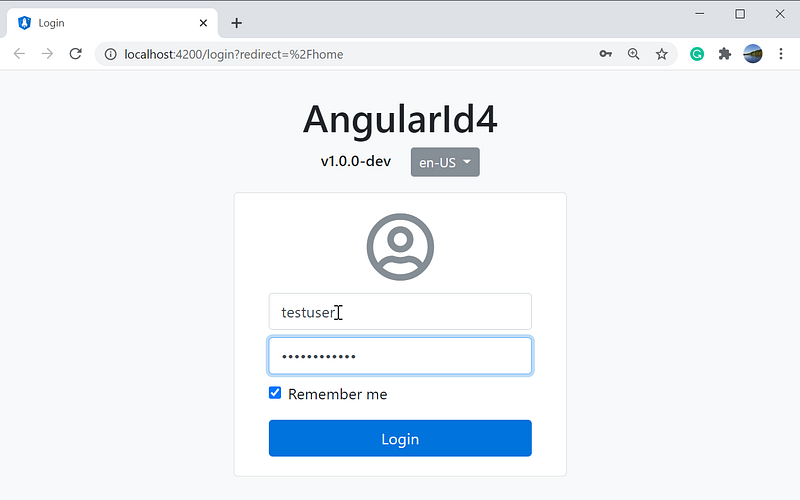
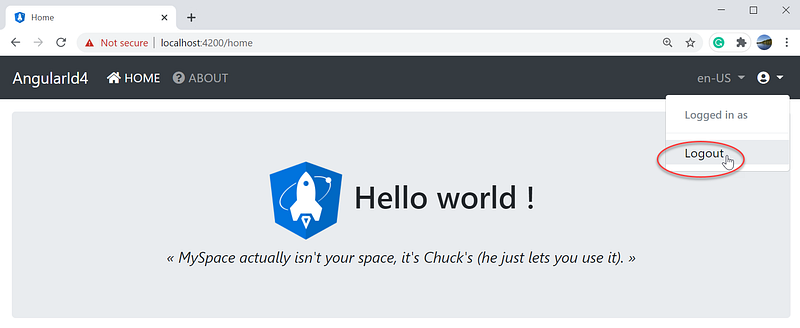
To login, enter a fake account such as “testuser” and “testpassword” into the username and password boxes and click on the Login button. You should see the app with the name AngularId4 together with the ‘Home’ and ‘About’ menu links on the upper left corner. In the upper right corner, you will find the option to log out when clicking on the user icon. See Figure 6 for a screenshot of the application home page and its menu.
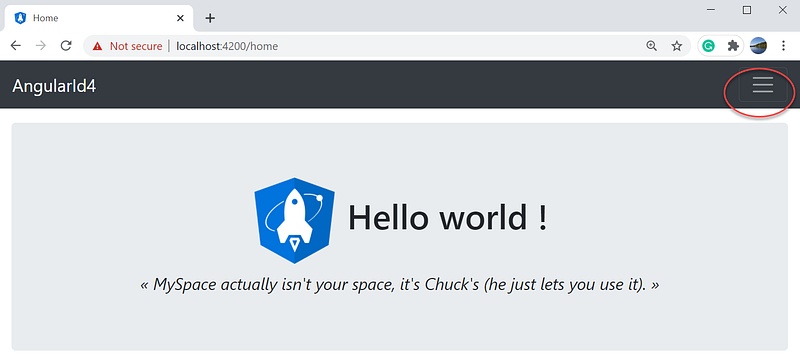
If you shrink the browser window, the app menu will be responsive and display the hamburger menu on the upper right corner as shown in Figure 7.
For more information about the Ngx-Rocket features and benefits, please visit https://github.com/ngx-rocket/generator-ngx-rocket.
Part 2- Install and Configure OIDC client library
In Part 1, we learned how to scaffold a new Angular app with responsive design using the Ngx-Rocket template. In Part 2, we will replace the username and password login with OpenId Connect and Code Flow PKCE to authenticate against a Token Service Server such as IdentityServer4.
Task 2.1— Open the Angular application with Visual Code
To open the project for edit,
- Launch Visual Code
- Open folder C:\apps\devkit\Clients\AngularId4
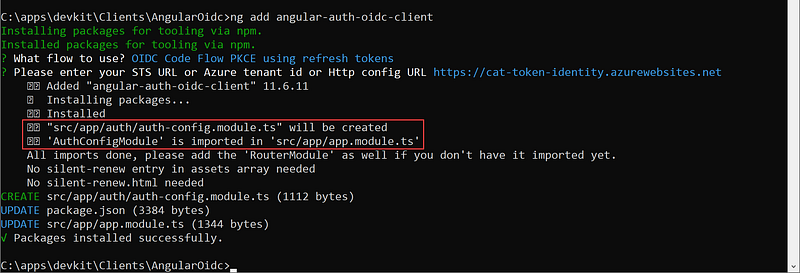
Task 2.2— Install OIDC client
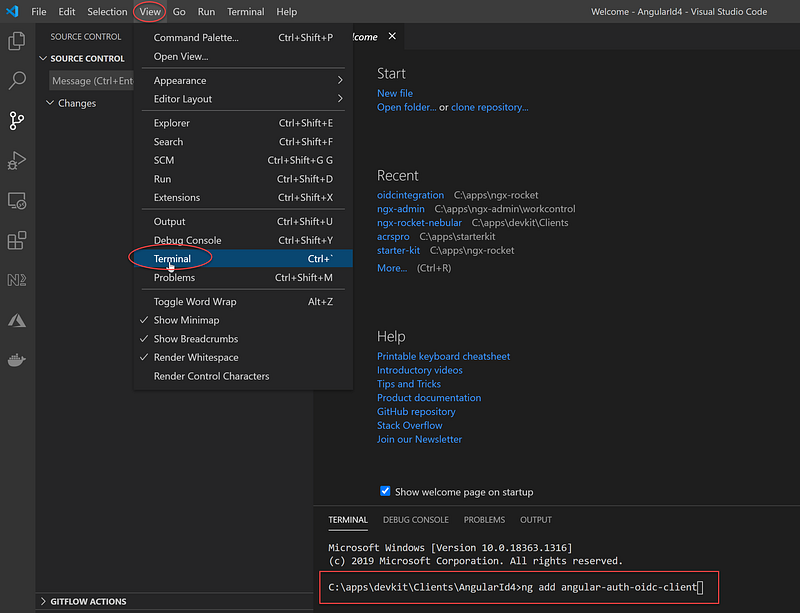
In Visual Code (see Figure 8 for visual aids),
- Click on menu View > Terminal (or “CTRL + ~”) to get to the Terminal prompt
- Type in: ng add angular-auth-oidc-client
- Hit the ‘Enter’ key
When prompting for inputs during installation, use the information below (see Figure 9 for visual aids):
- What flow to use? OIDC Code Flow PKCE using refresh tokens
- Please enter your STS URL or Azure tenant id or Http config URL — https://cat-token-identity.azurewebsites.net

After answering all the prompts, the installation will
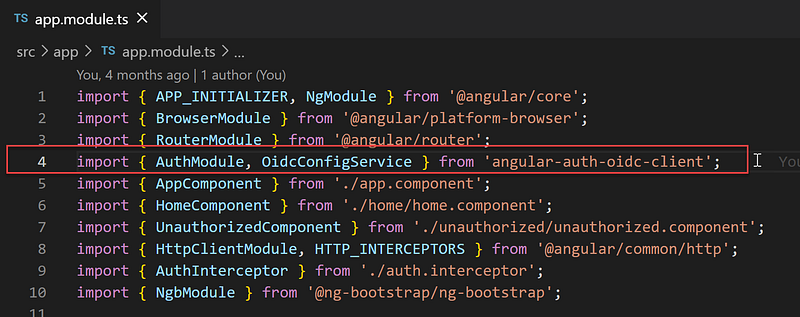
- add file src/app/authauth-config.module.ts (see Figure 10)
- import the AuthConfigModule to the app.module.ts (see Figure 11)
Task 2.3— Configure OIDC Client
In Visual Code, open the src\app\auth\auth-config.module.ts and update the settings in the oidcConfigService.withConfig with the following (see Figure 12 for visual aids):
- stsServer = https://cat-token-identity.azurewebsites.net (an example of the Secure Token Service (STS) based on IdentityServer4 running in Azure).
- clientId = devkit-clients-spa.pkce (the Id of a registered client in the IdentityServer4)
- scope = openid profile email roles app.api.employeeprofile.read ( defined scopes inside the IdentityServer4)
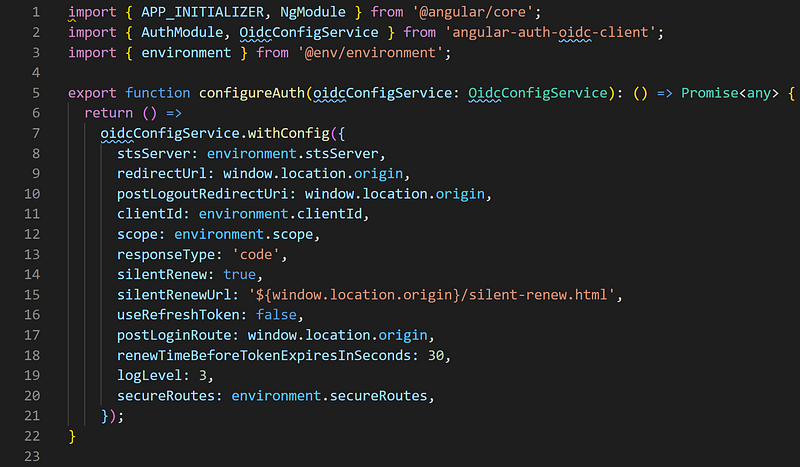
The setting for stsServer, clientID, scope, and secureRoutes are from the environment.ts file. For more information on how to use the environment settings in Angular, see Building and serving Angular apps.
Task 2.4 — Custom Code for Authentication
Five source code files are added/updated to replace the default username/password login with code flow PKCE using the Angular OIDC client library.
- src/app/app.module.ts
- src/app/app.component.ts
- src/app/auth/auth.service.ts
- src/app/auth/login.component.html
- src/app/auth/login.component.ts
Code walkthru of app.module.ts (Figure 13)
line 18 : import AuthConfigModule from ./auth/auth-config.module
line 35 : include the AuthConfigModule in the NgModule > imports
Code walkthru of app.component.ts (Figure 14)
line 11: import auth.service
line 40–42: call a wrapper method checkAuth in the authservice.ts which in turn call the this.oidcSecurityService.checkAuth() (see Figure x, line 21–23)
Code walkthru of auth.service.ts (Figure 15)
line 9-11: isLoggedIn() — check if login against local storage; see src/app/auth/authentication.guard for example usage
line 13–15: token() — get access token; — see src/app/about/about.component.ts for example usage
line 17–19: userData() — get user profile data; see src/app/about/about.component.ts for example usage
line 21–23: checkAuth() — check authentication against Token Service Server, see src/app/app.component.ts for example usage
line 25–27: doLgoin() — initial oAuth flow; see src/app/auth/login.component.ts for example usage
line 29–32: signOut() — redirect to Secure Token Service server to log out; see src/app/app.component.ts for example usage
Task 2.5— Custom Code for Calling Secured REST API
To call secured WebAPI, the access token must be in the header. This is done with the AuthInterceptor as referenced in the source code file src/app/@core/core.module.ts (Figure 16). The setting for which the call to REST API will have the Access Token automatically append to the header is in src/app/auth/auth-config.module.ts (Figure 17).
Code walkthru of core.module.ts (Figure 16)
line 31–35: add the AuthInterceptor to NgModule > providers section
Code walkthru of auth-config.module.ts (Figure 17)
line 22: set the REST API that will have Access Token automatically append to the header
Task 2.6 — Login using OIDC Client
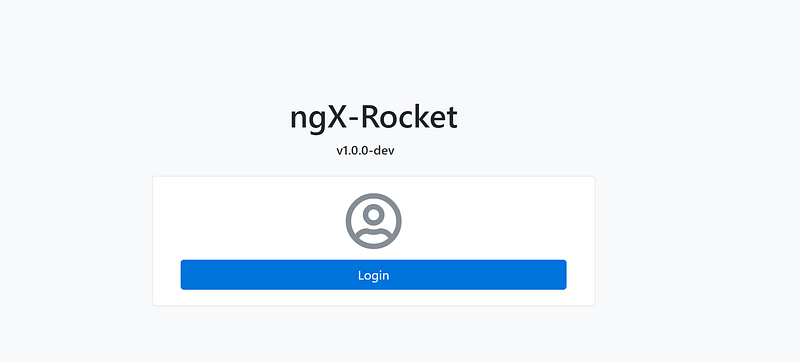
To log in with OIDC client, in the Visual Code > Terminal screen, run ng serve -o. You should see a login screen as shown in Figure 18.
Clicking on the Login button will redirect you to the Secure Token Service login screen as shown in Figure 19.
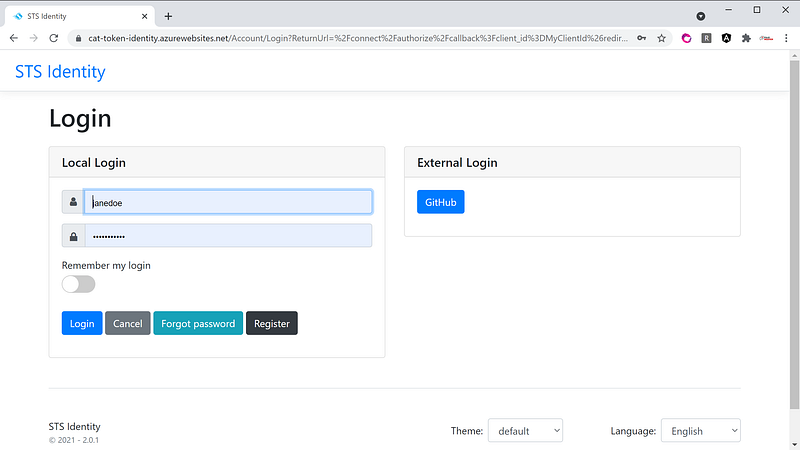
Log in with the account (janedoe, Pa$$word123). After successful login, it will redirect back to the Angular app as shown in Figure 20. Notice that the IdentityServer4 is integrated with GitHub login as well. If you have GitHub account, you can also login using an external IdP (Identity Provider).
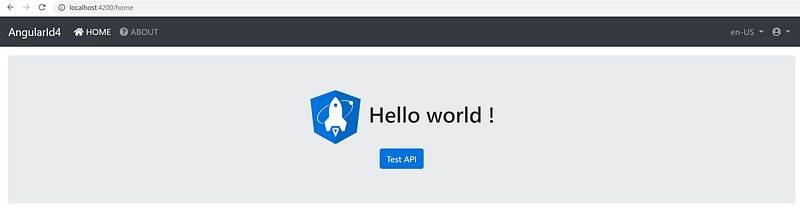
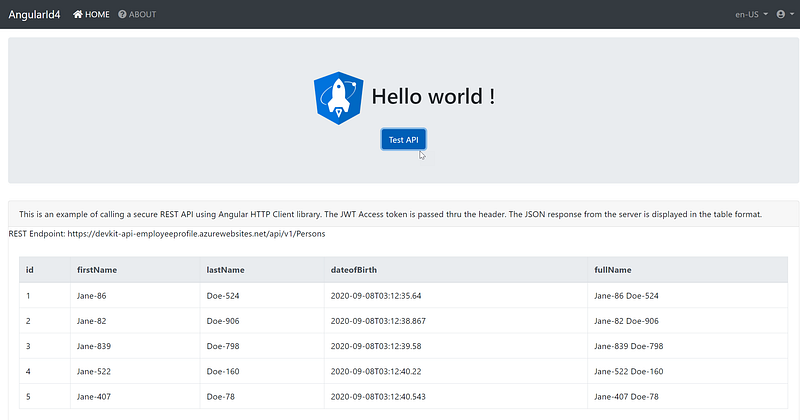
On the Home page, click on the Test API button to see an example REST API call. The response data is shown in a table as shown in Figure 21.
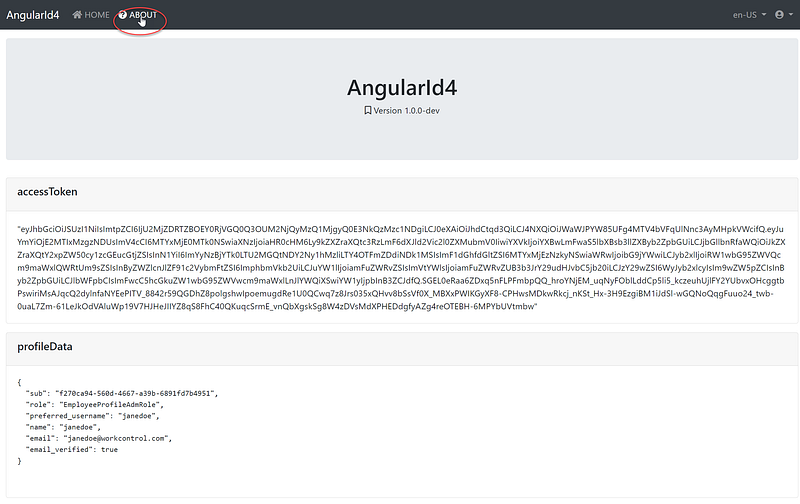
Click on the ‘About’ menu to see a dump of Profile Data and Access Token as shown in Figure 22.
Screencast
This youtube video is a record of my computer screen going over the steps in this article. Enjoy the background music!
Source Code in Github
You can clone the source code and run it as it is without setting up the backend Token Service and WebApi infrastructure. The source code points to a demo IdentityServer4 and ASP.NET Core WebAPI applications running in Azure.
https://github.com/workcontrolgit/AngularId4
Related Stories
- Angular 11 Pagination of 100,000+ Rows
- CAT architecture pattern for modern app SPA/Mobile
- NetCore 5 Pagination 100,000+ Rows
Summary
I have personally used Ngx-Rocket generator to create enterprise Angular applications and secure them with OIDC clients. Together with IdentityServer4, these high-quality open source projects will help developers to scaffold and secure Angular applications in no time.
Thanks for reading! Hope you found it useful. Want more? Hit the “Follow” button below my profile. With your support, I’ll keep creating awesome content for you. Have a great day ahead! — Fuji Nguyen


