
Securing a Node.js API with Auth0
A guide for setting up a Node.js API with Auth0
If you have read my previous articles on Auth0 then you know I am a big fan of using it for identity management in new applications. In this article I will be demonstrating how to create an API in the Auth0 admin, building an API that is secured using Auth0, and finally will be walking through how to manage user access with roles and permissions.
To complete the demonstration API in this article you will need to have an Auth0 account already set up or create a new one. If you need some guidance on how to do that be sure to check out my previous Auth0 article which I will link below.
Previously I have written an article that is an introduction to Auth0 and provides as a guide for setting up a new React app and securing it with Auth0. Be sure to check out that article below.
Creating a new API in Auth0
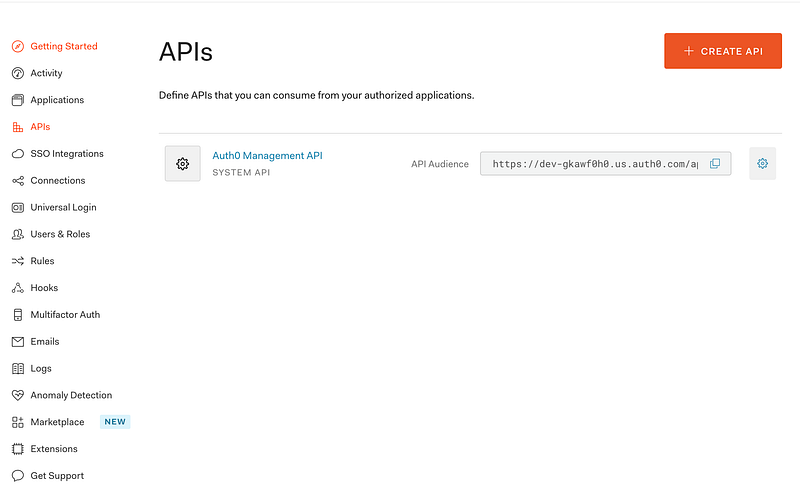
Before we can start building our Node.js API we will need to set up a new API in the Auth0 admin. After you create or sign in with your existing account you will want to navigate to the APIs section in your admin UI.
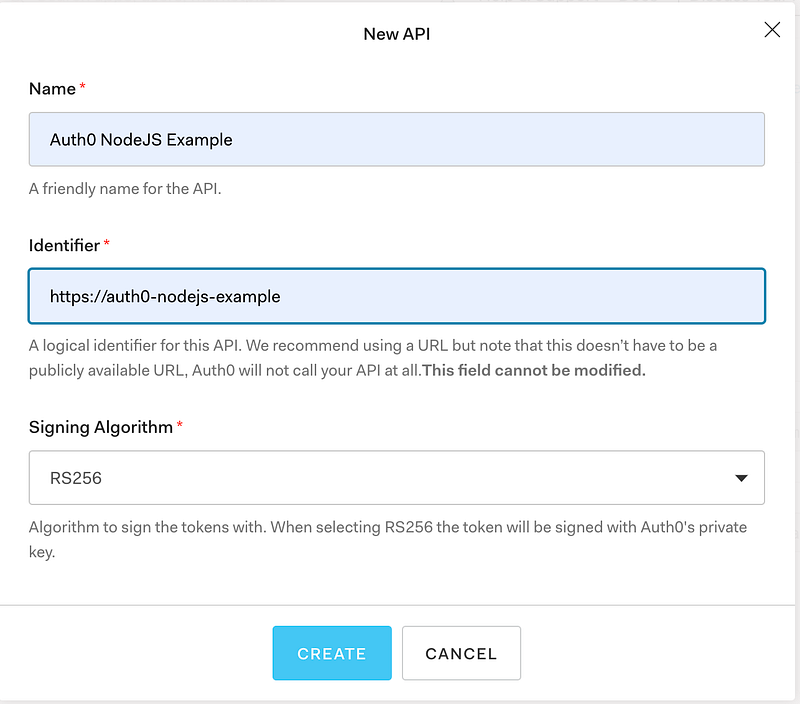
To create a new API you will be presented with a dialog and need to enter a Name and Identifier. Auth0 recommends the Identifier be a URL. If you know what domain you would be deploying the API to you could that as an identifier. I will just be using a logical name for the demonstration.
After you have successfully created the new API you will be taken to the Settings view for that API. You will want to note these settings for when we get to setting up our API here a bit later on.

Auth0 will automatically create a test application for testing your new API. You can see in the screenshot below that you can see this test application by going to the “Machine to Machine Applications” tab.
Later in the article, you will need the client_id and client_secret to generate access tokens for testing out our Node.js API. You can find those setting by clicking on the link to that newly created test application.
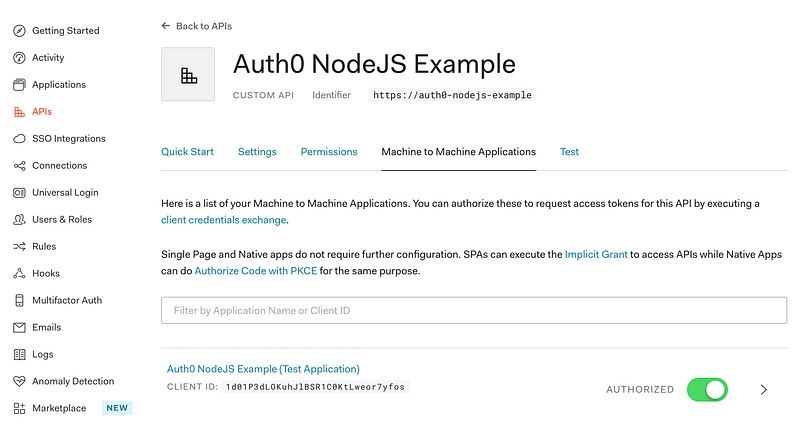
The test application is an example of a Machine to Machine application which in other words would be one of your services calling the API with a bearer token. This is what we will be using for the demonstration in this article but note you can also use the bearer tokens generated in your Auth0 Single Page Applications.
That takes care of the initial admin section of this guide. Next, we will be moving into setting up the Node.js API.
The API
We are almost ready to begin writing code for our demonstration API. But before we can jump into the code we will need to create a new Node.js project and install a few dependencies through npm.
Create a new directory and enter the following commands in a terminal within that directory.
npm init
npm install express express-jwt jwks-rsa express-jwt-authz
This step is optional, but if you want the API to automatically restart after you make file changes then I recommend adding nodemon to the dependencies.
npm install --save-dev nodemonOur dependencies are all installed and now we can create index.js at the root of the project where we will create the server. The code to start is below for the server file.
Nothing much to the server as you can see. You will just need to replace audience, issuer, and jwksUri with the values from your own API. We are usingjwt middleware to validate the bearer tokens sent in the Authorization header. Note that because we have been setting this middleware at the base of the express app it will apply to every endpoint we create.
We could selectively apply this to some endpoints and leave others unsecured, but if we use it as above it will apply to every route we create.
Next, we are ready to run the API with either command below in the terminal.
npx nodemon index.js
// or
node index.js
Now with the API running, we will use curl to generate an access token with the test application created earlier. Use the following command to generate a token. Make sure to replace the example values with your own where necessary.
curl --request POST \
  --url https://dev-gkawf0h0.us.auth0.com/oauth/token \
  --header 'content-type: application/json' \
  --data '{"client_id":"YOUR_CLIENT_ID","client_secret":"YOUR_CLIENT_SECRET","audience":"https://auth0-nodejs-example","grant_type":"client_credentials"}'
The result you get back will look similar to the following:
{
  "access_token": "eyJhbGciOiJSUzI1NiIsInR5cCI6IkpXVCIsImtpZCI6ImRaN2JYcUI3bkF4QTZ2LTZjQkZ2VSJ9.eyJpc3MiOiJodHRwczovL2Rldi1na2F3ZjBoMC51cy5hdXRoMC5jb20vIiwic3ViIjoiMWQwMVAzZExPS3VoSmxCU1IxQzBLdEx3ZW9yN3lmb3NAY2xpZW50cyIsImF1ZCI6Imh0dHBzOi8vYXV0aDAtbm9kZWpzLWV4YW1wbGUiLCJpYXQiOjE2MDIzMDA4NjksImV4cCI6MTYwMjM4NzI2OSwiYXpwIjoiMWQwMVAzZExPS3VoSmxCU1IxQzBLdEx3ZW9yN3lmb3MiLCJndHkiOiJjbGllbnQtY3JlZGVudGlhbHMifQ.ZIVMFbtTVHaxpFNOBs-tYV_hL2gtLAuBQnlaO-b0ooDDF2Sbh8x4xiWGXlpqrtSez7v2wd-FGPTTGPzgvF_OaLHJRva9t-lHM4TfRk4CzrgxAS-I6xXlk5YPITL6BqnYEJk0aHZS_if5Hlp0s4UCiqjjNwPfew-WXAsLmgR3946LbnKY63omwcg2RX8FwD4MnzCHutiuCyRZNdXp4dyxSlAmdKtn3v49j7DGUt9ybj_k0nZ1AbEaqLtEpOInWP5C1IzWQ0aof-95Cv0VVKLuB3jabXI6BHIL0EUt-HFi8eCjR7Bv4apxcsSgyBmLwhqnY_Hko0n-FNp-rzis1NCp-A",
  "expires_in": 86400,
  "token_type": "Bearer"
}
You will want to copy and paste the entire value of access_token that is sent. We will be adding this JSON Web Token (JWT) to the Authorization header when we call the API.
Just for a quick experiment to make sure our endpoint is secured we will attempt a call to the API without it. Use the following curl command in a terminal to test.
curl --request GET \
  --url http://localhost:8000/secured
The result should look something like the following:
<!DOCTYPE html>
<html lang="en">
<head>
<meta charset="utf-8">
<title>Error</title>
</head>
<body>
<pre>UnauthorizedError: No authorization token was found<br> at middleware (/Users/matthewbrown/develop/auth0-node-example/node_modules/express-jwt/lib/index.js:79:21)<br> at Layer.handle [as handle_request] (/Users/matthewbrown/develop/auth0-node-example/node_modules/express/lib/router/layer.js:95:5)<br> at trim_prefix (/Users/matthewbrown/develop/auth0-node-example/node_modules/express/lib/router/index.js:317:13)<br> at /Users/matthewbrown/develop/auth0-node-example/node_modules/express/lib/router/index.js:284:7<br> at Function.process_params (/Users/matthewbrown/develop/auth0-node-example/node_modules/express/lib/router/index.js:335:12)<br> at next (/Users/matthewbrown/develop/auth0-node-example/node_modules/express/lib/router/index.js:275:10)<br> at expressInit (/Users/matthewbrown/develop/auth0-node-example/node_modules/express/lib/middleware/init.js:40:5)<br> at Layer.handle [as handle_request] (/Users/matthewbrown/develop/auth0-node-example/node_modules/express/lib/router/layer.js:95:5)<br> at trim_prefix (/Users/matthewbrown/develop/auth0-node-example/node_modules/express/lib/router/index.js:317:13)<br> at /Users/matthewbrown/develop/auth0-node-example/node_modules/express/lib/router/index.js:284:7</pre>
</body>
</html>The result comes back as a chunk of HTML, but you can see the basic idea is that is this is UnauthorizedError that is shown if we try to call the secured endpoint without an authorization token. So that’s good, exactly what we would expect.
Next, we will try once again but this time with the authorization token. Note you will replace the token after “Bearer” in the authorization header.
curl --request GET \
  --url http://localhost:8000/secured \
  --header 'authorization: Bearer eyJhbGciOiJSUzI1NiIsInR5cCI6IkpXVCIsImtpZCI6ImRaN2JYcUI3bkF4QTZ2LTZjQkZ2VSJ9.eyJpc3MiOiJodHRwczovL2Rldi1na2F3ZjBoMC51cy5hdXRoMC5jb20vIiwic3ViIjoiMWQwMVAzZExPS3VoSmxCU1IxQzBLdEx3ZW9yN3lmb3NAY2xpZW50cyIsImF1ZCI6Imh0dHBzOi8vYXV0aDAtbm9kZWpzLWV4YW1wbGUiLCJpYXQiOjE2MDIzMDA4NjksImV4cCI6MTYwMjM4NzI2OSwiYXpwIjoiMWQwMVAzZExPS3VoSmxCU1IxQzBLdEx3ZW9yN3lmb3MiLCJndHkiOiJjbGllbnQtY3JlZGVudGlhbHMifQ.ZIVMFbtTVHaxpFNOBs-tYV_hL2gtLAuBQnlaO-b0ooDDF2Sbh8x4xiWGXlpqrtSez7v2wd-FGPTTGPzgvF_OaLHJRva9t-lHM4TfRk4CzrgxAS-I6xXlk5YPITL6BqnYEJk0aHZS_if5Hlp0s4UCiqjjNwPfew-WXAsLmgR3946LbnKY63omwcg2RX8FwD4MnzCHutiuCyRZNdXp4dyxSlAmdKtn3v49j7DGUt9ybj_k0nZ1AbEaqLtEpOInWP5C1IzWQ0aof-95Cv0VVKLuB3jabXI6BHIL0EUt-HFi8eCjR7Bv4apxcsSgyBmLwhqnY_Hko0n-FNp-rzis1NCp-A'
This time you should get back our success message: {“success”:true}
Validating Permissions
Now that we have done the basics let’s move on to authorization or validating the access token to see if it contains the proper permissions for what it is trying to access on the API.
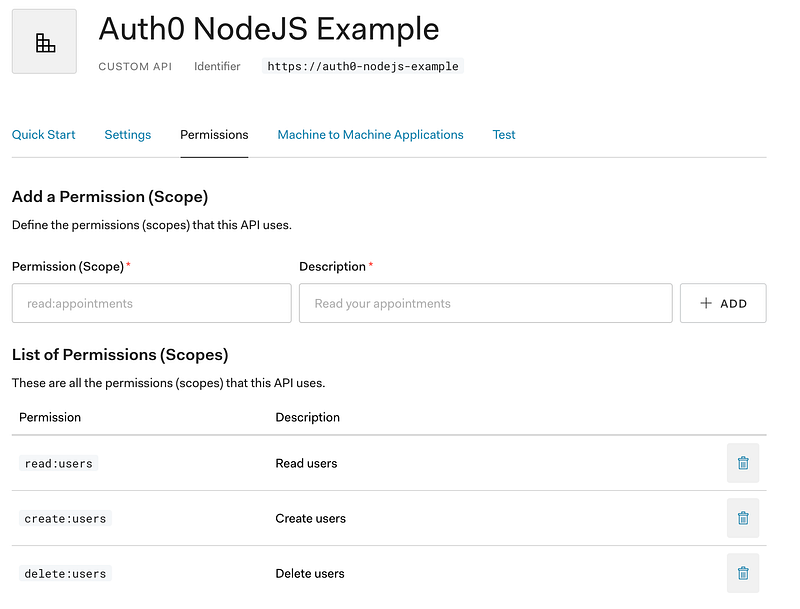
So the first thing is we will need to jump back into the Auth0 admin to create a few permissions. Follow the screenshot below and create these in your API:
create:usersread:usersdelete:users
Now that we have defined the permissions for our API we will want to add a few more endpoints to make use of these. Add the following code to the existing index.js file.
We create a function for checking permissions that we use as a middleware function for our new endpoints. We can pass checkScopes multiple permissions to require or just single permission as we have done above.
If we run the API with the latest updates and update the URL from the previous curl command to point to GET /users we receive the following message: Insufficient scope
This is exactly what we expect so our new permissions validation is working as expected. To get this to work we can simply add these permissions to the testing application we are using to validate the API.
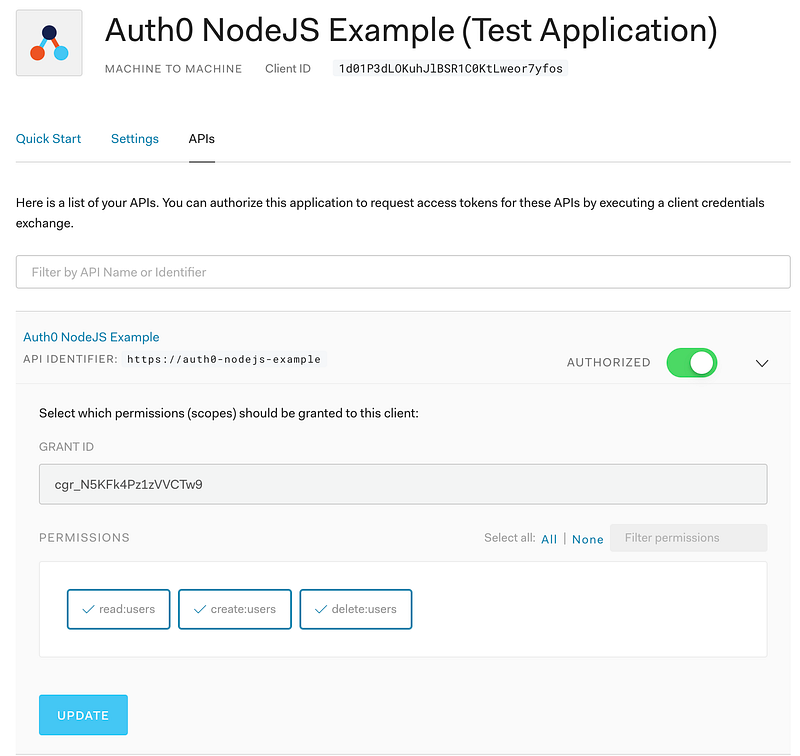
We want to check one or all of the permissions in the APIs tab under the testing application. Once this is complete we will need to create a new token and be sure it contains the expected permissions.
There is an easy way to check this. Copy the JWT and paste it into JWT.io. This will decode the token and you can easily inspect it as a JSON object.
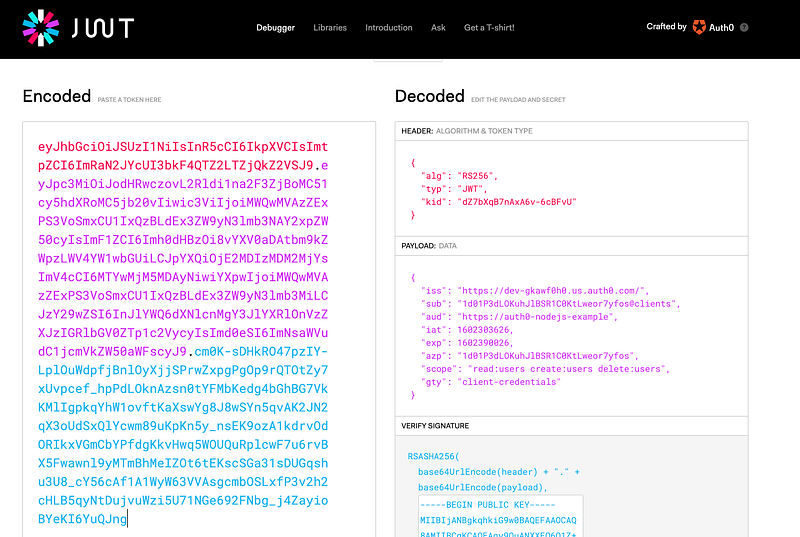
If we check in the payload section in the scope property we can see the token contains all the permissions we just added so if we call the API again with the new token it should be successful this time.
I hope you have found this guide to getting started with Node.js and Auth0 helpful. Auth0 is a powerful tool for identity management and I have had a great experience using for production applications and like to help others do the same. Thanks for reading!


