
Build a Remote Micro Frontend with Vite, React, and TypeScript
Hello everyone, this is my very first article here at Medium about what I do for a living, which is being a Software Engineer and I'm very excited about it!
In this guide, I am using, Vite, Typescript, and React to build the project. Please check their documentation website.
Recently, I’ve been building a micro-frontend architecture that allows us to reuse components across different projects. This way, we avoid repetition and keep maintenance centralized. Sweet, right? 🤩
But I've faced some challenges where, there is not much content out there for this, since it’s something hard to implement I think companies just try to avoid the additional complexity or they don't know that we can avoid the “too much” complexity and have a smoother implementation and maintainable architecture.
So I will be showing and guiding you what I have found and created so far and I hope it helps you to achieve what you are looking for!
So you may be wondering…
ok, but what is a Micro-Frontend?

A very short description to keep our sake is that Micro Frontends is an architectural style that allows different teams to develop and deploy features independently, improving scalability and speeding up development. It’s like breaking a monolithic application into smaller, manageable pieces. For more details, check out this Micro Frontends overview.
Alright, in this article, we will focus on setting up the remote application for a micro frontend project using Vite, React, and TypeScript. The remote is like the cool kid that works perfectly on its own but eventually needs to play nice with the host. So, we’ll get this part up and running first. Then, next week, I’ll show you how to build the host and bring it all together. It’s gonna be fun — don’t miss it!
First, let's start by setting up our project with Vite and Typescript.
Setting Up Your Micro Frontend Remote Application
1. Create a Project Folder
mkdir micro-frontend-remote
cd micro-frontend-remote
2. Set Up Vite with React and TypeScript
Since we are already in the micro-frontend-remote folder, we can run the command below with the ., which means the project will be created in the same directory without creating a new folder for it.
npm create vite@latest .
When prompted:
- Current directory is not empty. Please choose how to proceed: Choose Ignore files and continue.
- Choose React as your framework.
- Choose TypeScript + SWC as the variant.

3. Install dependencies
npm install
4. Run the project
npm run dev
You should see something like this.

Great! We just took the first step towards building our micro-frontend application. 👏👏👏
But first…
Change some default configurations.
1. Strict Port (Required)
For our micro-frontend work, we need to be consistent with where it’s hosted, so we cannot have random ports when we run the application, let’s change our package.json to look like this
{
  "name": "micro-frontend-remote",
  "private": true,
  "version": "0.0.0",
  "type": "module",
  "scripts": {
    "dev": "vite --port 5001 --strictPort --mode dev",
    "build": "tsc && vite build",
    "build:dev": "tsc && vite build --mode dev",
    "lint": "eslint .",
    "preview": "vite preview --port 5000 --strictPort",
    "serve:dev": "npm run build:dev && vite preview --port 5000 --strictPort"
  },
  "dependencies": {
    "react": "^18.3.1",
    "react-dom": "^18.3.1"
  },
  "devDependencies": {
    "@eslint/js": "^9.9.0",
    "@types/react": "^18.3.3",
    "@types/react-dom": "^18.3.0",
    "@vitejs/plugin-react-swc": "^3.5.0",
    "eslint": "^9.9.0",
    "eslint-plugin-react-hooks": "^5.1.0-rc.0",
    "eslint-plugin-react-refresh": "^0.4.9",
    "globals": "^15.9.0",
    "typescript": "^5.5.3",
    "typescript-eslint": "^8.0.1",
    "vite": "^5.4.1"
  }
}
I added a --port 5001 --strictPort to my dev script so I can always run the development mode in the 5001 port as well as a serve:dev with port 5000 so this way I can serve and test it in the host application and can still run the development mode for changes if needed. I also created de :dev assuming that you may have different environments, so I will be adding the others as we go, if it is not your case, feel free to clean up and use only one.
2. Vite Configuration (Optional)
This configuration is totally personal so feel free to add them or not in your project, they just make my life easier and more organized. In your vite.config.ts file, do the following
import { defineConfig } from 'vite';
import react from '@vitejs/plugin-react-swc';

export default defineConfig({
  plugins: [react()],
  resolve: {
    alias: {
      '@/': new URL('./src/', import.meta.url).pathname,
    },
  },
  envDir: './src/environments',
});
Here I added the resolve and envDir, since I will be setting up this project for multiple environments, I like to organize all the respective files under a folder called environments in my src folder. And also I like to have the@ as my starting point since pretty much everything related to the project is inside src folder. But we need one more step for this to work fine since we are using Typescript, we need to also define the @ path there and say that it’s a valid path. So go to the tsconfig.json (it might be also called tsconfig.app.json)and add the path to it.
Another tip, for a cleaner view, I prefer to clean a bit of the file tsconfig.node.json, delete the tsconfig.app.json and replace the content of the tsconfig.json with this one below.
{
  "compilerOptions": {
    "paths": {
      "@/*": ["./src/*"]
    },
    "target": "ES2020",
    "useDefineForClassFields": true,
    "lib": ["ES2020", "DOM", "DOM.Iterable"],
    "module": "ESNext",
    "skipLibCheck": true,
    "moduleResolution": "node",
    "allowImportingTsExtensions": true,
    "allowSyntheticDefaultImports": true,
    "resolveJsonModule": true,
    "isolatedModules": true,
    "noEmit": true,
    "jsx": "react-jsx",
    "strict": true,
    "noUnusedLocals": true,
    "noUnusedParameters": true,
    "noFallthroughCasesInSwitch": true,
    "removeComments": true,
    "types": ["vite/client"]
  },
  "include": ["src"],
  "references": [{ "path": "./tsconfig.node.json" }]
}
And your tsconfig.node.json should look like this
{
  "compilerOptions": {
    "composite": true,
    "skipLibCheck": true,
    "module": "ESNext",
    "moduleResolution": "bundler",
    "allowSyntheticDefaultImports": true,
    "strict": true
  },
  "include": ["vite.config.ts"]
}
Alright, so after these custom changes, your project folder structure should look like this. 👍👍

Installing plugin for Module Federation
Now that we have the project ready and configured, we are ready to jump into the world of Micro-Frontend with the Module Federation approach. There is a plugin that helps us to set up, it's the vite-plugin-federation that you can find the documentation here.
A short description of it is the vite-plugin-federation enables Module Federation in Vite projects, allowing multiple applications to dynamically share and load code from each other at runtime. It simplifies building micro-frontends by handling remote and host module loading more efficiently.
Ok, no need for more introduction, we see it’s good! so now let’s install it in our project.
Open the terminal and run
npm install @originjs/vite-plugin-federation --save-dev
Now we can start creating the components that will be exposed in our micro-frontend entry.
Creating a feature sample component
Under the folder src let's create a folder called features and inside this folder let's create a folder called feature-one and then our first component entry, create a FeatureOne.tsx file, which will hold the first feature of our micro-frontend.
Why the features folder? As I mentioned earlier, implementing a micro-frontend architecture comes with its challenges. One approach I found incredibly useful is creating a wrapper for each feature. By making the feature its own entry point and grouping all related components within it, it becomes much easier to manage and manipulate. This structure also makes it simple to create contexts if needed, promoting cleaner and more scalable code. We will see this in practice later on, no worries!
Ok, let's go back to the feature creation, inside the Feature.tsx you can add this
function FeatureOne(): JSX.Element {
  return <p>This is a Feature from a Micro-Frontend</p>;
}

export default FeatureOne;
Now, it’s time to make this feature available to our host, go to vite.config.ts and now we will use the vite-plugin-federation and let’s create a new federation entry point to it.
import { defineConfig } from "vite";
import react from "@vitejs/plugin-react-swc";
import federation from "@originjs/vite-plugin-federation";

export default defineConfig({
  plugins: [
    react(),
    federation({
      name: "micro-frontend-remote",
      filename: "MicroFrontendRemoteEntry.js",
      exposes: {
        "./FeatureOne": "./src/features/feature-one/FeatureOne.tsx",
      },
      shared: ["react", "react-dom"],
    }),
  ],

  resolve: {
    alias: {
      "@/": new URL("./src/", import.meta.url).pathname,
    },
  },
  envDir: "./src/environments",
  build: {
    modulePreload: false,
    target: "esnext",
  },
});
Where federation creates the new entry point called microFrontendRemoteEntry.js and we are exposing the component that we just created, the FeatureOne.tsx . In thebuild configuration at the end I added two configuration settings, I strongly suggest you read about them in the plugin documentation but what I found is, that the most important ones are:
modulePreload: false because, in a micro-frontend setup, you may want to disable module preloading to prevent over-fetching of unnecessary chunks across different applications. By turning it off, you have finer control over what gets loaded, which can be important when using module federation where remotes might be loaded dynamically.
And target: ‘esnext’ that ensures your code remains modern, without unnecessary polyfills or down-level transformations. This is particularly useful in micro-frontend environments, as modern browsers often handle these micro-apps, and you avoid performance overhead by transpiling code for older browsers.
Great! So now we have the necessary configuration to expose our FeatureOne.tsx to our host.
Build Application and Serve the Remote Application
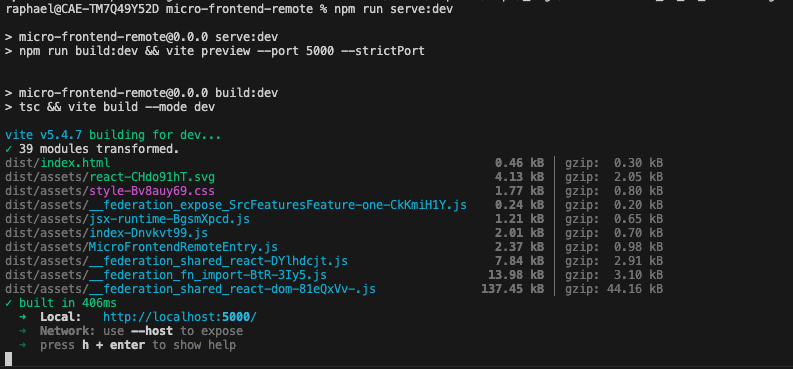
Make sure to always build the application before serving it, remember that when we serve the application, the browser will show what was just built, what you can do is combine the build and serve like we did in our package.json so you make sure that every time you serve you also build the application.
npm run serve:dev
You should be able to see the log in the terminal like:
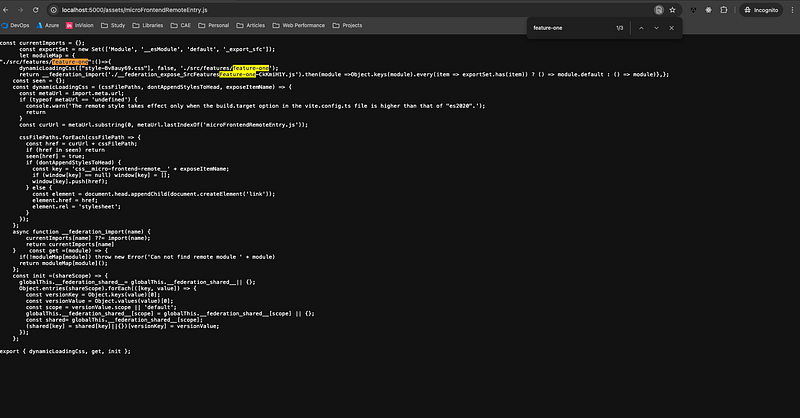
If you go to http://localhost:5000 you should see:

But hold on! How do I see if the configuration we just created in the vite.config.ts file is working? 🤔
On the same window as your application is running, replace the URL with http://localhost:5000/assets/microFrontendRemoteEntry.js and voilà, the js file we just exposed in our vite configuration with our FeatureOne.tsx 🎉🎉.
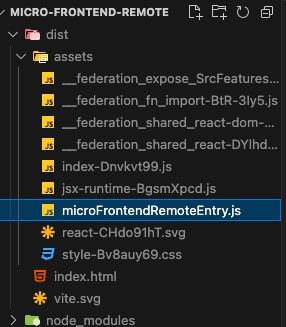
And if you check your dist folder, you will see the file there.
Setup build and serve for different environments
Now we should be good to set up our multiple environments build and serve . Your package.json should look like this with this new setup.
{
  "name": "micro-frontend-remote",
  "private": true,
  "version": "0.0.0",
  "type": "module",
  "scripts": {
    "dev": "vite --port 5001 --strictPort --mode dev",
    "build": "tsc && vite build",
    "build:dev": "tsc && vite build --mode dev",
    "build:qa": "tsc && vite build --mode qa",
    "build:prod": "tsc && vite build --mode prod",
    "lint": "eslint .",
    "preview": "vite preview --port 5000 --strictPort",
    "serve:dev": "npm run build:dev && vite preview --port 5000 --strictPort",
    "serve:qa": "npm run build:qa && vite preview --port 5000 --strictPort",
    "serve:prod": "npm run build:prod && vite preview --port 5000 --strictPort"
  },
  "dependencies": {
    "react": "^18.3.1",
    "react-dom": "^18.3.1"
  },
  "devDependencies": {
    "@eslint/js": "^9.9.0",
    "@originjs/vite-plugin-federation": "^1.3.6",
    "@types/react": "^18.3.3",
    "@types/react-dom": "^18.3.0",
    "@vitejs/plugin-react-swc": "^3.5.0",
    "eslint": "^9.9.0",
    "eslint-plugin-react-hooks": "^5.1.0-rc.0",
    "eslint-plugin-react-refresh": "^0.4.9",
    "globals": "^15.9.0",
    "typescript": "^5.5.3",
    "typescript-eslint": "^8.0.1",
    "vite": "^5.4.1"
  }
}
Where I added qa and prod for serve and build . Now you can have different values in different environments and test them according to your needs, especially when it comes down to testing the source of the micro-frontend, whether is in dev , qa or prod you will be always able to run the values locally and debug where is the problem you might be facing or how certain keys should look different in each environment.
For example, I work with the Feature Flag concept, which you can read more about here. So for each environment, we have a different client-key, to make sure they work fine I can add the value there and switch the configuration based on the environment.
The same works for the backend URL, you will have different backend URLs based on your environment, and you easily switch them with this configuration, and more than that, they are organized into one folder. 🙂
Conclusion Addition
Thank you for following along! 🙏
I hope this guide helps you set up your own micro-frontend remote application. If you have questions or want to share your experiences, feel free to comment below.
If you found this guide helpful, consider following my profile for more articles on micro-frontends and other exciting topics. Happy coding! 🎉
If you want to check the repository with this remote application, you can check it in my GitHub profile.


