
Redux-persist & Redux-toolkit implementation made easy for React Native and React JS
(redux-persist with redux-toolkit in react) updated: Oct 02, 2021
SUMMARY of this Story
- React native counter application. (Steps will be exactly the same for a react JS web app.)
- Redux implementation using redux-toolkit.
- Redux-persist implementation over redux-toolkit (blacklist store attributes)
- Bonus (React Native Paper — Component Library for Material design in React Native)

Why redux-persist?
- Redux-persist does a very simple yet very powerful job of persisting your application state across different user sessions /browser windows(days, months, years).
Why this Story?
✓ Implement redux-persist in a react (JS or native) app with redux-toolkit.
✓ You may find documentation and other internet articles for redux-persist implementation with traditional redux (store, Provider, reducer, actions)
✓ If you are using the now recommended redux-toolkit (configureStore, createSlice, Provider), you may not find much help to implement redux-persist.
✓ That’s where this article comes to your rescue.
Being here, I assume:
- You are well-off with React JS or React Native or both.
- You are already using or aware of redux.
- Redux-persist helps us to save the redux store state across the application sessions. You kill the app/browser and open again, your redux store is persisted.
- In this article, we will mainly focus on implementing redux-persist with “redux-toolkit” (redux-toolkit includes Thunk and redux dev-tools by default, removable though.)
- Redux-toolkit is now highly recommended to simply redux implementation in your react web and native applications.
- Git repo of example (ReadMe is updated with steps followed)
- Live example on expo snack (play around and refresh the window, it will always retain your counter value on the same device/browser)
- This example will also help you with the basic implementation of the redux-toolkit. This implementation should be sufficient for an industry-level corporate standard web / react-native application.
For React Js Corporate level app architecture and design pattern in detail refer: https://saurabhshah23.medium.com/70b7b9103f22
Example scenario:
- Suppose you have a simple counter app.
- This app displays the current value of the counter (default=0), and two buttons for Increment and Decrement.
- A user increments and the current value is 10.
- For some reason, your user kills the app. Next time that user opens the app, the app will display the default counter value as 0 and not 10.
- You wish to locally persist all the app’s redux store values on that device across the user sessions without sending/saving them to the database and fetching on app startup.
- You need redux-persist.
Implementation:
Step-1: React native counter application.
✓ This is a basic counter-example. ✓ A numeric value is displayed. ✓ Two buttons for Increment and Decrement the counter value are displayed. ✓ App is created using the “npx react-native init ReduxPersist” command. ✓ Checkout “README.md” for all the dependency installations. ✓ You can install all the dependencies at once and then follow further steps. Remember feel free to play around.
Step-2: Redux implementation using redux-toolkit.
I will try to cover this in a little depth for covering “redux-toolkit” usage and understanding. Do not hesitate to skip this part if you are already aware of redux-toolkit.
1. Get familiar with the directory structure:
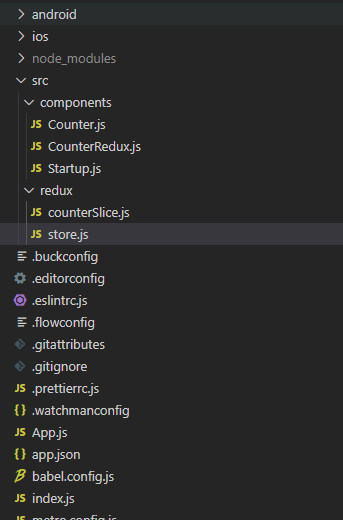
a. All the code resides within the “src/” folder for redux and components. b. The main configuration code resides in “/App.js”. You can move this to a separate file as well. I have kept it like this to avoid many changes from the default react-native init boilerplate code.
2. Create a Redux Store:
a. Create a store using the “configureStore” method from redux-toolkit. b. It is way too simplified from the traditional implementation not requiring combineReducers, createStore, middleware, configuring redux developer tools, etc. c. Redux-toolkit comes packed with Thunk and redux dev-tools.
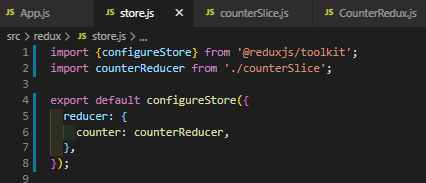
d. In the above image, we have already added counterReducer, which will be created in the upcoming step via createSlice method.
3. Provide the Redux Store to React:
a. Wrap the application JSX within the redux Provider.
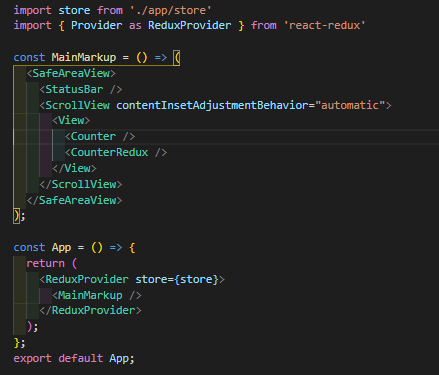
b. This code is different from what you see in the live example, as we will be amending the code to implement redux-persist.
4. Create a Redux State Slice (reducer):
a. Redux-toolkit takes away the hassle of defining actionTypes, creating actions, defining reducer cases for each actionType, etc in a single and simple “createSlice” method. Don’t believe it, that’s why redux-toolkit is recommended.

b. “addThunk” method is a bonus from me to demo an asynchronous action. Redux-toolkit uses Thunk for implementing side-effects. ref: Redux Toolkit Story with focus on async operations.
c. createSlice will actually combine creating actions and reducers together.
d. No need to worry about defining consts for action types.
e. API service calls, AJAX calls, any other asynchronous tasks can be implemented like addThunk using async-await:
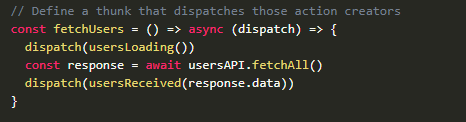
f. This implementation will suffice the majority of the scenarios for any corporate standard application.
g. Although there are more detailed implementations for specific requirements, I suggest referring to the documentation.
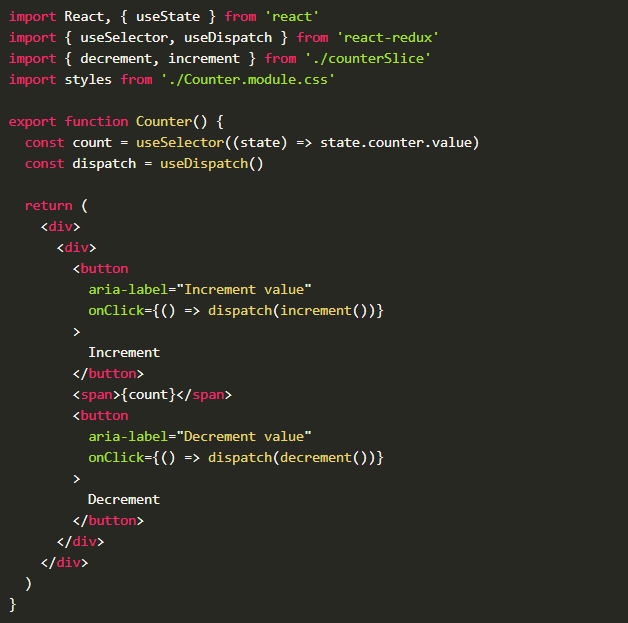
5. Use Redux State and Actions in React Components:
a. Create a simple counter component with redux store value and buttons to increment and decrement the value.
b. Below is an example code for the same
6. Voila! Run the app and it should work.
Although, if you refresh or restart the app after killing it, the counter will always be reset to “0”.
Step-3: Redux-persist implementation over redux-toolkit.
- If you are using traditional redux, simply follow the steps on “https://github.com/rt2zz/redux-persist”
- I’ve referred to the documentation but definitely structured it in a bit better way and added few missing steps.
- No changes are required to the slice/reducer.
- Store and App config requires major changes.
1. Update Store:
a. Ref: https://github.com/saurabhshah23/react-native-redux-persist/blob/main/src/redux/store.js
b. Async-storage is for react-native mobile apps. Although it works on browsers, you can skip and use storage and it will default to localStorage for React JS web apps.
c. “combineReducers” is the traditional method required if you have more than one reducer.
d. OK, I remember I lauded redux-toolkit to not require combineReducers, but unfortunately this is the only way-around for multiple reducers. You won’t find these things in the documentation.
e. Blacklist any store attribute using its reducer name in the “persistConfig” object. Blacklisted attributes will not persist.
f. Blacklist option itself is sufficient for most scenarios, although there is a whitelist option as well for exactly the opposite function (persist only whitelisted attributes).
g. Add …ignoredActions:[…] in configureStore() method. This is specifically to handle a non-serializable value error.
h. Export store & persistStore()
2. Configure “persistor” in “PersistGate”:
a. Ref: https://github.com/saurabhshah23/react-native-redux-persist/blob/main/App.js
b. Wrap the app jsx within PersistGate to launch app with the previous known application state (redux store)
c. The PersistGate “loading” prop can be null. In our example, we are displaying a loading indicator while the store is being reinstated.
That’s all folks!
Now, play around. Increment and decrement the values for counter value to be any number. Kill the app explicitly, and restart. Your app should launch with the counter value to be the last updated value and not zero.
BONUS:
React Native Paper
React Native Paper is a high-quality, standard-compliant Material Design library that has you covered in all major use-cases.
I personally feel Material UI for React JS and RN Paper for React Native come in very handy to follow the material design.
Con: An only missing component as of today (published date) in this library I feel is the dropdown / select element.
But, then I found it is the case with all the other React Native libraries like elements.
References:
- redux-persist docs: https://github.com/rt2zz/redux-persist
- Live Code sandbox: https://snack.expo.io/@saurabhshah23/github.com-saurabhshah23-react-native-redux-persist
- GitHub repo: https://github.com/saurabhshah23/react-native-redux-persist

Say thanks by buying me a coffee ☕
My other stories:
- React JS — Architecture + Features + Folder structure + Design Pattern
- Perfect React Native application setup — Industry standards
😀Thank you😀 😀Clapping is motivating 😀Do not hesitate to applause


