
Reactive Programming With the J.A.M. Stack (Java-Angular-Mongo)
A full-stack reactive application walkthrough, built with Spring Boot 2, Angular 8, and MongoDB.

Introduction
I have found it challenging to learn reactive programming models, and to change the way I think from writing an imperative set of instructions to building an event-based non-blocking system where data is allowed to flow freely from one component to another. It is relatively simple for me to understand something like:
find a record using some criteria and return it
whereas a more reactive flow such as:
open a subscription and watch changes to this type of record, and expose the subscription to other interested components
is much more conceptually difficult.
In this article we will explore a simple example of a fully reactive web application using Mongo 4.x, Reactive Spring Boot 2.1 with Webflux, and Angular 8. We’ll call it the J.A.M. stack (Java — Angular — Mongo).

Everything is containerized and orchestrated for local development using Docker Compose. The complete project can be found here on GitHub.
The basic architecture looks something like this:

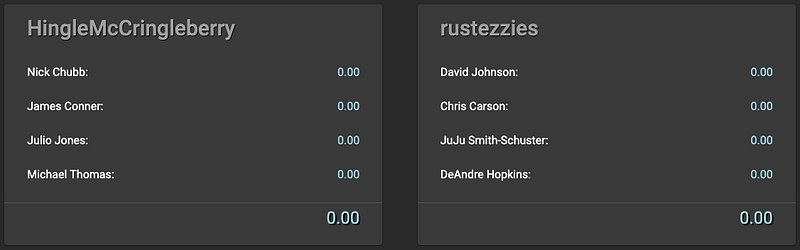
The application we are building is an overly simplified Fantasy Football matchup page where player scores update automatically in response to Server Sent Events. The “Simulate” button calls a helper endpoint that randomly updates records in the database. The change to the database records triggers an event in the change stream, and a Server Sent Event is generated with the updated data. The UI shown below subscribes to the Server Sent Event and displays the data in real-time.
The basic concepts that we’ll cover have wide-ranging applications for all kinds of real-time data. Things like stock-prices, Twitter updates, and email inboxes are great use-cases for this type of communication model.
The Walkthrough
This article is split into 3 sections. The links below jump directly to the part of the article described.
Note: Links in Chrome will open a new tab.
Section 1: MongoDB with Change Streams
- MongoDB Change Streams
- Docker configuration for running a single-node replica set locally (needed for change streams)
- How and why to seed your local MongoDB instance with data to provide a repeatable starting point for development
Section 2: Spring Boot with WebFlux
- Setting up simple Mongo collection models and repositories for basic CRUD operations
ReactiveMongoTemplate for advanced queries- Subscribing to a Mongo change stream to watch for changes on a collection using
ReactiveMongoTemplate - Basic structure of Router Functions
- Defining and using Path Variables in Router Functions
- Creating a ServerSentEvent from a Flux
- Accessing a path variable from a ServerRequest
- Generating a ServerResponse body from ServerSentEvents and from a Publisher
- Randomizing a list within the context of WebFlux
- The zip function
- Serving static content with Spring Webflux and Netty
- Dealing with CORS for local UI development
Section 3: Angular 8 with EventSource
- An interface to help with deserialization into Typescript classes
- How to subscribe to a Server Sent Event using EventSource
- How to share data among sibling components using
BehaviorSubject and Observables - Creating components with flexible behavior using
@Input() - Formatting numbers using the Angular Decimal Pipe
Section 1: MongoDB with Change Streams

Our reactive journey begins, as is my preference when embarking on a full-stack endeavor, with the database. The criteria for our data storage is as follows:
- Non-blocking
- Ability to subscribe to real-time changes in the data
I’m sure there are multiple database products that fit our needs, and for this example we are going to use MongoDB version 4.0 .

Change Streams
The key feature that we want to leverage in MongoDB is called Change Streams. The idea is that we can watch for changes in the database that fit some criteria and take action when a change event is fired.
In the example application, we have a collection of fantasy football teams, and we create a watch condition on the change stream for that collection so that we can update the UI whenever a player score changes.
The Dockerfile
Let’s start with a simple Dockerfile, and see where that gets us.
This will create a MongoDB container and initialize it with whatever you put into the ./init-db.d/ directory. But, as we’ll find out next, this isn’t quite enough.
Some Background and An Unexpected Hiccup
Part of the inspiration to write this article was a project that I worked on where I wanted to take advantage of change streams during local development. I had my Mongo Docker container running (with the above Dockerfile), and my Spring Boot code looked just right. Ok, I’m ready to start the application and see the beautiful free-flowing data move through my reactive system!

What happened? Instead of a beautiful stream of data flowing freely I see some descriptive yet confusing error messages:
After some research, I found that MongoDB change streams rely on something called the “oplog”, or “operations log”. According to the MongoDB documentation, the Oplog:
keeps a rolling record of all operations that modify the data stored in your databases
Further, the Oplog is only present and available when your MongoDB instance is part of a replica set.
It turns out that a simple MongoDB Docker instance is not automatically part of a replica set, and therefore there is no Oplog. Since there’s no Oplog, there’s no change stream, and now it makes sense why I see errors instead of streams of data.
So, what now? How can we add our MongoDB instance to a replica set? Do I need to run multiple instances just to get access to the change streams feature? Some of the many very good examples I found suggested just that. But that seems like overkill to me and I don’t want to run three MongoDB containers while I’m developing locally if I don’t need to. I want my setup to be simple and repeatable for myself and other team members that might be working on the project with me. My preference would be to have a single command that gets a development environment up and running for myself, or a colleague, and that’s what we’re going to create.
Single Node Replica Set
After some more digging, I found that we need to create/initiate a replica set, set the oplog size, and join the replica set. If we do this correctly, we can create a single-node replica set which will enable all of the change stream functionality we want! Here is the full Dockerfile:
Let’s start the application and see if those ghastly errors go away…

YES! It works! Now we have the beginnings of a fully reactive local development setup to go with our newfound sense of accomplishment!
Next we’ll add some seed data, and put it all together with Docker Compose.
Seed Data
When I’m developing an application with my team, I want to have a common starting point. That starting point includes at least some properly formatted data in the Dockerized database, whether it’s Postgres, Couchbase, or, as in the current example, MongoDB.
The MongoDB Docker image provides a way to add initial data to your container by adding your scripts to the /docker-entrypoint-initdb.d directory. This is a common practice that you may recognize from other database providers, and it works really well for a lot of cases. However, I found that the initial data was not getting inserted correctly when I put my data initialization script in. I do see in the logs:
/usr/local/bin/docker-entrypoint.sh: running /docker-entrypoint-initdb.d/seed.js
However, the collection has not been created, and the data has not been inserted. It looks like this is because at the time the seed.js file is executed, the replica set has not been fully configured and initialized. So, how can we reliably and repeatably wait until the database is ready before executing our data insertion scripts?

The Seed Container
This is a useful trick that I picked up from a colleague at some point. We create a separate container whose only purpose is to ensure the main database container is properly initialized. The start command pings the target database container once per second until it is ready, and then executes an initialization script that includes seed data. It looks like this:
The Makefile: One Command to Rule Them All

Ok, maybe it’s not that dramatic, but I do love a good Makefile like Gollum loves the Precious! It’s right up there with IntelliJ on my list of must-haves for my development process. You could just as easily run these commands separately, but I want to be able to just run something like:
make up-db-local
And have my database magically spin up, ready with data to accept my application connections. So let’s do that:
Section 1 Wrap Up
We created a Docker container running a single-node MongoDB instance, and we are now able to take advantage of the Change Streams feature.
Next we will build a reactive Spring Boot application to subscribe to the change stream, and expose the events via Server Sent Events.
Section 2: Spring Boot with Webflux

I like to create my Spring Boot applications using the Spring Initializr. For this project, we will choose the following dependencies:
- Lombok
- Webflux
- Reactive MongoDB
Mongo Client Setup
Connection
We begin by configuring a connection to the MongoDB instance running in Docker on our local machine in the application.properties file. The setup looks like this:
spring.data.mongodb.host=localhost
spring.data.mongodb.port=27017
spring.data.mongodb.database=fantasy_db
Configuration
For straightforward reactive CRUD operations, we can use the traditional model::repository pattern. We can start by creating the Player and Team models to match the collection that we created in Section 1, as well as a TeamRepository to extend the ReactiveMongoRepository interface.
Models

Recall our initial data in the teams collection:
We want to model this simple collection in Java, and we’ll use Lombok to cut down on the boilerplate (and delight ourselves in the process). You may notice that we are directly embedding the list of players into the teams collection. We could also have a separate collection of players, and use a foreign-key model for the list. That is probably a better design, but we’re going to keep it a bit simpler in this example.
Player Model
Team Model
Team Repository
For more about the BSON
@Queryannotation in the repository above, see the Spring Data documentation.
The ReactiveMongoRepository interface is very powerful, and is a joy to use. If we were to omit the method declaration in the interface definition above, we would still have a fully-functional reactive repository with generic methods like findAll, save, saveAll, and count. It is easily extensible as well, and IntelliJ has some great autocomplete features when defining new methods:
This works well for most of our use-cases, but it doesn’t give us access to subscribe to the MongoDB change stream, which we need for real-time updates on our data collections. For that, we’ll need to create our own ReactiveMongoTemplate.
The Template Bean
We need some specific configurations to set up our ReactiveMongoTemplate, and for that we will extend the AbstractReactiveMongoConfiguration class:
With that, we can use our configured ReactiveMongoTemplate throughout the application. For instance, when we want to subscribe to the change stream:
There’s a lot going on here, so let’s break this down a bit. We first set up the ChangeStreamOptions object to define what we want to watch for, and what we want to be returned to us when the criteria is met. The two most important details are:
Criteria.where(“operationType”).is(“replace”)
and:
.returnFullDocumentOnUpdate( )
In these two lines, we are saying to watch for replace operations, where a document is being fully replaced rather than patched via update, and that we want to be given the entire document when this happens.
Side Note: This “full-replace” setup bugs me a bit, as it strikes me as inefficient. I think a more sophisticated way to handle this might be to watch for
updateoperations, and only care about the differences in the document so that we can make smaller adjustments to the object(s) in memory. This is an opportunity for further research and refinement in the future.
Router Functions and Handlers

We have our MongoDB repository and change stream watcher configured, so now it’s time to expose access to the collections via a REST API. We’re going to use the RouterFunction functional interface to define the REST API, and we’ll keep the implementation extra clean by creating a separate class which defines all of the handlers. Let’s dive in to show an example.
Get All Teams Router and Handler
We start with a handler function, which takes a ServerRequest as input, and returns a Mono<ServerResponse>. Notice the functional style, and the fact that the BodyInserter is able to convert the Flux<Team> from teamRepository.findAll() into the response body by using the fromPublisher function.
And in our RouterFunction, we can add simply add getTeams as the handler for when GET /teams is called.
Path Variables and Server Sent Events
We’ve seen a very simple case where we retrieve a list of all the teams in the repository, and now we will use Server Sent Events to expose a subscription to the change stream observer we built earlier. We want a route that allows us to watch changes to all teams, and a separate route that allows us to specify the team we want to watch changes on.
There are two things to notice here:
- We add routes to our
RouterFunctionAPI with the intuitively namedandRoutefunction - We specify path variables, familiarly, with the
{}notation
Notice how simple it is to read the path variable in the handler, by calling request.pathVariable. The variable name used here must match the variable name denoted with {} in the router function.
We can also see here how to create a data stream using Spring Webflux to wrap a ServerSentEvent using a builder function. We first build a Flux of type ServerSentEvent<Team>, and then use the BodyInserters.fromServerSentEvents function to return the data stream.
It’s easy to test the get all teams endpoint since it just returns a static list of whatever is in the database at the time. However, it is a bit more of a challenge to test the endpoints that expose Server Sent Events, because they require change events in the database to be fired. We’ll create some handlers and routes in the next section to trigger changes in the database so we can see our Server Sent Events in action, and we’ll highlight some interesting challenges encountered along the way.
The Winds of

Let’s re-focus on the nature of the example application that we are building, and that should help to understand the motivation for the upcoming handlers and routes.
We are building a fantasy football matchup scoreboard. The UI will show two teams, their players and player scores, and the total team score.
The routes that we’ve built so far are sufficient to allow the user interface to subscribe to the necessary data streams, but we have not yet built anything to actually make the requisite changes and updates to the data which would trigger events in these streams. For the example, we create three additional REST endpoints:
/update/{name}/{scoreChange}— update a particular players score/update/{count}— randomly update player scores/zero— reset all player scores to zero
Randomization: An Unexpected Challenge
The handlers for updating a single player score and for resetting all player scores to zero can be found here and here, and they are pretty standard. However, the most interesting of the three handlers is the one that randomly updates player scores.
The problem seems pretty simple: randomly choose players from a list, and update their score on some time interval to simulate streaming events. This turns out to be very challenging when dealing with a fully non-blocking system. If this were a blocking system, we could use some kind of loop and perform an update action on each item. But we want the application to be fully reactive and non-blocking, so the solution has to be compatible with one or more streams of data.
The solution that I came up with is to create two distinct Flux instances, as shown in the following diagram:
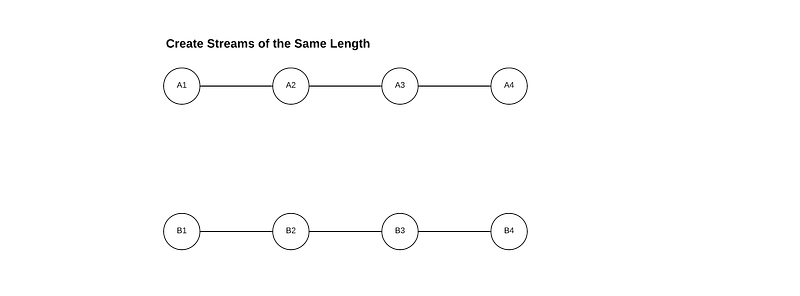
This is pretty abstract so far, so let’s combine this with our example project to make some sense of it. The goal of this operation is to randomly update the score of a particular player. We have a method called updateTeam with a signature like this:
Mono<Team> updateTeam(String playerName, Double scoreChange)This method will find the player in the teams collection, and update their score by adding scoreChange to the stored value. So, what we want is a stream of String playerName and Double scoreChange so that we can call the updateTeam method. In the diagram above, think of Flux<A> is a Flux of playerName, and Flux<B> is a Flux of scoreChange. But how can we get these values together?

Flux.zip
We can use the zip function to combine two or more Flux instances together! From a high level, it looks something like this:
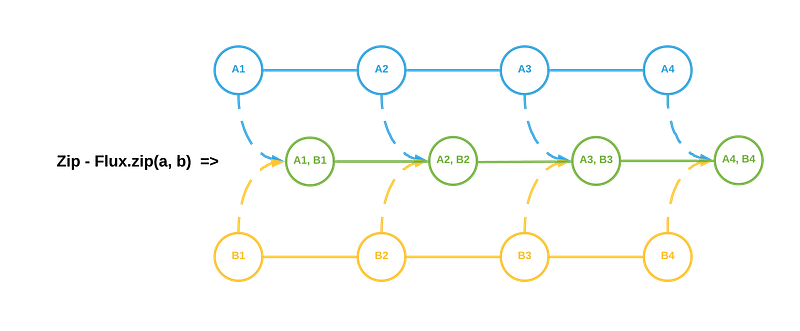
Here is the actual implementation:
We have the count variable to tell us how many items should be in each Flux. We first create a list of String playerName from the database, and use the helpful Collections.shuffle(list) to randomize the order. We then create a Flux containing random Double values, and add an interval of one second between each pulse. This interval is used so that the data updates are spread out, rather than all firing at one time.
The zip function creates a new stream from two or more other streams. In this case we use the flatMap function to perform additional operations. We’ll use this to call the updateTeam method, and simulate random score change events.
// combine two fluxes and update player scores with random Doubles
Flux<Team> updateFlux = Flux.zip(doubleFlux, playerNames)
        .flatMap(objects -> {
            // objects.getT1() returns the first item
            Double scoreChange = objects.getT1();

            // objects.getT2() returns the second item
            String name = objects.getT2();

            return this.updateTeam(name, scoreChange);
        });
Frontend Considerations
In order to prepare for building the Angular application in Section 3, we need to take care of two features related to the frontend Angular application.
- How to serve static content (for deployment)
- How to add CORS filters (for local development)
Static Content
We need to implement the WebFilter interface, and use it to direct requests to the Angular SPA. It looks like this:
CORS Filters

For this, we need a CorsWebFilter bean. A simple example looks like:
This will allow us to run our development server(s) for both the backend and frontend, and stop the browser from complaining about Cross-Origin-Requests. It’s not as easy as with the old RestController where you could just add @CrossOrigin, but you can see it’s also not particularly complicated either.
Section 2 Wrap Up
We have created a fully reactive Spring Boot 2 application, using Router Functions for REST endpoints instead of the RestController pattern. We’ve subscribed to the MongoDB change stream that we set up in Section 1, and exposed the change event via Server Sent Events.
In Section 3 we will build an Angular 8 application that subscribes, via an EventSource, to the Server Sent Event that we just created. We will highlight a great technique for ensuring JSON data is deserialized correctly into our TypeScript models, as well as how to share data among sibling components using Observables and BehaviorSubjects.
Section 3: Angular 8 with Eventsource

We have two goals with the design of the frontend application:
- Provide an effective visualization of the data we built in Section 1
- Update the visualization in real-time as the data changes
There are many great resources to help you get started with Angular, like the Angular CLI and Angular Material start pages. This section assumes you have already created an Angular application, and understand how to generate new components and services.
Modeling the Response
We begin by creating models to represent the response data that we created in Section 2 (above). Recall the application we’re building is an overly-simplified fantasy football matchup scoreboard, and the Server Sent Event contains updates to the teams collection. The payload looks like:
data: {
  "id": {
    "timestamp": 1561073857,
    "machineIdentifier": 9491123,
    "processIdentifier": 15078,
    "counter": 2730663,
    "date": "2019-06-20T23:37:37.000+0000",
    "time": 1561073857000,
    "timeSecond": 1561073857
  },
  "name": "HingleMcCringleberry",
  "players": [
    {
      "name": "Nick Chubb",
      "score": 13.63256320598832
    },
    {
      "name": "James Conner",
      "score": 11.033827107352751
    },
    {
      "name": "Julio Jones",
      "score": 17.091989615619006
    },
    {
      "name": "Michael Thomas",
      "score": -2.4274618420066187
    }
  ],
  "totalScore": 39.33091808695346
}
Let’s create some TypeScript model classes to capture this data structure.
Notice the Deserializable interface which the model classes implement. This is a trick I picked up from the “Working with models in Angular” article on the nehalist.io blog, and I use it in every project. It’s just a very clear and reliable strategy to convert a JSON payload to a TypeScript object, and it works great.
Subscribing to Server Sent Events
The important pieces to notice are that we create an EventSource and define the onmessage and onerror callbacks, and that we use NgZone to fire Observable events using observer.next(json). Without NgZone, the SSE subscription doesn’t work.
Now that we have the connection to the backend Server Sent Event endpoint, how can we get this data into a component?
Observables and Behavior Subjects
In order to expose this data stream for Angular components to display, we are going to create a private BehaviorSubject and a public Observable in the TeamService. The syntax looks like:
We will fire the teamWatchSource.next(data) event from the TeamService, and then any component that subscribes to the _teamWatchSource will be updated with the data. Let’s untangle that sentence with an example:
Matchup Component
We want to subscribe to the Observable from within the component, and update the data in real-time.
There’s a lot going on in here, so let’s break it down. First, notice that we are injecting the TeamService into the constructor. This allows us to access all of the public fields and methods of the service, and thereby allows the component to subscribe to the _teamWatchSource Observable.
The next thing to notice is that we are doing something weird with the teams array to get the Angular event loop to notice that something has changed.
// editing array contents does not fire Angular change events
this.teams = [].concat(this.teams);
If you are ever making changes to an array that a component is supposed to be displaying/updating, and the data isn’t getting updated, try this little
.concattrick. Angular does not see changes to objects in an array as changes to data, so we need to make it think the array itself has changed with this trick.
Team Component
We have an array of TeamModel objects, and now we need to display them. This time, we’ll use the @Input decorator to pass data from the parent (MatchupComponent) to the child (TeamComponent).
And we can pass in the team input from the parent:
Notice the
[team]="team"on theapp-team-cardcomponent. That’s how we use the@Inputbinding to pass in data.
Number Formatting
The last detail I’d like to highlight is how we can format number in Angular. Recall the format of the data that comes back from the Spring Boot application we built in Section 2, specifically the length of the number:
"players": [
    {
      "name": "Nick Chubb",
      "score": 13.63256320598832
    },
    {
      "name": "James Conner",
      "score": 11.033827107352751
    },
    {
      "name": "Julio Jones",
      "score": 17.091989615619006
    },
    {
      "name": "Michael Thomas",
      "score": -2.4274618420066187
    }
]
That definitely won’t do. We want to display at most 2 digits after the decimal point, and we can do that with the Angular decimal pipe. It looks like:
<div>{{player.score | number : '1.2-2'}}</div>The Finished Product
Clicking the “Simulate” button calls the /update/{count} endpoint we built into the Spring Boot application in Section 2. If you’ll recall, the handler for this endpoint will randomly update a player score in one-second intervals. This triggers the change stream event in MongoDB which we are watching in the Spring Boot application, and this in turn triggers the Server Sent Event which we subscribed to in the Angular application above. The entire data flow is reactive and non-blocking.
Section 3 Wrap Up
We have created an Angular 8 application where we subscribe to Server Sent Events and allow individual components to respond to changes in the data using the Observable pattern. Our full-stack reactive application is complete!

Conclusion
Thank you so much for your time! I learned a lot about reactive programming while building this application, and I hope the details that I’ve highlighted in this article have been helpful. If you have any suggestions or questions, please feel free to comment below.


