
OSA / RTOS — Quick Intro — Part 2/3
Real-Time Operating System for Microchip PIC-controllers
Hi guys! See Part 1 too!
We’re back, now with a working OSA/RTOS code (github repo👈).
We’ll use a PIC18F4522 chip from PicGenios board.
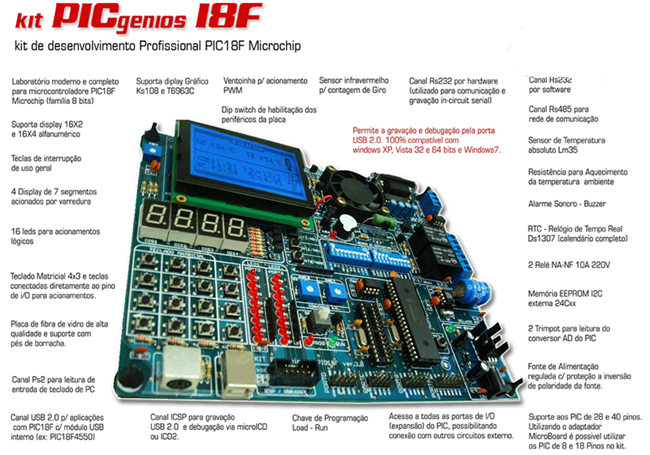
The board is from Microgenios, a Brazil’s firm Microchip’s Certified Trainning Partner, where I took my specialization course in pic.
You can also use PIC18F45K22 chip from EasyPIC™ 7. It is the latest version of this popular development tool from MikroElektronika (MIKROE-798). Now with dual power supplies (3.3V and 5V) it supports over 250 different PIC MCUs. EasyPIC 7 accepts DIP packages from 8 to 40 pins and comes with a PIC18F45K22 installed.

In every bsp.c code there is this block, which makes it portable to EasyPIC™ 7:
ifdef P18F45K22
      (…)
#else
       (…)//P18F4522
#endif
Lets get started!
The idea is to flash 3 LEDs simultaneously on different threads (tasks).
Step-by-Step:
- Step 1 → Maybe you are interested in reading my first post on this topic. Please, feel free; then…
- Step 2 →acess Real-Time Operating System (RTOS) for Microchip PIC official page and in OSA/download tab and get this RTOS-OSA zip file: Version 110306 @1.4 Mb (2011, mar, 6);
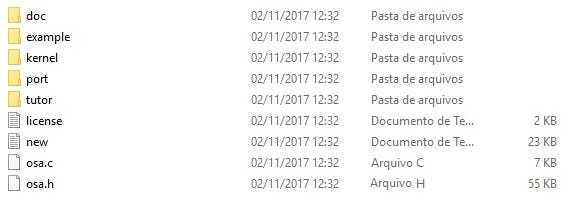
- Step 3 → Unzip it and you’ll get this directories configurations:
- Step 4 →Now we need OSAcfg_tools.
Do this: In the same place, below TOOLS tab, get the osa:osacfg_tools.rar, Program File, for manual installation; Cool…
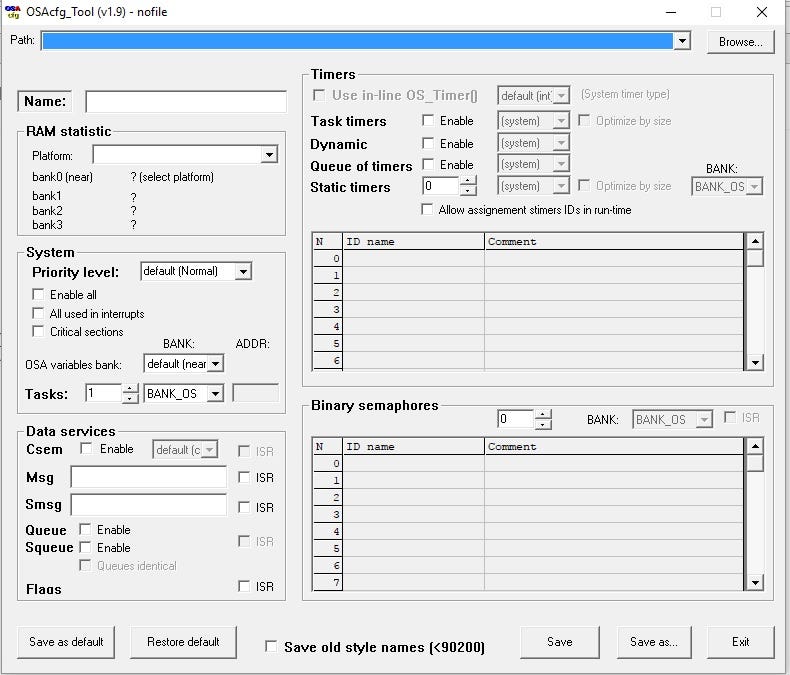
- Step 5 →Unrar it. When you try to run the OSAcfg_Tool.exe app as administrator (and I’m using Windows 10) you’ll get this error:-(
Failed to load MSFLXGRD.OCX module…The problem is that windows does not find the way to register this file. Do just that :
a) copy …\osacfg_tool\OSAcfg_Tool folder to c:/ folder;
b)on OSAcfg_Tool directory open readme.txt and you’ll read it:
Before running OSAcfg_Tool.exe, run install.bat to register the .ocx filec) see inside install.bat (use notePad) this:
regsvr32 MSFLXGRD.OCXd) and you’ll have to execute this command on prompter.exe (as admin) like this on c:/ folder:
regsvr32 C:\OSAcfg_Tool\MSFLXGRD.OCXPlease, note that you’ll need a administrator access!
You’ll will see this message (sort of:)
DllRegisterServer in C:\OSAcfg_Tool\MSFLXGRD.OCX was successfulNow run OSAcfg_Tool.exe and you’ll see:-)
- Step 6 →Now copy the osa folder from osa_110306\osa to your \code directory with this layout:
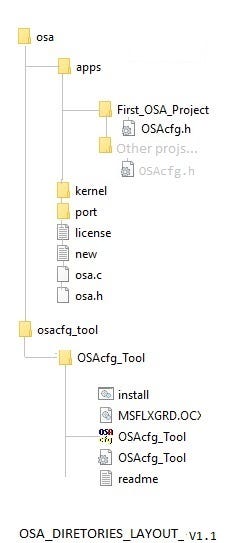
We added the directory apps where we will save all our OSA/RTO future projects.
See that we will use the OSAcfg.h for each project (so in this project, it is a barebone file);
- Step 7 → Now go to MikroElectronika web page mikroC compilers and chose mikroC PRO for PIC (in these days Release version: 7.1.0);
- Step 8 → Run this app and you’ll get this on your desktop:

- Step 9 →Now head up to PICkit 2 Development Programmer/Debugger page and download PICkit 2 V2.61 Install A (optional for EasyPIC™ 7) ;
- Step 10 →Run this app and you’ll need this hardware:
- Step 11 → Build your directories. See this video sequence for your reference. These are the tasks executed here:
a)Make a directory and name it code;
b)Copy/paste osa_110306\osa folder to it;
c)Leave kernel, Port folders and others files that are on base folder, including osa.c and osa.h (see above image dir layout) ;
d)Create apps folders;
e)Inside this folder create First_OSA_Project folder;
f)On code base create osacfg_tool folder and copy/paste all OSAcfg_Tool folder into it;
g)Open MikroC Pro For PIC and run a new project;
h)Project > Close Project (to safeguard);
i)New Project — Stardard and next;
j)Point to your new directory base;
l)Chose P18F4520 (or P18FK4520 for EasyPIC™ 7), 8 MHz;
m)next, next;
n)Copy/Paste this code:
o)Open OSAcfg_Tool and set
OS_TASKS = 3
OS_ENABLE_TIMER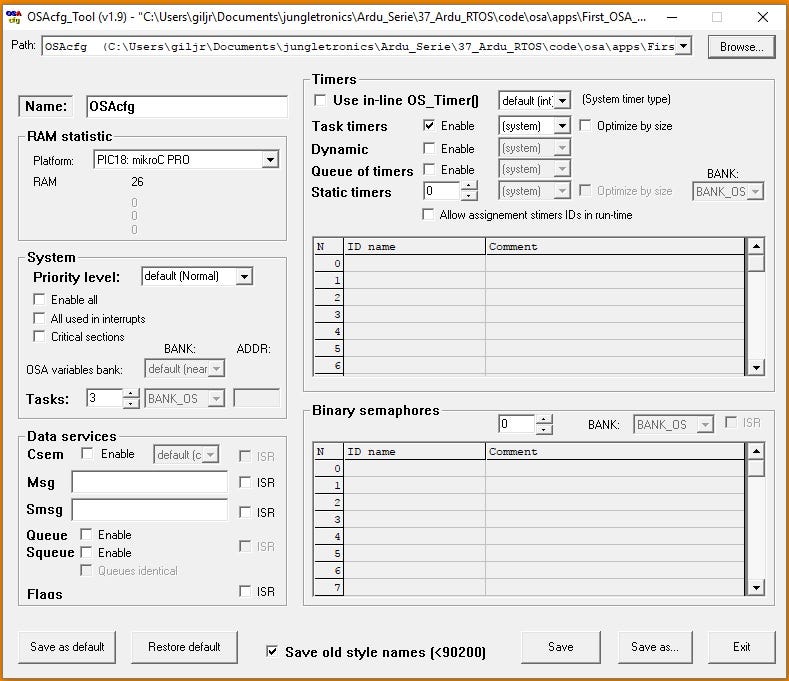
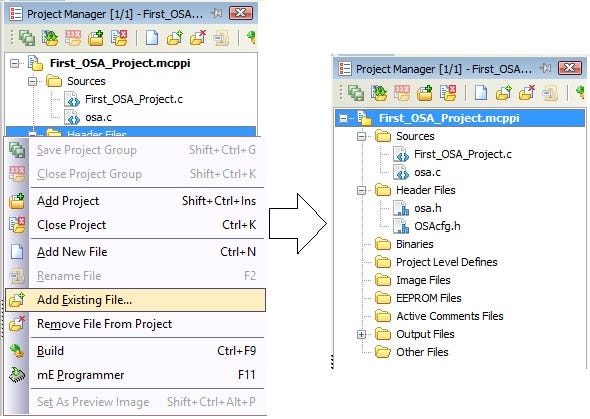
p)In Project Manager include these files(Add Existing File…)
osa.c -> Source osa.h OSAcfg.h -> Header Files
q)compile (build) the code;
r)Run PicKit2 and load .hex file to the chip (if you’re using EasyPIC™ 7 run mikroProg Suite For PIC);
s)There you have it!
In the video you’ll see some comments about this code. This is issue for future Pic Interruptions Series videos.
Thanks & Congrats! (if you succeed to replicate it:-)
Download All Files For This Project
Credits & References:
So you made it so that, in order to fly, you need a certain amount of flat terrain.
— — — — — —
First Published @ Nov,2017


