
#30DaysOfNLP
NLP-Day 24: Know Your Place. Positional Encoding In Transformers (Part 2)
How to implement a positional encoding layer in Keras

In the last episode, we gently introduced the idea of positional encoding. We shed some light on the underlying concepts as well as the computational steps necessary to encode the word positions within a sequence.
Now, it’s time to go one step further and implement this concept in the context of transformer models.
In the following sections, we’re going to create a positional encoding layer in the Keras API that can be used as a building block for Transformer models. By doing that, we will also learn how to make use of the TextVectorization and Embedding layer provided by Keras.
So fire up your IDE, take a seat, and make sure to follow #30DaysOfNLP: Know Your Place. Positional Encoding In Transformers (Part 2)
It’s indexing time
In order to be able to compute a positional encoding of words within a sequence, we first of all need to represent the words numerically.
The built-in TextVectorization layer creates a dictionary of words in the presented sequence and replaces each word with its associated index. This representation allows for further processing down the line.
So let’s take a closer look at the TextVectorization layer in action.
After defining the input sentences as well as some parameters (output dimension, maximum number of tokens), we can instantiate the TextVectorization layer.
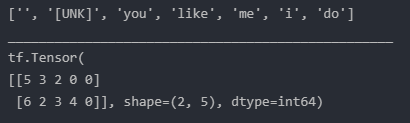
Next, we convert our sentences into tensors and train our TextVectorization layer by making use of its adapt() function. Once trained, we can retrieve the vocabulary as well as vectorized words.
Printing out the vocabulary and vectorized words, we get the following result.
Word embeddings
Now that we have a numerical representation of our words, we need to convert them into dense vectors that map our integer-based indices to random trainable weights.
For that purpose, we make use of the Embedding layer provided by the Keras API.
Pretty straightforward. We simply instantiate the Embedding layer, define its dimensions and provide the vectorized words as input.
If we print the resulting tensor we can see the (random) results that represent each word from each sentence.
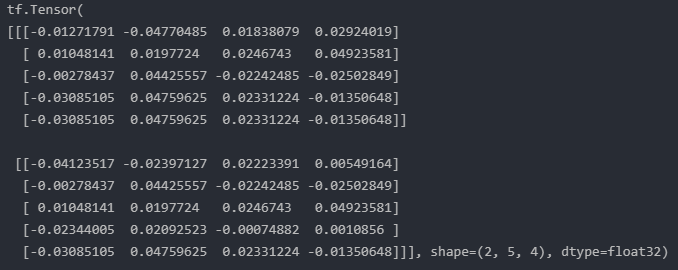
Each row represents a single word. The weights are trainable which means while training our model we can learn the word embeddings.
Positional embedding
So far, we created an embedding for each word in a sentence. However, we still need a way to represent the word positions.
Once again, we make use of the Embedding layer and encode each word’s position.
We instantiate yet another Embedding layer.
Its shape is defined by the length of the output sequence and the user-defined output dimension. It’s important that we make sure to match the shape of the word embeddings since both layers will be summed together in the end.
The resulting embedding encodes each word index into a trainable 4-dimensional vector.

Now, we simply have to add both, the word and the positional embedding layer together, and we have our final input for the encoder.
Subclassing layer in Keras
In order to make our lives easier in the future, we implement a reusable solution with the Keras API.
For that purpose, we implement a positional embedding layer by subclassing the layer class, similar to the Keras example.
We initialize our layer with the necessary parameters and create two embedding layers. The word and positional embeddings. Next, we simply provide the input to both layers and add them together to create and return our final input representation.
Applying our custom layer to the same example as before we get the following result.
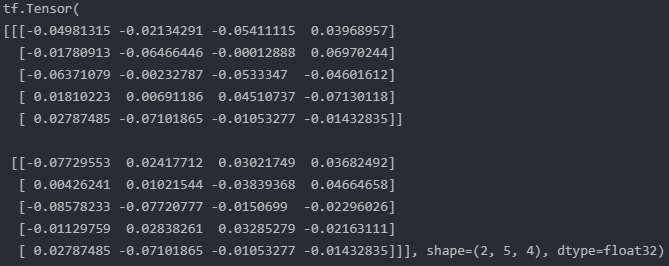
Looks pretty good. And this is it. We successfully implemented our own positional encoding layer.
Note: In this example, we implement a positional encoding with trainable weights. If we want to apply the encoding scheme as specified in Attention Is All You Need, we have to apply the sine and cosine functions in order to generate the embeddings. Furthermore, the weights should be fixed which means we have to set the parameter
trainable=False.
Conclusion
In this article, we built upon the concept of positional encoding and implemented our own custom layer with the Keras API.
By subclassing the layer class, we’re able to provide a reusable positional embedding layer. We can use that layer to inject positional information into transformer-based models which inherently have no way of accounting for the word positions within a sequence.
In the next episode, it’s about time we talk about BERT.
So make sure to follow and never miss a single day of the ongoing series #30DaysOfNLP.
Enjoyed the article? Become a Medium member and continue learning with no limits. I’ll receive a portion of your membership fee if you use the following link, at no extra cost to you.
References / Further Material:


