
#30DaysOfNLP
NLP-Day 18: Machine Translation With Sequence-to-Sequence (Part 2)
How to translate English to German using a seq2seq model

In the previous episode, we learned all about sequence-to-sequence, the related problems, and the associated seq2seq models. We covered the underlying concepts. We covered the main ideas. But we only did this in theory.
Now it’s time to tinker, to mess around with our own sequence-to-sequence model. It’s time to create a network for machine translation.
In the following sections, we’re going to implement a sequence-to-sequence model, preprocess and clean our dataset, and translate short sentences from one language into another.
So take a seat, don’t go anywhere, and make sure to follow #30DaysOfNLP: Machine Translation With Sequence-to-Sequence (Part 2)
Two of a kind. Word pairs
Before we can build and train any model, we need data.
And not just raw data. We need to preprocess it, creating a triplet consisting of input, target, and annotated target data with a special “start” and “stop” token.
But before all of that, we need to get our hands on a dataset containing adequate bilingual sentence pairs. Fortunately, such a dataset already exists and is provided by ManyThings.org. In our case, we download the English-German dataset, consisting of a whopping 249,230 sentence pairs.
Now that we have the raw data, we can start our favorite IDE and start coding.
Note: The following implementation is inspired by the Keras.io example. However, we are not going to work on the character level and instead implement our model based on complete words.
Getting in shape
First of all, we need to import the necessary libraries as well as the text file containing our sentence pairs.
Once loaded, we can begin preprocessing the data.
First, we define a small helper function clean_text() that makes use of a simple regex pattern to strip the raw text from any punctuations. We also apply case folding and return all strings in lower case.
Next, we iterate over each sentence pair in our previously imported text file. However, we only do this for a user-defined number of maximum samples since the dataset is otherwise too big to handle all at once.
During each iteration, we basically do three things.
We separate the sentences pairs using the split() function.
We clean and annotate the sentence pairs, yielding us two lists: The input texts for the encoder and the target texts for the decoder.
And we create two sets of unique words. One contains the input tokens and the other the output tokens.
Next, we simply create a few variables, storing general information about our dataset. For example, the maximum number of tokens we feed to the encoder. Those variables will come in handy once we proceed.
Now, it’s time to get in shape — or at least, it’s time to transform our dataset into a form that makes the Keras API smile.
Before we do that, however, we create some lookup tables in the form of basic dictionaries. We need those to easily retrieve either the word index or the word itself in a human-readable form.
Next, we create three zero matrices and start building our input and target data.
For that purpose, we iterate over all the preprocessed sentence pairs. With each iteration, we run over each word of each sentence and store the associated word indices inside the encoder and decoder input data matrix. This integer-based representation will later be used to create our word embeddings.
We also create a one-hot encoded target data matrix which will be used for the loss calculation. We, however, have to make sure to exclude the “start” token and make sure input and target data are not offset by one time step.
And this is it. We’re done with the preprocessing and our data is looking adequate enough to make our yet-to-build seq2seq model happy.
It’s time to train
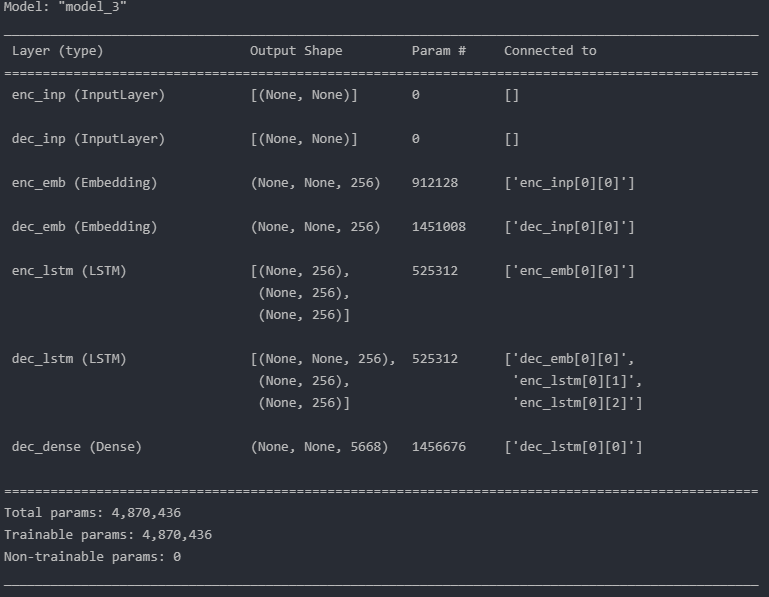
Now, we can start building our sequence-to-sequence model with an encoder-decoder structure.
The encoder receives input and routes it to an embedding layer. The embedding layer will learn the word representation which is processed by the following LSTM layer. We discard the output of the LSTM and keep only the states since we are interested in the encoder’s thought vector which contains the internal representation of the input sentence.
Next, is the decoding part. Once again we receive an input, create an embedding layer which is followed by an LSTM. This time, we discard the decoder states, at least during the training phase, and only keep the decoder output. This output flows into the final dense layer with a softmax activation function, computing the probabilities of the next token in the sequence.
Eventually, we compile the model and we’re ready to proceed.
Note: We use accuracy as a quick way to monitor training progress on the validation data. Machine translation typically uses BLEU scores as well as other metrics.
Our model is compiled, alive, and well.
Now, it’s training time. We simply train our model for 100 epochs and save the results for later use.
Decoding a sequence
We already did a lot of work. We imported and preprocessed the dataset, built our model, and trained it. Although, we did all those things we have yet to implement the core functionality. The decoding of a new input sequence.
In order to be able to decode an unseen input sequence, we need to reconstruct the encoder, retrieve its thought vector, and feed the vector into a modified version of our decoder. The decoder can then start to generate the next token in the sequence.
First of all, we load our trained model and define a helper function to create the encoder model. Nothing fancy so far.
Next, we define a second helper function to build the decoder model. The decoder receives the input sequence and the thought vector as inputs. We process the input sequence with the embedding and the LSTM layer. This time, however, we keep the decoder states since we output the probabilities of the next token as well as the thought vector. In the end, we simply return the decoder model.
Next, we define our core function, generating a decoded sentence based on an input sequence.
After receiving the input, we create our encoder model and use the predict function to obtain the thought vector. Now, we create a target sequence that only contains the “start” token. Both, the thought vector and the target sequence act as our starting point, to get the decoder going.
In the iteration loop, we make use of the thought vector as well as the target sequence. We create our decoder and utilize the prediction function to receive the output probabilities as well as the new thought vector.
We simply append the new token to our decoded sequence and update the target sequence and thought vector with the new values. Now, we’re ready for the next iteration. Both, the updated target sequence and the thought vector are used to keep the decoder working and generate the next token in the sequence. This process repeats itself until we either generate the stop token or reached the maximum length.
And this is it. We’re finally done. One last step though. We define a little helper function, enabling us to enter small English phrases.
Let’s give it a try and take a look at the results.
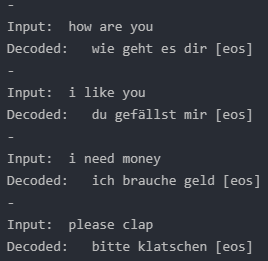
Awesome. It’s working and the results are looking pretty reasonable.
Conclusion
In this article, we covered a lot of ground by implementing a sequence-to-sequence model translating small English sentences into their German counterpart. We also flexed our coding muscles by preprocessing and shaping the data quite heavily.
However, as always, there is room for improvement.
In the next episode, we will stay in the realm of sequence-to-sequence-related problems and encounter a new concept.
The concept of attention.
So take a seat, don’t go anywhere, make sure to follow, and never miss a single day of the ongoing series #30DaysOfNLP.
Enjoyed the article? Become a Medium member and continue learning with no limits. I’ll receive a portion of your membership fee if you use the following link, at no extra cost to you.
References / Further Material:
- https://arxiv.org/abs/1409.3215
- Keras.io: Character-level recurrent sequence-to-sequence model
- Hobson Lane, Cole Howard, Hannes Max Hapke. Natural Language Processing in Action. New York: Manning, 2019.


