
#30DaysOfNLP
NLP-Day 16: How To Remember Text With Long-Short-Term-Memory (Part 2)
Generating novel text with a long-short-term memory
In the previous article, we learned all about long-short-term memory. We covered the overall concept as well as the inner workings. We particularly paid attention to how the memory state is composed and computed.
Now, it’s time to put that knowledge to good use.
In the following section, we’re going to utilize the Keras API and implement our own LSTM. We will even go one step further and train our model all the way down to the character level, allowing us to create novel text.
So take a seat, don’t go anywhere, and make sure to follow #30DaysOfNLP: How To Remember Text With Long-Short-Term-Memory (Part 2)
Down to the core
So far we only trained our networks to predict a certain target label e.g. the sentiment of a text. Now, we switch gears and use the training samples themselves as the target.
For each token in a text, we want to predict the next token. And in our case, the next token is the next character. We’re taking the concept all the way down to the character level, enabling us to create complex models.
Character level modeling is considered the gateway to more sophisticated models that are able to pick up spelling, grammar, and punctuations. They’re even able to grasp concepts like rhythm and cadence as well.
However, there is one catch.
As always, we need to find a suitable dataset. A dataset that contains less diverse text, preferably written by just a single author. And if this isn’t enough of a burden already, we also need a lot of data. We need a big dataset.
Loading and preparing the data
Fortunately for us, we can rely on libraries like NLTK to serve us with a suitable dataset. The NLTK library comes with a small selection of documents provided by Project Gutenberg that we can download and use.
So without further ado, let’s get started.
First of all, we import all the necessary libraries.
Next, we download the Gutenberg corpus with the NLTK downloader. Once we obtain the documents, we concatenate all three Shakespeare plays into a string.
Now, that we consolidated everything into a single string we can create our list of unique characters as well as two lookup tables. A list of unique characters is needed to create a one-hot encoded representation of each character. The lookup tables will prove useful, once we need to retrieve the actual character based on the predicted index.
Moving on to the tricky part.
We iterate through the complete text, starting at the first character with index 0. By slicing the text from the current index up to the maximum length, we create a single sentence of 40 characters and append that to our list. Since our goal is to predict the 41st character, we extract that character as well and append it to the second list.
Now, we simply repeat the process for every third character (step=3). Iterating and slicing the text in this way, allows us to create a semi-redundant, oversampled dataset.
Once we created our lists of single sentences and target labels (next characters), we simply need to one-hot encode them.
Before iterating over each sentence and each character, we create two zero matrices representing our features and targets.
Our feature matrix has three dimensions. The number of sentences, the maximum number of characters per sentence, and the number of unique characters in total.
Our target matrix, however, is slightly less complex with only two dimensions. The number of sentences and the number of unique characters.
Having defined our matrices, we simply iterate over each sentence and character and create a one-hot encoded representation of each character. We store the representation inside the associated matrix.
And this is it. We’re done with the preprocessing.
Now, we can make the Keras API happy with two nicely shaped data matrices.
It’s training time
We make use of the Keras Functional API in order to implement our model.
Since we can rely on the built-in implementation of the long-short-term memory, we have a relatively easy job building the network.
First of all, we define the input layer in the shape of the maximum number of characters per sentence as the rows and the number of unique characters as the columns.
The next layer is the long-short-term memory with 128 units.
A simple dense layer with a softmax activation function serves as our output layer. The number of neurons is defined by the number of unique characters which makes sense since we want to output the probabilities of all characters.
Next, we create and compile the model.
With a compiled model, we can dive straight into the training process.
Nothing fancy here. We simply run the model for 20 epochs and save the structure as well as the weights for later use.
Time to get chatty
Our model is trained on a very specific corpus, aiming to predict the next character in a sequence. With that in mind, it’s time to test our network and generate some novel text.
First, we define two helper functions to make our lives a lot easier.
The first function get_one_hot_vec() takes in a sentence and returns a one-hot encoded representation in the same way we already encountered in the preprocessing section before. So nothing really new here.
The second function get_next_char() takes in the network's prediction for a single sentence. By drawing a random sample from the distribution, we get the index of the next character. Plugging that index into the lookup table we created in the beginning, we can retrieve and return the next character.
Note: Taking the log of the predictions and dividing it by a floating-point number either flattens or sharpens the probability distribution. Thus, allowing for more or less diversity.
After defining both helper functions, we can get down to business and start generating text.
We utilize NumPy to generate a random start index.
Next, we carve out our seed sentence from the complete text. We use this seed to get our model started.
Now, we make use of our first helper function and create a one-hot vector representation of our seed. Then we obtain the model’s prediction which we use to retrieve the next char.
Next, we generate a new sentence by shifting one character to the right and appending the next char. This process repeats itself and we generate novel text, character by character.
Once the iteration finishes, we can take a look at some random output.
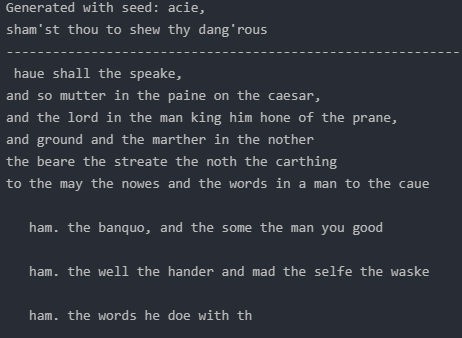
And this is it. We’re done. Our model seems to be working.
However, after only 20 epochs the model might not be perfectly fine-tuned. As we can see in the output above, some words simply do not make any sense at all.
Conclusion
In this article, we applied our knowledge of long-short-term memory and generated novel text. We did this by going one step further, training our model all the way down at the character level.
However, our model is far from perfect. Yet it marks the beginning of an exciting adventure into the world of sequence-to-sequence-related problems.
The topic of our next episode.
So take a seat, don’t go anywhere, make sure to follow, and never miss a single day of the ongoing series #30DaysOfNLP.
Enjoyed the article? Become a Medium member and continue learning with no limits. I’ll receive a portion of your membership fee if you use the following link, at no extra cost to you.
References / Further Material:
- Deep Learning (Ian J. Goodfellow, Yoshua Bengio and Aaron Courville), Chapter 10, MIT Press, 2016.
- Hobson Lane, Cole Howard, Hannes Max Hapke. Natural Language Processing in Action. New York: Manning, 2019.


