avatarTeri Radichel

Free AI web copilot to create summaries, insights and extended knowledge, download it at here

6469

Abstract

market dynamics. This is where feature engineering becomes invaluable. By transforming and synthesizing the raw data using established technical indicators, we can provide the model with enriched insights that could explain underlying market patterns and trends. Such enriched data can significantly improve the model’s ability to anticipate future price movements.</p><p id="07ea">For this forecast, we will utilize a couple of technical indicators for our feature engineering like RSI, MACD, Bollinger Bands, Parabolic SAR, and Stochastic Oscillator. Additionally, we introduce lag features to capture temporal dependencies, ensuring our model benefits from both current and historical contexts.</p><p id="f61d"><b>Let’s calculate the features we will utilize in this forecast</b></p><div id="d4ed"><pre><span class="hljs-comment"># Compute RSI</span> df[<span class="hljs-string">'momentum_rsi'</span>] = RSIIndicator(close=df[<span class="hljs-string">'Close'</span>]).rsi()

<span class="hljs-comment"># Compute MACD</span> macd = MACD(close=df[<span class="hljs-string">'Close'</span>]) df[<span class="hljs-string">'trend_macd'</span>] = macd.macd() df[<span class="hljs-string">'trend_macd_signal'</span>] = macd.macd_signal() df[<span class="hljs-string">'trend_macd_diff'</span>] = macd.macd_diff()

<span class="hljs-comment"># Compute Bollinger Bands</span> bollinger = BollingerBands(close=df[<span class="hljs-string">'Close'</span>]) df[<span class="hljs-string">'volatility_bbm'</span>] = bollinger.bollinger_mavg() df[<span class="hljs-string">'volatility_bbl'</span>] = bollinger.bollinger_lband() df[<span class="hljs-string">'volatility_bbh'</span>] = bollinger.bollinger_hband()

<span class="hljs-comment"># Compute Parabolic SAR</span> psar = PSARIndicator(high=df[<span class="hljs-string">'High'</span>], low=df[<span class="hljs-string">'Low'</span>], close=df[<span class="hljs-string">'Close'</span>]) <span class="hljs-comment"># Assuming you have 'High' and 'Low' columns in your df</span> df[<span class="hljs-string">'trend_psar'</span>] = psar.psar()

<span class="hljs-comment"># Compute Stochastic Oscillator</span> stochastic = StochasticOscillator(high=df[<span class="hljs-string">'High'</span>], low=df[<span class="hljs-string">'Low'</span>], close=df[<span class="hljs-string">'Close'</span>]) <span class="hljs-comment"># Assuming you have 'High' and 'Low' columns</span> df[<span class="hljs-string">'momentum_stoch'</span>] = stochastic.stoch() df[<span class="hljs-string">'momentum_stoch_signal'</span>] = stochastic.stoch_signal()

<span class="hljs-comment"># Create Lag Features</span> df[<span class="hljs-string">'Close_Lag1'</span>] = df[<span class="hljs-string">'Close'</span>].shift(<span class="hljs-number">1</span>)

<span class="hljs-comment"># Drop NaN values introduced due to lag features and indicators</span> df = df.dropna()

<span class="hljs-comment"># Define features and target</span> X = df[[<span class="hljs-string">'momentum_rsi'</span>, <span class="hljs-string">'trend_macd'</span>, <span class="hljs-string">'trend_macd_signal'</span>, <span class="hljs-string">'trend_macd_diff'</span>, <span class="hljs-string">'volatility_bbm'</span>, <span class="hljs-string">'volatility_bbl'</span>, <span class="hljs-string">'volatility_bbh'</span>, <span class="hljs-string">'trend_psar'</span>, <span class="hljs-string">'momentum_stoch'</span>, <span class="hljs-string">'momentum_stoch_signal'</span>, <span class="hljs-string">'Close_Lag1'</span>]] y = df[<span class="hljs-string">'Close'</span>]</pre></div><p id="712f">The above code is organizing the dataset <code>df</code> into input features and a target variable for our model. The input features, captured under <code>X</code>, consist of various the features we calculated on and previously defined. The target variable, denoted by <code>y</code>, is the <code>Close</code> column, representing the daily closing price of EUR/USD, which our model aims to predict based on the provided features.</p><p id="bdfb"><b>Model Initialization and Training</b></p><div id="a7d2"><pre><span class="hljs-comment"># Initialize the model</span> model = xgb.XGBRegressor( learning_rate=<span class="hljs-number">0.75</span>, n_estimators=<span class="hljs-number">200</span>, max_depth=<span class="hljs-number">5</span>, subsample=<span class="hljs-number">0.9</span>, colsample_bytree=<span class="hljs-number">0.8</span>, colsample_bylevel=<span class="hljs-number">0.8</span>, gamma=<span class="hljs-number">0</span>, min_child_weight=<span class="hljs-number">1</span> )

<span class="hljs-comment"># Train the model</span> model.fit(X_train, y_train)</pre></div><p id="7ce9">Continuing from the previously discussed data preparation, this section of code dives into the model initialization and training phases using XGBoost. The <code>xgb.XGBRegressor()</code> initializes a regression model with specified hyperparameters to optimize the forecast. Key parameters include a learning rate of <code>0.75</code>, which determines the step size at each iteration while optimizing, <code>200</code> estimators or trees, and a maximum depth of <code>5</code> for each tree, among others. These hyperparameters play a role in controlling the model’s complexity and fit to the data.</p><p id="4e91">After initializing, the model is trained on the <code>X_train</code> and <code>y_train</code> datasets using the <code>fit</code> method. This step allows the model to learn the underlying patterns from the training data, preparing it to make future predictions on unseen data.</p><p id="95cf"><b>Performance Evaluation and Testing</b></p><div id="a823"><pre><span class="hljs-comment"># Predict on the test set</span> y_pred = model.predict(X_test)

<span class="hljs-comment"># Calculate performance metrics</span> mae = mean_absolute_error(y_test, y_pred) mse = mean_squared_error(y_test, y_pred) rmse = np.sqrt(mse)

<span class="hljs-built_in">print</span>(<span class="hljs-string">f"Mean Absolute Error: <span class="hljs-subst">{mae}</span>"</span>) <span class="hljs-built_in">print</span>(<span class="hljs-string">f"Mean Squared Error: <span class="hljs-subst">{mse}</span>"</span>) <span class="hljs-built_in">print</span>(<span class="hljs-string">f"Root Mean Squared Error: <span class="hljs-subst">{rmse}</span>"</span>)

y_train_pred = model.predict(X_train)</pre></div><p id="8c56">After training the

Options

model on the historical data we evaluate its performance on unseen or test data. Using the <code>predict</code> method of the trained model, predictions (<code>y_pred</code>) are generated for the test dataset <code>X_test</code>. Subsequently, to assess the accuracy and reliability of these predictions, various performance metrics are computed:</p><ul><li><b>The Mean Absolute Error (MAE)</b> provides an average magnitude of errors between predicted and actual values.</li><li><b>The Mean Squared Error (MSE) </b>squares these errors to emphasize larger discrepancies.</li><li><b>Root Mean Squared Error (RMSE) </b>is the square root of MSE, providing error in the same units as the original data.</li></ul><p id="c92b">These metrics are then printed for clear visibility. We concludes by also predicting on the training set (<code>X_train</code>) with <code>y_train_pred</code>, to further analyze and compare the model’s performance on both training and test datasets.</p><p id="44c0">The following output displays the performance metricswhich assess the accuracy of our model’s predictions:</p><div id="6743"><pre><span class="hljs-attribute">Mean</span> Absolute Error: <span class="hljs-number">0</span>.<span class="hljs-number">009141215039947168</span> <span class="hljs-attribute">Mean</span> Squared Error: <span class="hljs-number">0</span>.<span class="hljs-number">000303615460154008</span> <span class="hljs-attribute">Root</span> Mean Squared Error: <span class="hljs-number">0</span>.<span class="hljs-number">017424564848340058</span></pre></div><ul><li><b>Mean Absolute Error (MAE): </b>At 0.0091, it shows the model’s average absolute deviation from the actual values.</li><li><b>Mean Squared Error (MSE):</b> With a value of 0.0003036, it indicates the average squared error, emphasizing larger mistakes.</li><li><b>Root Mean Squared Error (RMSE):</b> At 0.0174, it provides the average error in the original unit, illustrating the typical magnitude of error.</li></ul><p id="7500">The relatively low values across these metrics suggest that the model has a good degree of accuracy in its predictions. The model appears to be reliably forecasting the target variable, depicted with minimal deviations in the forecasted data when compared to the actual data.</p><p id="be3b"><b>Data Visualization</b></p><div id="2b49"><pre><span class="hljs-comment"># Create a new DataFrame for visualization</span> viz_df = pd.DataFrame({<span class="hljs-string">'True'</span>: y_test, <span class="hljs-string">'Predicted'</span>: y_pred})

<span class="hljs-comment"># Concatenate the training data for a complete view</span> viz_df_train = pd.DataFrame({<span class="hljs-string">'True'</span>: y_train, <span class="hljs-string">'Predicted'</span>: y_train_pred}) viz_df = pd.concat([viz_df_train, viz_df])

<span class="hljs-comment"># Plot the results</span> plt.figure(figsize=(<span class="hljs-number">14</span>, <span class="hljs-number">7</span>)) plt.plot(viz_df[<span class="hljs-string">'True'</span>], label=<span class="hljs-string">'True'</span>, color=<span class="hljs-string">'blue'</span>) plt.plot(viz_df[<span class="hljs-string">'Predicted'</span>], label=<span class="hljs-string">'Predicted'</span>, color=<span class="hljs-string">'red'</span>, alpha=<span class="hljs-number">0.7</span>) plt.title(<span class="hljs-string">'EUR/USD Forecast: True vs Predicted'</span>) plt.legend() plt.grid(<span class="hljs-literal">True</span>) plt.show()</pre></div><figure id="ce5c"><img src="https://cdn-images-1.readmedium.com/v2/resize:fit:800/1*cLlTTCFRMZqUBQIUBeya0g.png"><figcaption></figcaption></figure><p id="62e5">The visual representation of the EUR/USD currency pair’s forecasted versus actual values offers an insightful glimpse into the model’s capabilities. The close alignment between the blue <code>True</code> line and the red <code>Predicted</code> line for most of the chart affirms the model’s strong predictive proficiency, especially given the low Mean Absolute Error (MAE) of 0.0091. The few areas where deviations occur resonate with the Root Mean Squared Error (RMSE) of 0.0174, indicating the average magnitude of error.</p><p id="ba85">Notably, the small segment towards the right end, where predictions seem to diverge slightly, underscores the challenges of exact currency forecasting. Nevertheless, the model, as depicted in the graph and corroborated by the performance metrics, has shown remarkable accuracy in capturing the nuances of the EUR/USD exchange rate’s movements.</p><h1 id="fe27">Conclusion</h1><p id="3036">In conclusion, this exploration into Forex forecasting has underscored the critical interplay between data preprocessing, feature engineering, and model selection. Through this model we found that XGBoost in predicting the EUR/USD currency pair stands out, demonstrating the algorithm’s robustness and adaptability. Finally, the precision showcased by our model reinforces XGBoost’s reputation as an efficient tool to forecast financial data.</p><p id="0141">Read more of my stories here:</p><div id="c60c" class="link-block"> <a href="https://algocraft.xyz/eur-usd-forecasting-simplified-an-lstm-users-guide-337ccdda6158"> <div> <div> <h2>EUR/USD Forecasting Simplified: an LSTM User’s Guide</h2> <div><h3>LSTM, or Long Short-Term Memory, is a specialized type of Recurrent Neural Network (RNN) designed to recognize patterns…</h3></div> <div><p>algocraft.xyz</p></div> </div> <div> <div style="background-image: url(https://miro.readmedium.com/v2/resize:fit:320/1*EUIE-cUkt3x2AqBX5nUotA.jpeg)"></div> </div> </div> </a> </div><div id="a6a6" class="link-block"> <a href="https://algocraft.xyz/how-to-get-131-return-with-mean-reversion-trading-strategy-from-stock-selection-to-backtesting-c623870adf31"> <div> <div> <h2>How to Get a 131% Return with Mean Reversion Trading Strategy: From Stock Selection to Backtesting</h2> <div><h3>undefined</h3></div> <div><p>undefined</p></div> </div> <div> <div style="background-image: url(https://miro.readmedium.com/v2/resize:fit:320/0*o95y-D4ETf1Geqx3)"></div> </div> </div> </a> </div></article></body>

Multi-Session Compromise

ACM.146 How session compromise could defeat segregation of duties

~~~~~~~~~~~~~~~~~~~~~~~~~~~~~~~~~~~~~~~~~~~~~~~~~~~~~~~~~~~

⚙️ Check out my series on Automating Cybersecurity Metrics. The Code.

🔒 Related Stories: IAM | AWS Security | Data Breaches | Penetration Testing

💻 Free Content on Jobs in Cybersecurity | ✉️ Sign up for the Email List

~~~~~~~~~~~~~~~~~~~~~~~~~~~~~~~~~~~~~~~~~~~~~~~~~~~~~~~~~~~

Yesterday I explained some of the issues related to session compromise.

Then I mentioned that I have one other concern [at least] for this approach of using two different roles for separation of duties to limit an abuse of create user permissions.

The way I have been demonstrating segregation of duties in these posts up till now is with all my code on one host where I execute commands with one user that requires MFA to assume a role — and then the next command might get executed by a different user role that requires a different MFA device to assume.

What happens during this scenario? Let’s say I run a command with the IAM administrator role. It pops up an prompt for an MFA token. I enter it. A session gets created and some temporary tokens are cached on my machine.

Next I run a command as the KMS administrator. A prompt appears for me to enter my token so I enter a token from the MFA administrator profile.

Now let’s say I fixed or added something in one of my IAM scripts. I go back and run it to update my implementation. What happens?

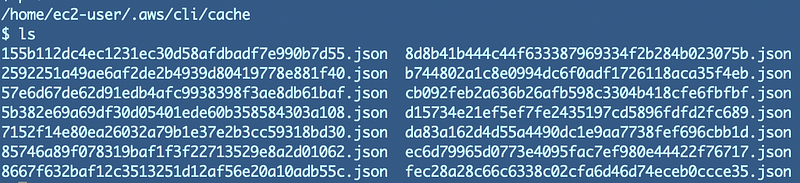
The AWS CLI does not prompt me again for my MFA code because the session credentials are now cached on the host, as explained in my last post — for both roles.

You might see where I’m going with this. Let’s say I split my IAM Administrator into two roles — IAM User Administrator and IAM Access Administrator. I’m running scripts for both users with both roles have active sessions.

Now let’s say an attacker gets onto the machine where I have an active session for both users. Now the attacker or a malicious insider who is aware of all this has everything required to escalate privileges using the two sets of temporary credentials for that session.

I feel like the AWS SSO UI has the same issue. In the past when you switch roles at least you had to enter an account and a role (unless you were using something like Active Directory federation that provides a pop up screen with a list of accounts).

Here’s an image from the AWS Security blog that shows once you login you can simply click a link to get to any account, including programmatic access. As I noted in a prior post, I don’t see a way to turn that programmatic access off with AWS SSO at the time of this writing (with except for recent billing policy action changes.)

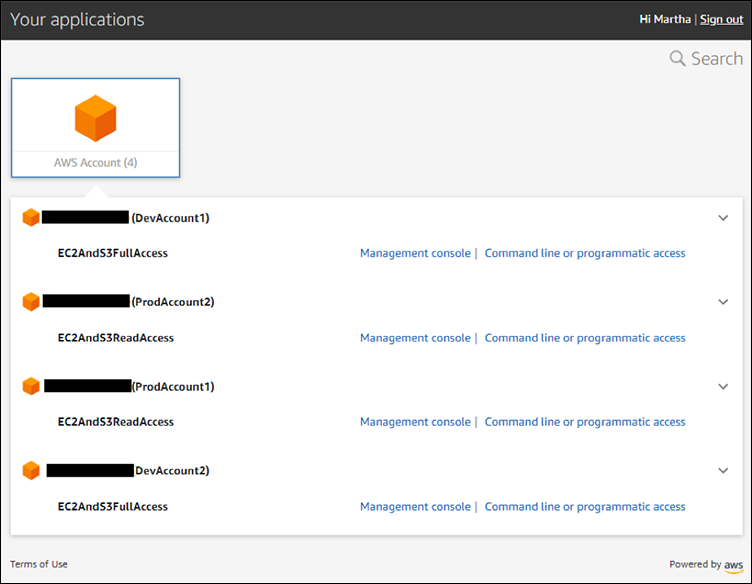
If an attacker gets onto a user’s machine and the user is using a low privilege role, but all the attacker has to do is go to the main SSO page for the organization and click a different link to elevate privileges, so can malware on that user’s machine.

It would be nice if AWS would at least let you provide a separate MFA device for different roles and require the user to re-enter the MFA device to assume the higher privilege role.

I wrote about that fix here:

By the way, the way around this is to give the user two logins — one for sensitive actions and one for every-day use. Then at least the attacker is somewhat limited.

An even better approach is the one I want to show you — eventually…we’re getting there.

Revoking IAM Sessions for an assumed role

One way to try to prevent this would be to revoke the session of the assumed role as soon as a script run by that role is complete. Then assume the next role with the second set of credentials.

Here are the steps:

  • Run a script with a particular session and the related keys.
  • Revoke the session.
  • Assume the next role and run the next script.
  • If you need to go back and user the first user, revoke the second user’s session.

What’s the problem with that approach?

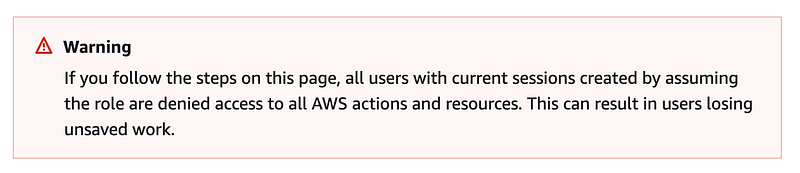
First of all you can’t really revoke sessions on AWS. You have to update policies to disallow actions.

As stated at the top of the page, you’re going to block all users who have assumed the role, not the single session you want to terminate. This is not really a session revocation. This is just a permission change and it’s not ideal to be changing IAM policies around frequently unless the purpose of the change is to change permissions, so this is not a good approach. I hope AWS will provide a better way to revoke sessions in the near future. #awswishlist

Running all your scripts in this linear fashion might prevent some parallel processing to speed up completion of tasks.

It’s also just got a fragile feel to it. Someone is going to forget to revoke a session and then you’ll have problems.

Running sessions on separate compute resources

Another approach would be to execute the scripts on different compute resources. If an attacker breaks into one system they would need to break into the other in order as well to compromise both sessions at the same time and perform their desired task.

This presumes you don’t have a scenario where all the systems have the same network access with the same vulnerability.

Now the weak point is that if one user is testing with both accounts, the attacker may be able to get into multiple compute resources via the same user workstation.

Let’s say the user is logged into two RDP or SSH sessions. Or perhaps the user has two windows open with an AWS CloudShell session running and the attacker has access to all the browser windows.

This is a better solution, though it still could pose a risk.

Automation

We could also use automation such that it is harder for an attacker to get a handle on both sessions because the roles are leveraged in two different batch jobs, for example. That’s where I’m going with ultimately. In production we can provide more separation and segregation.

In the development workspace, hopefully there’s less useful things for an attacker to steal or attack. And hopefully you have backups to recover from ransomware. Also, ideally you have monitoring in place such as unsuccessful network access on a private network or attempts to access canaries or honey tokens.

Short session duration

Well, I don’t see a great solution here for commands run manually, but one thing we can do is short term is set a short session duration for a role that performs sensitive actions. Hopefully people performing sensitive security-related actions such as policy changes will not mind the short duration.

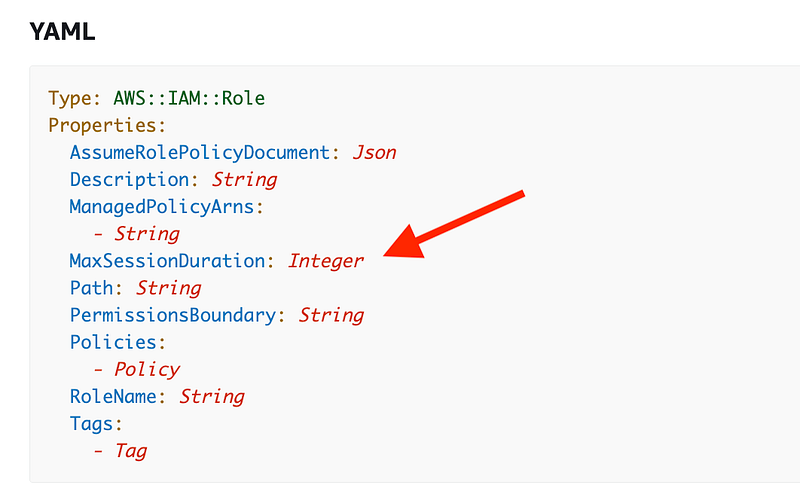
Just a note that you might not want a short duration for all roles. Some roles need to run scripts that take a long time. Also developers are writing code all day and are in non-production environments. (You do have developers working only in non-production environments, right?) Those types of systems and users may be safer to grant longer session durations, but you’ll have to evaluate your particular environment.

Since we have one role-creation template, we’ll want to consider these variations and create a way to set a default duration and have the capability to override it if needed.

There’s one other way I can potentially break up my user creation and user access roles. What if the users are not created on AWS? I’ll explore that next.

Follow for updates.

Teri Radichel | © 2nd Sight Lab 2023

About Teri Radichel:
~~~~~~~~~~~~~~~~~~~~
⭐️ Author: Cybersecurity Books
⭐️ Presentations: Presentations by Teri Radichel
⭐️ Recognition: SANS Award, AWS Security Hero, IANS Faculty
⭐️ Certifications: SANS ~ GSE 240
⭐️ Education: BA Business, Master of Software Engineering, Master of Infosec
⭐️ Company: Penetration Tests, Assessments, Phone Consulting ~ 2nd Sight Lab
Need Help With Cybersecurity, Cloud, or Application Security?
~~~~~~~~~~~~~~~~~~~~~~~~~~~~~~~~~~~~~~~~~~~~~~~~~~~~~~~~~~~~~
🔒 Request a penetration test or security assessment
🔒 Schedule a consulting call
🔒 Cybersecurity Speaker for Presentation
Follow for more stories like this:
~~~~~~~~~~~~~~~~~~~~~~~~~~~~~~~~~~~~~~~~~~~~~~~~~~~~~~~~~~~~~ 
❤️ Sign Up my Medium Email List
❤️ Twitter: @teriradichel
❤️ LinkedIn: https://www.linkedin.com/in/teriradichel
❤️ Mastodon: @teriradichel@infosec.exchange
❤️ Facebook: 2nd Sight Lab
❤️ YouTube: @2ndsightlab
Session
AWS
Cloud Security
Cybersecurity
Application Security
Recommended from ReadMedium