
Mastering Test Automation with Robot Framework
If you work in DevOps or Software development then learning how to automate your testing process is a must. Using popular testing frameworks like Robot Framework is an essential skill in today’s tech industry.
In this guide, we’ll guide you through a step-by-step tutorial of how Robot Framework works, how to write your first automated first tests and an overview of its simple yet powerful scripting language.

Automated Testing Robot Framework is a test automation tool based in Python and helps us automate a wide variety of test scenarios.
It provides its own set of built-in libraries that covers a wide range of testing capabilities. Robot Framework can automate the testing of databases, APIs, and even web UI testing - which we’ll demonstrate later in this blog.
Robot Framework also supports various other testing frameworks you may be used to like Selenium & Junit. Meaning we can integrate directly with existing processes and tools to easily run tests again different environments and platforms.
Enough talking, let's get hands-on with building our first test.
Installation & Setup
I’ll assume you already have some form of Code Editor & Python installed. If you need help installing either of these here are the download links for both Python & VSCode.
Once we have Python installed we can simply use PIP to grab the robot framework module as seen below.
$ pip install robotframework
We’re also going to need the robot framework selenium library for this test. So let’s get that installed as well.
$ pip install robotframework-seleniumlibraryWriting our first test
In this example, we’re going to write a simple test that checks to see if an Apache server is running on localhost port 80. Start off by creating a new directory for your tests to live in.
Our first step is to create a new Robot Framework test file with the extension .robot. Let's call this file apache_test.robot. Open this file in a text editor and add the following code:
*** Settings ***
Documentation    Test for Apache web server
Library          SeleniumLibrary


*** Test Cases ***
Check Apache is running
    Open Browser    http://localhost:80    Chrome
This code defines a new test case called “Check Apache is running”. We're using the Open Browser keyword to open the Chrome browser and navigate to http://localhost:80. This should open the homepage if the web server is indeed running.
Let’s try running this test.
Running Your Tests
To run the test, open a terminal window and navigate to the directory where the apache_test.robot file is located. Then, run the following command:
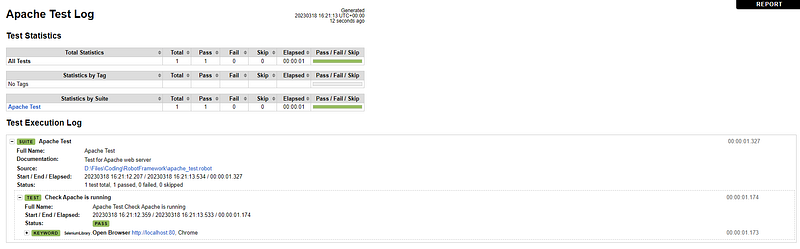
robot apache_test.robotWhen this test executes you should see Chrome open on your screen and navigate to our localhost address. Robot will then check to see if this operation has been successful and then compile a report for you to view.
This should have generated a few files in our directory about the output of our test. If we open the report.html in a web browser, we can see exactly what happened.
Writing Keywords
Okay, that’s great and all but all we’re really doing is checking that we’re getting a 200 response code for our web server. We have no way of knowing if we’re actually displaying the right content. So let’s re-write some of this test to check if we’re seeing the homepage of our application.
In order to do this, we’re going to create a new custom keyword. This test would actually work fine without one, but creating keywords helps us keep track of what our tests are doing and means we can reuse them.
Firstly let’s change our original test to use a keyword instead for navigating to localhost. We’ll add a Keywords section to our robot file and create a new keyword for ‘Navigate to Server’ that just opens Chrome the same way we were doing before. Then we’ll change the Test Case to just use the keyword instead.
*** Settings ***
Documentation    Test for Apache web server
Library          SeleniumLibrary

*** Keywords ***
Navigate to Server
    Open Browser    http://localhost:80    Chrome

*** Test Cases ***
Check Apache is running
    Navigate to Server
This should have the same functionality as before, but now if we ever wanted to navigate to the web server for any other tests, we could reuse the same keyword instead of retyping our code. Personally, I like the look of this a little better as well.
Now let’s add some more functionality. We’ll create a new keyword to check if the page we’ve loaded really is the homepage of our application.
*** Keywords ***
Navigate to Server
Open Browser http://localhost:80 Chrome
Verify Page is Apache Default Page
Wait Until Page Contains Element xpath://h1[text()='It works!']
*** Test Cases ***
Check Apache is running
Navigate to Server
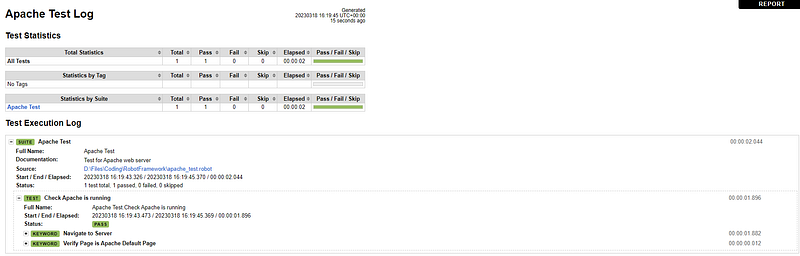
Verify Page is Apache Default PageThis code defines a new keyword called “Verify Page is Apache Default Page”. It uses the Wait Until Page Contains Element keyword from the SeleniumLibrary to wait until the Apache test page is loaded successfully.
Since the homepage I’m running for this web server is just a standard Apache default index.html page, the only thing the page contains is the heading “It works!”. So we’ll configure Robot to look for that <h1> tag using an xpath locator.
Now our test can be simplified to just be ‘Navigate to Server’ followed by ‘Verify Page is Apache Default Page’.
Variables in Robot Framework
Let's talk Variables.
Variables are used to store and manipulate data in Robot Framework. They are defined using the *** Variables *** section in the test file. For example:
*** Variables ***
${BASE_URL}    http://localhost:80

*** Keywords ***
Check Apache is running
    Open Browser    ${BASE_URL}    Chrome
In this code, you can see we’ve replaced our static call to localhost with a variable called ${BASE_URL} . As you might expect, this works in exactly the same way as before but we’ve now parameterized our input so we can use it across multiple tests.
That’s it! We’ve created our first test using Robot Automated test framework.
Thanks for reading, If you enjoyed this, I regularly post DevOps articles exclusively on Medium — If you would like to read more I recommend checking out the stories below.