
Making a RTS game #8: Boosting our selection feature (Unity/C#)
Let’s continue our RTS game project: today, we’ll improve our selection mechanism!
⬅️ Tutorial #7: Polymorphism, take 2! | TOC | Tutorial #9: Implementing character units and skills ➡️
📕 Get the ebook and bonus material on Gumroad! 🚀 Find the code of this tutorial series on my Github!
A couple of weeks ago, we improved our UI and displayed more info on the buildings (with an info panel and healthbars).

Today, we’re going to continue on this topic and improve our selection mechanism — we’ll do three things:
- display the list of currently selected units: in order to better remember what we’ve selected, even if it is off-screen, let’s list the units at the bottom of the screen as little blocks!
- create selection groups: this is a nice way of switching between your units that many RTS provide
- show up info on the active selected unit: it would be nice to have some data and specific actions for a unit when we select unit
Displaying the list of currently selected units
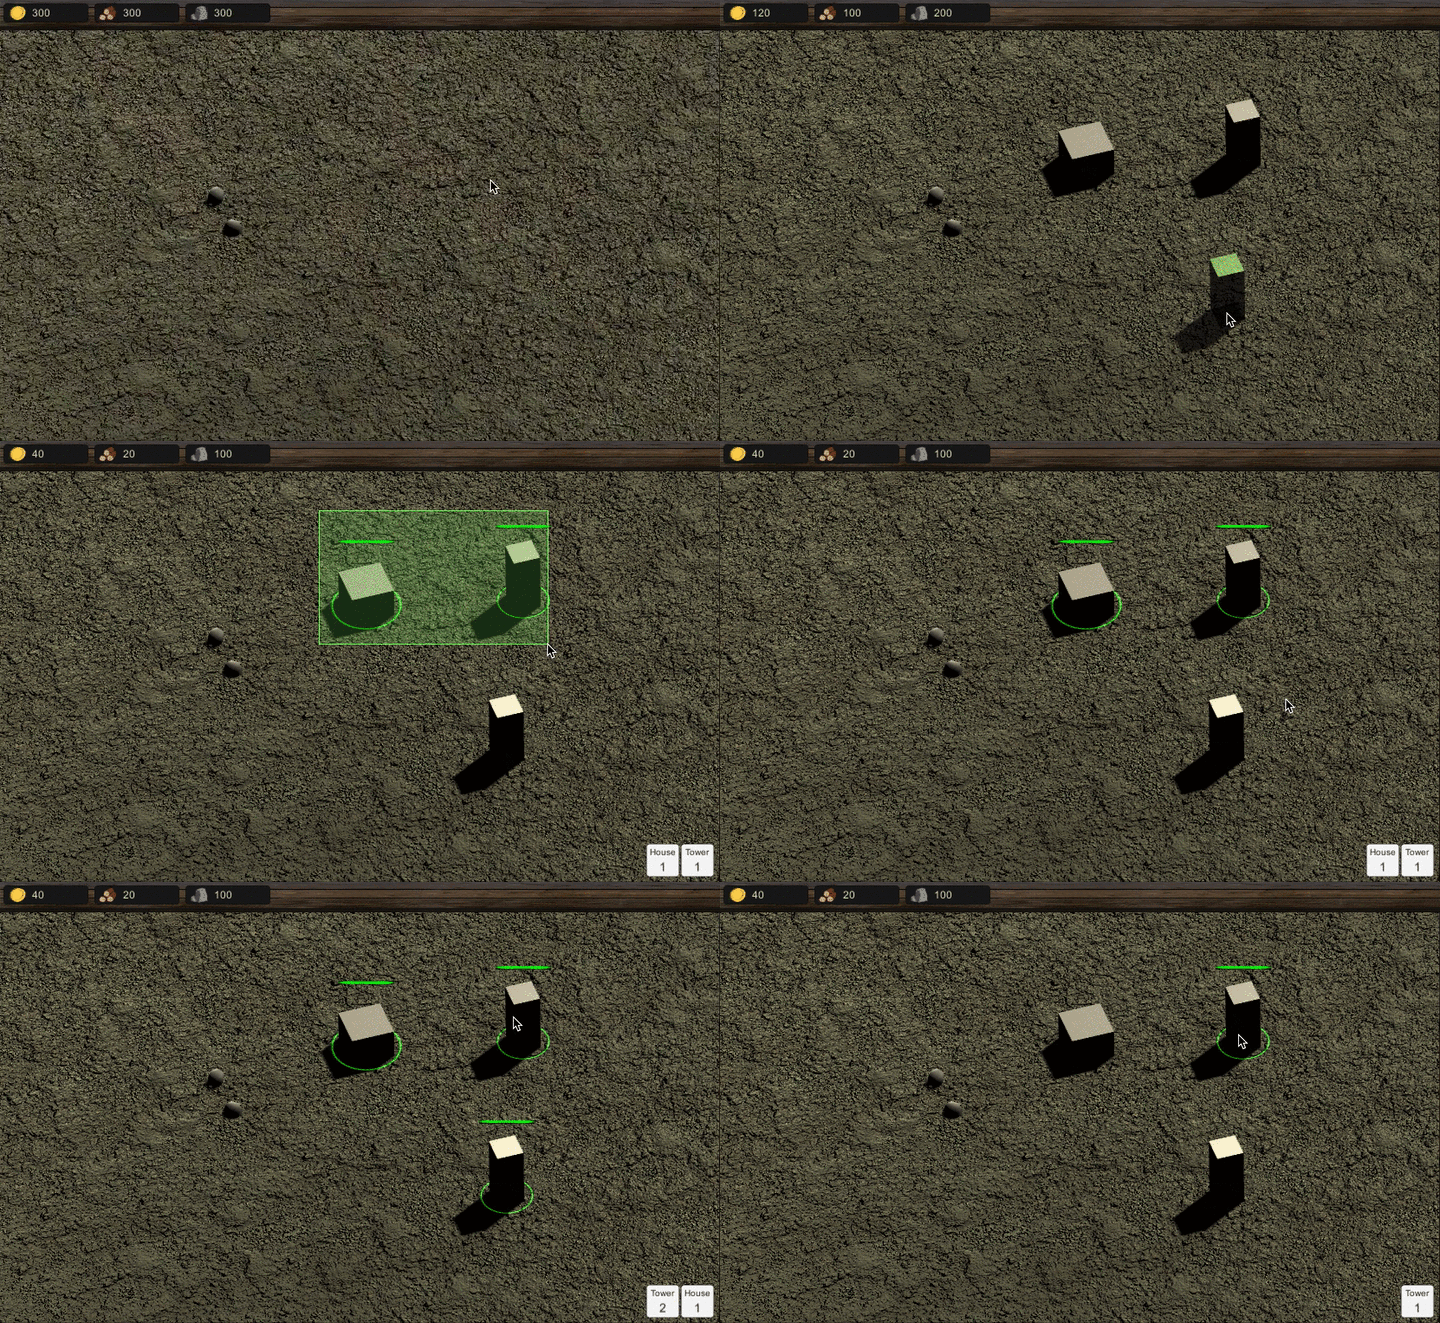
In a previous tutorial, we set up a basic selection system that allows to select units by either dragging a box around them on the screen or by clicking on them directly. We see which units are selected because they have a selection circle and a healthbar, but it would be nice to have a complete list of all the units currently selected somewhere on screen. In particular, this will be very useful when we start moving the camera and possibly have selected units that are no longer in the viewport.
To avoid having too many blocks in this list, we will group units per unit type; so for example if we select one House and two Towers, we will have two items: one for the House with a count of 1 and one for the Towers with a count of 2. Eventually we could use the unit icons — for now, we’ll simply add a text with the name of the unit type:
To implement this, we have to:
- add some UI elements in our Canvas, in particular a parent panel with a GridLayout to easily stack the items and a prefab to display the selected units as small blocks
- update our
UIManagerandUnitManagerscripts to integrate this new feature to the current selection system
The first part is very similar to what we’ve done in previous tutorials and it’s quite dependent on the feel you want for your game, so I won’t give explicit details about this here. The important thing is just that my SelectedUnitDisplay prefab has two children with Text components on them: the “Count” and the “Name” to show respectively the current amount of selected instances and the unit type.
In the UIManager class, we need some additional references to prefabs and UI elements in the scene and two new events: "SelectUnit" and "DeselectUnit" (with their associated callbacks and the util functions _OnSelectUnit(), _OnDeselectUnit(), _AddSelectedUnitToUIList() and _RemoveSelectedUnitFromUIList()). Notice that the selection/deselection events need to carry with them data of Unit type so we should add this new field to our CustomEventData structure - once again, we’ll use multiple constructors depending on the type of data we want to store for our event:
Other than that, there’s not much news compared to the previous tutorials:
Note: the code string variable used here is the unique code of the unit - we create one child in the layout for each unit type, i.e. for each unique code in the list of selected units.
All that’s left to do is to trigger those events in the UnitManager script so the selection mechanism takes this into account:
Creating selection groups
A very cool feature of great RTS games like Empire Earth or Starcraft is the ability to assign some units to specific groups so that the player can easily reselect all of them just with the click of a button (or a key). This functionality works in two (or three) phases:
- firstly, you select the units you want to assign to your selection group and press a combination of keys, usually
- secondly, you press the <#> key again (with no
) to cancel your current selection and instead select all of the units registered in the matching group - (bonus: show matching buttons for each group so you can easily remember your groups and/or reselect a group)
This can be crucial in such strategy games because it lets you switch around between your units quickly.
We actually already have most of what’s needed to add this new functionality. The only issue we might face is getting the correct keyboard inputs.
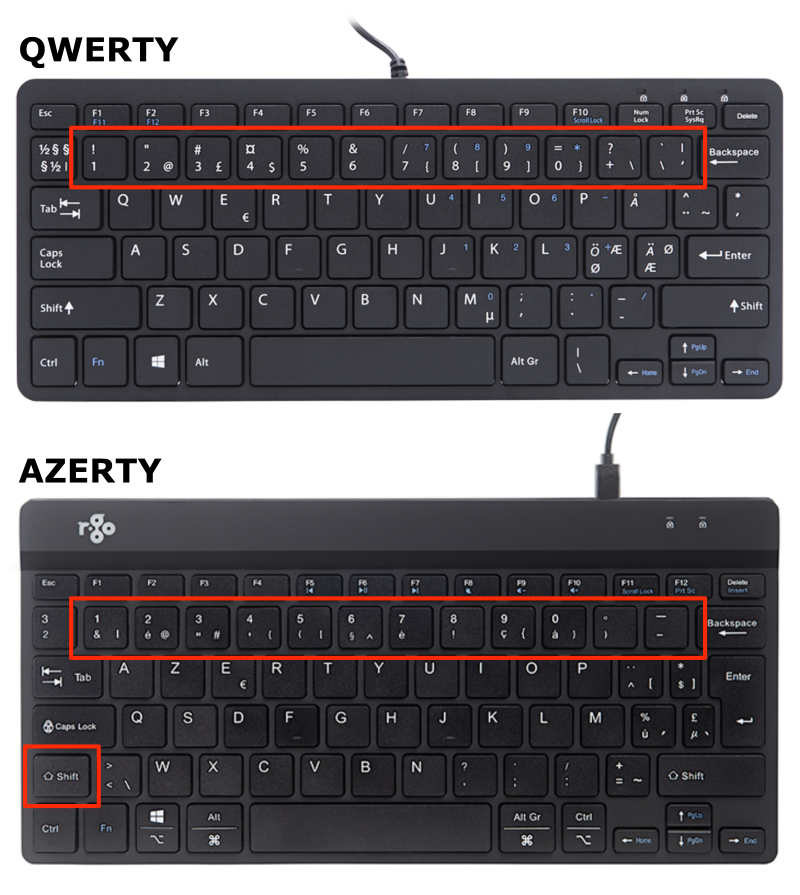
From my experience, Unity’s input system is very good but it is primarily made for QWERTY keyboard layouts. Although the new input system they are developing (in Unity 2020+) looks promising, it seems multi-layouts is still not their forte. When, like me, you work with a French AZERTY keyboard layout, you’ll have some problems when you want to catch pressing of the alphanumeric keys. This is because an QWERTY layout has all of the numbers directly accessible on the top row while an AZERTY keyboard places the numbers in the same place but requires you to press the Shift key too.
To bypass this issue, I decided to use a raw info from Unity, the “input string”, and to code up my own key checker. Basically, if any key is pressed, I get the character that it “prints” and I use this character to decide if it is an alphanumeric key (QWERTY and AZERTY keyboards alike, hopefully). This is done in a new method in our Utils.cs file:
Notes:
- Even if this solution works, I still feel like it’s not the best way to deal with this. If some of you happen to know of a better technique to handle cross-layout inputs, I’d be really interested! Feel free to send me a message or post a comment ;)
- And, actually, if it doesn’t work for you, you might want to take a look at this Stack Overflow thread with some other solutions to this “cross-platform” keys detection issue! (Many thanks to @Jean Yves Armand for sharing this link)
Now that we have this utility, the first two points are pretty straightforward to add in our UnitsSelection class:
As I’ve said before, the script does the following:
- it checks for inputs and, if an alphanumeric key is pressed, it either creates a group or selects it (this depends on whether or not a
/ key is pressed at the same time or not) - if we currently have an empty selection, then the group is removed (if it exists)
- else we assign all the currently selected units to the group with the given index
- re-selecting a group means deselecting the current selection and reloading the one stored for the group with the given index
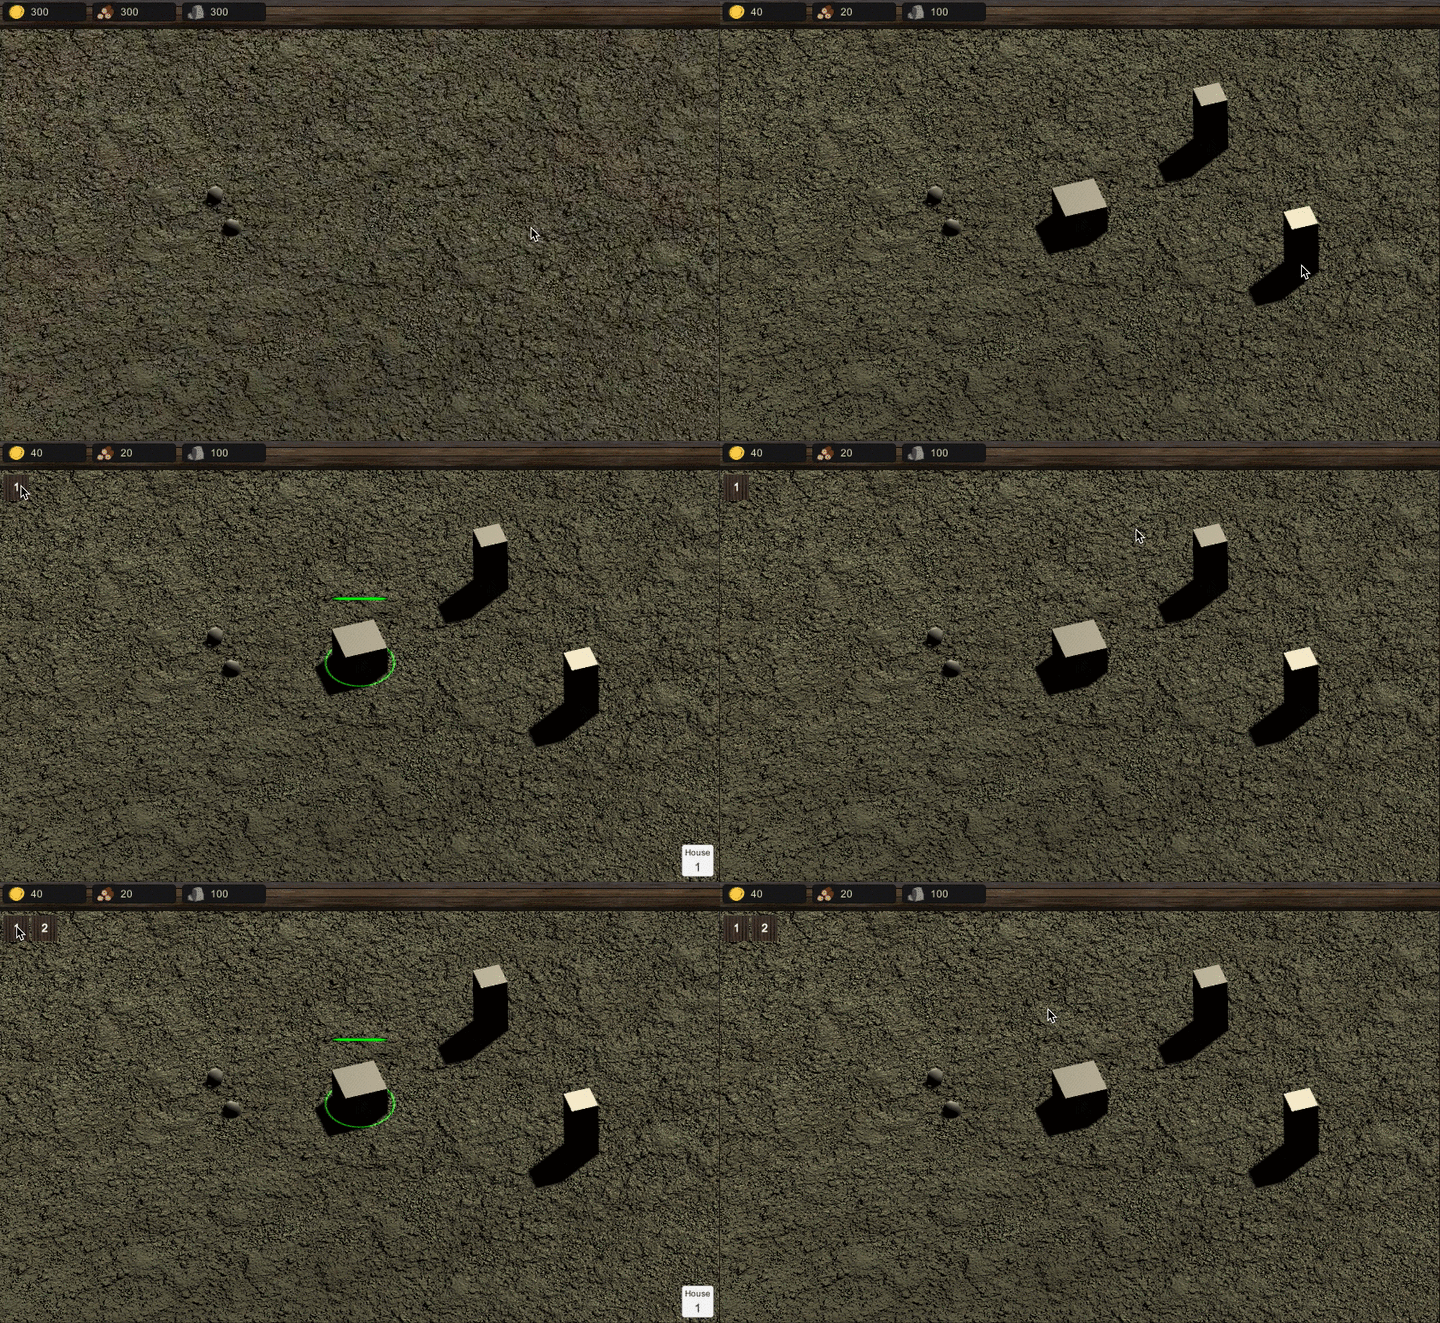
To add the groups visualisation in the UI, because we know we can only have groups with an index between 1 and 9 (inclusive), we can create the group buttons before hand in edit mode. The idea will be to have a GridLayout with 9 small buttons that are all deactivated by default and then reactivated whenever the matching group is defined. When we click the button, we should reload the corresponding set of units.
Let’s update our UIManager class first so it has all the necessary variables and functions exposed:
And then we’ll simply call this function from our UnitsSelection.cs script (remember to assign the uiManager variable in the inspector):
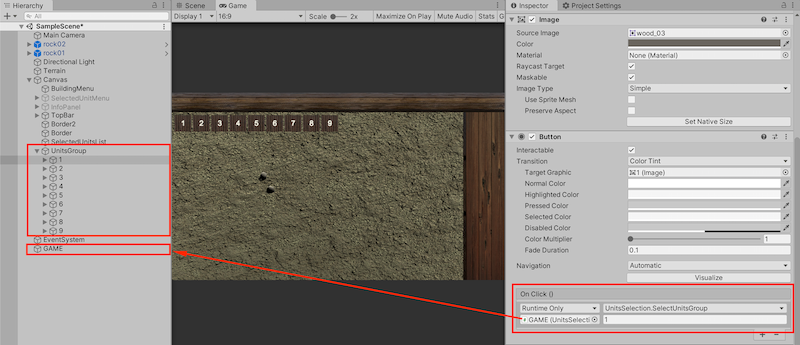
Now, we can jump in into Unity’s editor and set up our buttons. First, we create UI buttons elements and we move them as children of a panel with a GridLayout. Then, we update the text of each to match the group index; and we directly assign the SelectUnitsGroup() method we defined on the UnitsSelection script located on the "GAME" object while passing it the proper index for each button:
And that’s it! We can now create groups from our selection and easily re-select units by clicking on the UI buttons in the top-left corner or pressing the alphanumeric keys :)
Showing up info on the active selected unit
The final improvement I want to make to our selection system today is adding some info on the “active selected unit”. We call “active selected unit”:
- the only selected unit if we have only one currently selected
- or the last one in the list if there are more than one currently selected
To prevent the UI from taking too much space on the screen, we are going to swap between the global building menu and the active selected unit info on the right of the screen. So we should end up with something like this — if no unit is selected, we see the building menu; else, we see the info on the unit:
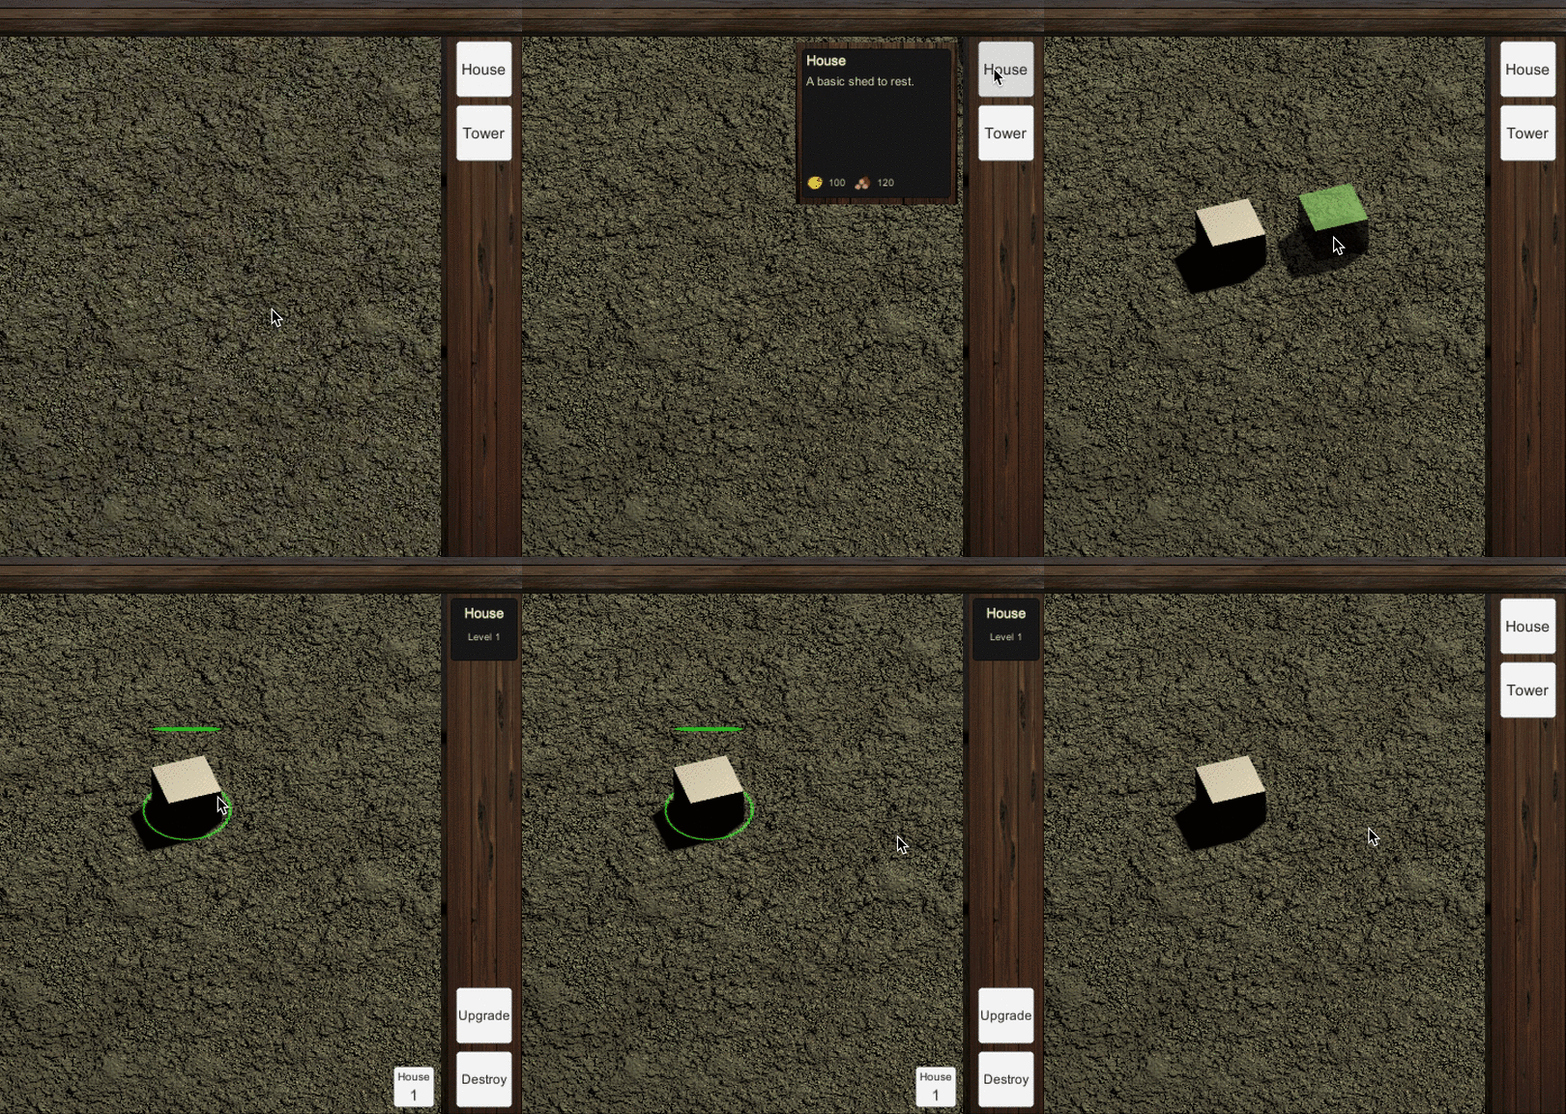
This selected unit panel should display two things:
- on the one hand, actions common to all units such as upgrading or destroying the unit
- on the other hand, actions specific to the unit like powers or character production (for buildings): we’ll prepare the reference but this will remain empty for now as we haven’t implemented these actions yet
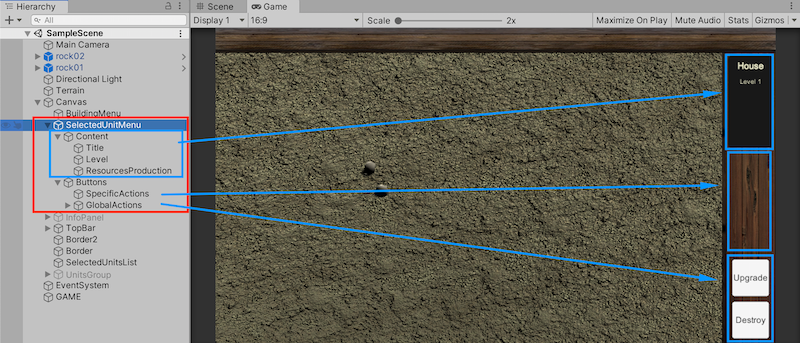
First thing — we need to add the UI element in the scene. It’s basically a copy of the building menu with two subpanels, one for the common actions and one for the specific actions. As usual, I won’t dive into the details so you can have your own UI style but on my part it’s a vertical layout in three parts with a “Content” part to display the unit’s info:
I’ve also prepared a little “Game Resource Cost” prefab to instantiate in my info display: this will be instantiated to show what kind of in-game resources the unit produces.
Now, we can add the references and relevant methods to the UIManager script - we just have to update our _OnSelectUnit() and _OnDeselectUnit():
Warning: since we are accessing our UnitManager’s Unit field directly, we need to make sure that this variable is accessible. Thus in the UnitManager.cs script, we need to change the Unit variable from protected virtual to public virtual - and similarly in the BuildingManager.cs script we have to use a public override Unit unit field. (Thanks to Agentsmith for pointing this out in the comments ;) )
You see that in our _SetSelectedUnitMenu() function, we use our Unit instance to fill in the data properly. In particular, we compute the height of this "Content" object dynamically because it depends on the resources the unit produces. For now, our units don't have any production, so we don't have to worry too much about this part. But if I simulate some production, I'll get the following interface when I select the unit:
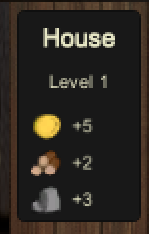
Great, we now have a way to access the specific data and actions of our units! As soon as we define custom actions for the units, we will be able to display them in this panel and we already have what we need to upgrade or destroy the units.
Conclusion
Today, we added several things to our RTS: the ability to list the selected units, to make selection groups and to display additional info on the active selected unit.
Next week, we’ll work on character units and skills and we’ll make our buildings capable of “producing” units.
⬅️ Tutorial #7: Polymorphism, take 2! | TOC | Tutorial #9: Implementing character units and skills ➡️
📕 Get the ebook and bonus material on Gumroad! 🚀 Find the code of this tutorial series on my Github!
If you liked this article, you can find more blog posts about tech, AI and programming on my website :)


