
Making an RTS game #12: Moving character units (Unity/C#)
Let’s continue our RTS video game — we’ll talk about AIs and pathfinding!
⬅️ Tutorial #11: Adding a day-and-night cycle| TOC | Tutorial #13: Adding a minimap and fog of war 1/3 ➡️
📕 Get the ebook and bonus material on Gumroad! 🚀 Find the code of this tutorial series on my Github!
Today, we’re going to add a fundamental feature to our RTS game: the ability for our character units to move around in the scene! Whereas buildings are placed once and for all, characters can be selected and then moved by the player by targeting a specific destination point clicked on the ground. This will require us to use a pathfinding algorithm so our units can compute the best path to follow from their current to their target positions.

Here is a preview of what we’ll be able to do at the end of this tutorial: by selecting one or more units and right-clicking on the ground, we can give them a target point and they will walk on the terrain while avoiding obstacles! :)
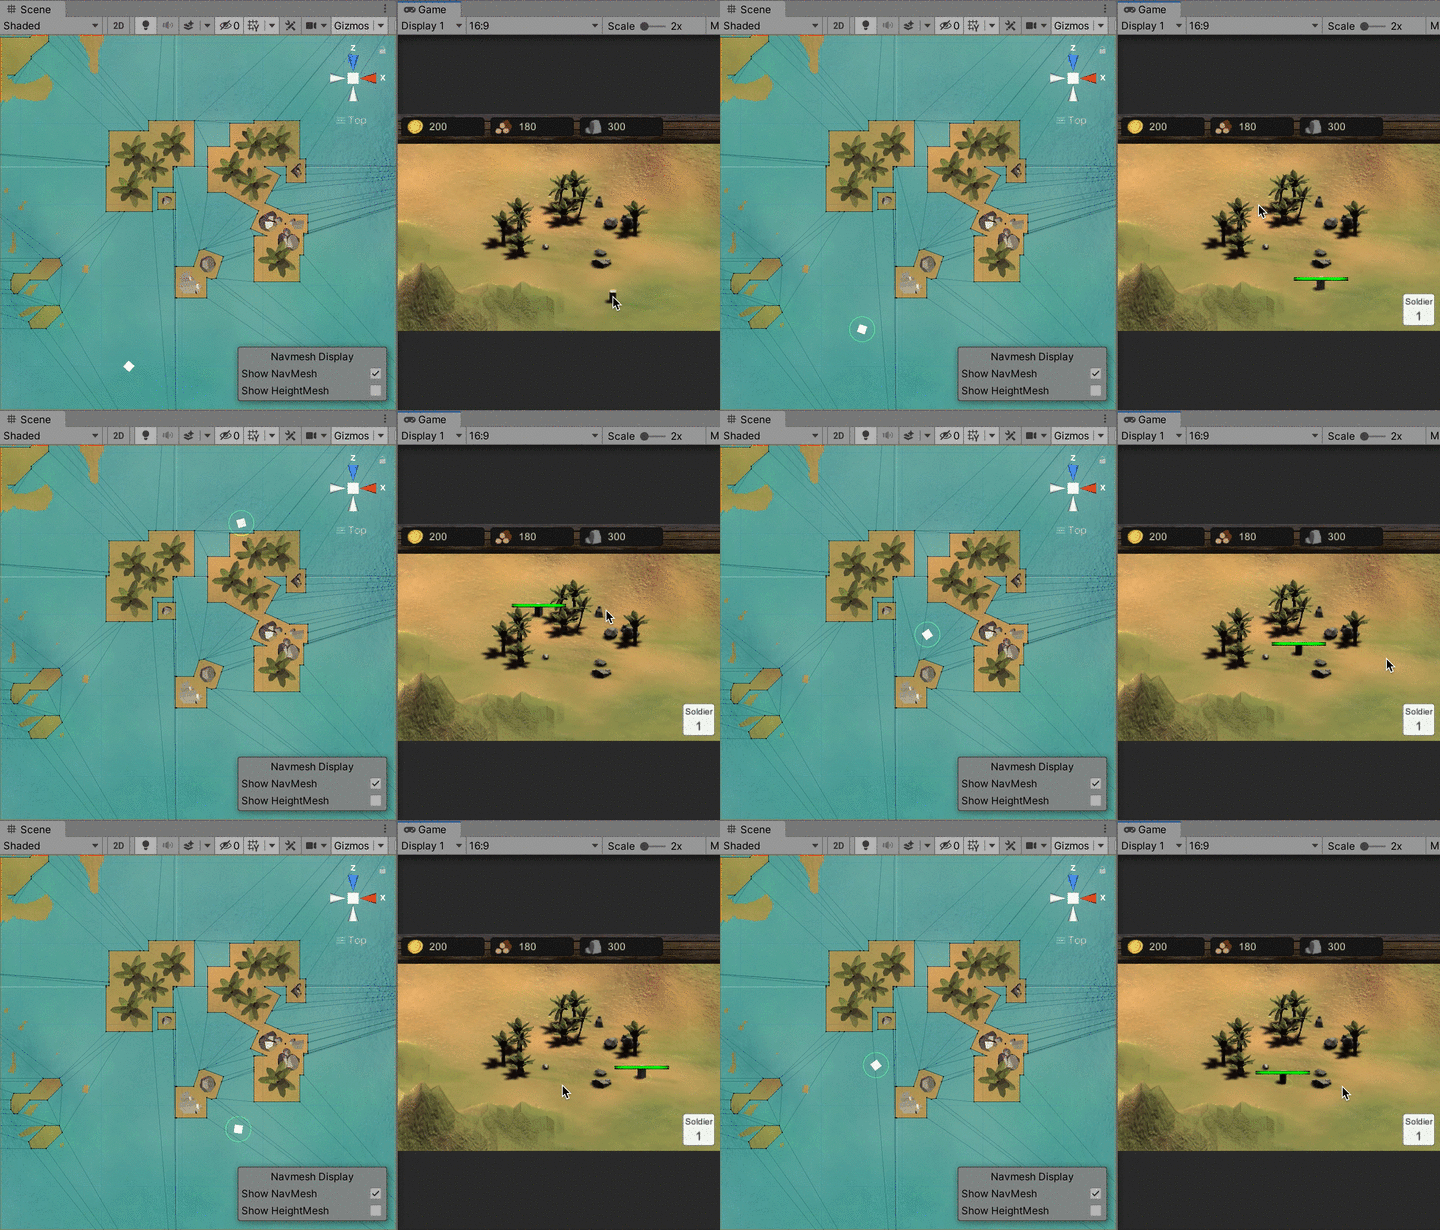
On the left, you see in blue the zones where the unit can walk. When I pick a destination in the game, the unit automatically computes the best path to reach this point in minimal time.
Unity’s AI/Navigation system
A great advantage of using well-featured game engines such as Unity is that you’re offered super-powerful functionalities with minimal setup. This is particularly true for AI behaviour. Back in the days, having a unit move from one point to another required you to implement a search algorithm yourself. Now, we can leverage Unity’s AI/Navigation system: it is a very user-friendly way of adding complex moving abilities to your characters — basically, they’ll be able to navigate around your scene and find optimal paths to reach their destination points “on their own”.
As explained in Unity’s docs, Unity’s AI/Navigation system relies on the A* search algorithm to compute agent paths. The A*-Pathfinding Algorithm is a path search algorithm famous for its completeness, optimality, and great efficiency. It was first published in 1968 by Hart, Nilsson and Raphael. It’s an extension of the well-known (and previously regarded as best) Dijkstra’s algorithm and it uses heuristics to improve its performance: the program looks at the minimal distance to both the starting and the goal point.
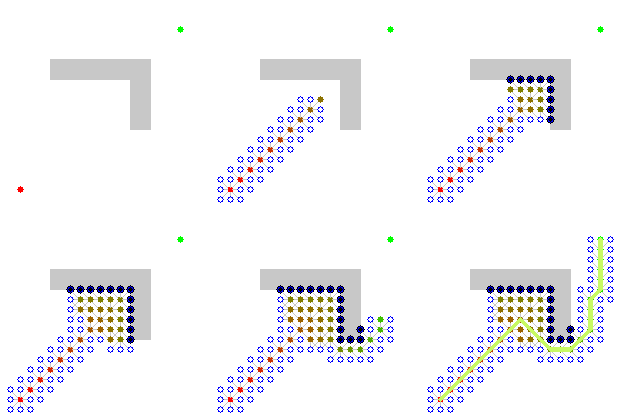
As you see in the animation above, to allow for this algorithm to work, you need to have a grid representation of the scene — in Unity, this is the “navigation mesh” (or “nav mesh”), a mapping of all walkable and blocked areas that will be used to compute paths. Once this nav mesh is prepared, or “baked”, any navigation agent can move around towards its assigned destination along the optimal path, as calculated by the A* algorithm.
Implementing the navigation
Adding pathfinding is a piece of cake!
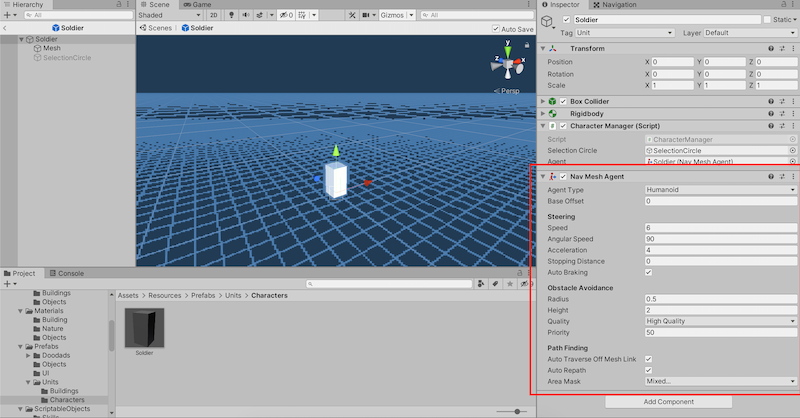
The first thing we need to do is to add a “Nav Mesh Agent” component to our character prefabs. For now, we can keep the default settings, but you can also do a few tests and change the parameters if you wish (here for example I changed the speed and acceleration):
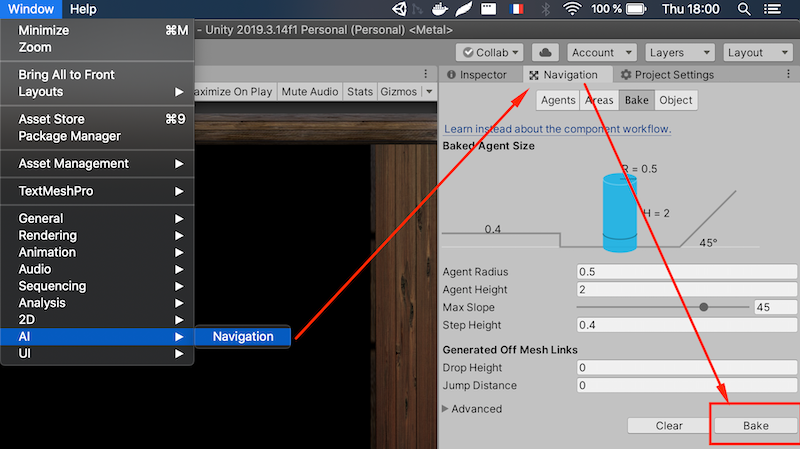
Then, we have to mark our ground as “a navigation surface” so that Unity knows it has to bake a navigation mesh it. To do that, we just need to select our “Terrain” object, open the Unity’s “AI > Navigation” panel, switch to the “Object” tab and mark this object as a “navigation static”! This will register it as a static surface that is part of the environment and used for the nav mesh.
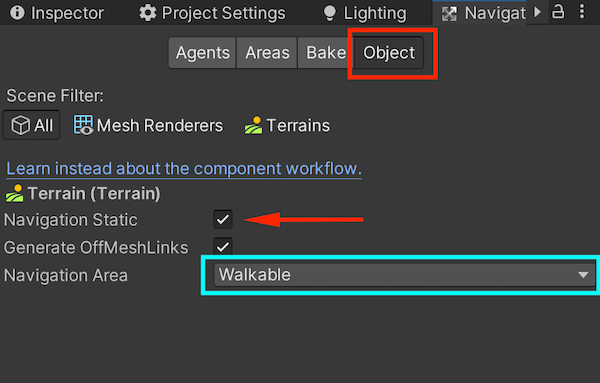
Note that the dropdown lets you choose which area this object should use in the nav mesh: this allows you to mark “walkable” and “unwalkable” zones, or even to define “harder to walk” areas that your characters will try and avoid if possible…
Finally, we can simply bake our nav mesh by clicking the “Bake” button! ;)
Thanks to Unity’s AI/Navigation system, it is very easy to move our agents around. It only takes one line of code! This means that our CharacterManager is actually a super-simple class:
Basically, we just set the current destination point of the “NavMesh Agent” component on the character unit, and it will automatically compute and walk the best path from its current to its target point. And now, we can call this MoveTo method for all selected units whenever we right-click on the ground - we do this in the GameManager script since it's a somewhat global scene mechanic:
I’m always amazed at how quick it is to setup pathfinding with this new navigation system! ;)
Adding NavMeshObstacles
Now that we have a ground to walk on and agents to walk with, we need to make sure they avoid obstacles. In our scene, it will be the trees, the rocks… in other games, we might have walls or holes in the ground the player cannot walk on. Those are very easy to create thanks to Unity’s “NavMesh Obstacle” component.
This “NavMesh Obstacle” component can be assigned to any object in your scene with a 3D collider to designate it as a blocking element for the agents. More specifically, marking an object as an obstacle will enforce a small unwalkable area around it when you bake the navigation mesh that corresponds to the “forbidden” zone for the agents. This area is computed by carving the bounding box of the obstacle out of the nav mesh and adding a little offset (that depends on the size of the agent). Below is an image that shows the same scene in three different states (from top to bottom):
- without the display of the nav mesh
- with the display of the nav mesh but no carving
- with the display of the nav mesh and with carving
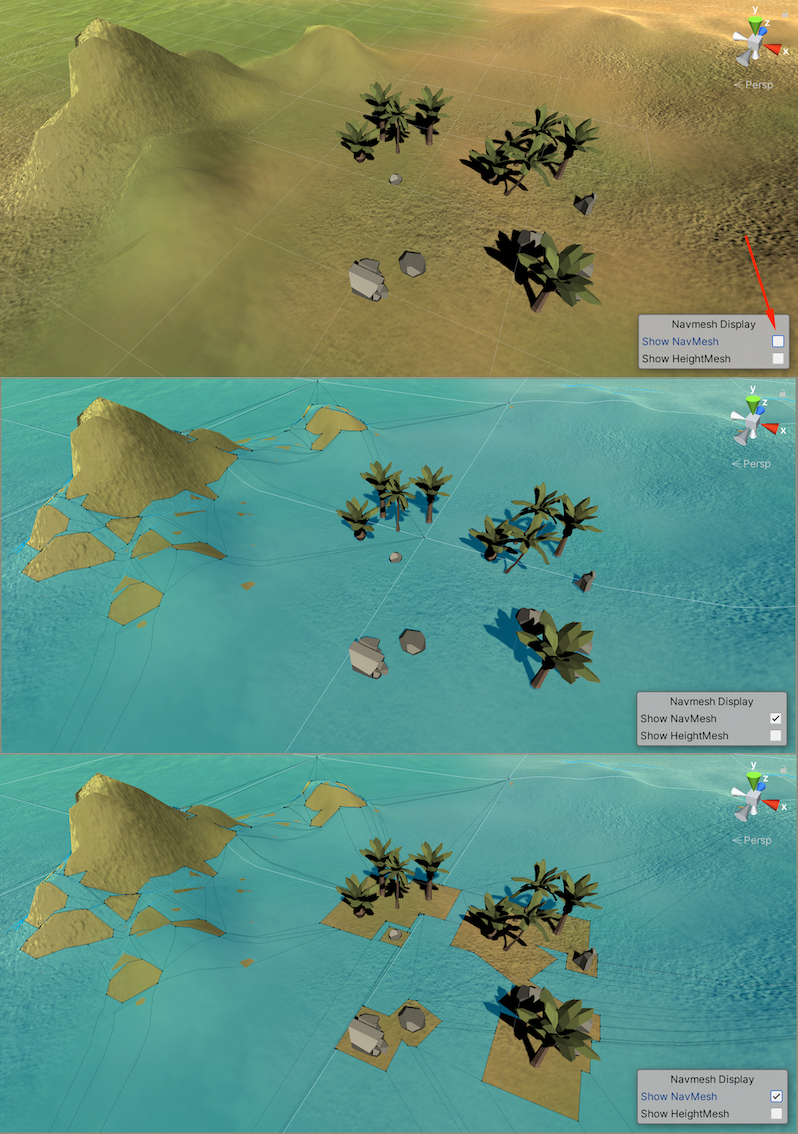
Here, we notice two things:
- Unity automatically takes into account the configuration of your navigation agent to assess whether some slopes are too steep to be walkable: on the left, the hill is only partially valid for navigation, the rest cannot be used by the agent
- the obstacles (like trees and rocks) have a little zone around them that has been carved out of the nav mesh — here, I used the colliders as reference and I put box colliders on everything to make it simpler to understand and faster to compute
Making our navigation mesh update dynamically
The problem is that, for now, we are baking the navigation mesh beforehand in the editor, and it cannot be modified during playtime. Even if the terrain in itself won’t change at runtime, we still need the nav mesh to update dynamically as we add buildings on the ground for example (so that all character units go around buildings instead of trying to go through them!).
Unity doesn’t provide this feature out-of-the-box, but there is an official plugin that fits just this purpose: the NavMesh Components high-level API. If you go to this Github repo, you’ll find an official package that can be downloaded and installed in your project and offers various additional components related to the AI/Navigation system. Most notably, the plugin has a “NavMesh Surface” component that can be added anywhere in your scene and will be able to automatically recompute a valid nav mesh based on the renderers and/or colliders in your scene. Instead of baking it just once before starting to play, this “NavMesh Surface” holds a reference to a particular asset, some NavMesh Data associated with the scene. And this NavMesh Data can then be re-updated as many times as you want (though you should beware of performance issues if you plan on recomputing the entire thing very often!), especially during runtime.
After you’ve installed the plugin in your project (see the Github for more info on how to install), you’ll be able to use the “NavMesh Surface” in your game scene — simply add it to any object! I decided to add it to my Terrain asset because they’re logically linked so I find it easier to remember that way… but you could also add it to the “GAME” game object ;)
You’re nearly ready to use a dynamic nav mesh; you only need to bake the NavMesh Data a first time (this will create a new folder in your Scenes folder named after your current scene with the data inside it) — after that, your code can modify this data whenever you want!
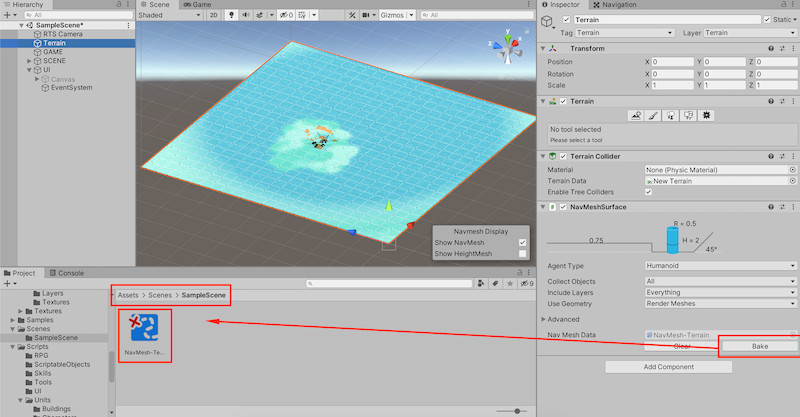
Note: after you’ve baked the navigation mesh, if you select the scene object that has the “NavMesh Surface” component, you’ll be able to toggle the “Show NavMesh” checkbox in the edit view and see the nav mesh as shown in previous images.
At this point, we can use our dynamic nav mesh in our scripts — we’ll need to do three things:
- keep a reference to our nav mesh in our
Globalsclass - set it up in the
GameManagerinitialisation sequence - update the nav mesh whenever we place a building
Here are the three updated scripts:
A final fix: instantiating characters
Disclaimer: thanks to Chung-Tai for pointing this out! :)
At the moment, when we create soldiers using our “INSTANTIATE_SOLDIER” skill, we set its transform directly inside of our SkillData class code:
The problem is that this is not valid anymore: because we’re using a navigation mesh now, we can’t directly set the position of the agent unit. Instead, we have to use the Warp() method of our agent to "teleport" it to the proper position, still using the nav mesh system:
Conclusion
Unity offers us an easy-to-setup and user-friendly mechanism for AI and navigation — thanks to this system, we can very quickly set up our characters movement and have the units walk around the scene while avoiding obstacles and computing optimal paths.
If you go back to the video at the very beginning of this article, or if you play around with your new navigation system, you’ll probably notice some overshooting from time to time, meaning the unit doesn’t quite reach its target point but instead circles around it and has to go back. This can be mitigated by tweaking the “stopping distance” parameter of our nav agents to increase the distance at which they consider they’ve reached their destination. You’ll probably need to play with these values anyway to get a better feel in your own game, depending on your assets.
In the tutorials to come, we’ll add a minimap in our UI so we can have a global overview of the scene and have our units move across the whole terrain, and we will add a fog of war to hide the unexplored map areas.
⬅️ Tutorial #11: Adding a day-and-night cycle| TOC | Tutorial #13: Adding a minimap and fog of war 1/3 ➡️
📕 Get the ebook and bonus material on Gumroad! 🚀 Find the code of this tutorial series on my Github!
If you liked this article, you can find more blog posts about tech, AI and programming on my website :)


