
Making a RTS game #11: Adding a day-and-night cycle (Unity/C#)
On with our RTS game: today, we add a day-and-night cycle!
⬅️ Interlude #2: Refactoring the event system| TOC | Tutorial #12: Moving character units ➡️
📕 Get the ebook and bonus material on Gumroad! 🚀 Find the code of this tutorial series on my Github!
In the last tutorial, we talked about camera placement and projections. We saw how crucial the position and properties of the camera in order to convey the proper look and feel for your game. Another essential component of this ambiance is the lighting of your scene.

Time is of the utmost importance in almost all video games, be it because it is part of the story itself (like in Majora’s Mask), because you’re required to time your actions very precisely (like in the infamous Dragon’s Lair — considered the first QTE game), because you have limited time to complete a mission (like for some World of Warcraft quests), because you need to wait for something to happen (like in Minecraft, when you want your crops to grow)…
Time might be a simple continuous countdown, or it might match some sort of day and night cycle, as we have in real life.
For example, in MMORPGs where players need to rejoin and play together (and thus share the same “world clock”), the time in-game matches the time in real life and the day-/night-time (based on the server timezone). At the other end of the spectrum, a small game like Tools Up! (2019) relies heavily on time constraints (you have a given amount of minutes to complete the level) but it has absolutely no use for an actual day/night cycle. And so in-between, you have games that have a somewhat realistic day/night cycle mechanism. The Final Fantasy series, Don’t Starve, Starcraft, Sea of Thieves, Minecraft (or the way more recent Valheim)… all have gameplays that incorporate day- and night-time. Depending on the game, the effect of time varies but it almost always has an impact on the rest of the game systems.
In strategy games, it is often used both for storylines and to slightly alter the gameplay so the players stay on their toes.
Our day and night cycle will rely on a set of lights that rotate continuously so that a different light in the set is directed towards the ground depending on the period of the (in-game) day. In this basic tutorial project, the cycle won’t have any direct impact on the game other than the lighting of the scene. However in your final RTS game, it could be similar to Warcraft 3’s day/night cycle and:
- change unit’s health regeneration (both yours and the enemy’s/NPCs’)
- alter unit’s sight of vision
- modify the creepers that pop around
- allow/prevent certain skills from being triggered
- …
Thanks to our event system, it will be fairly easy to hook up the “sun is up” or “sun is down” moments to events emitting and thus catch this specific scene property in our other game systems.
Setting up our “stars” game object
In order to get a continuous light, we’ll actually create 4 directional lights and place them back to back to form a cross:
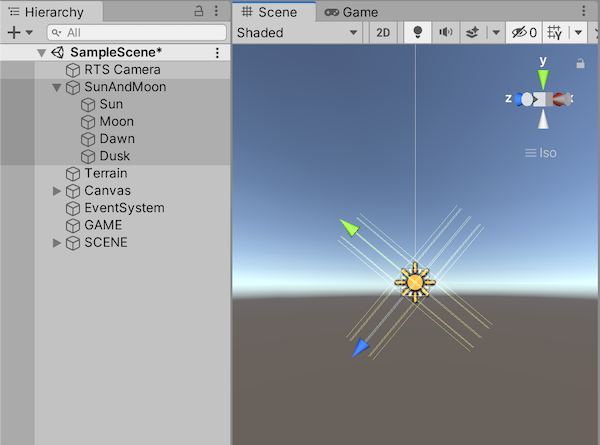
Those 4 lights correspond to the following 4 time periods:
- “sun”: daytime
- “dawn”: day end, before the night starts
- “moon”: night-time
- “dusk”: night end, before the day starts
Adding some global game parameters
Since we’ve gotten the hang of it in a previous tutorial, let’s use another Scriptable Object! It will enable us to quickly change the settings of our game scene and also centralise all relevant parameters in a single place.
The object data in itself (written in a new GameParameters.cs C# file) is pretty simple and self-explanatory:
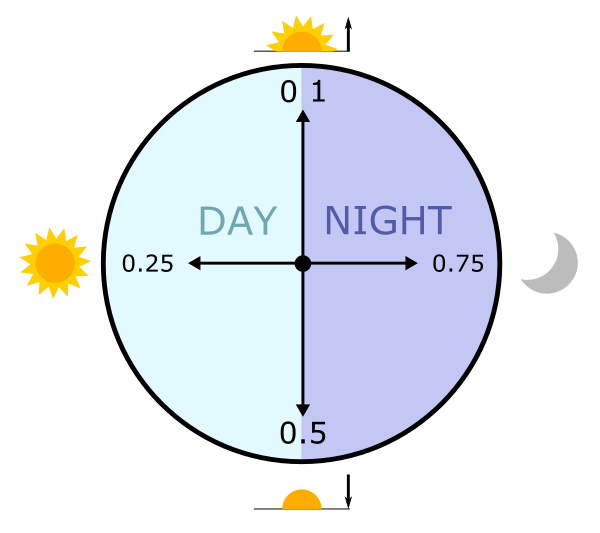
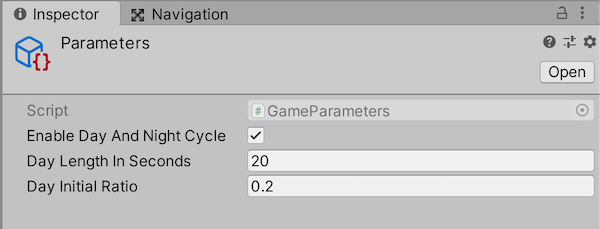
The enableDayAndNightCycle is an easy way of turning the system on or off - it's sometimes better to disable the day-and-night cycle, either for our tests or during actual play sessions. The dayInitialRatio allows us to define the initial position of the "stars" - remember that we encompass both day- and night-time in the total time period, so:
- a ratio of 0 means that we start at dusk time
- a ratio of 0.5 means that we start at dawn time
- noon corresponds to a ratio of 0.25
- and midnight corresponds to a ratio of 0.75
We can create a new instance of game parameters (using the Assets > Create > Scriptable Objects > Game Parameters menu) and set up some test values — of course, a 20 seconds-day is unrealistic, but it’s already quite long for our debugging phase:
Implementing the DayAndNightCycler class
To begin with, we’ll add a new script called DayAndNightCycler that will be in charge of rotating the "stars" to simulate time progression, and we'll add it to our "GAME" object.
Now, we can make use of our enableDayAndNightCycle boolean and trigger our new script depending on this parameter in our GameManager:
Now, it’s time to actually code up our “stars” system rotation routine.
The “stars” rotation routine
A naive approach would be to use Unity’s built-in Update() method to regularly rotate the "stars" and have the cycler simulate day and night time. But in truth, this is a bit too much: we don't really need the update to occur every frame as it would with this technique. Instead, we can leverage coroutines one more time. This time, it's not that we want to wait for a given amount of seconds. Rather, we want to call our cycler rotation update at a specific (and not-too-fast) rate. For example, I feel like moving the system every 0.1 second is good enough - the human eye does not really catch the difference with a frame-by-frame update.
At that point, we can easily compute the angle step we need for our “stars”. Given our L = dayLengthInSeconds game parameter, we basically want to rotate x degrees every r = 0.1 second, where:
x = 360° * r / L
That way, we’ll make a full revolution (360°) in dayLengthInSeconds seconds, as expected.
Also, just like in the previous tutorial for our moving camera, we need to be careful which axis we use for our transformations; more precisely, here, we need to make sure that we have the proper rotation axis. If we simply reference the local x-axis of the object, it will gradually update and therefore gradually introduce an unintended somewhat vertical rotation into the mix. To prevent this from happening, we need to take the initial x-axis as reference and keep this precise vector for the rest of the rotations.
Here is the code that implements all of this — hopefully, it is clear enough after those preliminary explanations ;)
A note on Quaternions and Euler angles
You see that, in this code, we use Quaternions for our rotations. However, we call the Quaternion.Euler() method that creates a Quaternion based on a Euler angle. Those two mathematical objects are two ways of representing a 3D rotation.
For real math lovers, Quaternions are an extension of complex numbers that are composed of 4 numbers (x, y, z, w) — that’s why they’re pretty hard to grasp intuitively and you almost never touch the components of a Quaternion directly. Instead, you usually start from an initial transform and apply rotations or lerping to it to gradually modify it. Unity’s developers are actually quite adamant about you not modifying your Quaternions directly… ;)

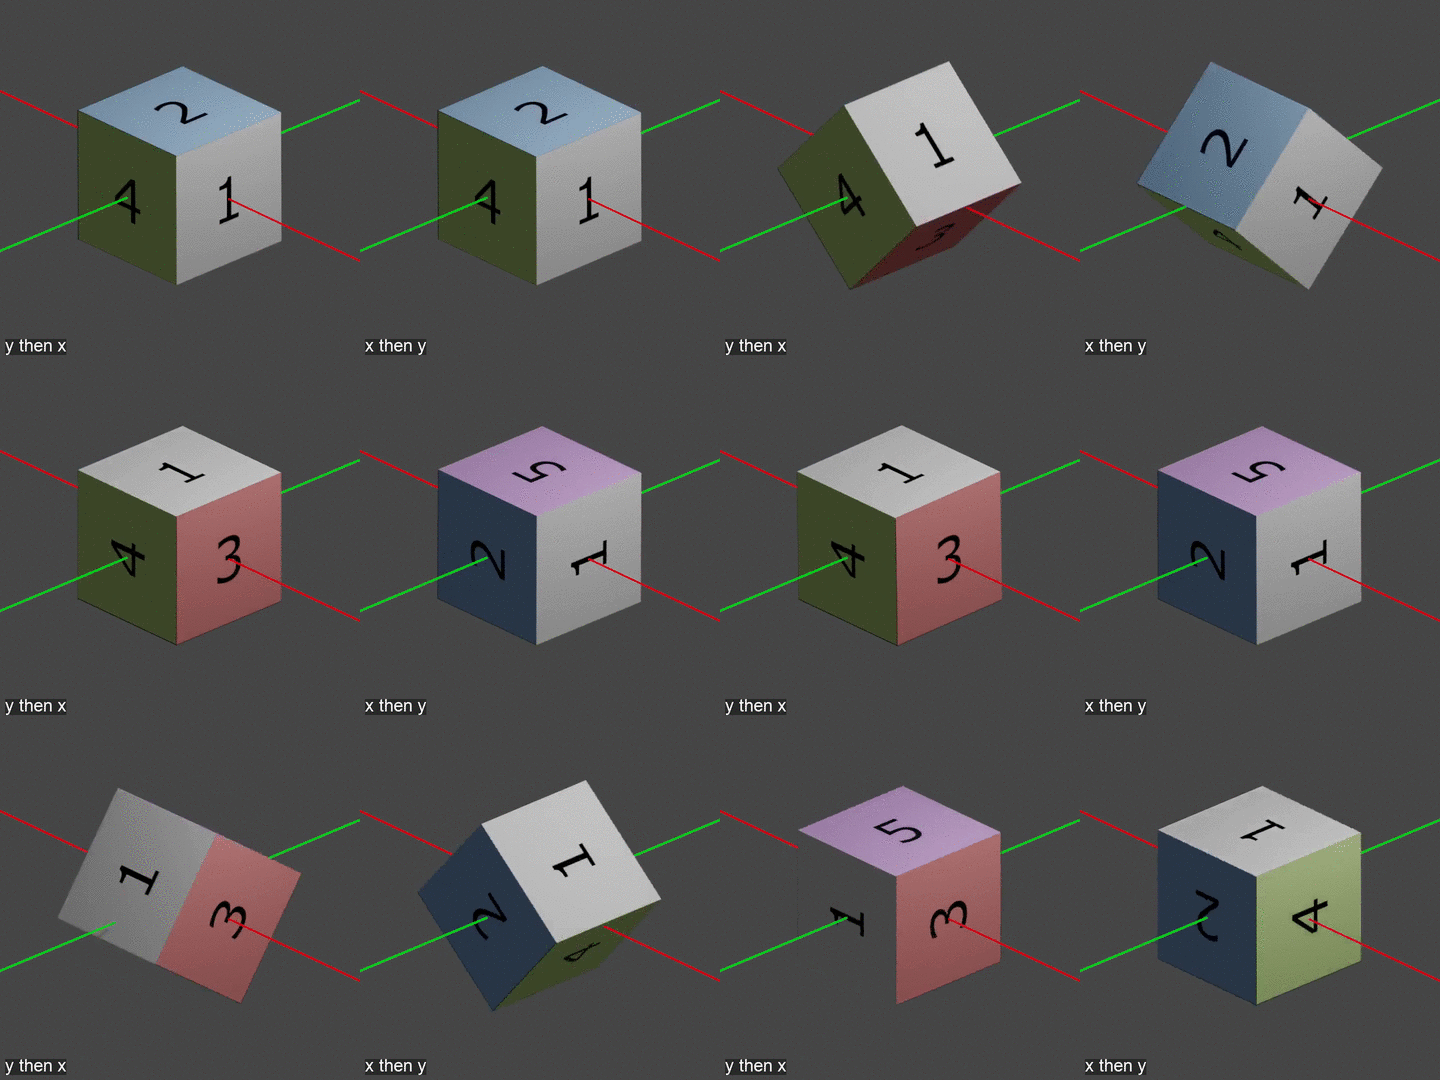
As explained in this short tutorial by confuted, while Quaternions math may strain your brain a bit, there is a fundamental result you should remember: applying successive rotations with Quaternions is as easy as multiplying them together… but rotations order matters!
Indeed, take the following cube. If you first rotate around the y-axis and then the x-axis, it won’t end up in the same state as if you first rotate around the x-axis and then the y-axis:
Euler angles are another representation of rotations where the orientation of the object is given as a set of 3 angles bound to a reference system, for example xyz. Here too, we apply successive rotations around each axis of the system and, similarly to quaternions, the order of the rotations is important. They provide an easy way to combine rotations in order to reach any final orientation you want. Your reference system might be static (in Unity’s, it’s the world-coordinates system) or dynamic (the local-coordinates system).
Although Quaternions are intuitively harder to understand than Euler angles, they have an unfair advantage on the latter: they are (if properly coded up) impervious to gimbal lock. This common problem in 3D rotation computation occurs whenever you lose a degree of freedom in your 3D system; in other words, two of your rotation planes sync up so that they move together and you only have this group of plane and the remaining third to play with. The reason Quaternions don’t have this problem is because, thanks to their 4th coordinate, they actually define points on an hypersphere (a 4D-sphere)… but yeah, that’s a pain to even conceptualise in our heads, so let’s instead simply remember that:
- Euler angles are nice and easy to start with
- Euler angles are intuitive
- however, Euler angles are subjected to gimbal lock and often go crazy when you reach the end of your revolution
- Quaternions are way better at handling edge cases
- but they are harder to understand and should (probably) not be manipulated directly
- in both rotation systems, order matters
Conclusion
We now have a little day-and-night cycle system that goes from day- to night-time with the intermediary dusk and dawn in a given amount of seconds. Just as an example, here’s a little movie of the result for a day with a length of 20 seconds and an initial ratio of 0.2 (i.e. almost noon) — the orange circle indicates the “sun” light, so when it is up, the sun is pointing away from the ground and it is night:
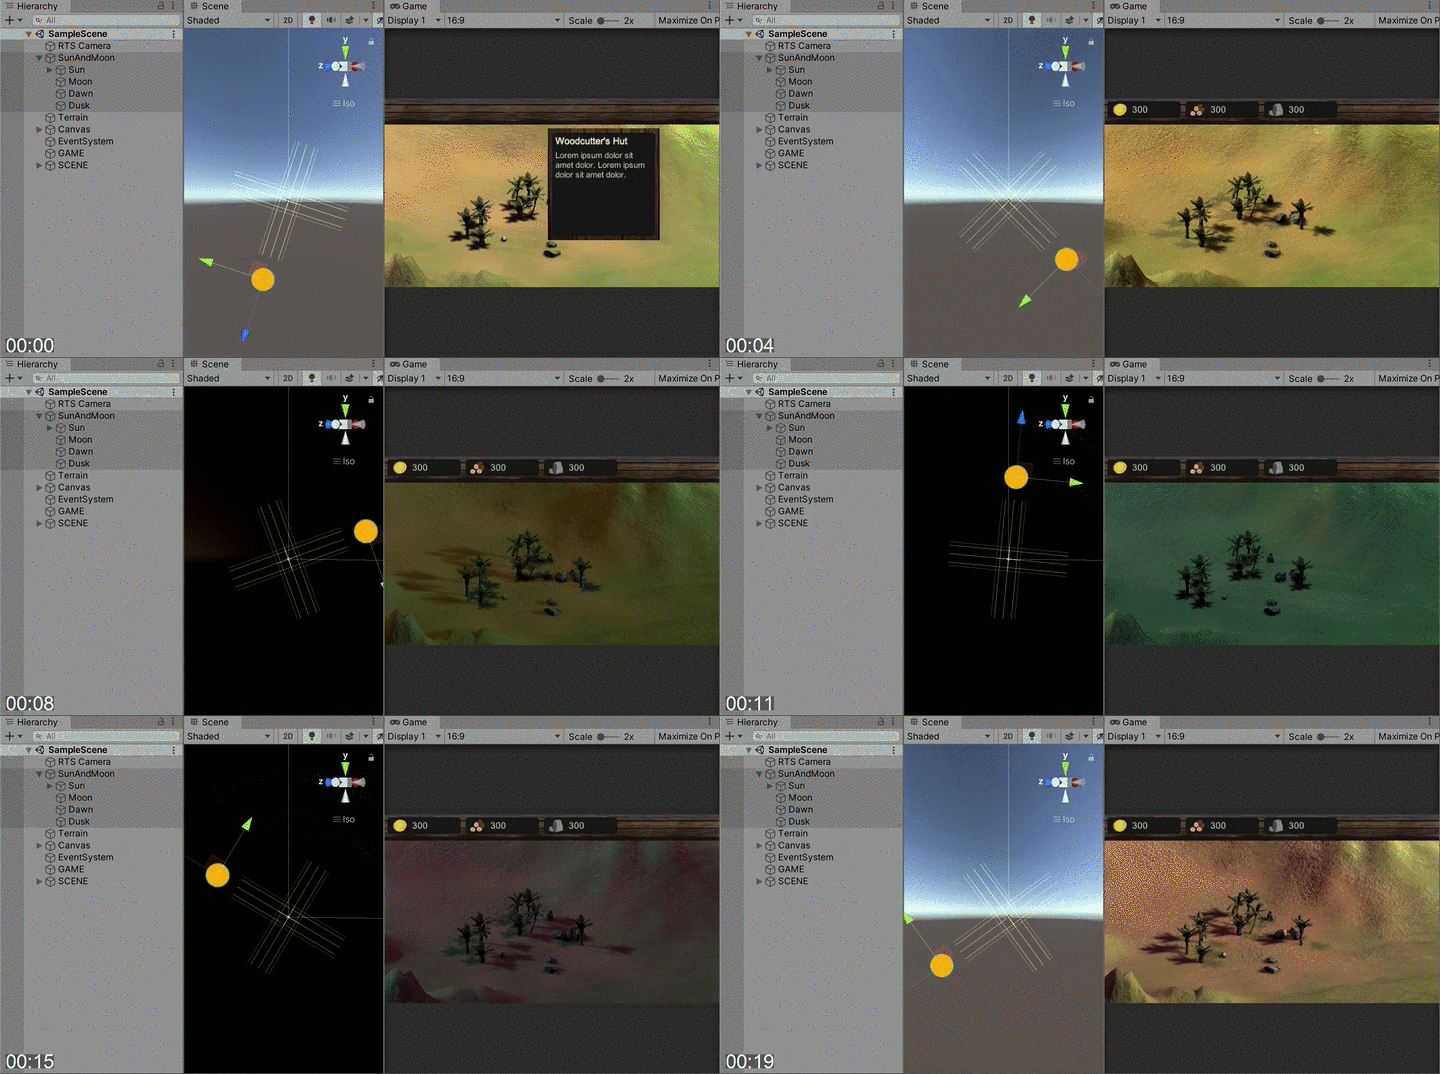
We indeed see that daytime occurs whenever the “sun” light is more or less pointing down towards the ground and that a complete revolution takes 20 seconds.
In the game, we could probably have days that are about 20 minutes long (10 minutes of daytime, 10 minutes of night-time). Also, depending on your game and its mechanics, it can be cool to have uneven days and nights — for example, if you have a creepy zombie-game, you might want to extend the night a little as the levels go by to make it harder and harder on the player. The system we set up here can be super-easily adapted to fit this uneven mode: simply rotate the lights closer together in the “cross” game object, and you’ll get a shorter timespan between the two!
Alright, now that we’ve placed our cameras and our lights, let’s start exploring this world! Next time, we’ll add an essential feature to our RTS: character units movement :)
⬅️ Interlude #2: Refactoring the event system| TOC | Tutorial #12: Moving character units ➡️
📕 Get the ebook and bonus material on Gumroad! 🚀 Find the code of this tutorial series on my Github!
If you liked this article, you can find more blog posts about tech, AI and programming on my website :)


