Laravel 7 package development from scratch
This article is an updated version of Larave 5.5 package development article
Step 1. Create a new project
I prefer using the Laravel installer. You can read more about the installation here: https://laravel.com/docs/7.x/installation
laravel new lara-dgI prefer using SQLite for testing and package development. Adjust your.env file
DB_CONNECTION=sqlite
DB_DATABASE=/Users/ivan/code/packages/test-project/database/database.sqlite
Then let’s create our package skeleton. We will be using a CLI tool. It will generate all necessary files
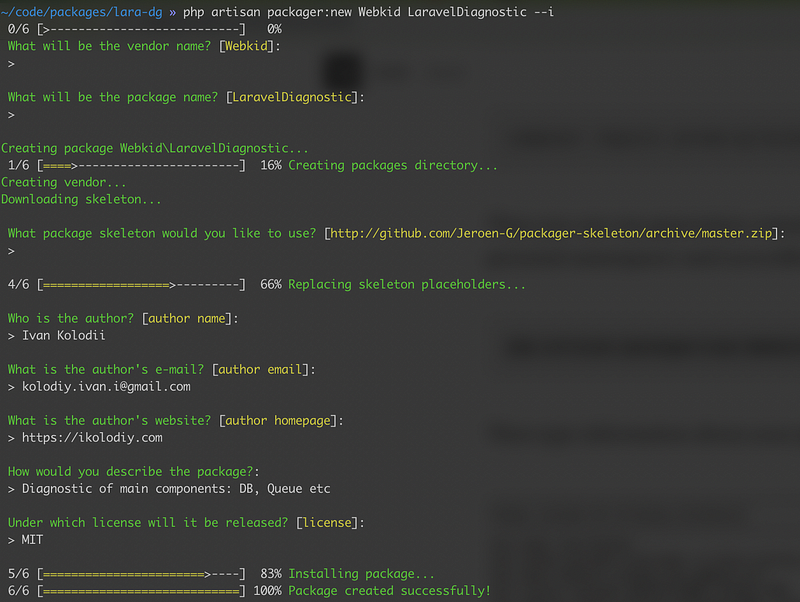
composer require jeroen-g/laravel-packagerThen you can run generation command. Webkid stands for vendor name(your namespace) and LaravelDiagnostic as the name of your project
php artisan packager:new Webkid LaravelDiagnostic --iThen type information about your package and you. It should look like that
Now you have packages folder inside of your project with Webkid directory inside and all necessary files inside.
This package is automatically loaded via composer. I prefer using a relative path:
"repositories": {
    "webkid/laraveldiagnostic": {
        "type": "path",
        "url": "../../packages/lara-dg/packages/Webkid/LaravelDiagnostic"
    }
}
Also, update your require section if it wasn’t updated automatically. It will create a symlink in your vendor directory to your package directory
"require": {
    "webkid/laraveldiagnostic": "*"
},
Now you can create classes inside the src folder, but they should have appropriate namespace Webkid\LaravelDiagnostic.
For example, I have Commands folder and RunDiagnostic.php class inside. So it should have such namespace:
namespace Webkid\LaravelDiagnostic\Commands;If you want to use your migrations, routes, config files, views, or even assets(js, CSS, images), you have to load them in your service provider. You can read about that in the official documentation. I was using only commands in my example. Take a look at bootForConsole() method in my LaravelDiagnosticServiceProvider:
public function bootForConsole()
{
    if ($this->app->runningInConsole()) {
        $this->commands([
            RunDiagnostic::class
        ]);
    }
}
I was struggling with how to structure my package for the first time. So I want to share my personal preferences with you. I prefer to put all PHP classes into the src folder and all other files outside. Example:
- assets — for all CSS, js, images
- config — for all configuration files
- migrations — for all migrations
- resources — for all views, lang files, etc.
- src — all PHP classes including main service provider
If you need some other package to be included, you have to edit your package composer.json.
"require": {
    "cviebrock/eloquent-sluggable": "^4.3"
}
One more useful tip. When you are working with assets, and you need to test changes simultaneously, you can use a symlink to avoid repeating vendor publish all the time. It will create a symlink instead of copying files. It saved me a lot of time once:)
ln -s /path/to/your/project/webkid-cms/packages/webkid/cms/assets /path/to/your/project/webkid-cms/public/vendor/cmsThen update composer autoloading to add new files
composer dump-autoloadStep 2 Put your project on Github.
When your codebase is ready, you can go to a package folder and initialize a repository
cd packages/Webkid/LaravelDiagnostic
git init
git add .
git commit -m "first commit"
Create a new GitHub repository and add origin.
git remote add origin [email protected]:yourusername/yourrepository.git
git push -u origin master
git tag -a 1.0.0 -m "release: First version"
git push --tags
Step 3 Put your project on Packagist.
First, register on Packagist.org. I prefer using my Github account for signup.
Then submit a new package using this URL. Enter your package’s GitHub URL and click Check. If any errors occur, follow the onscreen instructions.
When you’re done, you’re taken to your package’s packagist page, where you’ll probably get a notice like this:
This package is not auto-updated. Please set up the GitHub Service Hook for Packagist so that it gets updated whenever you push!
Let’s take care of that. Get your API token on this page and go to your package’s GitHub page, in Settings / Webhooks & Services / Add a new service. Search for Packagist. Enter your username and the token and hit Submit. Your error in Packagist should disappear in 5–10 minutes.
My congratulations, you have a working package online, you can now require it via composer
Step 5. Keep working on it from the packages folder
If the application where you’ve developed the package had this sole purpose — to help you develop the package, you’re done.
But if you’ve developed the package in a bigger project, where you now require it, you can leave code in packages folder and work with it.
Whenever you finish work, you can remove this code from your composer.json
"repositories": {
    "webkid/laraveldiagnostic": {
        "type": "path",
        "url": "../../packages/lara-dg/packages/Webkid/LaravelDiagnostic"
    }
}
and pull your package from the packagist.
Thank you for reading. I hope this article will be helpful to someone.
And let’s contribute to open-source!
Materials:


