Free AI web copilot to create summaries, insights and extended knowledge, download it at here
5593
Abstract
tle function_">fetch</span>(url, options)
.<span class="hljs-title function_">then</span>(<span class="hljs-function"><span class="hljs-params">response</span> =></span> {
<span class="hljs-keyword">if</span> (!response.<span class="hljs-property">ok</span>) {
<span class="hljs-keyword">throw</span> <span class="hljs-keyword">new</span> <span class="hljs-title class_">Error</span>(<span class="hljs-string">'Network response was not ok'</span>);
}
<span class="hljs-keyword">return</span> response.<span class="hljs-title function_">json</span>(); <span class="hljs-comment">// Parse the JSON response</span>
})</pre></div><h1 id="2ce0">STEP 4</h1><p id="6a4e"><b><i>Handle the Promise of Fetch</i></b></p><p id="9faa"><i>Tip : to handle promise, we need to add then statement.</i></p><p id="1b66"><b>Please find complete code with promise handling</b></p><div id="e6a8"><pre><span class="hljs-keyword">const</span> url = <span class="hljs-string">'https://jsonplaceholder.typicode.com/posts/1'</span> ;
<span class="hljs-keyword">const</span> putData = {
<span class="hljs-attr">id</span>: <span class="hljs-number">1</span>,
<span class="hljs-attr">title</span>: <span class="hljs-string">'footest'</span>,
<span class="hljs-attr">body</span>: <span class="hljs-string">'barddd'</span>,
<span class="hljs-attr">userId</span>: <span class="hljs-number">1</span>,
}
<span class="hljs-keyword">const</span> options = {
<span class="hljs-attr">method</span>: <span class="hljs-string">'PUT'</span>,
<span class="hljs-attr">headers</span>: {
<span class="hljs-string">'Content-Type'</span>: <span class="hljs-string">'application/json'</span> <span class="hljs-comment">// Specify the content type as JSON</span>
},
<span class="hljs-attr">body</span>: <span class="hljs-title class_">JSON</span>.<span class="hljs-title function_">stringify</span>(putData) <span class="hljs-comment">// Convert the data </span>
};
<span class="hljs-comment">// Send the POST request</span>
<span class="hljs-title function_">fetch</span>(url, options)
.<span class="hljs-title function_">then</span>(<span class="hljs-function"><span class="hljs-params">response</span> =></span> {
<span class="hljs-keyword">if</span> (!response.<span class="hljs-property">ok</span>) {
<span class="hljs-keyword">throw</span> <span class="hljs-keyword">new</span> <span class="hljs-title class_">Error</span>(<span class="hljs-string">'Network response was not ok'</span>);
}
<span class="hljs-keyword">return</span> response.<span class="hljs-title function_">json</span>(); <span class="hljs-comment">// Parse the JSON response</span>
}) .<span class="hljs-title function_">then</span>(<span class="hljs-function"><span class="hljs-params">data</span> =></span> {
<span class="hljs-variable language_">console</span>.<span class="hljs-title function_">log</span>(<span class="hljs-string">'Data updated successfully:'</span>, data);
})
</pre></div><h1 id="512c">STEP 5</h1><p id="c914"><b><i>Handle the exceptions with catch</i></b></p><div id="1827"><pre><span class="hljs-keyword">const</span> url = <span class="hljs-string">'https://jsonplaceholder.typicode.com/posts/1'</span> ;
<span class="hljs-keyword">const</span> putData = {
<span class="hljs-attr">id</span>: <span class="hljs-number">1</span>,
<span class="hljs-attr">title</span>: <span class="hljs-string">'footest'</span>,
<span class="hljs-attr">body</span>: <span class="hljs-string">'barddd'</span>,
<span class="hljs-attr">userId</span>: <span class="hljs-number">1</span>,
}
<span class="hljs-keyword">const</span> options = {
<span class="hljs-attr">method</span>: <span class="hljs-string">'PUT'</span>,
<span class="hljs-attr">headers</span>: {
<span class="hljs-string">'Content-Type'</span>: <span class="hljs-string">'application/json'</span> <span class="hljs-comment">// Specify the content type as JSON</span>
},
<span class="hljs-attr">body</span>: <span class="hljs-title class_">JSON</span>.<span class="hljs-title function_">stringify</span>(putData) <span class="hljs-comment">// Convert the data</span>
};
<span class="hljs-title function_">fetch</span>(url, options)
.<span class="hljs-title function_">then</span>(<span class="hljs-function"><span class="hljs-params">response</span> =></span> {
<span class="hljs-keyword">if</span> (!response.<span class="hljs-property">ok</span>) {
<span class="hljs-keyword">throw</span> <span class="hljs-keyword">new</span> <span class="hljs-title class_">Error</span>(<span class="hljs-string">'Network response was not ok'</span>);
}
<span class="hljs-keyword">return</span> response.<span class="hljs-title function_">json</span>(); <span class="hljs-comment">// Parse the JSON response</span>
}) .<span class="hljs-title function_">then</span>(<span class="hljs-function"><span class="hljs-params">data</span> =></span> {
<span class="hljs-variable language_">console</span>.<span class="hljs-title function_">log</span>(<span class="hljs-string">'Data updated successfully:'</span>, data);
}).<span class="hljs-title function_">catch</span>(<span class="hljs-function"><span class="hljs-params">error</span> =></span> {
<span class="hljs-comment">// Handle any errors that occur during the fetch request</span>
<span class="hljs-variable language_">console</span>.<span class="hljs-title function_">error</span>(<span class="hljs-string">'There was a problem with the fetch operation:'</span>, error);
});</pre></div>
Options
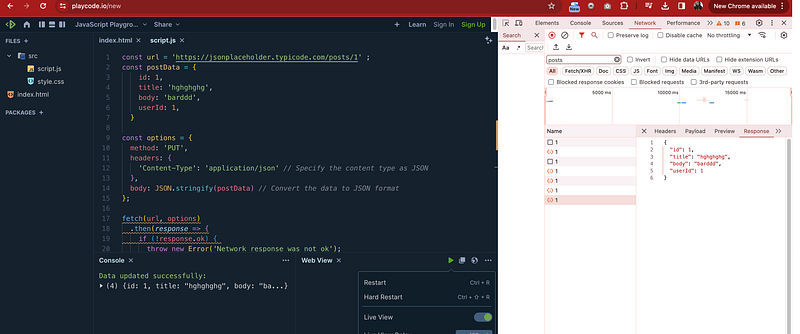
<h1 id="b0fc">STEP 6</h1><p id="f179">Test the above code in any JavaScript application running on local host or use any live JavaScript playground</p><p id="88ff">We will use below JavaScript playground</p><div id="5895" class="link-block">
<a href="https://playcode.io/new">
<div>
<div>
<h2>JavaScript Playground</h2>
<div><h3>Try this online JavaScript Playground playground with instant live preview and console. Easy & Fast. Experiment…</h3></div>
<div><p>playcode.io</p></div>
</div>
<div>
<div style="background-image: url(https://miro.readmedium.com/v2/resize:fit:320/)"></div>
</div>
</div>
</a>
</div><figure id="bb6a"><img src="https://cdn-images-1.readmedium.com/v2/resize:fit:800/1*Jih3yJngZZcSejD6byXQLw.png"><figcaption></figcaption></figure><h1 id="06d0">Step 7 Final Debugging in Network Tab</h1><p id="5e4d"><b>Op</b>en the DevTools and click on Network tab</p><p id="f24a"><i>You can see the call in network with all parameters and options</i></p><p id="9082">In our PUT Method — we will see request payload (body as per our above code reference)</p><p id="10df"><b>Status Code — 200 ok (when resource updated)</b></p><figure id="d873"><img src="https://cdn-images-1.readmedium.com/v2/resize:fit:800/1*C3aiinau4CCWlU6pY4iTJA.png"><figcaption>DAY 32 (April 23rd, 2024) — Fetch API (PUT) Request with kirti kaushal</figcaption></figure><figure id="4ac1"><img src="https://cdn-images-1.readmedium.com/v2/resize:fit:800/1*c4fCOBlqIEbUu7Qbdp48hQ.png"><figcaption>DAY 32 (April 23rd, 2024) — Fetch API (PUT) Request with kirti kaushal</figcaption></figure><h1 id="d0ae">Conclusion</h1><p id="d19c"><i>Above code is sample example so remember to replace <code>'url'</code> with the actual URL you want to send the PUT request to, and adjust the <code>putData</code> object accordingly with your desired data.</i></p><p id="0d3c"><b><i>Tomorrow we will learn more about fetch API with Delete method examples.</i></b></p><figure id="e81e"><img src="https://cdn-images-1.readmedium.com/v2/resize:fit:800/1*_RC41wSMB270MGHGIG3ibg.png"><figcaption>JavaScript Day 32 — Mastering JavaScript Basics: A Comprehensive Guide for Interview Preparation Thank You with Kirti Kaushal</figcaption></figure><h1 id="71dd">Happy Coding and Stay Tuned :)</h1><p id="a1ed" type="7">Kind is cool !!!</p><p id="7a49" type="7">Share knowledge to gain knowledge !!!!</p><p id="ebc1" type="7">Be kind and treat people with respect !</p><h1 id="65f6">If you find my blog helpful, then please subscribe, claps and follow to support :)</h1><div id="4a71" class="link-block">
<a href="https://kirtikau.medium.com/list/953da44e71ce">
<div>
<div>
<h2>Explore OpenAI, ChatGPT , Next.js, the React framework</h2>
<div><h3>Explore OpenAI, ChatGPT , Next.js, the React framework that empowers developers with server-side rendering, static site…</h3></div>
<div><p>kirtikau.medium.com</p></div>
</div>
<div>
<div style="background-image: url(https://miro.readmedium.com/v2/resize:fit:320/0*2ad63dbb6593f826f599de4c13654700cb4eb24e.jpeg)"></div>
</div>
</div>
</a>
</div><div id="2aaa" class="link-block">
<a href="https://kirtikau.medium.com/list/6d895127c989">
<div>
<div>
<h2>100 Days of JavaScript Interview Prep: A Beginner’s Journey</h2>
<div><h3>Mastering JavaScript Basics: A Comprehensive Guide for Interview Preparation (00 Days of JavaScript Interview Prep: A…</h3></div>
<div><p>kirtikau.medium.com</p></div>
</div>
<div>
<div style="background-image: url(https://miro.readmedium.com/v2/resize:fit:320/0*628d4ff99e5caa930a36460e97355cf0b875eed6.jpeg)"></div>
</div>
</div>
</a>
</div><div id="4c8b" class="link-block">
<a href="https://readmedium.com/javascript-day-31-mastering-javascript-basics-a-comprehensive-guide-for-interview-preparation-6ceb09feb97b">
<div>
<div>
<h2>JavaScript Day 31 — Mastering JavaScript Basics: A Comprehensive Guide for Interview Preparation</h2>
<div><h3>100 Days of JavaScript Interview Prep: A Beginner’s Journey</h3></div>
<div><p>medium.com</p></div>
</div>
<div>
<div style="background-image: url(https://miro.readmedium.com/v2/resize:fit:320/1*g3tV5d3PLU6UYOJFR04OkQ.png)"></div>
</div>
</div>
</a>
</div><div id="e955" class="link-block">
<a href="https://rohitsportsphysiorehabclinic.co.in/?source=post_page-----6ceb09feb97b--------------------------------">
<div>
<div>
<h2>Home - Krishna Sports Injuries Physiotherapy & Rehab Clinic</h2>
<div><h3>Krishna Sports Injuries Physiotherapy & Rehab Clinic There are plenty ways how to make an appointment. You can call us…</h3></div>
<div><p>rohitsportsphysiorehabclinic.co.in</p></div>
</div>
<div>
<div style="background-image: url(https://miro.readmedium.com/v2/resize:fit:320/0*ZHvoaI272R1DuYq_)"></div>
</div>
</div>
</a>
</div></article></body>