avatarCharmaine Chui

Free AI web copilot to create summaries, insights and extended knowledge, download it at here

4193

Abstract

ire</span>(<span class="hljs-string">'asset/js/autoComplete.js'</span>);</pre></div><p id="7cdc">This triggers the following error message instead:</p><figure id="011e"><img src="https://cdn-images-1.readmedium.com/v2/resize:fit:800/1*C0GzFspSGGvltjyE5uEa-A.png"><figcaption>Screenshot by Author | TypeError: autocomplete is not a constructor</figcaption></figure><p id="3078"><b>Explanation:</b> Since the JS plugin <a href="https://gist.githubusercontent.com/incubated-geek-cc/7abfc122bcbb50b086b6585e18c2a193/raw/cad4bbca15264865f7a2acd0b15d8649a275e712/autoComplete.js">autoComplete.js</a> had been created for browser use-cases only, unless it’s embedded within the browser’s <code><script src></code> tags, it is evident that it needs to be bundled into a Node module before being imported into a NodeJS application.</p><p id="111c">Hence, in order to access <a href="https://github.com/browserify/browserify">Browserify</a>’s utility functions and ‘modularise’ this JS file, it would first be necessary to carry out the following steps to set the tool up:</p><h2 id="5ee7">Step 1. Create a folder for your workspace and inside that folder, proceed to open up your terminal/cmd and run the following commands:</h2><div id="9b6b"><pre>npm init -y npm install browserify --save</pre></div><p id="8110">At this point, your workspace should contain <b>the following 3 artifacts</b>:</p><div id="8b91"><pre><span class="hljs-string">|--node_modules/</span> <span class="hljs-string">|--package.json</span> <span class="hljs-string">|--package-lock.json</span> <span class="hljs-string">|</span></pre></div><h2 id="561f">Step 2. Create a ‘index.js’ file in your workspace folder</h2><div id="4899"><pre><span class="hljs-string">|--node_modules/</span> <span class="hljs-string">|--package.json</span> <span class="hljs-string">|--package-lock.json</span> <span class="hljs-string">|</span> <span class="hljs-string">|--index.js</span> <span class="hljs-string">|</span></pre></div><h2 id="0e91">✸Step 3. Copy and paste the contents of autoComplete.js into index.js and make the following changes in the file:</h2><p id="0341"><b>Change 1.</b> Change <code>var</code> to <code>const</code></p><div id="125d"><pre><span class="hljs-keyword">const</span> autoComplete = (<span class="hljs-keyword">function</span>(<span class="hljs-params"></span>){ <span class="hljs-keyword">function</span> <span class="hljs-title function_">autoComplete</span>(<span class="hljs-params">options</span>){ <span class="hljs-keyword">if</span> (!<span class="hljs-variable language_">document</span>.<span class="hljs-property">querySelector</span>) <span class="hljs-keyword">return</span>; (...rest <span class="hljs-keyword">of</span> the code...) } <span class="hljs-keyword">return</span> autoComplete; })();</pre></div><p id="0c3e"><b>Change 2.</b> Finally, add in the 1 line at the end of the file and the final index.js should look like the following:</p><div id="4312"><pre><span class="hljs-keyword">const</span> autoComplete = (<span class="hljs-keyword">function</span>(<span class="hljs-params"></span>){ <span class="hljs-keyword">function</span> <span class="hljs-title function_">autoComplete</span>(<span class="hljs-params">options</span>){ <span class="hljs-keyword">if</span> (!<span class="hljs-variable language_">document</span>.<span class="hljs-property">querySelector</span>) <span class="hljs-keyword">return</span>; (...rest <span class="hljs-keyword">of</span> the code...) } <span class="hljs-keyword">return</span> autoComplete; })(); <span class="hljs-variable language_">module</span>.<span class="hljs-property">exports</span> = autoComplete;</pre></div><p id="38ef"><b>Step 4. In your workspace folder, run the following command in your terminal/cmd:</b></p><div id="30c1"><pre>node_modules/.bin/browserify index.js -s <name of module> > <name of output JavaScript file></pre></div><p id="3c69">After running the following:</p><div id="7d6f"><pre>node_modules/.bin/browserify index.js -s autoComplete > autoComplete.js</pre></div><p id="5ac9"><b>Result: </b>A new autoComplete.js file should be output and th

Options

is new file can be retrieved from my <a href="https://raw.githubusercontent.com/incubated-geek-cc/sg-hdb-building-layer-in-3D-offline/main/asset/js/autoComplete.js">GitHub repo</a> (modularised and NodeJS compatible version). <b>This is the modularised version of the autoComplete.js file.</b></p><p id="d13c">Replace the autoComplete.js file in the NodeJS web app. Re-start the app and initialise the module:</p><div id="f798"><pre><span class="hljs-keyword">const</span> autoComplete = <span class="hljs-built_in">require</span>(<span class="hljs-string">'js/autoComplete.js'</span>); <span class="hljs-title function_">autoComplete</span>({ <span class="hljs-attr">selector</span>: <span class="hljs-string">'#geocoder'</span>, <span class="hljs-attr">minChars</span>: <span class="hljs-number">2</span>, <span class="hljs-attr">source</span>: <span class="hljs-keyword">function</span>(<span class="hljs-params">term, suggest</span>){ term = term.<span class="hljs-title function_">toLowerCase</span>(); <span class="hljs-keyword">var</span> choices = <span class="hljs-title class_">Object</span>.<span class="hljs-title function_">keys</span>(geocoders); <span class="hljs-keyword">var</span> suggestions = []; <span class="hljs-keyword">for</span> (<span class="hljs-keyword">var</span> i=<span class="hljs-number">0</span>;i<choices.<span class="hljs-property">length</span>;i++) { <span class="hljs-keyword">if</span> (~choices[i].<span class="hljs-title function_">toLowerCase</span>().<span class="hljs-title function_">indexOf</span>(term)) { suggestions.<span class="hljs-title function_">push</span>(choices[i]); } } <span class="hljs-title function_">suggest</span>(suggestions); }, <span class="hljs-attr">onSelect</span>: <span class="hljs-keyword">function</span>(<span class="hljs-params">e, term, item</span>) { <span class="hljs-keyword">let</span> coordinatesStr=geocoders[term]; <span class="hljs-keyword">let</span> latlng=coordinatesStr.<span class="hljs-title function_">split</span>(<span class="hljs-string">','</span>); latlng=[<span class="hljs-built_in">parseFloat</span>(latlng[<span class="hljs-number">1</span>]),<span class="hljs-built_in">parseFloat</span>(latlng[<span class="hljs-number">0</span>])]; map.<span class="hljs-title function_">animateTo</span>({ <span class="hljs-attr">center</span>: latlng, <span class="hljs-attr">zoom</span>: maxZoom, <span class="hljs-attr">pitch</span>: defaultPitch, <span class="hljs-attr">bearing</span>: defaultBearing }, { <span class="hljs-attr">duration</span>: <span class="hljs-number">2000</span> }); } });</pre></div><p id="3eaa"><b>— The error from before is not longer triggered and the address search lookup works properly.</b></p><p id="d8d1">The GIS Side project has been deployed at:</p><p id="d2f0"><a href="https://sg-hdb-building-layer-in-three-d.netlify.app/">https://sg-hdb-building-layer-in-three-d.netlify.app/</a></p><h2 id="84ba">GIS Side Project Source Code: Link</h2><h2 id="4b45">Browserify Minimal Setup Source Code: Link</h2><h1 id="2ce1">Conclusion</h1><p id="c948">It is not surprising that <a href="https://github.com/browserify/browserify">Browserify</a> is not primarily known for the functionality displayed in this article. In fact, in use-cases when many Browser-only compatible plugins are required in a NodeJS app, it would be more practical to bundle them into modules with a bundling module such as <a href="https://webpack.js.org/">Webpack</a> instead. However if the primary objective is to merely bundle a handful of functionalities, then <a href="https://github.com/browserify/browserify">Browserify</a> can be considered as a tool for mere convenience.</p><h2 id="d124">Many thanks for persisting to the end of this article! ❤ Hope you have found this guide useful and feel free to follow me on Medium if you would like more GIS, Data Analytics & Web application-related content. Would really appreciate it 😀</h2></article></body>

Import & Use Browser JavaScript files as Node Modules in NodeJS Easily

Step-by-Step Use of Browserify — Full Code + Use-Case Demo.

Image by Author | The dual conversion process by Browserify Utility

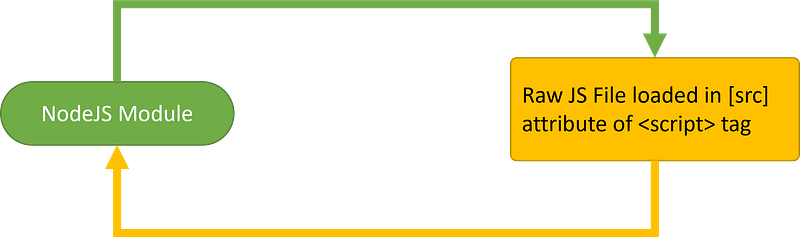
In 1 of the previous articles I have shared, I demonstrated how a NodeJS module can be transformed into Browser-compatible JavaScript files which can be rendered in raw <script> tags on the Client browser via the utility Browserify (E.g. json-2-csv npm package)

Illustration by Author | Transforming a Node module to be browser

— Command to run:

node_modules/.bin/browserify index.js -s <name of module> > <name of output JavaScript file>

— File index.js

const converter = require('json-2-csv');
module.exports=converter;

— Output File json2csv.js:

<script type="text/javascript" src="json2csv.js"></script>

For more details and full source code for the above, please refer to:

However, what happens when you have a Browser JS Plugin which you would like to include in your NodeJS web app?

Showcasing Browserify’s complementary Feature

Illustration by Author | Transforming a browser

Use-Case Demo: autoComplete.js

In a side project I implemented, I wish to implement the lightweight plugin autoComplete.js into a GIS app as a quick address lookup. Ideally, the address search would behave as follows:

Screen Capture by Author | Lookup an address to pan the map towards the required location selected

However as I attempt to import the autoComplete.js file into src/app/index.js:

const autoComplete=require('asset/js/autoComplete.js');

This triggers the following error message instead:

Screenshot by Author | TypeError: autocomplete is not a constructor

Explanation: Since the JS plugin autoComplete.js had been created for browser use-cases only, unless it’s embedded within the browser’s <script src> tags, it is evident that it needs to be bundled into a Node module before being imported into a NodeJS application.

Hence, in order to access Browserify’s utility functions and ‘modularise’ this JS file, it would first be necessary to carry out the following steps to set the tool up:

Step 1. Create a folder for your workspace and inside that folder, proceed to open up your terminal/cmd and run the following commands:

npm init -y
npm install browserify --save

At this point, your workspace should contain the following 3 artifacts:

|--node_modules/
|--package.json
|--package-lock.json
|

Step 2. Create a ‘index.js’ file in your workspace folder

|--node_modules/
|--package.json
|--package-lock.json
|
|--index.js
|

✸Step 3. Copy and paste the contents of autoComplete.js into index.js and make the following changes in the file:

Change 1. Change var to const

const autoComplete = (function(){
    function autoComplete(options){
        if (!document.querySelector) return;
    (...rest of the code...)
    }
    return autoComplete;
})();

Change 2. Finally, add in the 1 line at the end of the file and the final index.js should look like the following:

const autoComplete = (function(){
    function autoComplete(options){
        if (!document.querySelector) return;
    (...rest of the code...)
}
    return autoComplete;
})();
module.exports = autoComplete;

Step 4. In your workspace folder, run the following command in your terminal/cmd:

node_modules/.bin/browserify index.js -s <name of module> > <name of output JavaScript file>

After running the following:

node_modules/.bin/browserify index.js -s autoComplete > autoComplete.js

Result: A new autoComplete.js file should be output and this new file can be retrieved from my GitHub repo (modularised and NodeJS compatible version). This is the modularised version of the autoComplete.js file.

Replace the `autoComplete.js` file in the NodeJS web app. Re-start the app and initialise the module:

const autoComplete = require('js/autoComplete.js');
autoComplete({
      selector: '#geocoder',
      minChars: 2,
      source: function(term, suggest){
        term = term.toLowerCase();
        var choices = Object.keys(geocoders);
        var suggestions = [];
        for (var i=0;i<choices.length;i++) {
            if (~choices[i].toLowerCase().indexOf(term)) {
              suggestions.push(choices[i]);
            }
        }
        suggest(suggestions);
      },
      onSelect: function(e, term, item) {
        let coordinatesStr=geocoders[term];
        let latlng=coordinatesStr.split(',');
        latlng=[parseFloat(latlng[1]),parseFloat(latlng[0])];
        map.animateTo({
            center: latlng,
            zoom: maxZoom,
            pitch: defaultPitch,
            bearing: defaultBearing
        }, {
            duration: 2000
        });
      }
 });

— The error from before is not longer triggered and the address search lookup works properly.

The GIS Side project has been deployed at:

https://sg-hdb-building-layer-in-three-d.netlify.app/

GIS Side Project Source Code: Link

Browserify Minimal Setup Source Code: Link

Conclusion

It is not surprising that Browserify is not primarily known for the functionality displayed in this article. In fact, in use-cases when many Browser-only compatible plugins are required in a NodeJS app, it would be more practical to bundle them into modules with a bundling module such as Webpack instead. However if the primary objective is to merely bundle a handful of functionalities, then Browserify can be considered as a tool for mere convenience.

Many thanks for persisting to the end of this article! ❤ Hope you have found this guide useful and feel free to follow me on Medium if you would like more GIS, Data Analytics & Web application-related content. Would really appreciate it 😀

Web Development
JavaScript
Productivity
Programming
Technology
Recommended from ReadMedium