
Implement a Passwordless Authentication App With WebAuthn
Understand the passwordless authentication mechanism with this hands-on tutorial

In this article let’s implement a passwordless authentication app by building a FIDO2 server and learning how we can interact with it using WebAuthn API. Also, explore some tips and resources when implementing a passwordless authentication mechanism.
FIDO2, WebAuthn and CTAP
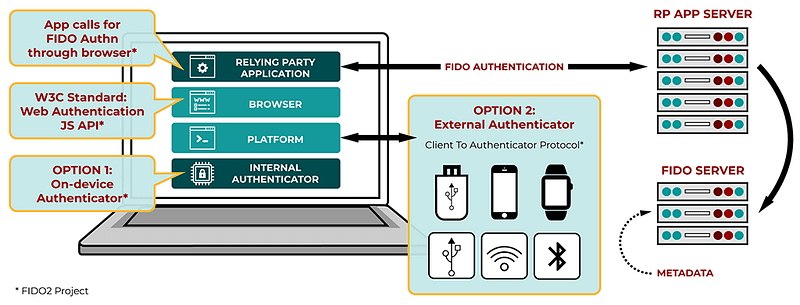
FIDO2 is comprised of Web Authentication Specification (WebAuthn) from the W3C and Client-to-Authenticator Protocols (CTAP) from the FIDO Alliance. Relying Party (short for RP, in our case it’s our app) will use WebAuthn API to interact with Authenticator for creating and managing public/private keys. A fully functional passwordless authentication system consists of:
- An RP App Server and a FIDO server. (can be built separately or combined)
- A frontend RP App which calls WebAuthn API
- A compatible browser that can run WebAuthn API.
- A FIDO2 compatible Authenticator.
For more detail about others FIDO Specifications, the context of why FIDO was born, have a look at my previous articles. FIDO WebAuthn Passwordless: Let’s go bananas!
Look at the picture above, what we need to implement is only 2 things:
- An RP App Server and a FIDO server.
- A frontend RP App which calls WebAuthn API
The hardest part is done already thanks to FIDO Alliance, they have worked with platform providers, device manufacturers to implement the CTAP protocol in the Authenticator and expose it to WebAuthn API so we just need to call simple functions in the browser.
Want to try it first?
Here is our demo site, have a look and play around~ https://webauthn.cedarcode.com
Implementation
For the FIDO server, we can build it ourselves by using open source libraries or using an existing solution from other parties. Personally, I will use Rails because it’s quicker to implement. In this article, I will use webauthn-ruby for FIDO server and webauthn-json for calling WebAuthn API.
Here is the repository for our app webauthn-rails-demo-app.
Get set up
Open Gemfile and add webauthn-ruby gem and then run bundle to install it.
gem 'webauthn'Next, open webauthn configuration config/initializers/webauthn.rb and change config.origin to your application domain.
Registration
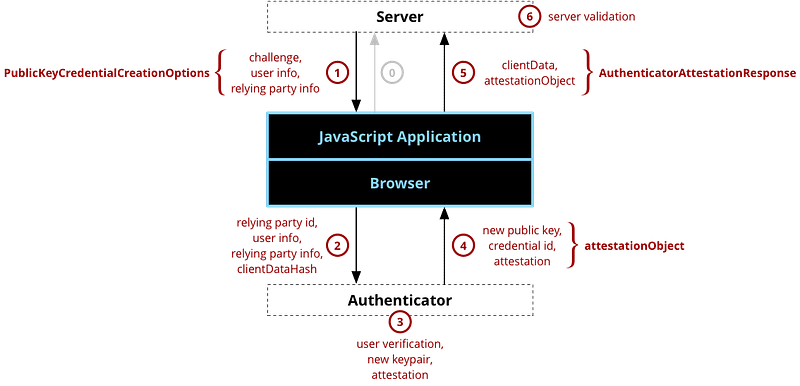
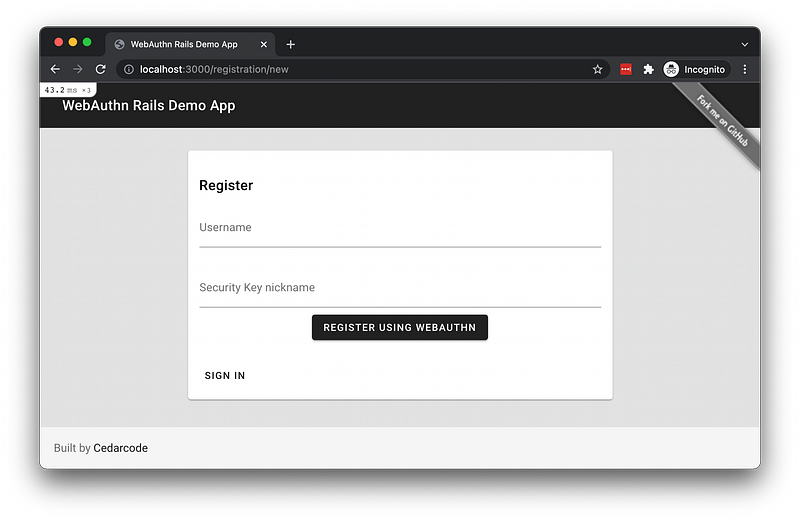
Step 0 (not in the above diagram) is when user input their username and a nickname for the Authenticator. After the user click “Register using WebAuthn”, it will call a POST request to the endpoint /registration.
In RegistrationsController#create controller, we will prepare PublicKeyCredentialCreationOptions to send to the JavaScript Application.
Here is what the response looks like in line 16:
challenge: A random string generated by the FIDO server, to maintain the state integrity between step 1 and step 5. The role is the same asstateparameter in OAuth.timeout: Timeout value for the interaction between the user and the Authenticator.rp: Information about the RP.rp.nameis required.user: Information about the user.user.id: server generated identifier, not PII (Eg: email, username). To ensure secure operation, authentication and authorization decisions MUST be made on the basis of this id member, not the displayName nor name members.user.nameuser.displayName: Name of the user and this is for display purposes only.pubKeyCredParams: List of signature algorithms supported by the server. The order of desire is from the top. The algorithm name is registered in the IANA COSE Algorithms registry. For example:-7: ES256,-257: RS256
Other options that FIDO can specify are:
  ...
  "attestation": "none",
  "authenticatorSelection": {
    "authenticatorAttachment": "platform",
    "userVerification": "required"
  },
...attestation: Indicates how the FIDO server will receive credentials from the authenticator. It’s like a certificate. Possible values are:direct indirect none. Usually, this is set to none. It is not usually necessary to request an Attestation unless it is required for compliance (e.g., for banks, enterprises, or government). For more about FIDO attestation.authenticatorSelection: FIDO server’s preference on AuthenticatorauthenticatorSelection.authenticatorAttachment: Filter available authenticators. If you want an authenticator attached to the device, useplatform. For roaming authenticators, usecross-platform.authenticatorSelection.userVerification: Determine whether authenticator local user verification isrequired,preferred, ordiscouraged.
Next, the JavaScript application receives the JSON in new_registration_controller.js and call webauthn-json JS library in credential.js.
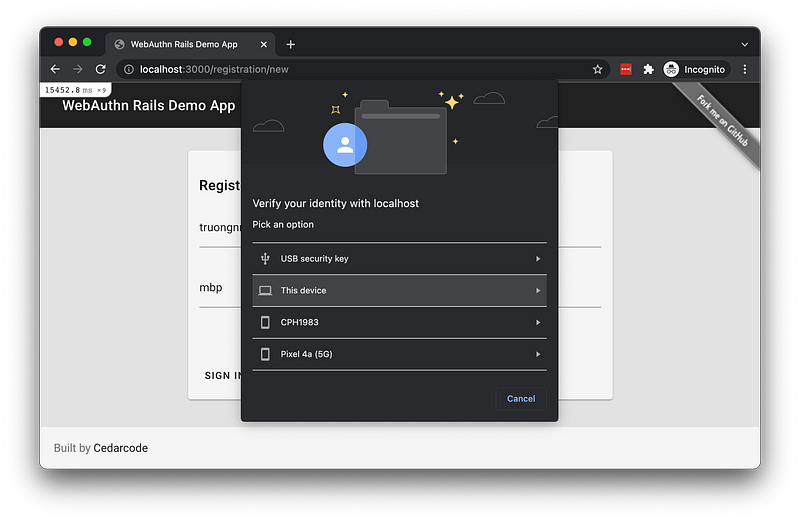
webauthn-json js library receives the JSON, fill other required parameters and create PublicKeyCredentialCreationOptions, then call the WebAuthn API navigator.credentials.create(). This is step 2 in our diagram. Then the browser will ask the user to select authenticator and if required, local user verification will be executed (step 3).
Assume authenticator can able to verify user, create a new keypair successfully …, then authenticator return attestationObject to the browser (step 4), then WebAuthn API creates AuthenticatorAttestationResponse and our JS code sends this response to the FIDO server in a callback. The response looks like this:
rawId: A unique ID to identify the public key.id: base64url encoded version ofrawIdtype: always fixed inpublic-keyresponse.clientDataJSON: A JSON Object encoded with base64url, this content will be added toauthDatainattestationObjectand signed by the authenticator. We can decode to see the information. Authenticator binds key pair with the domain, only this registered domain can be able to use the key pair. This is what makes it strong against phishing.
{
  "type": "webauthn.create",
  "challenge": "Wj4vWoL1BeG0PB8iJTKMfvLH8rBt3CA6PfM4QBIyKmU",
  "origin": "http://localhost:3000",
  "crossOrigin": false
}response.attestationObject: CBOR-encoded and base64url-encoded, like a certificate. For more detail aboutattestationObjectstructure: W3C documentation.
Next, in step 6, our FIDO server receives AuthenticatorAttestationResponse, verifies the challenge to make sure it’s a valid request, also webauthn-ruby gem internally validates the attestation (if needed). Assuming everything is correct, a user account will be created with public key, id, and other related information but no secret.
registrations_controller.rb
Register more security keys for an account
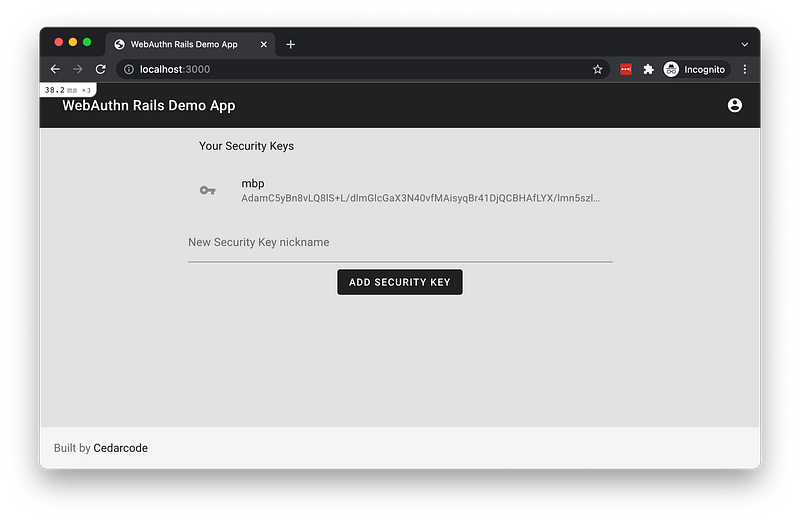
After registration, user is logged in. They can add more security keys to their account. When clicking the button “Add Security Key”, a POST request to /credentials will be made. Then step 1 to step 6 in our registration diagram repeat, only a little different is that the FIDO server specifies an additional param called exclude in line 8, which means all previously registered authenticators from the same user will be rejected.
credentials_controller.rb
Authentication

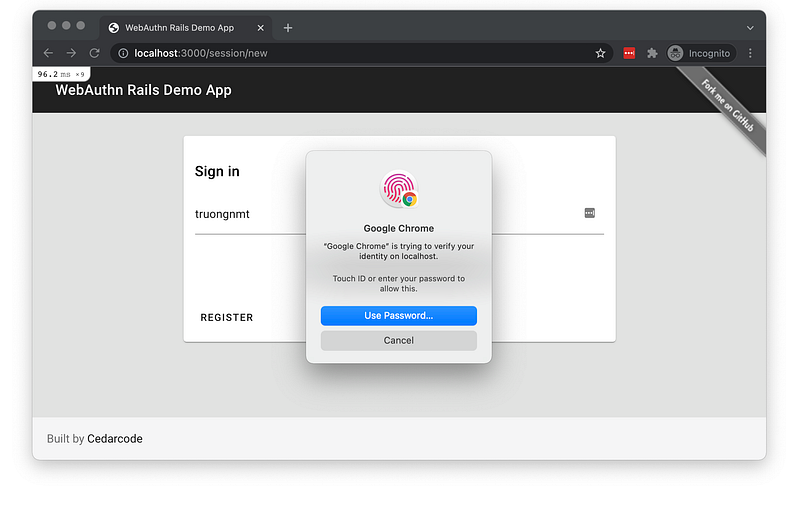
Step 0 (not in the above diagram) is when the user logged out, fill username in the form and click “Sign in using WebAuthn”. Then, a POST request to /session will be made.

That led to Step 1, in sessions_controller.rb, we prepare options to pass to the Javascript side.
The JSON from line 11 looks like this:
We are already familiar with other fields, this time when signing in, the only difference is that we have allowCredentials which means the FIDO server only allows using previously registered authenticators by specifying its id. For example, the above id Abn91… is the same public key id we receive in AuthenticatorAttestationResponse (Registration Step 5).
Next, the JavaScript application receives the above JSON in new_session_controller.js and call webauthn-json JS library in credential.js.
webauthn-json js library receives the JSON, fill other required parameters and create PublicKeyCredentialRequestOptions, then call the WebAuthn API navigator.credentials.get(). This is step 2 in our diagram. Then the browser will ask the user to select just the registered authenticator and if required, local user verification will be executed (step 3).
Assume authenticator can able to verify user, create assertion successfully …, then authenticator return authenticatorData, signature to the browser (step 4), then WebAuthn API creates AuthenticatorAssertionResponse and our JS code sends this response to the FIDO server in a callback. The response looks like this:
response.authenticatorData: CBOR-encoded and base64url-encoded, it has the same structure asattestationObject.response.userHandle: user.id (id inid name displayName)response.clientDataJSON: A JSON Object encoded with base64url, this content will be added toauthDatainauthenticatorDataand signed by the authenticator. We can decode to see the information.
{
  "type": "webauthn.get",
  "challenge": "pW3wrtt7b65n5ehxWbVpb8vGml9EGn9yXXTcuBzXI7E",
  "origin": "http://localhost:3000",
  "crossOrigin": false
}
Next, in step 6, our FIDO server receives AuthenticatorAssertionResponse, verifies the challenge to make sure it’s a valid request, validate sign_count, also webauthn-ruby gem internally validates the assertion (if needed). Assuming everything is correct, the user sign_count value will be updated and the user will be logged in.
sessions_controller.rb
Verifying Attestation and Assertion
There is one part that I briefly explain is the part validating Attestation (when Registration) and validating Assertion (when Authentication). This validation logic is done by webauthn-ruby gem internally. Each authenticator has its own way to validate, it’s very complicated and time-consuming to implement so we should leave this job to the library.
If you want to read more about this topic, I recommend this article: WebAuthn/FIDO2: Verifying assertion responses by Ackermann Yuriy
Pheww, it’s pretty tough when covering all the flow at once. 😅 If you still follow the tutorial up to this point, give yourself a round of applause!! 👏👏👏👏👏
Other considerations
Implement FIDO2 for Passwordless or for 2FA or for both?
There are two use cases when implementing FIDO2 for your app. You can either implement a passwordless authentication flow (as the example in this tutorial) or implement a 2FA method (register FIDO2 compatible security key).
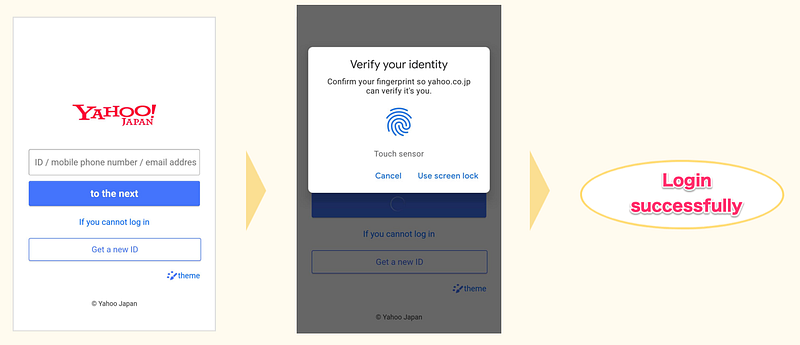
For the passwordless approach, the UX is greatly improved but we need to consider about recovery method. We still have to provide alternative login methods like passwords or send a recovery link in email or send an SMS text message. If the user sets a weak password, their account still can be compromised no matter passwordless is on or not. Using recovery methods like email or SMS, eventually, the user will need a password in the email provider and SMS text message is not always 100% trustable thus not every user will set a phone number. Regardless of FIDO2 strong security level, this reduces the entire account’s security level to the level of security of the account recovery method. Although passwordless does not raise the security level, there is still a benefit of doing so, which is improving the overall UX.
Example: Yahoo Japan, nulab
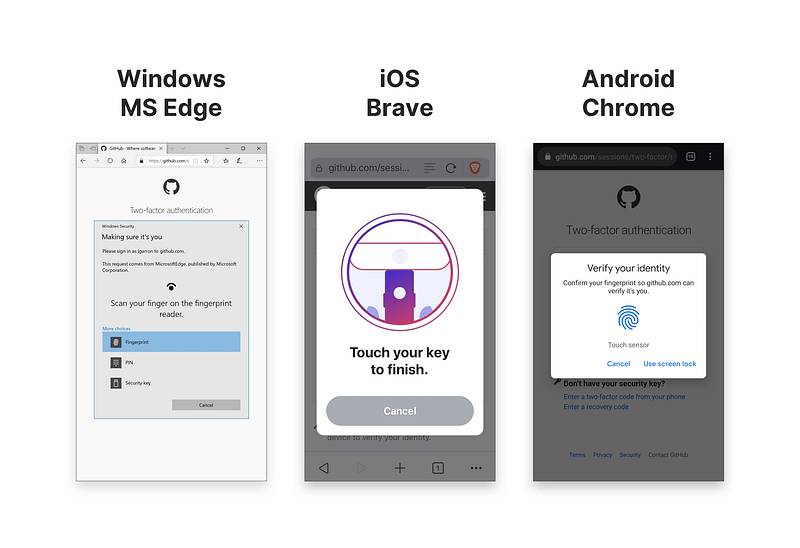
The second way is to implement FIDO as a 2FA method, instead of TOTP. FIDO setup process is much faster and simpler than TOTP. However, in order to set up FIDO as 2FA, TOTP still needs to be configured as an account recovery method.
Example: Github, Twitter
The first method is much suitable for B2C applications. For normal users, usually don’t care about setting up 2FA. We can use a password meter bar, urge users to set strong passwords then set up FIDO for easier login.
The second method is suitable for B2B applications, which is usually easier to enforce 2FA and users already get used to 2FA flow.
Passkeys = (synced) WebAuthn credentials (WIP)
As we said earlier, regardless of FIDO2 strong security level, the entire account’s security level can be reduced to the level of security of the account recovery method. We need to consider how to do account recovery.
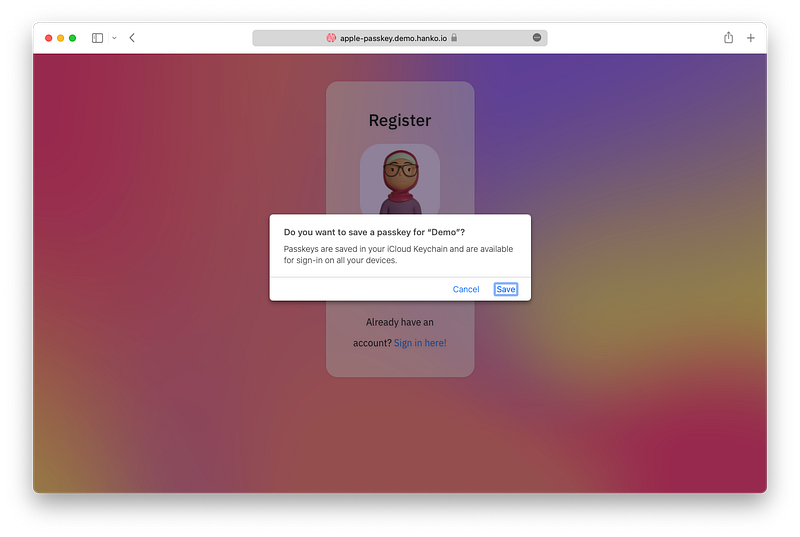
At WWDC21, Apple introduced a new “Passkeys in iCloud Keychain” feature. Basically, all WebAuthn credentials are synchronized across all Apple devices. So if a user loses a device that previously register as Authenticator, as long as they can access their Apple account, they can access all credentials saved in iCloud Keychain.
Until now, there is only Apple has introduced this feature. Personally, I heard that other platforms will release the same feature in late 2022.
User Presence vs User Verification
This article from Yubico explains this really well. Both registration and authentication require either or both of the following:
- User presence: this most basic configuration is nothing more than a FIDO2 call that prompts the user to touch the security key or interact in some way with the authenticator.
- User verification: a FIDO2 call where the authenticator verifies that the user is authorized to use the authenticator, and signals to the RP whether user verification was successful.
User verification serves to ensure that the person authenticating to a service is in fact who they say they are for the purposes of that service. User verification can take various forms, such as password, PIN, fingerprint, public key credential, etc. The point is to distinguish one user from any other, i.e., uniquely identify the user.
With user presence, the intent is not to identify the user, but to ensure that a user is physically present and in control of the authenticator.
Use cases for each type:
- User presence is appropriate for second factor authentication (2FA)
- User verification is not recommended for 2FA because the user will have already entered a shared secret (password) sent to the server over the network
- User verification is appropriate for passwordless scenarios and multi-factor authentication (MFA) because it combines “something you have” and “something you are”/“something you know” in a single gesture.
FIDO Desktop Authenticator UX Guidelines
The FIDO UX guidelines are a set of best practices to help service providers encourage their customers to log in with FIDO authentication on desktop environments. These guidelines aim to accelerate decision-making during FIDO implementation and specify what information and controls should be given to users through their journey from FIDO awareness to registration and subsequent logins.
You can read about FIDO UX guidelines here: https://fidoalliance.org/ux-guidelines/ux-guideline-pdf/
Other language libraries and resources
In this article, as an example, I use Rails and use webauthn-ruby to build a FIDO server. For open source libraries for other programming languages, see webauthn.io or AwesomeWebAuthn.
If you want to use existing solutions from other parties, have a look at the FIDO Alliance official page.
Conclusion
This is a really long article, sorry about that 😅. I hope that you’ve learned something, if you have questions, feel free to leave a comment. 💪
So, we have covered how to implement a passwordless authentication app and learn how the code runs step by step. We also talked about which way should we implement FIDO, the difference between User Presence and User Verification, best practices for UX, and explored other related resources.
Reference
- Web Authentication API (developer.mozilla.org)
- Web Authentication: An API for accessing Public Key Credentials Level 3 (www.w3.org)
- Yahoo! JAPANでの生体認証の取り組み(FIDO2サーバーの仕組みについて) (techblog.yahoo.co.jp)
- WebAuthnことはじめ (engineering.mercari.com)
Thanks for reading this article! Leave a comment if you have any questions. If you found this article helpful, please hold the clap button so that others can find this. Be sure to sign up for my newsletter below or follow me on Medium to get more articles like this. ☝️👏 😄


