
How To Use Android’s Proto DataStore With Kotlin Support
Asynchronous type-safe persistence of objects in a key-value store manner

Persisting data is essential in almost every Android app you are going to develop. When it comes to persisting single values or just setting “flags”, using a fully functional database like Android Room is an overkill for such key-value data.
Instead, for these cases, we stick to lightweight key-value stores like Android’s SharedPreferences. However, because the SharedPreferences has some trade-offs.
Some examples are the synchronous API, no options for the developer to get notice of errors, and last but not least the lack of transactional API support.
To overcome these drawbacks, Google published Jetpack DataStore. In the table below you can see the benefits of using the DataStore over the legacy SharedPreferences.
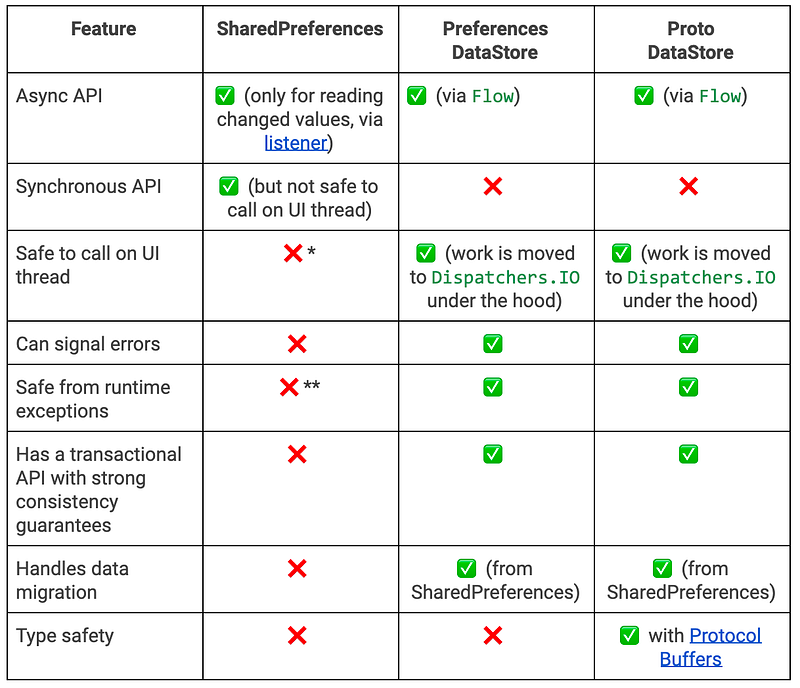
As you can see, the DataStore is split up into two variations. One is the Preferences DataStore and the other is the Proto DataStore.
While the Preferences DataStore mimics the behavior of SharedPreferences, providing the benefits shown in the table above, the Proto DataStore allows us to persist not only simple key-value pairs but entire objects.
For persisting objects, we need to use Google's Protocol Buffers, which allows serializing data like XML but is faster and requires less space.
In my opinion, the official documentation for using the Proto DataStore lacks the setup for using Protocol Buffers in an Android project. Especially on how to use it with Kotlin.
That said, in this article, I will guide you from setup to a practical example of how to implement the Proto DataStore and make use of Kotlin DSL.
1. Setup
As a first step, let’s add the required dependencies and plugins.
For the dependencies, besides the Proto DataStore, we also add the Protobuf Java Lite Runtime to the app-level build.gradle, which is recommended for Android. Additionally, we add the Lite version of the Kotlin Protocol Buffers library which will later allow us to build our ProtoBuf structures using Kotlin DSL.
Next, we add the ProtoBuf Gradle plugin. Typically you would generate your Java objects of the declared proto files using the command line. Luckily this handy plugin assembles the Protobuf Compiler and automates this step by adding gradle tasks to the build step of your project.
To summarize, we will therefore later use this plugin to generate Java objects from our declared .proto files.
Add the following to the dependency block in your project-level build.gradle file:
Afterward, add the plugin to the plugins { .. } body of your app-level build.gradle:
Now we need to add a configuration block for configuring Protobuf. We set the protoc artifact to a precompiled version provided by Google and enable the Protobuf Java Lite Runtime (still in our app-level build.gradle) and building the required classes for using Kotlin DSL:
Additionally, install the Protocol Buffers plugin for Android Studio. This plugin will allow us later to use Syntax highlighting etc. for proto3 which is the language used for writing the .proto files we will later generate our persistence objects.
Bonus — Getting ready for production builds
Finally, we need to extend our proguard-rules.pro to later be able to build our production build with R8 obfuscation:
2. Declaring Protocol Buffer files
Now that we have our set up, let’s proceed with the actual declaration of the Protocol Buffer files.
Imagine we want to always save the last time the user started the app and then count how often he started the app. How can we store these two values in one single object?
We start by creating a folder proto under src/main/... Next, we add a new file using lower snake case naming convention app_startup_params.proto.
The AppStartupParams is written in proto3 syntax and displays the declaration of our persistence object for our Proto DataStore.
Let’s go through it line by line:
- Line 1: The declaration of the syntax. As we just said, we are using
proto3. - Line 3: The package name declaration. You will later be able to import the generated class file via this package path. So replace it with your respective app’s package path.
- Line 4: The multiple files option. If you set this field to false, only a single
.javafile will be generated for our.protofile. That means that all other classes/enums/etc. required will be nested inside. If set to true, as we did in our example, separate classes will be generated. You can read more about that option here. - Line 6: The actual declaration of our “message”. A message in
proto3when generated represents a full Java object. You can also nest multiple messages that relate to each other. The name behind themessageoperator will also be the one our generated class is named to. - Line 7: We declare a field
startup_counterasInt32that will act as our counter for the app startups. TheInt32will generate to aIntfield in Java. The assignment is the field number and represents a unique id for each field. - Line 8: We declare a field
startup_unix_timestampasInt64that will act as our timestamp for the last app opening. TheInt64will generate to aLongfield in Java.
If we now execute our build process, we will be able to access the generated AppStartupParams.
2.1 The serializer
To use the generated class with the DataStore, we first need to create a Serializer.
The Serializer will be responsible for instructing our Proto DataStore on how to serialize our class to a persistable object and on the other way how to deserialize it back to our object.
Check out the following code snippet that shows a Serializer for our AppStartupParams.
As you can see we implement the Serializer interface. In the readFrom() function we handle the case where we read from the DataStore whilst in the writeTo() we handle the case where we write our object to the DataStore.
Finally, at the bottom of the file, we add an extension function to the Android Context object that will allow us to get the DataStore for our AppStartupParams using the by dataStore delegate function and adding our AppStartupParamsSerializer as a parameter.
3. Practical Example
Now that we got our setup done, let’s get to a practical example.
3.1 Writing to the DataStore
At app startup, we want to use our new AppStartupParams class to persist the latest parameters. Therefore we will implement a custom Application and update our parameters in the onCreate() function.
Note: that this is just to show off how to use the DataStore API. In a real-world example you should put the code for interacting with the DataStore onto the data layer.
The following shows the mentioned custom Application:
Accessing the DataStore can only happen from a coroutine or another suspend function. Therefore we create our custom CoroutineScope and launch a new coroutine.
Inside that coroutine, we can now use our previously defined extension function appStartupParamsDataStore while accessing the Application class via this@ExampleProtoApplication because it provides a Context on which our extension function is scoped.
We can now update our AppStartupParams by using the updateData function.
Now the benefits of using the Kotlin Protocol Buffers come into play. While the actual class is still a Java class, the Kotlin Protol Buffers provides us with some handy Kotlin functions.
In this case we are using the copy function and can therefore easily manipulate only the parameters we really want to update without further boilerplate code.
3.2 Reading from the DataStore
But how can we read or value on the other hand? Unlike SharedPreferences we don’t directly get a value but a Flow.
So if we’d want to read our AppStartupParams, it could look like the following snippet shows:
4. Conclusion
In this article, we took a look at the Protocol Buffer variation of the Jetpack DataStore or rather the Proto DataStore.
We saw how we can set up our Android project in order to automatically generate Java files from Protocol Buffer files in our build process and how to persist them in the Jetpack DataStore.
In my opinion, the Proto DataStore is a really good alternative when it comes to deciding whether you persist simple data into your database or use a Key-Value store.
Often you have the case where multiple values stand in relation and get always read and written at the same time as key-value pairs. This overhead can easily be reduced by creating one single Protocol Buffer structure that is then type-safe persisted at once into the Proto DataStore.
However, it can create quite an overhead to create the necessary code for using the Proto DataStore in every situation, so one should think carefully about the situation in which it is really worthwhile.
I hope you had some takeaways, clap if you liked my article, make sure to subscribe to get notified via e-mail, and follow for more!
To get a better understanding of the setup process, you can also checkout the GitHub repository with sample code:


