
How to Start Using FedEx API Quickly

There is a lot of talking about APIs and how they are the future of software. You might agree with it (or you might not) but in any case, APIs are taking the world by storm and it’s pretty hard to ignore them.
Personally, I love this trend. We got nice applications to work with APIs like Postman and Insomnia, we got colorful documentation, interactive consoles, and the ability to test the calls in real-time. All of it makes integrations (and our lives) easier so what’s not to love? However, not all companies follow this trend and if that API has been around for a while, chances are you’ll have to spend quite some time to figure out what’s going on.
How to get started with FedEx
Recently, I did a bunch of shipment integrations and had a rough time figuring out both UPS and FedEx APIs. Both companies are doing their best and even provide long, boring PDFs with examples but it’s hard to figure out the exact steps you need to take in order to get at least one successful call. The UPS integration article is coming soon and today, I’ll show how to:
- Register on the FedEx website
- Get your testing credentials
- Make a SOAP request to FedEx API to get available rates for a particular shipment (the example is taken from their Developer Documentation) using Postman or a similar application.
By following this guide step by step, you’ll get your “200 OK” response in no time.
Step 1: Sign up and Download their Documentation
First of all, you need to sign up on their website. After you log in to your account on the FedEx site, navigate to the web services development page. Step 1 will have the documentation and downloads you can use. These PDFs look a bit scary but don’t worry, you will mostly use them to find and copy their examples or read more about a particular field. Alternatively, you can spend a few hours reading them and then come back to this guide.
Step 2: Sign Up for Test Credentials
Now, let’s sign up for test credentials. On the same page mentioned above, you will see an option for “Get Your Test Key”. Follow their instructions and make sure you enter a valid email (you’ll get some important information after!). After completing the steps, you will receive a developer test key, password, test account number, and test meter number. The test password was provided via email. For some reason, they send the password separately and don’t show it anywhere on the success/confirmation page with the rest of the information. Save all your information and wait for their email. Once you receive it, you are ready to perform your first test request.
Step 3: Perform your First Request
Now, you are ready to submit your first test request. The test URL endpoint for all requests will be provided in the confirmation email:
https://wsbeta.fedex.com:443/web-services
The body of the request will change (and you can copy any example from the PDF you got in the first step) but the URL will stay the same. I will use the get rates example to test my first call.
Open Postman (or a similar application if you prefer to use something else) and start a new request. If you’ve never worked with SOAP requests before, Postman has a great guide to get you started.
Here is how your first request will look like:
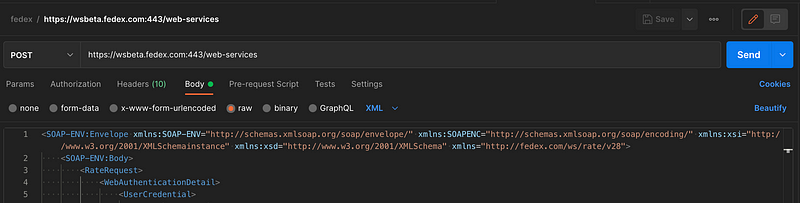
I used Example 49 Rate Request and plugged in my credentials along with valid addresses but you can use any other request from the book. If you’re looking to test the tracking, some numbers that worked for me are:
797843158299
123456789012
111111111111
Every carrier usually has a lot of tracking numbers for different use cases, but not FedEx… they used to have a list of test tracking numbers before but those stopped working in older versions of the API.
Let's go back to our request from Example 49. At first, I was getting an Authentication error but this was happening because I was trying to use my account password instead of a testing one that they sent in the email. So before you send the request, make sure you changed the values in all of these fields:
<Key>INPUT YOUR INFORMATION</Key>
<Password>INPUT YOUR INFORMATION</Password>
<AccountNumber>INPUT YOUR INFORMATION</AccountNumber>
<MeterNumber>INPUT YOUR INFORMATION</MeterNumber>
Now, hit Send and look at the result. Above, I mentioned the 200 OK response code but in fact, it doesn’t really indicate that you got a valid response with this API. It’s always going to be 200 OK but the real result will be stored (and can be parsed) from the body of the response:
<Notifications><Severity>SUCCESS</Severity><Source>crs</Source><Code>0</Code><Message>Request was successfully processed. </Message><LocalizedMessage>Request was successfully processed. </LocalizedMessage></Notifications>Read the errors carefully — if you forgot to change a value, the response will tell you so. Even though FedEx API is quite messy and doesn’t offer great documentation, it’s still possible to start using it quickly. Good luck!
For an UPS integration, check out this article.


