
How to start any professional Python Package project
Including test automation, creating documentation on ReadTheDocs and publishing to PyPi.

Introduction
Virtually everyone who uses Python makes use of PyPi, the Python Package Index where open-source code can be downloaded from (which is consulted when using $ pip install). Famous packages as pandas and Numpy are all on PyPi. It’s actually really easy to publish your own project to PyPi. However, to simply write some code and publish it to PyPi isn’t a professional or sustainable approach. The following problems can arise:
- Lack of or absence of documentation can cause other people to not know how to use your package, or you yourself forget it after a few weeks, months or years.
- Lack of or absence of (automated) tests can cause broken code to enter your package unnoticed when making changes.
- Changes to your package’s dependencies can cause your code to break.
- Badly or inconsistently formatted code can make the code hard to read.
In this article we will tackle all the steps anyone should take when wanting to create a professional (open source) package. This includes e.g. project management, dependency management, automated testing, creating documentation and publishing it on ReadTheDocs, and publishing the package to PyPi.
This article follows a step-by-step approach, which results in that anyone with some Python experience can follow along. Because we’ll tackle many subjects of professional package development we won’t go into the detail of every area, but I leave references for anyone who’d want to dive deeper into a certain aspect.
You can use this repository as a reference for the files we’re creating in this article. To have a proper understanding of all aspects of a professional Python package I strongly encourage you to follow along with the article instead of just cloning the Github repo. You can always do that at the end :).
Table of Contents
Introduction Tech stack Setup Github Setup virtual environment using pyenv Setup poetry and link the repo to Github Creating a simple package Creating tests
Setting up test automation Create documentation for ReadTheDocs Publish to ReadTheDocs Publish to PyPi Conclusion
Tech stack:
Github
- Github Repositories -> to store the code
- Github Projects -> to keep track of e.g. issues, progress, bugs and future wishes.
- Github Actions -> to automate testing
Python3
- pyenv -> for python version management
- poetry -> for package and development management
- Black -> for code formatting
- isort -> for imports formatting
- flake8 -> for testing code format
- pytest -> for testing of code
- Hypothesis -> for generating extensive test cases
- pre-commit -> for testing code format before committing.
Python3 — ReadTheDocs
- Sphinx -> to create HTML files with documentation
- myst-parser -> for writing in Markdown instead of reStructuredText
- sphinx-autobuild -> for generating the ReadTheDocs pages locally
- nbsphinx -> for using Jupyter Notebooks for documentation
- sphinx-autoapi -> for automatically generating API documentation
- sphinxcontrib-napoleon -> to create documentation from Numpy docstrings
- sphinx-rtd-theme -> ReadTheDocs theme for sphinx
- ipykernel -> for writing Jupyter Notebooks
Setup Github
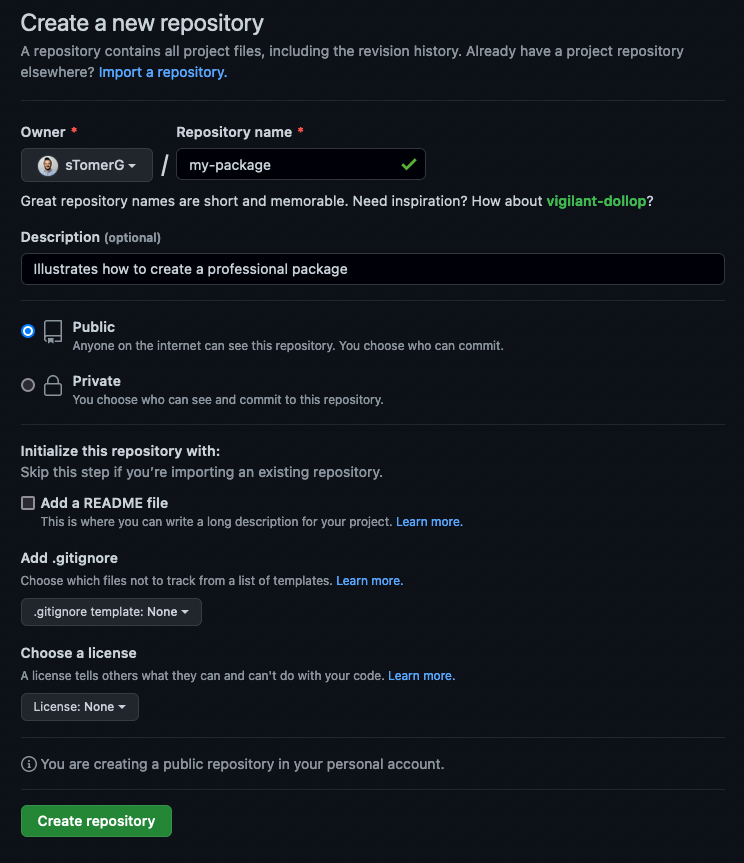
Go to https://github.com and create a new repository (or sign up for an account if you don’t have one yet, it’s free). Please make sure to use the same settings as pictured below. Of course, you can choose a different name for your repository, which should be the same as the name you want for your package. I’ll use my-package for the name of the package we’ll create throughout this article. It’s a consensus to use hyphens instead of underscores here.
In the Repository of my-project, click on Issues, and on the right of your screen there is a button called Milestones. Click on Milestones and create a new one:
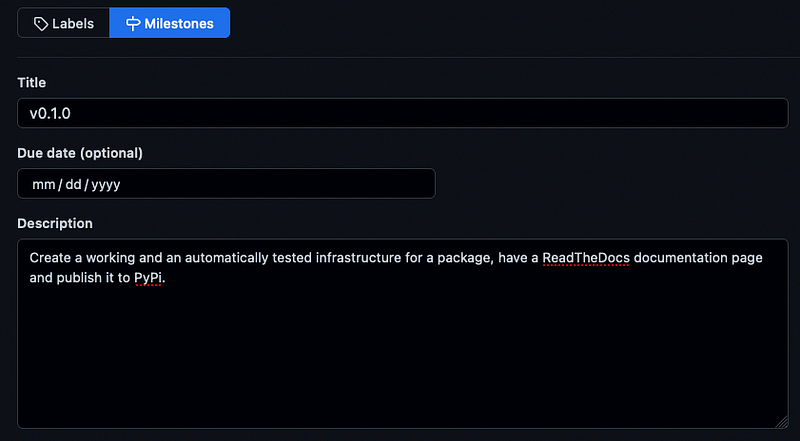
Milestones in Python packages are often linked to the new release of a (sub)version of a package. As this will be our first version of our package, let’s use the semantic version convention by calling it 0.1.0 , also see: https://semver.org/
Given a version number MAJOR.MINOR.PATCH, increment the:
1. MAJOR version when you make incompatible API changes
2. MINOR version when you add functionality in a backwards compatible manner
3. PATCH version when you make backwards compatible bug fixes
Additional labels for pre-release and build metadata are available as extensions to the MAJOR.MINOR.PATCH format.
Setup a Github Project
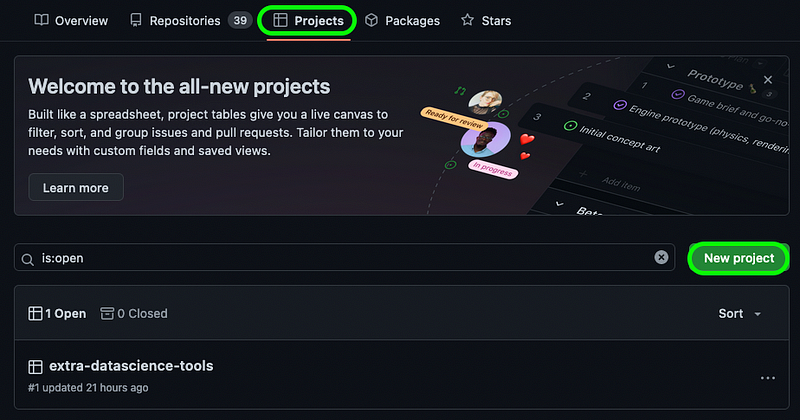
Next to having the Github Repository where we’ll push our code, we want to create a Project, where we can track what issues we’re working on and what we’d like to work on in the future. Go to your account, click on Projects and click on New project.
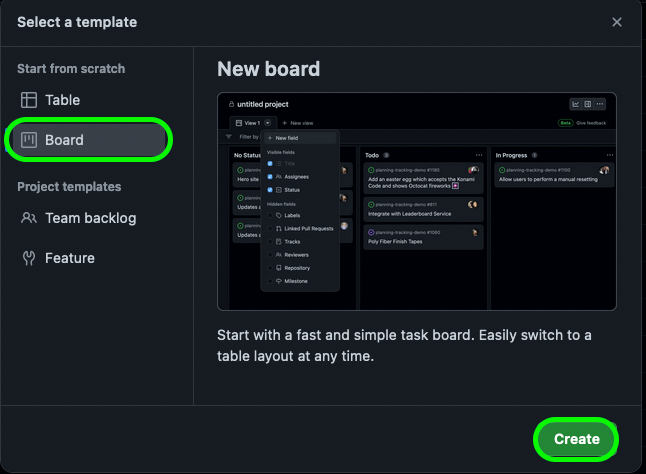
Click on Board and then Create, you can change to a different layout at any time.
Now, let’s rename the project in the top left to my-project and let’s add some draft items in the bottom left.
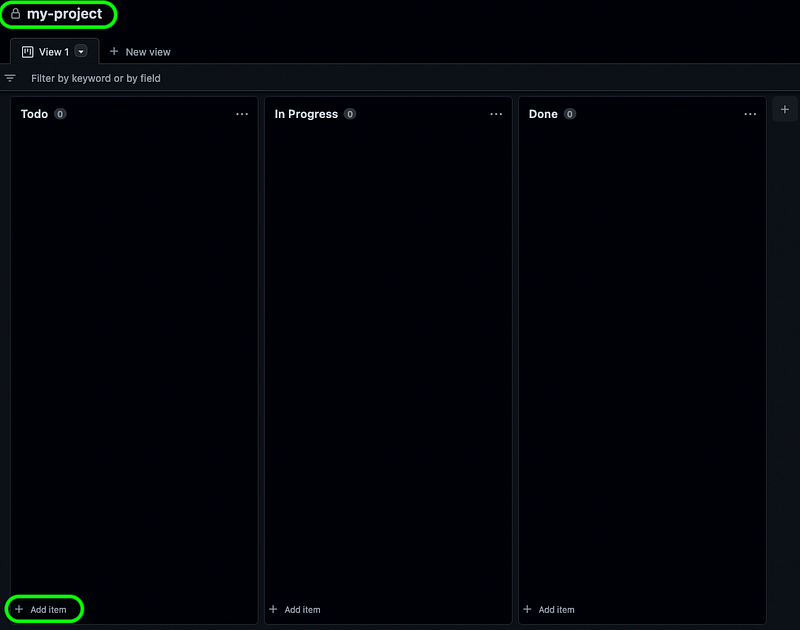
Our Todo list on this board is exactly what we’ll cover in the rest of this article:

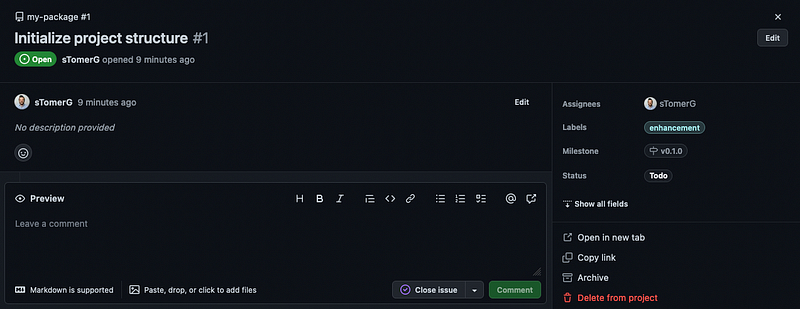
We can convert the drafts to issues of my-project by clicking on them. Make sure to convert the draft to an issue of my-project, give it the right labels, and add it to the v0.1.0 milestone. A draft should end up looking like this:
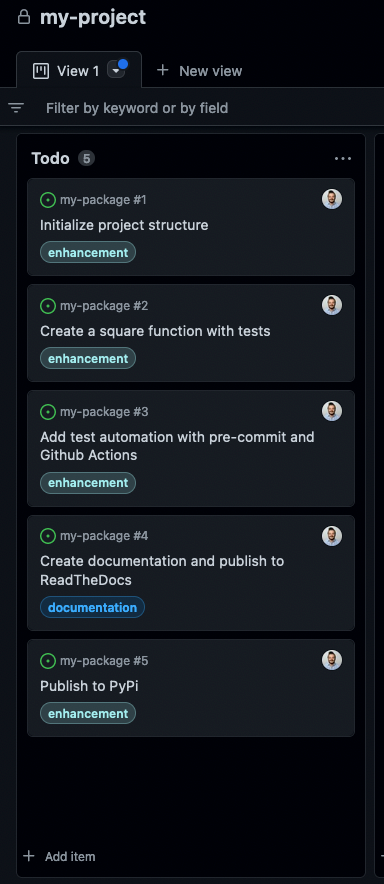
Which, if you’ve edited all your drafts, should result in a Todos that look something like the screenshot below. Click on the arrow next to View 1 to make the labels visible.
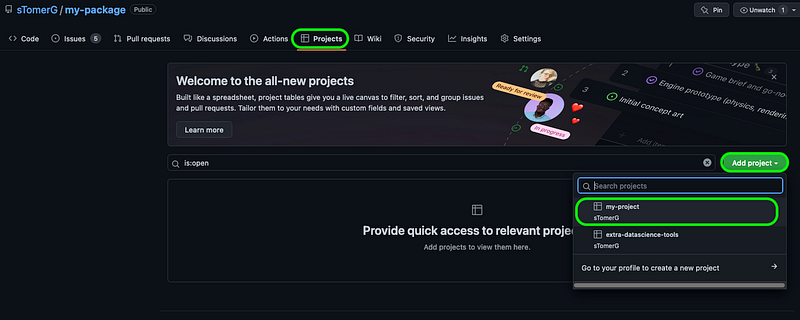
Now let’s link the Github Project to our Github Repository:
That’s it! Our Github is now ready for a professional-level developed project. If you or someone else finds a bug or wants to suggest a feature, you can add that on the project board to track who is working on what and when. For more functionalities of Github Projects please take a look here.
Setup virtual environment using pyenv
Before we start our project we want to choose a Python version to develop our project in. With pyenv you can choose any Python version, regardless of what you’ve installed globally on your laptop, that’s why we’re using it here.
Install pyenv (for installation on other OS systems than macOS click here).
$ brew update
$ brew install pyenv
$ brew install pyenv-virtualenv
Check which versions of Python are available:
$ pyenv install --list | grep " 3\."
Choose a Python version to install, which will be the Python version you’ll develop your package in.
$ pyenv install 3.10.6
Create a virtual environment to develop your package in:
$ pyenv virtualenv 3.10.6 my_package
Activate your virtual environment:
$ pyenv shell my_package
Check if the version is correct:
$ python --version
Python 3.10.6
Congratulations! You now have your virtual environment set up for your package.
Setup Poetry and link the repo to Github
Poetry is a Python package which makes packaging and dependency management easy. This saves us a lot of hassle with dependencies, versioning and publishing.
Setup Poetry
We’ll continue where we left. Make sure your virtual environment is activated.
$ pyenv shell my_package
First let’s upgrade pip:
$ pip install --upgrade pip
Then install Poetry:
$ pip install poetry
Initialize a new package with: (use the same name as on Github, with hyphens and not underscores)
$ poetry new my-package --src
Created package my_package in my-package
Enter the newly created directory:
cd my-package
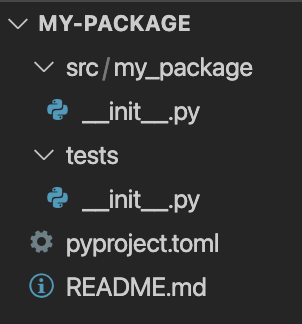
This is how your directory should look like. All the code for the core of the package will be coded in src/my_package. Tests of the code should be written in the tests folder. In pyproject.toml is all the meta info about the reposiory, from name to author to dependencies. It is steadily replacing the long used setup.py and setup.cfg structure. The README.md still empty, this is what a user will read at first when bumping into your package on Github or PyPi. Usually there are installation instructions and a basic usage explanation in the README.MD.
For now that’s all we need from poetry.
Link the repo to GitHub
Go back to the terminal. In the my-package folder (note: not src/my_package) initialize git with:
$ git init -b main
Your terminal should look now something like this:
git:(main) $
To add the current files created by poetry to GitHub:
git:(main) $ git add . && git commit -m "initial commit"
Copy the link of the Github repository:

Use the link in the following command to link the local my-package repository to the my-package repository on Github.
git:(main) $ git remote add origin https://github.com/<your_username>/my-package.gitTo push the local files to Github:
git:(main) $ git remote -v
git:(main) $ git push -u origin main
Now your local repository is linked to Github, which allows you to submit any local changes to Github.
Creating a simple package
Let’s first switch to a new git branch. For now it’s enough to know that each new feature of your package should ideally be created on it’s own branch, before being merged to the main branch, when the feature’s code is final. For more information about Git branching please read this article.
To create a new branch use:
git:(main) $ git checkout -b "v0.1.0_initialize_package"
Your terminal should now look like this:
git:(v0.1.0_initialize_package) $
Because this gets a bit long, I’ll shorten the terminal back to just $
Activate the poetry virtual environment
When developing we’ll use poetry’s virtual environment that will activate (or create if it doesn't exist yet) for our package through:
$ poetry shell
Adding Black and isort as a dependencies.
For this project we’ll use Black and isort to format our code. Black automatically formats Python code in a structured way to create consistency throughout your entire project. isort is a package that sorts imports at the top of your Python file in a structured and consistent way.
To add Black and isort as a dependency to the package we’ll use poetry. However, it’s important to note that only people developing and contributing to the package need to have Black and isort installed. End users won’t need them since they’ll only use the code, and not change it. To add Black and isort as a dependency for developers use:
$ poetry add black isort --group dev
This should add the following two lines to your pyproject.toml file (exact versions can differ):
[tool.poetry.group.dev.dependencies]
black = "^22.8.0"
isort = "^5.10.1"
Next to that poetry has added Black and isort as dependencies for developers, it has also automatically installed it for us in poetry’s virtual environment. In general there is no need for pip installcommands with poetry.
To have Black and isort align add the following two lines to pyproject.toml:
[tool.isort]
profile = "black"
known_third_party = []
Writing the function
From inside the my-project folder on your laptop create a .py file called calc.py inside the my_project/src folder. You can also use the touch command to create the file:
$ touch src/my_package/calc.py
Inside calc.py create a function called square which returns the square of its input.
There are some important things to notice here:
- We’re using type hinting
Union[int, float]to imply which value types are accepted as input and to imply which value type should be returned. - We’re using Numpy’s Docstring style for the docstring. VisualStudio Code has an extension which auto-generates large parts of the doc-string in Numpy’s style. Make sure to invest in proper docstring documentation and add the
Examplessection too, as this will be very useful later on when we’ll generate documentation for ReadTheDocs . - We’re using Black’s and isort’s formatting style. Run
$ poetry run black src/to format the core package to Black’s style and$ poetry run isort src/to automatically sort the imports. - To use our function
square(x)we can import it through:>>> from my_package.calc import square. Make sure to installmy_packagefirst with:$ poetry install
Creating tests
To have a professional package means every function must have its own tests. We’ll use pytest in combination with Hypothesis for testing.
First let’s add pytest and Hypothesis as test dependencies with a oneliner. Make sure your inside the poetry shell: $ poetry shell .
$ poetry add pytest hypothesis --group test
pytest will look inside the tests folder for files with test_ in its name, and tests functions inside those files with test_ in their name.
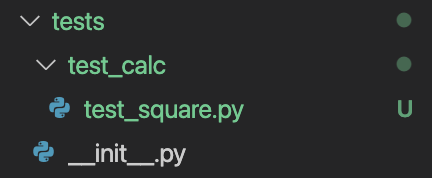
Let’s create a folder in tests called test_calc
$ mkdir tests/test_calc
Inside that folder let’s create a file called test_square.py
$ touch tests/test_calc/test_square.py
Your tests folder should now have this structure:
Let’s create some simple tests. In a professional package, both the ‘happy flow’ and the ‘unhappy flow’ of functions should be tested. This means that tests should not only test for expected values, but also for unexpected values and values that should generate an error.
Testing the happy flow
To test for how the square function should work, we should only use integers and floats as arguments for parameter x . For this we can use hypothesis.strategies . Hypothesis’ strategies generate values for specific types, e.g. characters, integers, datetimes etc. Using hypothesis.strategies.one_of(), hypothesis.strategies.integers()andhypothesis.strategies.floats() we can generate integers and floats to insert as the argument of x into square . Using the assert statement we check whether the output of square(x) is equal to x * x .
To run pytest:
$ poetry run pytest
If everything goes ‘well’, pytest will inform us that a test has failed. If you’re having issues make sure that you’ve ran $ poetry install before.
The power of Hypothesis
Even though the test assert square(x) == x * x seems very trivial, as square(x) simply returns x * x , Hypothesis can find an input that will cause the test to fail. This is because nan is of type float , but nan has the property of never being equal to nan . This is exactly why Hypothesis is such a powerful package for testing. It will try to insert edge cases that will make your code break, which forces you to create robust code. If you’d written yourself examples of integers and floats, you’d probably had never tested for a nan value.
For now, let’s assume we don’t want our square() function to multiply nan values, so we’ll add a check for nan into our function. Of course, make sure to update the docstring too.
We’ll also change hypothesis.strategies.floats() to hypothesis.strategies.floats(allow_nan=False) to prevent Hypothesis from generating nan values, as we wanted to only test for the happy flow. All tests should pass now.
Testing for errors
It’s almost just as important to test for errors as it is for expected input. Two test functions are added to test for errors: test_for_nan() and test_for_invalid_types() :
@pytest.mark.parametrize() let’s you manually add different inputs to the test function’s parameter. Using parametrize for test_for_invalid_types(x) we insert all kinds of different data types to check if square(x) will raise a TypeError for it. Now $ poetry run pytest should still say all tests have passed!
Testing for style
Next to testing the code, we also want to test that our code adheres to style formatting rules. For this we’ll use flake8. Let us first add flake8 as a test dependency:
$ poetry add flake8 --group test
Let’s define some rules for flake8 , by creating a .flake8 file in the my-package/ folder:
$ touch .flake8
Add the following lines to .flake8:
To completely dive into flake8 is beyond the scope of this article. This file e.g. specifies that some errors thrown by fake8 should be ignored and that the maximum length of a line of code should be 79. This is a convention from Python’s styling guide PEP 8.
In the beginning we installed Black to automatically format our code, so let’s run that now:
$ poetry run black src/ tests/
To test our code on style let’s run
$ poetry run flake8 src/ tests/

As you can see, during development I’ve imported cmath.isnan and typing.Type while I’m not actually using that in the final code. flake8 warns for that! Let’s adjust calc.py to adhere to flake8 :
Still, we’re left with ‘E501 line too long’ in tests/test_calc/test_square.py. But didn’t we install Black to automatically format our .py files the right way? Yes, but by itself Black doesn’t use a max line length of 79, so we’ll add some settings of Black to the pyproject.toml file:
[tool.black]
line-length = 79
exclude = '''
/(
\.git
| \.hg
| \.mypy_cache
| \.tox
| \.venv
| _build
| buck-out
| build
| dist
| docs
)/
'''
Now if we run $ poetry run black src/ tests/ Black will automatically reformat tests/test_calc/test_square.py for us and $ poetry run flake8 src/ tests/ should generate no more errors.
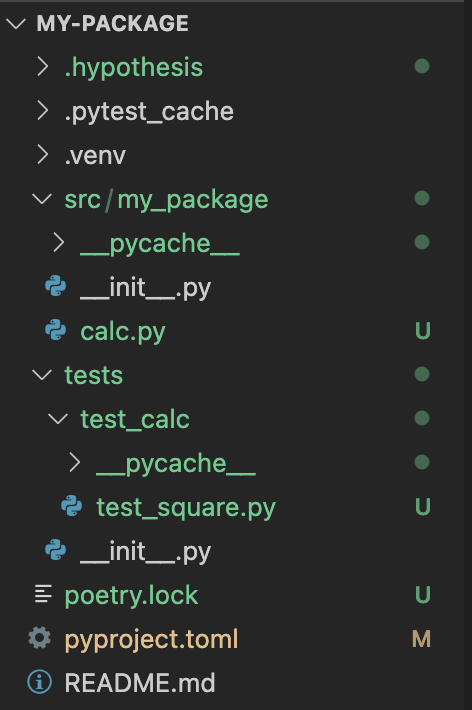
Checkpoint
Before continuing let’s make sure we are all on the same page at this stage. This should be your directory structure at the current moment:
To make sure the formatting of the files is right run:
$ poetry run black src/ tests/
$ poetry run isort src/ tests/
$ poetry run flake8 src/ tests/
A few scrolls above you can see how the final version of src/my_package/calc.py. should look like.
How your pyproject.toml file should look like by now (except for fields like author) :
How your tests/test_calc/test_square.py should look like:
Super! At this moment package has:
- A waterproof function
square(x)which can be imported through>>> from my_package.calc import square - Solid tests for
square(x)by using pytest and Hypothesis for testing for wanted , unwanted and edge case inputs. - A consistent style of coding using Black, isort and flake8.
This is a great moment to save the changes we’ve made. We’ll do this using git.
Save changes using git
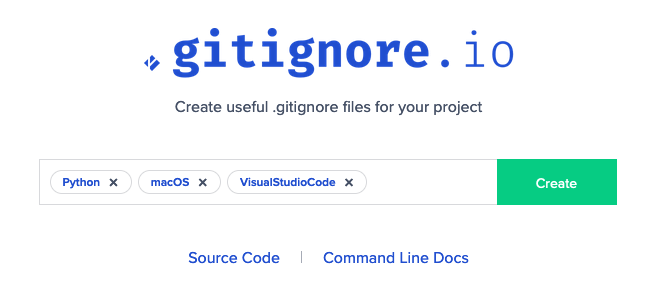
Before saving the changes we need to add a .gitignore file to our my-package folder($ touch .gitignore ) which will automatically ignore some files which should only be kept locally. gitignore.io is a website which automatically generates a .gitignore file for us based on preferences. Go to https://gitignore.io and generate a .gitignore file.
Press Create and copy all the text to your .gitignore file. Now we can save our current state of the package using the following commands: (I’ve added the branch details here to clarify we’re making these changes on the .v0.1.0_initalize_package branch).
git:(v0.1.0_initialize_package) $ git add .
git:(v0.1.0_initialize_package) $ git commit -m "created square(), with tests and formatting"
Setting up a test automation
We know our package is properly tested and styled at this moment, but what if we make some changes to the code and forget to run Black, isort and flake8? Or we make some changes to square(x) which would case some tests to fail, but we forget to run $ poetry run pytest ? Or we ourselves are very careful, but a colleague or a friend that wants to contribute to the package isn’t? For that we’ll set up test automation.
Pre-commit hooks for styling.
The standard workflow of adding your local files and directories to Github is: $ git add . $ git commit -m "commit message" $ git push . We can use pre-commit hooks to check for adhering to our style preferences before being able to commit code. To do this we have to add pre-commit as a development dependency:
$ poetry add pre-commit --group dev
The settings of pre-commit should be written in .pre-commit-config.yaml :
$ echo "" > .pre-commit-config.yaml (we’re using echo "" > instead of touch here as touch will generate an error.
Copy the following settings to .pre-commit-config.yaml :
Run $ poetry run pre-commit install to install the pre-commit hooks. Then run $ poetry run pre-commit autoupdate to possibly update any packages. When we run pre-commit locally for the first time it will generate some erros:
$ poetry run pre-commit run --all-files
pre-commit will automatically add some settings to pyproject.toml and now run the above command again.
If all went well the output should look like this:

Great! As soon as we’ve pushed this to Github it will make sure anyone who wants to commit code has to adhere to our specified style rules.
Autorun pytest on Github on pull requests
Our worries that someone (ourselves) can add code in the wrong style have been taken care of. But what if someone (or ourselves) adds faulty changes to square(x)?
Using Github Actions we can make sure that any code that is being pushed to Github will automatically be tested through pytest. To setup such a workflow we have to create a test-packge.yaml file in .github/workflows directory in our my-package folder:
$ mkdir .github
$ mkdir .github/workflows
$ touch .github/workflows/test-package.yaml
Copy the following code into .github/workflows/test-package.yaml :
This will make sure the package will be tested for Python 3.10 on the latest versions of Ubuntu and macOS when code is being pushed to the main branch of the Git repository or a pull request is made. The cache will help the tests be quicker the next times, if possible. Please refer here for more info on this workflow.
That’s it! Our package now contains automatic testing!
Create the pull request
Let’s push our code to Github to save the changes
git:(v0.1.0_initialize_package) $ git add .
git:(v0.1.0_initialize_package) $ git commit -m "added pre-commit and workflow for automatic testing"
git:(v0.1.0_initialize_package) $ git push --set-upstream origin v0.1.0_initialize_package
We use --set-upstream origin v0.1.0_initialize_package because that branch is not yet known on Github, we created it locally.
Go on https://github.com to your my-package repository and click on Pull requests and then on Compare & pull request or New pull request and select the v0.1.0_initialize_package branch.
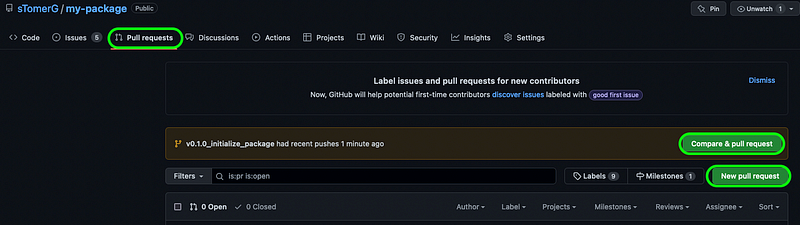
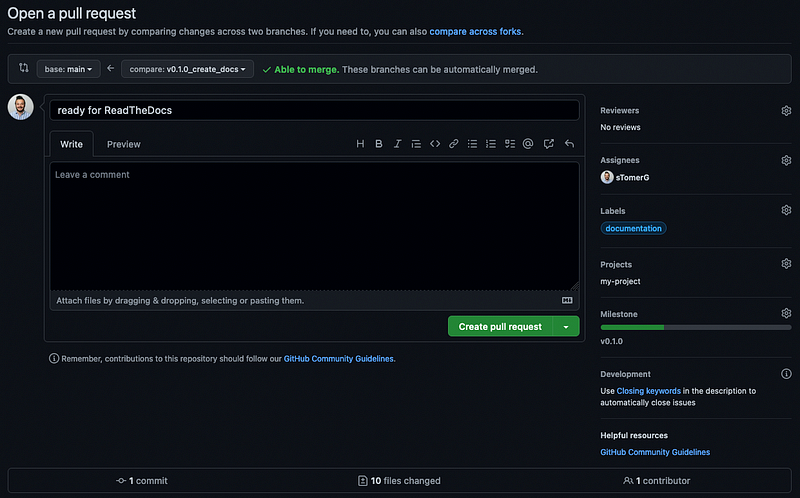
Edit the Pull request (Write, Assignees, Labels, Projects, Milestone) to look like this:
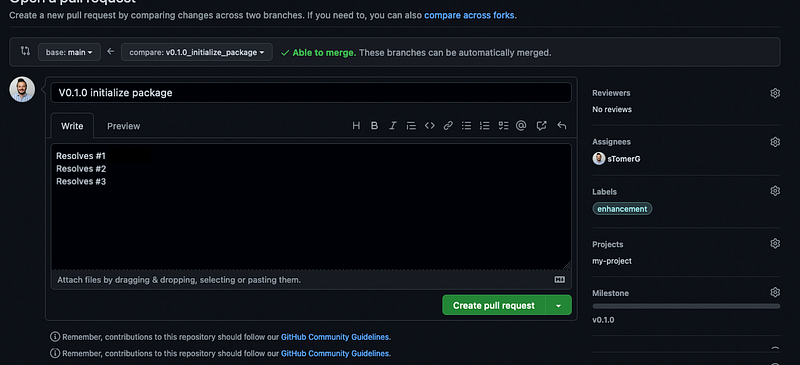
Resolves #1 Resolves #2 Resolves #3 refers to the issues we’ve created at the start of this article. When you type # you’ll get to choose which issues are linked to this pull request. When the pull accept is requested then automatically theses issues on the Github Project will be closed.
When you click Create pull request a request will be made to merge the branch to the main branch and because of .github/workflows/test-package.yaml tests from our tests/ folder will now start to run. After a few minutes (the next time should be quicker because we implemented caches in the workflow) the workflow should have passed all tests!
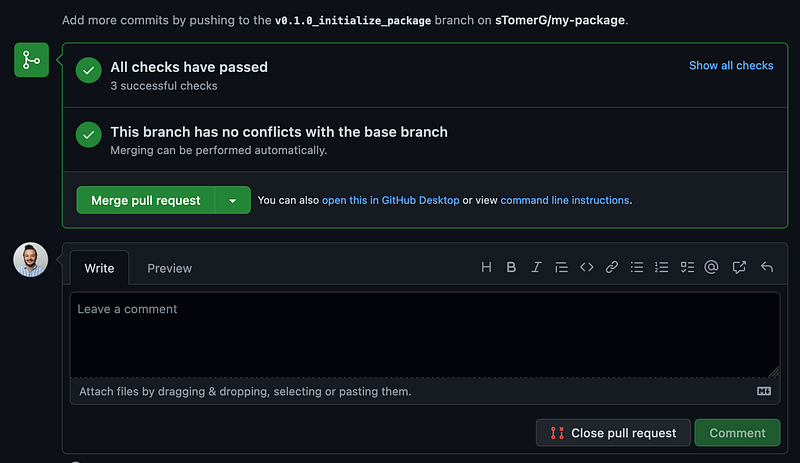
Now let’s press Merge pull request to push our once local code to the main branch on Github. Great!
Create documentation on ReadTheDocs
Let’s create a new branch for the documentation part that starts from the current state of the main branch:
git:(v0.1.0_initialize_project) $ git switch -c "v0.1.0_create_docs" mainFirst, let’s install Sphinx and sphinx-autobuild which will form the the building blocks for our documentation. We’ll create the group doc for the packages we’ll install for creating documentation.
$ poetry add sphinx sphinx-autobuild --group doc
To initialize the process of making our documentation to publish on ReadTheDocs run
$ poetry run sphinx-quickstart docs
Please answer the first question with y, all other questions speak for themselves.
> Separate source and build directories (y/n): yAfter running you should see a docs/ folder appear. Inside docs/source there are two very important files: index.rst and conf.py. index.rst is your the index page of your documentation website and conf.py contains the settings such as which theme and extensions to use.
To see our documentation so far let’s run the following command in a new terminal:
$ poetry shell
$ poetry run sphinx-autobuild docs/source/ docs/build/html
In the terminal you should find a link to probably port localhost:8000. Clicking on it should show you this webpage:

There it is! The start of our ReadTheDocs website! Notice that if you make changes to the index.rst the website re-renders automatically.
Professionalizing the documentation
.rst is the extension of reStructuredText, a quite old but still used markdown language. However, since markdown gained quite some popularity, is more modern and is more commonly used nowadays, we’ll switch to markdown using (because we’ll use rst2myst only once we’ll not add it as a doc dependency):
$ pip install rst-to-myst
$ rst2myst convert docs/**/*.rst
Now you should see an index.md inside docs/source/. This means we can safely remove the .rst version:
$ rm docs/source/index.rst
To be able for Sphinx to interpret markdown instead of reStructuredText, we’ll have to install MySt Parser:
$ poetry add myst-parser --group doc
For Sphinx to be able to use the myst_parser we have to add in to the list of extensions in docs/source/conf.py:
extensions = [
    "myst_parser",
]
Now rerun:
$ poetry run sphinx-autobuild docs/source docs/build/htmlYou should see the exact same website as before, even though we now use markdown instead of reStructuredText.
Let’s add some more extensions! Install these as follows:
$ poetry add nbsphinx sphinx-autoapi sphinx-rtd-theme --group doc
Change your docs/source/conf.py to: (but change the name etc.)
You might have noticed that in the bottom of conf.py we changed the html_theme to "sphinx_rtd_theme" . Which is a very classic theme for ReadTheDocs. You can pick any theme you like, just use $ poetry add <theme> --group doc and change the html_theme in conf.py to the name of the theme. You can find the best Sphinx themes here.
Run $ poetry run sphinx-autobuild docs/source docs/build/html
You should now see a webpage which looks something like this:
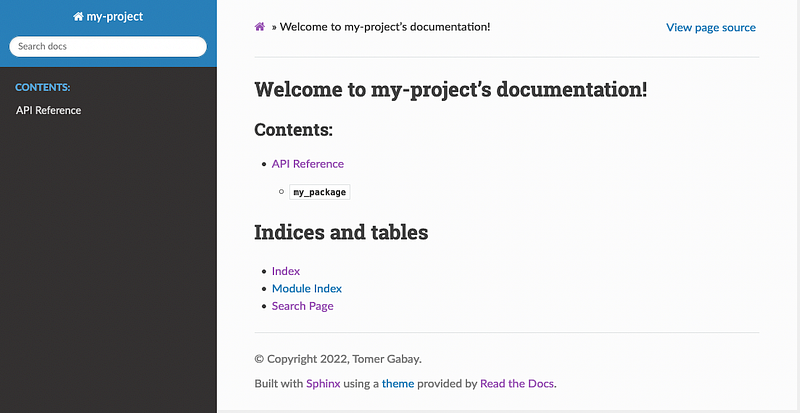
If you’re familiar with looking up documentation for Python you should recognize this often used theme! What’s very important to notice is that now in Contents we have an API Reference. This is automatically generated by the package we just added: Sphinx AutoAPI. And this is where we’re going to find out why we spent all this effort in creating a proper docstring of square(x) . Click on API Reference and navigate to my_package.calc . Here you should see the following:
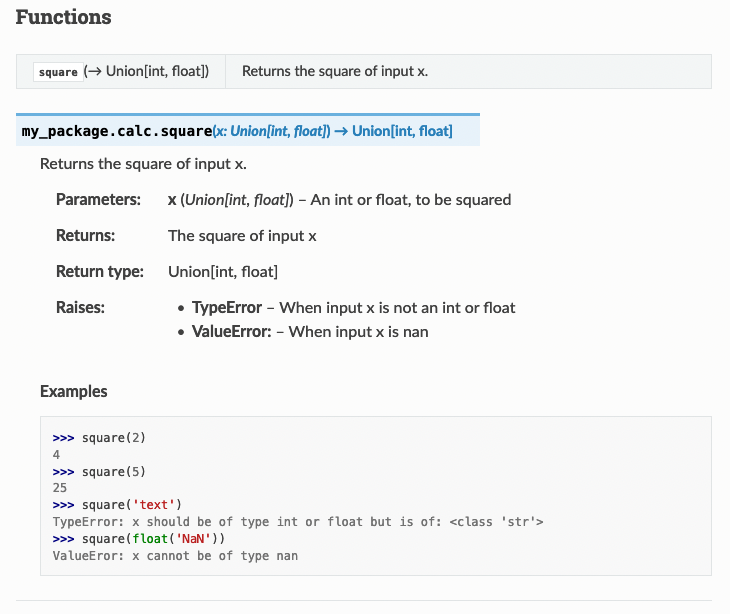
Without writing a single extra line of documentation besides the function’s docstring, we have beautiful documentation of square(x) !
Adding Jupyter Notebooks to the Documentation
Jupyter Notebooks have become very popular over the past decade. In these notebooks, you can add both Python code and markdown in the same file. Because we installed nbsphinx we can host Jupyter Notebooks on our documentation website. Let’s start by creating a usage notebook in docs/notebooks/source:
$ mkdir docs/source/notebooks
$ touch docs/source/notebooks/usage.ipynb
Create the following Notebook: (notice here that I wrote pip install my-package-tomergabay as the name my-package is already taken on https://pypi.org.
If you have a problem with creating a Notebook you can also just copy-paste the raw code from here into docs/source/notebooks/usage.ipynb.
We have to link this new file to the toctree in docs/source/index.md to make sure it’s findable by adding the line: notebooks/usage
````{toctree}
:caption: 'Contents:'
:maxdepth: 2
notebooks/usage
```There is a chance you might get an error that Pandoc wasn’t found if you now run $ poetry run sphinx-autobuild docs/source docs/build/html Install Pandoc with $ brew install pandoc or click here for installation instructions for Windows or Linux, and rerun the sphinx-autobuild command above again.
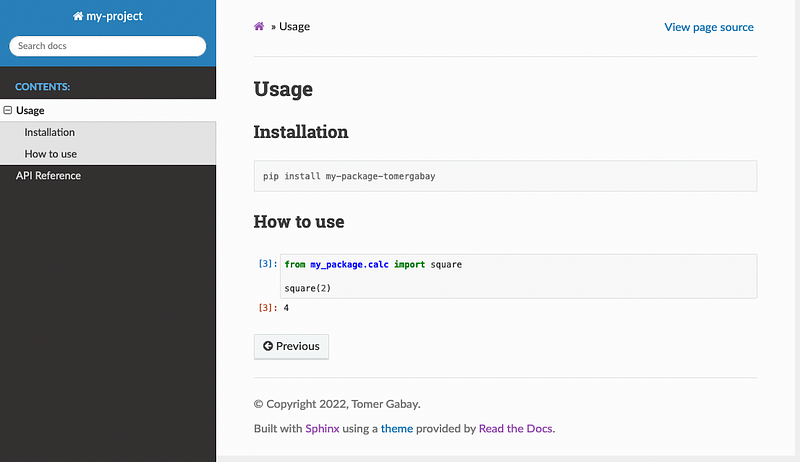
Now you should see the Usage page on your website too! You can add more .md or .ipynb files if you like. Just make sure to place them inside the docs/source folder and add them to the toctree in docs/source/index.md
Congratulations! That’s all the basics you need to know to create a beautiful documentation website for your Python package! If you want to have a deeper understanding of all the communicating parts within the documentation, I’d recommend to watch this video, which is where I first learned about Sphinx and publishing to ReadTheDocs.
Publishing to ReadTheDocs
Before publishing to ReadTheDocs we have to do five things:
- Create an account on ReadTheDocs.
- Create a .readthedocs.yaml configuration file
- Create a rtd_requirements.txt in docs/
- Push our code to Github and merge it with the main branch.
- Create a release version of our package on Github.
Create an account on ReadTheDocs Go to https://readthedocs.org/ and sign up if you don’t have an account yet, it’s free!
Create a .readthedocs.yaml configuration file
$ touch .readthedocs.yaml
And add the following code:
Create a rtd_requirements.txt in docs/
$ poetry export --with doc -f requirements.txt --output docs/rtd_requirements.txtPush our code to Github and merge it with the main branch.
git:(v0.1.0_create_docs) $ git add .
git:(v0.1.0_create_docs) $ git commit -m "ready for ReadTheDocs"
git:(v0.1.0_create_docs) $ git push
Create and merge the pull request on Github. All tests should still pass!
Create a release version of our package.
If you haven’t added text in the README.md yet, make sure to do so! Also add a LICENSE file (the file should literately be named LICENSE), in the same folder as the README, which you can pick from https://choosealicense.com/ (I chose MIT). Then everything should be ready for the first release version of our package:
Then add the tag v0.1.0:
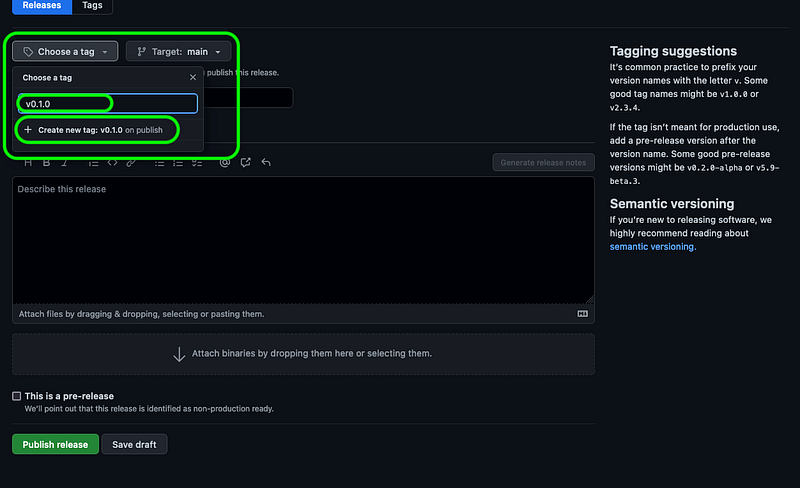
Add a name for the release, add a description and click Publish release.
You’ve now released the first version of your package!
Publish to ReadTheDocs
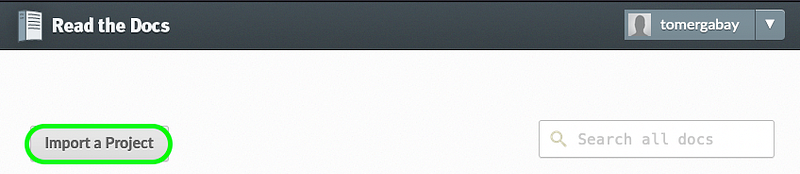
Go to https://readthedocs.org and sign up.
Click on the top of right on your name when you’re logged in and on My Projects and click on Import a Project:
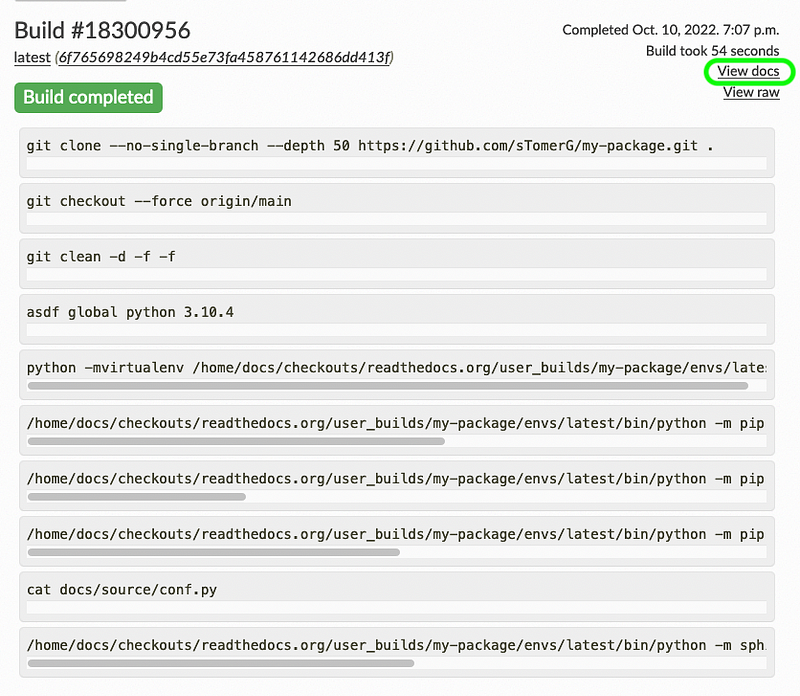
Find your package in the list and click on the + sign. You’ll see the default settings for your package, there is no need to change anything here, just click Next and then Build version. After a minute or so the build should be ready and you can click on view docs to see the documentation of your package on ReadTheDocs!
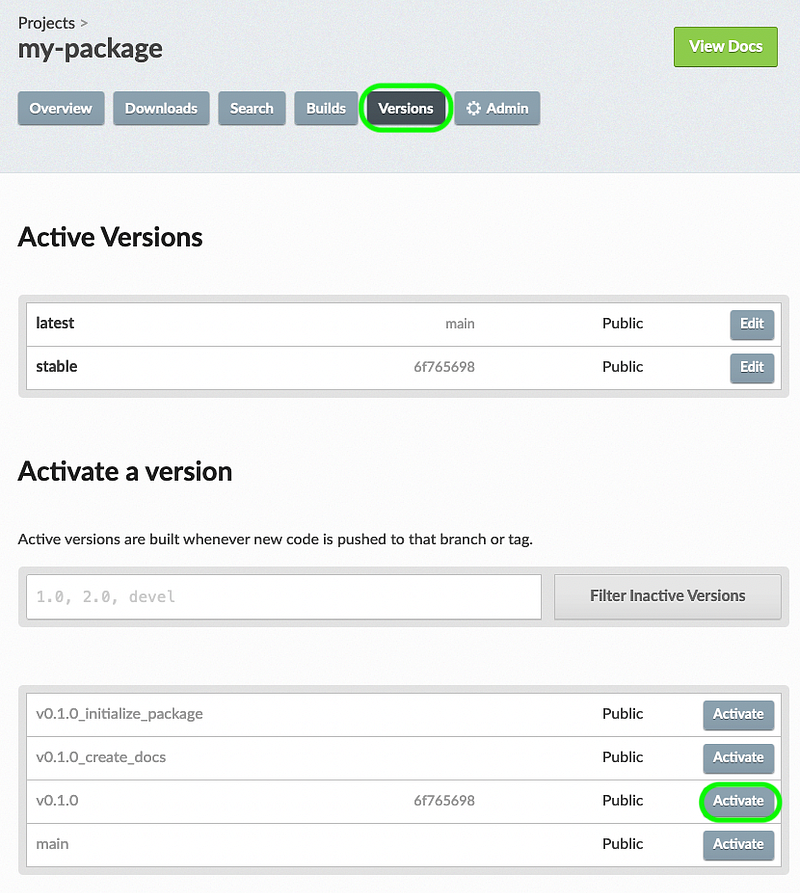
If you want to specifically build a ReadTheDocs for this version you can go to your project and click on Versions and activate version v0.1.0. The build process will start automatically.
There rests us only one thing now and that is to publish our package to PyPi!
Publishing to PyPi
If you want to make your package open source and thus installable for everyone using PyPi follow these steps:
Go back to the terminal and make sure your virtual environment is activated with $ poetry shell and that you are on the main branch with the last updates: $ git switch main && git pull
If don’t have an account yet on PyPi create it here.
Before continuing please make sure your pyproject.toml is how you want it to be, especially section [tool.poetry] . The README will appear on the homepage of your project on PyPi, so make sure useful information is in the README (e.g. the link to your ReadTheDocs page). Also make sure your code is still working as wanted with $ poetry run pytest.
Every time you want to make an adjustment to an already published package on PyPi you have to increase the version number according to the semantic versioning rules.
Build the required files for publishing to PyPi with
$ poetry build
and publish it to PyPi with:
$ poetry publish -u <username> -p <password>
That’s all! Your package is now installable for everyone through:
$ pip install <package name>
Check your package webpage by visiting https://pypi.org/project/
Conclusion
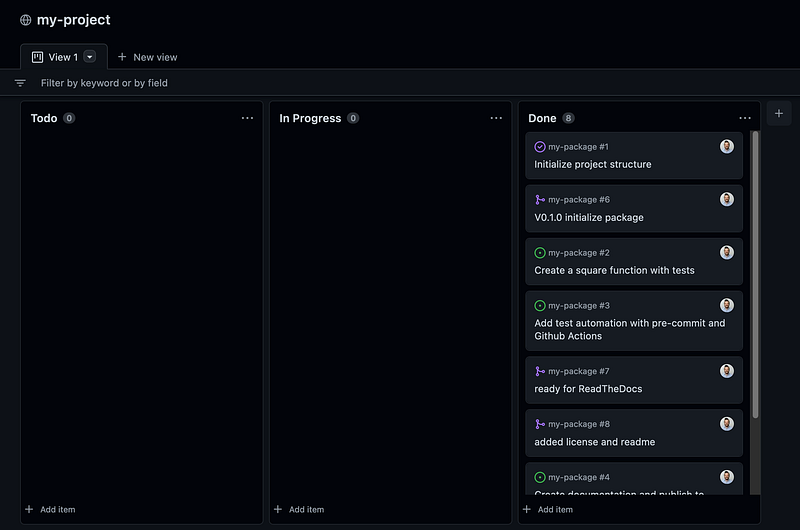
Congratulations! You’ve taken all steps to set up a professional (open source) Python package that contains uniformly formatted code, test-automation, documentation on ReadTheDocs and is published on PyPi! All your initial Todos can be moved to Done now on the Projects page:
You can continue developing your Python package from here onwards yourself. If you want to re-use this structure for another project in the future you can also clone this repository and follow its instructions in its README so that you don’t have to go through each step of this article again.
Feel free to contact me if you have any questions, or ask your question in the comment section!