
How to Set up Local File Server in your Home Server (Windows)

Today we will be looking at how to set up a file server at home. A file server is simply local storage that you can access remotely across multiple platforms. Imagine having google drive but with the privacy of storing your files locally. This is wonderful for consolidating data and having a centralized location to store all your files.
Is this NAS?
You might have heard of the word NAS, which stands for Network-attached storage. These are dedicated file storage to share data across a local area network. However, we will not set up a NAS system as it often involves specialized software and/or operating system. They only serve 1 function (albeit doing the one function very well) while we hope to achieve more utilities for our home server.
Setting up a file server on a host machine
Turn on Network File Sharing
On your host machine, search for ‘Manage advanced sharing settings’. You can also find the setting from Control Panel -> Network and Internet -> View Network status and tasks -> Change advanced sharing settings.

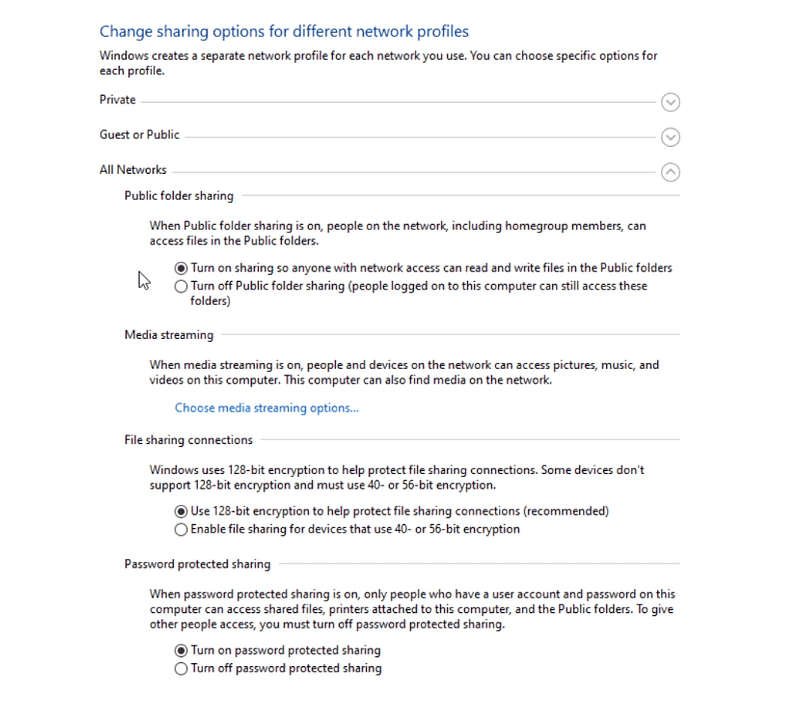
Under ‘All Networks’, ensure that you check the following check box:
- Turn on sharing so anyone with network access can read and write files in the Public folders
- Use 128-bit encryption to help protect file-sharing connections
- Turn on password-protected sharing
Create a Local User Account
Since we set password-protected sharing on, there is a need to create a user account on the host computer to access the shared files. Go ahead and create a local account with your preferred name and password (Note: this is the username and password you will use to access your shared files). If you faced trouble creating an account, try going to the ‘Family & other users’ setting and adding an account under ‘Other users’.
Share the Files
Now, you can proceed to share the drive/folders that you intend to use as a file server. Right-click on the folder/drive you like to share and go to the properties setting.
Under Sharing,
If it's a folder, click on share and add your newly created account. You should give Read/Write permission so you can edit the files remotely

If you are sharing a drive, click on advanced sharing and check the ‘Share this folder’ checkbox

Now you have successfully shared your files within your own local private network.
Connecting to File Server
Once you have your host machine set up, it’s time to connect to the file server using your other device remotely.
Connect to Local Private Network
The first step to accessing your file server is connecting to your local home network. I have written a detailed guide on how to connect to your home network using ZeroTier. You can refer to my ZeroTier guide to connect to your home network remotely.
Access File Server using Windows
Access network shared files across Windows can be done using the file explorer.
Open the file explorer, on the sidebar, and navigate to the network section. You should be able to see your server in the list. Click on the server and enter the user and password of the newly created account to access it.
Access File Server using Android
With Android, you have to download a file manager app that supports remote connection. I am using File Manager Plus and it has been serving me well. Go on to download the app from Google Play Store and install it.
When opened, you will be greeted with the screen below. Click on remote and add a remote location (SMB)


Enter the following Settings:
- Host: Managed IPs of your host machine in the ZeroTier Network setting
- Username: User of the newly created local account
- Password: Password of the newly created local account
Proceed to click ok and you should be connected to your remote file server.
Access File Server using iOS
The file manager we are using for iOS is the Owlfiles — File Explorer. Click on the lightning icon to add a new connection.


Enter the following Settings:
- Host Name/IP: Managed IPs of your host machine in the ZeroTier Network setting
- User Name: User of the newly created local account
- Password: Password of the newly created local account
Save and you should be connected to your remote file server.
Congratulation. You have just learned how to access your locally stored files remotely. You can now access all your local files no matter where you are around the globe.


