
How to Set Up a Local DynamoDB in a Docker Container
Improve your integration testing by setting up a local DynamoDB instance in a Docker container
Introduction
In this tutorial, I am going to show you how to set up a local DynamoDB in a Docker container so that you can play around with it on your local machine. On top of that, we will also be looking at how to perform basic CRUD (create, read, update, and delete) operations via the AWS command-line tool for DynamoDB.
Benefits of having a local DynamoDB instance
One of the benefits of having a local DynamoDB instance is that you can test your application code that interacts with DynamoDB locally instead of pointing to a real DynamoDB in AWS cloud. And should I mention that it is free of charge? 🙂 We also don’t need to worry about the provisioned throughput with the local instance.
Also, because we are hosting the instance in a Docker container, it will be separated from everything else that is running on your local machine. All the dependencies are contained within the container itself.
Docker image and OS details
The Docker image we will be using for this tutorial is the official AWS local DynamoDB image, which you can find here. This tutorial is also done on a macOS machine.
Let’s get started!
Download Docker
As a pre-requisite, you need to install Docker on your local machine, if you haven’t already. I am not going to show you how to do it because Docker has published the instruction on how to install Docker for macOS here. The instruction is detailed so you won’t be having any issues following it.
Install AWS Command Line Tool
Another prerequisite for this tutorial is the AWS command-line tool. Please follow the instruction written by AWS here to install the CLI tool on your macOS.
Create Docker-Compose File for Local AWS DynamoDB
Let’s create a docker-compose.yaml file so we can leverage docker-compose command to start and/or stop our Docker container.
I name the file docker-compose-dynamodb-local.yaml instead of just docker-compose.yaml because I want to be able to just start a Docker container that I need (assuming I have multiple Docker setups within the same folder).
For example, if I have another Docker setup for Kafka or other things, then this setup will work because docker-compose command allows you to specify the name of the file. So, I can handpick which Docker containers I want to spin up at any given time.
The content of the file is pretty simple. We just need to specify the Docker image we want, hostname, container_name as well as the ports we want to expose to the environment. In this case, we are exposing port 8000 of the Docker container on port 8042 on the local machine (i.e. the endpoint of the DynamoDB will be http://localhost:8042 ).
Start the Docker Container
After you have created the yaml file from the previous step, we’re ready to spin up our local DynamoDB. From your terminal, change directory cd to the directory where you created the yaml file. Then, execute the following command.
Awesome! Now we’re ready to play around with the local DynamoDB instance we just created.
CRUD Operations
Create Table
Before we can play around with any of the CRUD operations, we need to create a table first. From your terminal, execute the following command.
The variables that we set in the command are:
endpoint-url: notice that it is set to point tohttp://localhost:8042, which is the port that is exposed to access DynamoDB inside the Docker container.table-name: this is the name of the table that will be created. You can name it with a different name if you like.attribute-definitions:this is the description of the attribute that forms the table’s key schema. It has 2 parameters, theAttributeNameand theAttributeType.key-schema: this is where we can define the attribute that is the primary key of the table.provisioned-throughput: this defines the throughput capacities (read and write) of our table, though this wouldn’t matter since it is just a local instance.
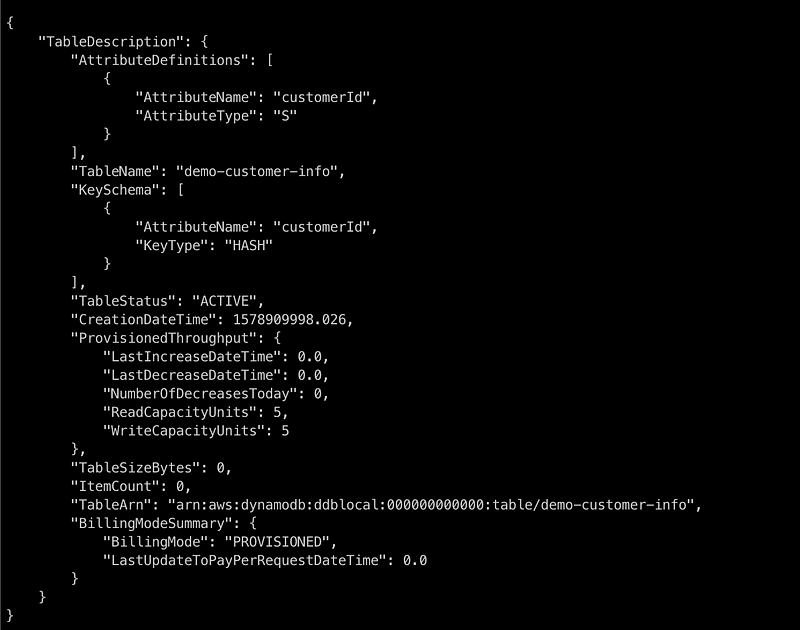
If successful, you should see a response like this. The response shows the details of the table that just got created.
We have a table to play with now. Yay! 😃
Create a record — PutItem
The first thing we’re going to do with our newly created table is to create a record. Imagine a scenario where we have a business and want to store our customer information. Let’s just pretend that all we need is their email address to start with and we have a system in place to generate a unique customerId.
To store a new customer record, you can execute the following command from your terminal.
This command actually returns nothing to the console if successful. So don’t get confused when you are not seeing any response. 🙂 There’s an argument --return-values ALL_OLD but this won’t return anything either as it will only return an existing record, if any. More on this at later section below.
Additionally, we might want to add a condition to our put-item command, for example, only create a record if there’s no existing record with the same customerId. The expression then becomes like this.
If you try to execute the above command, you will get an error because there’s already an existing record with the same customerId of 1111.

The condition-expression argument can also be used for update-item and delete-item operations.
Retrieve a record — GetItem
To retrieve an item from our table, we can use the get-item API. From your terminal, run the following command to retrieve the customer record we created from the previous section. We need to specify the customerId as it is the primary key of the table.
You should see a response, which shows the customer record.
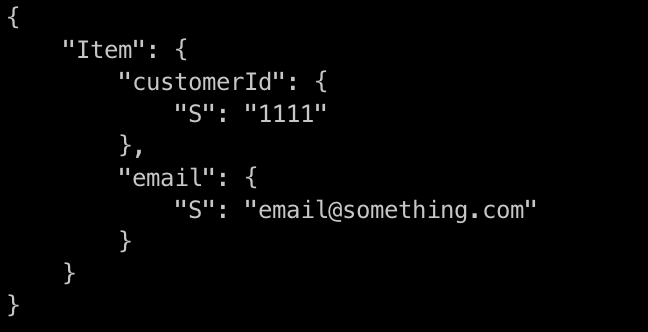
From this, we know that our put-item operation from the previous section was executed successfully. Hooray! 😆
Update a record — UpdateItem
Moving on, let’s see if we can update the customer record we added previously. Updating a record is very common in the real world. Imagine that your customer needs to change his/ her email address. To do that, let’s run the following command.
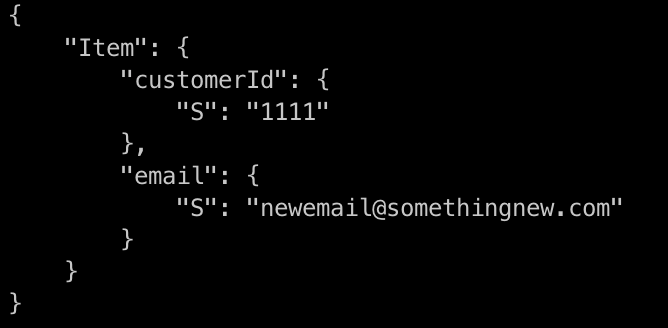
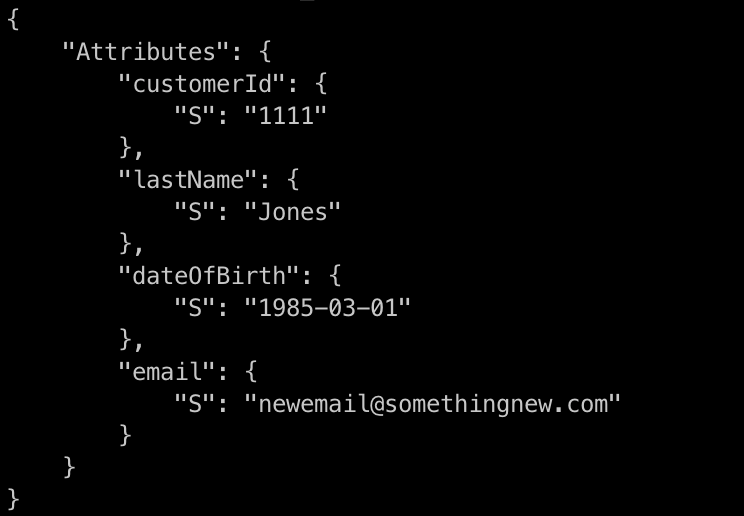
A successful update-item operation like above does not return any response if the return-values argument is not given. So, let’s do a get-item command to retrieve the customer record to validate the update we just made to the email field. You should see the following response, which shows the new email address as per our update-item expression.
We have mentioned return-values a few times now, so let’s talk about it. Essentially, we can add this argument if we want our update-item command (as well as put-item, delete-item) to return a value. There are 5 x acceptable values for the return-values argument:
NONE: if we simply do not includereturn-values, it will be defaulted toNONE. It means no values will be returned.ALL_OLD: it will return all the attributes or columns of the item as they were before the update.UPDATED_OLD: it will return only the attributes that were updated as they were before the update.ALL_NEW: it will return all the attributes or columns of the item as they are after the update.UPDATED_NEW: it will return only the attributes of the item as they are after the update.
So, for instance, if you just add --return-values ALL_NEW to the update-item command above, you will see what you see in the response from the get-item command we executed after the update-item command above.
Furthermore, we can use the same update-item command to add more fields to our customer record. Execute the following command.
You should see a response from this command containing all the current attributes of the item. Well done! 🙂
One last thing I would like to do with theupdate-item operation is to add condition-expression. Let’s say we want to send offers to our customers who meet eligibility criteria and, for some strange reason, the criteria is that the customers were born after 1980-01-01. 😅
To identify these customers and update our table with a flag that indicates the customer’s eligibility for the offer, let’s execute the following command.
As you can see, our customer 1111 has his isEligibleForPromotion flag equals to true. Yay! 🙂

If we try to update a customer that has a dateOfBirth before 1980-01-01, we will receive an error like so.

Delete a record — DeleteItem
Last but not least, sometimes we need to delete our customer record based on their request; for example, they opt-out from our mailing list or something. To do this, let’s run the following command.
We add the return-values argument here so it will print the item that was deleted to the console.
Stop the Docker Container
Now that you have finished with all the CRUD operations (or perhaps you want to keep on exploring?), it’s time to tear down the Docker container. To do that, you simply just run the following command from the same location as where you created docker-compose-dynamodb-local.yaml file.
You should see the following response in your terminal console.

Wrapping Up
If you have made it this far, you will have gained some skills in spinning up a Docker container with a DynamoDB instance, creating a DynamoDB table, performing CRUD operations on the table with conditional expressions and shutting down the container. Very well done, y’all. 👍 👍
I hope this tutorial helps you understand that you can leverage the local DynamoDB Docker image to do local testing of your application that uses DynamoDB. 🙂

What’s Next
You might be wondering now… “What if I want to interact with the local DynamoDB instance via my application?” Don’t worry, I got you covered. 😉
Check out this article to learn how to integrate your existing application with the local DynamoDB instance.


